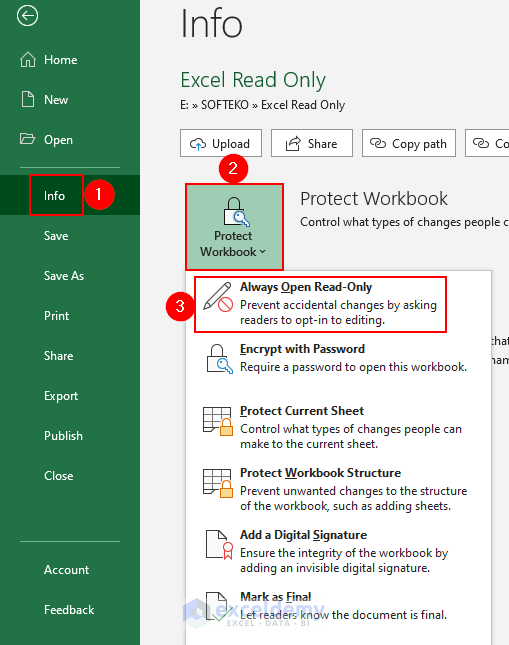
Method 1 – Use ‘Open as Read-Only’ Feature to Make Excel File Read Only
- Go to File>> Info>> Protect Workbook>> Always Open Read-Only.
- Shift the Excel workbook to Read-Only mode and if someone else will try to open the Excel file, it will show the following dialog box.
- Click Yes to proceed with the Read-Only mode whereas selecting No will enable editing the workbook.

Use the ‘Open as Read-Only’ feature to make our Excel file read-only.
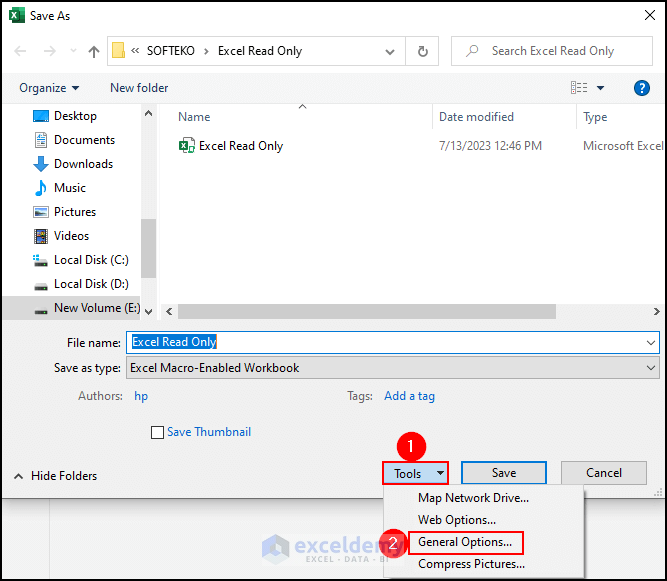
Method 2 – Use General Options to Make Excel File Read Only
- Click on the File tab.
- Go to Save As>> Browse.

- A dialog box named Save As will open up.
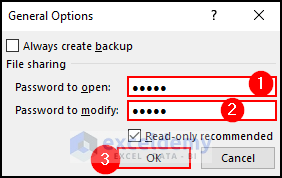
- Click on Tools>> select General Options from the drop-down.
- Set a password to open the file.
- Set another password to modify the file. We have entered 12345 in both fields.
- Click OK.
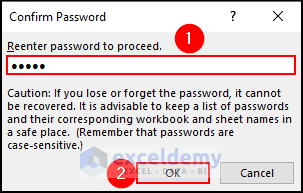
- Re-enter the password to proceed and click OK.
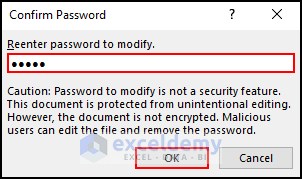
- Re-type the password to modify the file and click OK.
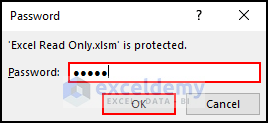
- The Excel file is now read-only, so if we close the workbook and open it again, it will ask for the password.
- Give the password to open the file.
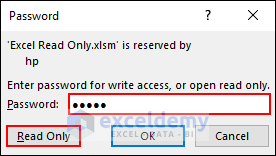
- Ask for the password to modify.
- Give the password and click Read Only.
Use general options to make our Excel file read-only with a password.
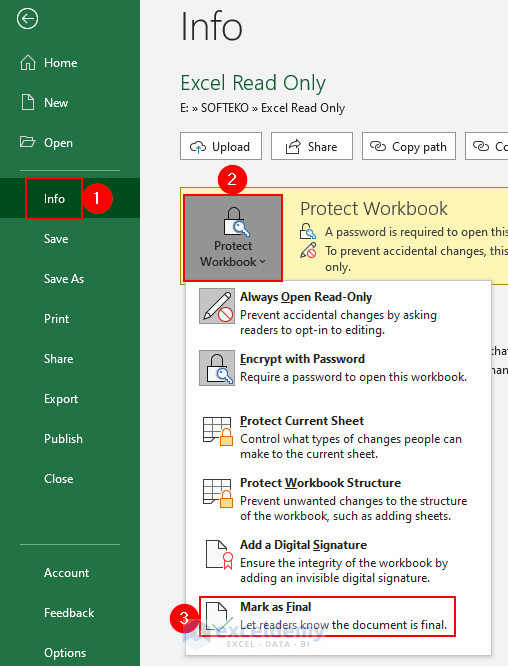
Method 3 – Make Excel Workbook Read Only Using Mark as Final Option
- Go to File>> Info>> Protect Workbook>> Mark as Final.
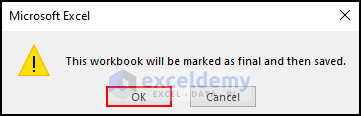
- A small dialog box will appear. Just hit OK.
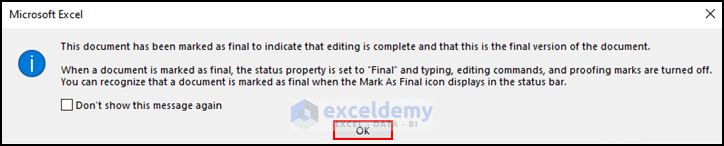
- Excel will automatically mark the Excel workbook as a final version.
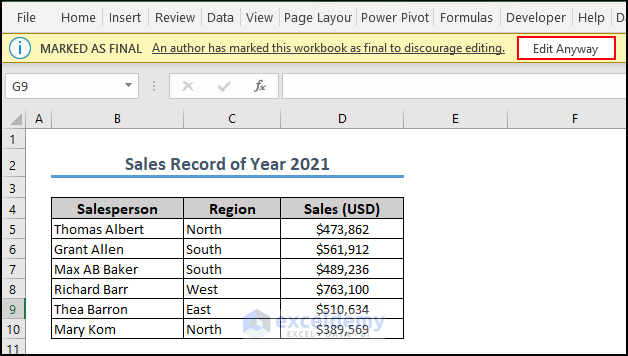
- Excel will display the following warning box if someone else attempts to open the workbook.
- Hit OK to proceed.
- If you want to continue editing the worksheet, click Edit Anyway.
- Excel will then allow you to edit the workbook.
Make an Excel workbook read-only by using the “Mark as Final” option.
Method 4 – Open Workbook as Read-Only Using VBA
- Press ALT + F11 on your keyboard to open Visual Basic.
- Click Insert and select Module.
- Insert the following code in the code editor.
Sub File_Open_Through_Dialog_Box()
Dim File_Explorer As Office.FileDialog
Dim selection_item As String
Set File_Explorer = Application.FileDialog(msoFileDialogFilePicker)
With File_Explorer
.Filters.Clear
.Filters.Add "Excel File type", "*.xlsx?", 1
.Title = "Choose your file"
.AllowMultiSelect = False
.InitialFileName = "C:\Desktop"
If .Show = True Then
selection_item = .SelectedItems(1)
End If
Set book = Workbooks.Open(Filename:=selection_item, ReadOnly:=True)
End With
End Sub- Close the Module window.
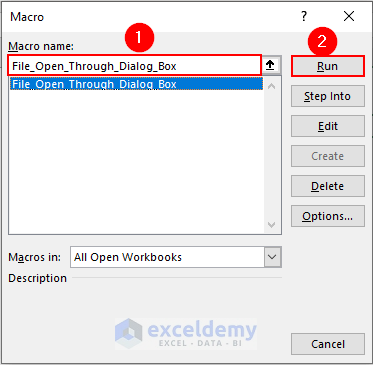
- Go to View tab > Macros>> click on View Macros.

- After clicking View Macros, select the macro File_Open_Through_Dialog_Box and click Run.
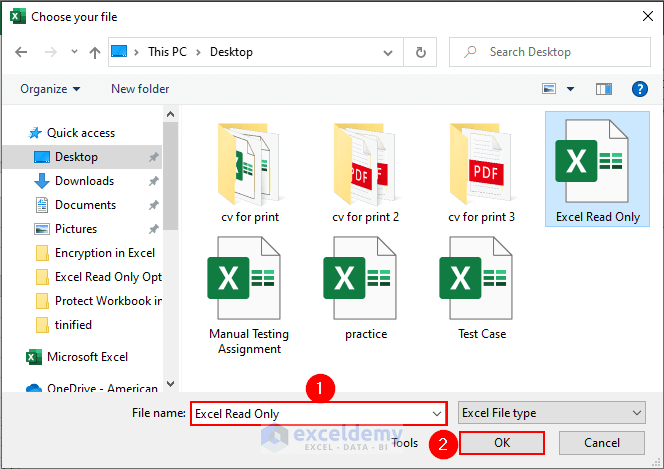
- A dialog box will appear.
- Select the file we intend to open as a read-only and click Open.
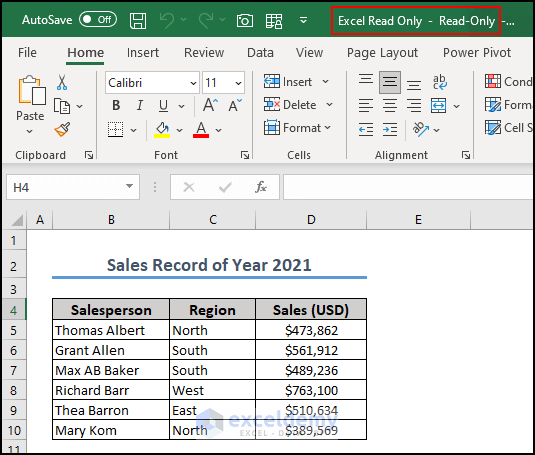
- You will see that the file is now open as read-only.
- We can open a workbook as read-only using the VBA macro.
Method 5 – Convert an Excel File to a PDF to Make It Read Only
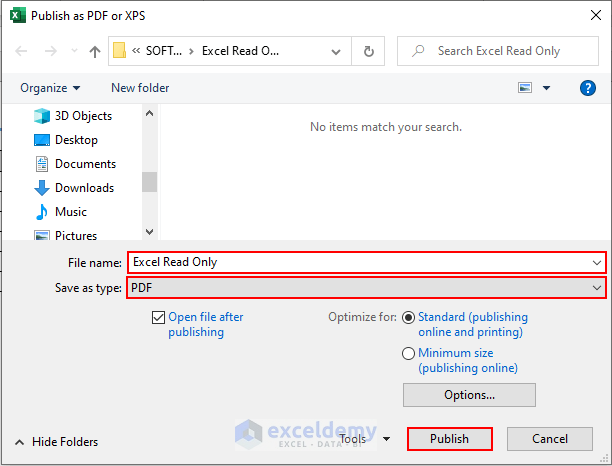
- Go to File>> Export>> select Create PDF/XPS.
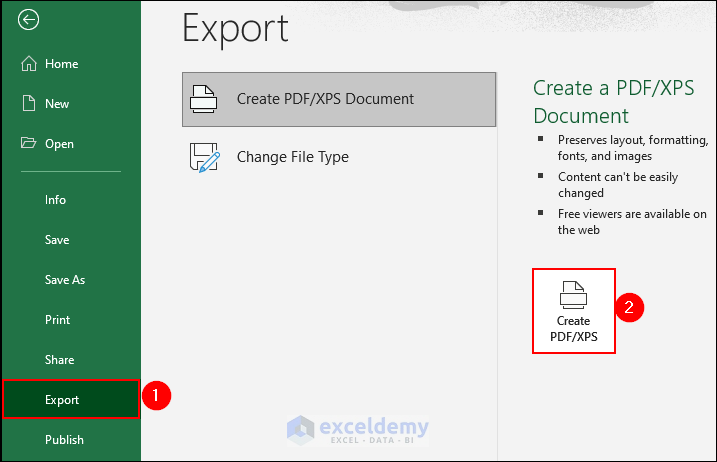
- Give a file name and select Save as type to PDF.
- Click Publish.
- A PDF file will be created like the below image.
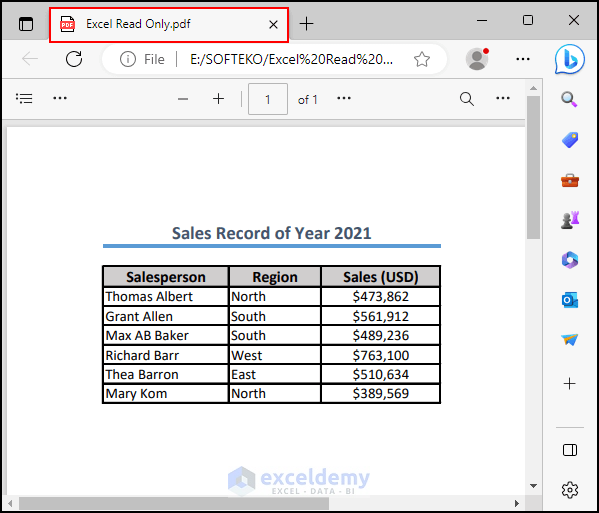
Users won’t be able to easily alter the file, and managing data will be more difficult. Thus we can convert an Excel spreadsheet to a PDF to make it read-only.
How to Make a Cell Read-Only in Excel
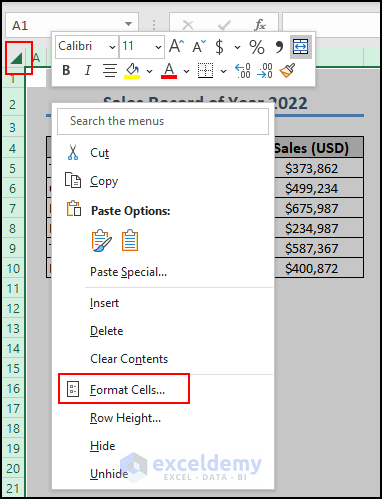
- Select all cells of the worksheet by clicking on the top left corner or pressing ‘Ctrl + A’.
- Right-click on your mouse and select Format Cells.
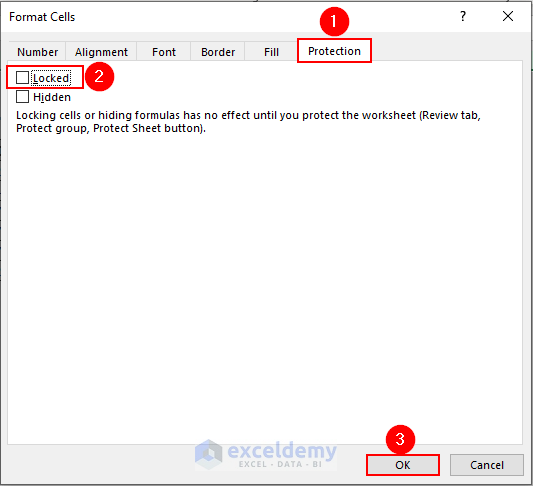
- Go to Protection>> unmark the box next to the Locked option>> then click OK.
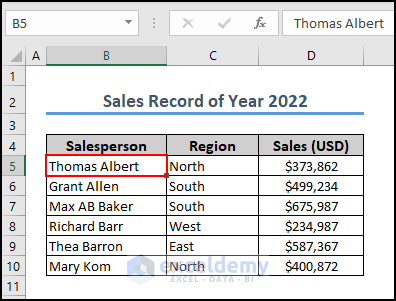
- Go to the Excel file again, and select the cell which you want to make read-only. It is cell B5.
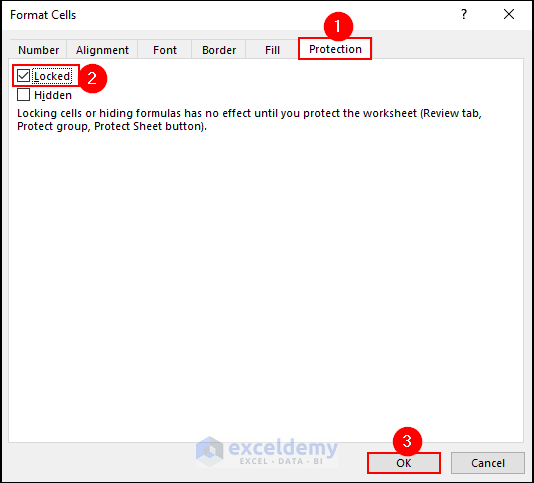
- Go to the “Format Cells” option again.
- Mark the box next to the Locked option and click OK.
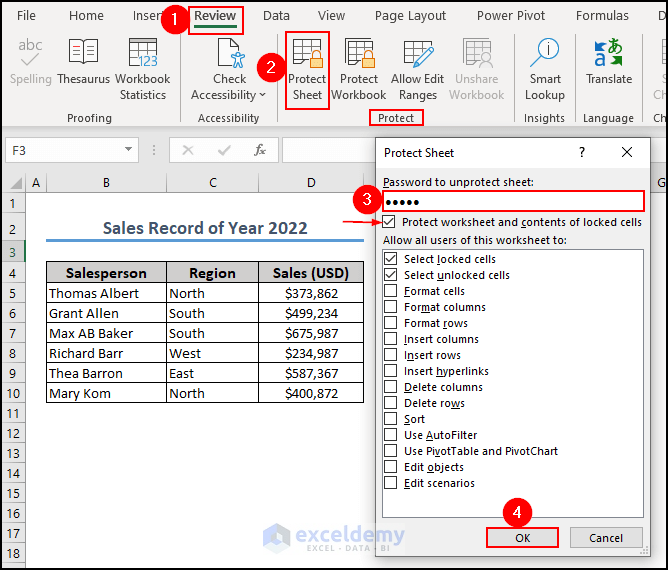
- Go to the Review tab>> Protect drop-down list>>select Protect Sheet.
- Enter the password and enable “Protect worksheet and contents of locked cells”.
- Click OK.
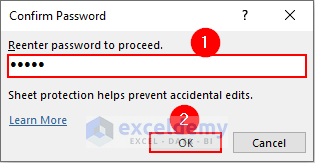
- Re-enter the password to confirm and click OK.
- If you want to make any changes in cell B5, Excel will show you the warning message like in the image below.

You can make a cell read-only.
How to Remove Read-Only From an Excel File
1. Use of Edit Workbook Option
- When a file is marked as final, a pop-up will appear.
- To remove read-only, just click Edit Anyway.
- Excel will then allow you to edit the workbook.

2. Remove ‘Read-Only’ Property from a Read-Only Excel file
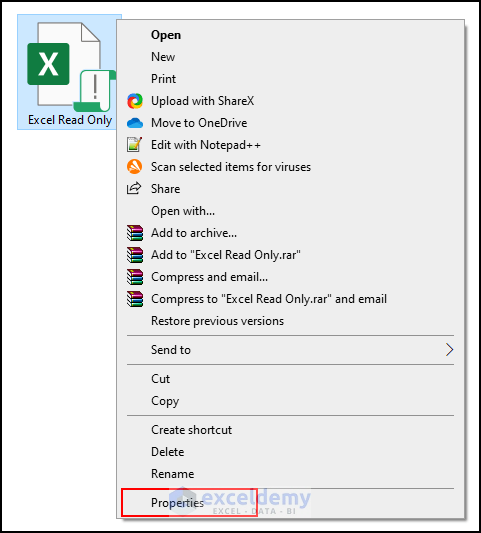
- Select the Excel ‘Read-only‘ file.
- Right-click on the file and select Properties.
- Tick the ‘Read-only‘ option from Attributes.
- Click Apply>> OK.
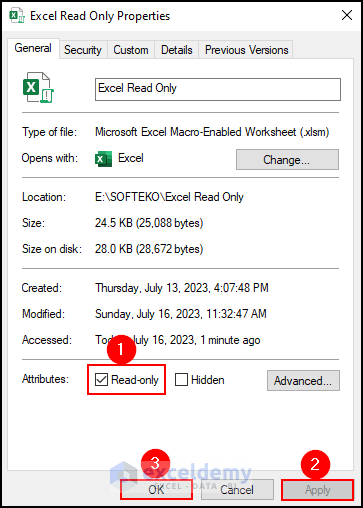
You can now open the file again, and it will not have the “Read-Only” restriction.
Benefits of Setting a File as Read Only
Setting a file to read-only has various advantages, including:
- You can protect data privacy and accuracy by setting a file as read-only.
- The read-only mode can prevent accidental modifications to a file.
- It also can help to prevent unwanted people from opening a file.
- The read-only mode can help to ensure that a file is always in a consistent state.
- We need a read-only version for presentations or demonstrations so that the data and formatting remain unchanged, preventing accidental modifications during the presentation.
Drawbacks of Setting a File as Read Only
- It can be hard to modify a file that is set to be read-only.
- When a file is set to ‘read-only’, it can be hard to share it.
- It can be hard to work together on a file that can only be read.
Frequently Asked Questions
1. Why is my Excel file opening as Read-Only?
There are several reasons why a file may open as Read-Only. It could be due to file permissions set by the operating system, the file being marked as Read-Only, or the file being password-protected. Additionally, if the file is shared or being accessed from a network location, it may open in Read-Only mode to prevent conflicts.
2. How do I change a disk from read-only?
To change a disk from read-only to read-write, you can modify disk properties (windows). To do that:
- Open File Explorer (Windows Explorer) by pressing Windows Key + E.
- Right-click on the disk or drive you want to modify and select “Properties” from the context
- In the Properties window, navigate to the “General” tab.
- If the “Read-only” box is checked, uncheck it.
- Click “Apply” and then “OK” to save the changes.
3. What is read only file system error?
Most of the time, you get the “Read-only file system” error when you try to change or write to a file system or storage device that is set to “read-only.” This error warning means that the operating system or the file system itself won’t let you write to the file system or object in question.
Key Takeaways from the Article
- Throughout this article, we have discussed the different methods for making a workbook read-only.
- First, we have discussed what it is a read-only mode.
- Then we have discussed 5 different ways of making a file read-only.
- We have also explained how to open a workbook using VBA macro.
- Showed a step-by-step procedure of all methods.
- Also showed how to make a cell read-only.
- Explained two easy ways of removing read-only from a file.
- Discussed some benefits and drawbacks of setting a file read-only.
- Provide solutions to frequently asked questions by readers.
Excel Read Only: Knowledge Hub
- [Fixed!]: Excel Files Open as Read Only From Network
- [Fixed!]: Excel Files Opening as Read Only
- [Fixed!]: This Workbook Was Opened in Read Only Mode
Download Practice Workbook
You can download the practice workbook from here:
The password for the file is- 12345.
<< Go Back to Protect Workbook in Excel | Excel Protect | Learn Excel
Get FREE Advanced Excel Exercises with Solutions!
