The Format Painter tool is handy for copying the format of cells to single or multiple rows. It’s like copying the style of one row and painting it onto others, saving you time on formatting.
In this article, we will show you how to use Format Painter for multiple rows in Excel for two cases. The first one copies only the formatting, whereas the second copies both the formatting and the row height.
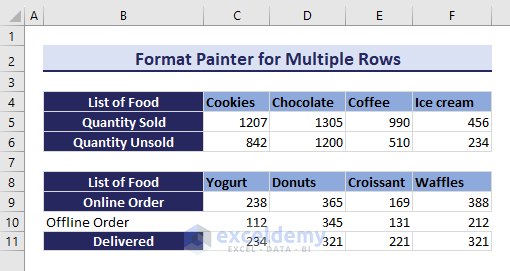
As you can see in the image below, we have copied the formatting of row 5 and applied it to rows 9, and 11, respectively.
To use the Format Painter for multiple rows, go through the following two cases:
Case 1: Copying Only Formatting for Multiple Rows
The Format Painter in Excel is like a quick copy-paste feature for formatting. There are two ways to use the Format Painter in Excel: a single click and a double click. Clicking the Format Painter button once allows you to copy the formatting from one cell. After applying the format, it will automatically deactivate itself. As a result, you have to turn it on every time you want it to use this.
Double-clicking the Format Painter button activates a persistent mode. In this mode, you can apply the copied formatting to multiple cells, rows, or ranges without clicking the Format Painter button again.
To use the Format Painter to apply formatting to multiple rows:
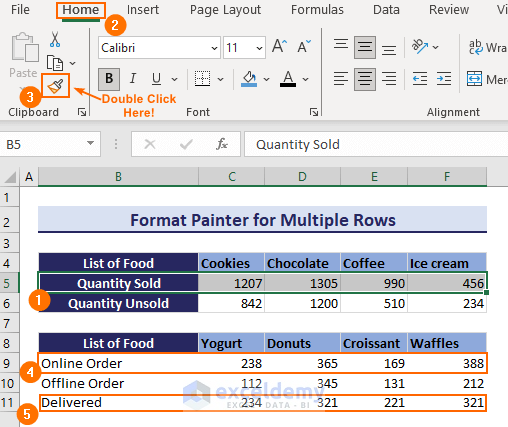
- Select the rows whose formatting you want to apply.
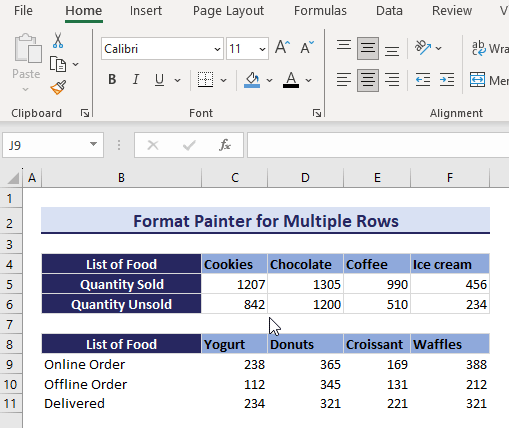
In this example, we selected row 5 to copy its formatting. - Go to the Home tab > Clipboard > double-click on Format Painter in the Clipboard group.
- Click on any cell of the rows where you want the formatting.
 Hence, you will have the formatting of the 5th row in rows 9 and 11.
Note: Remember that the Format Painter only copies the formatting, not the actual content of the cells. If you want to copy both formatting and content, consider exploring other options, like using the Paste Special feature.
Read More: How to Use Format Painter for Multiple Cells in Excel
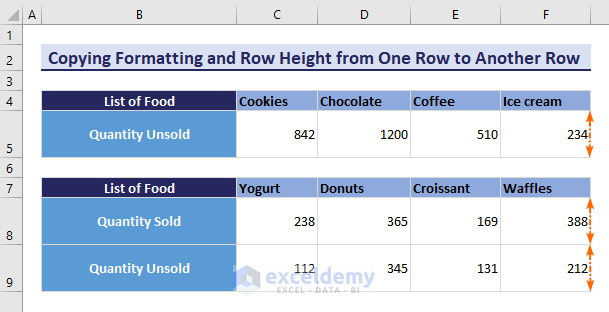
Case 2: Copying Formatting and Row Height from One Row to Another Row
This case differs slightly from the last one in that the row height in the previous approach cannot be copied; only the format may. However, Format Painter allows you to copy both the format and the row height simultaneously.
To copy the formatting along with the row of the desired cell, apply it to the multiple target rows. You can follow these steps:
- Click on the row header that has the formatting you want to copy.
- Double-click the Format Painter. This locks the Format Painter.
- Click on the row header of the rows where you want to apply the formatting.

- Release the button on the mouse. After selecting the target rows, release the Format Painter by pressing Esc or by clicking on the Format Painter button again.
This will copy the formatting along with the row height from the desired row and paste it to the target row.
Note: To copy formatting from one row to another, you can also use keyboard shortcuts. Select the source row, press Ctrl+C, choose the target row, press Shift + F10, and then R. Now, your selected row has the same formatting. Repeat for multiple rows as needed.
Download Practice Workbook
Download this practice workbook to exercise while reading this article.
Conclusion
Thanks for making it this far. I hope you find this article useful. Now you know two easy cases of using Format Painter for multiple rows in Excel. Please let us know if you have any further queries, and feel free to give us any recommendations in the comment section below.
Frequently Asked Questions
How to use Format Painter to apply to multiple rows without dragging mouse?
To copy formatting and apply it to multiple rows without using the mouse:
- Select the row from which you want to copy the formatting.
- Press Alt+H+F and P consecutively.
- Press F5 on the keyboard, and the “Go To” dialogue will pop up. In the “Go To” dialog box, there is a text box labeled “Reference:”.
- Click inside this text box and type the range where you want the formatting. When done, hit Enter.
This will apply the formatting to the desired range.
How do you use Format Painter on multiple lines?
To use Format Painter on multiple rows in Excel, follow these steps:
- Select the cell with the desired formatting.
- Double-click the Format Painter button on the toolbar.
- Click and drag over the multiple rows where you want to apply the formatting.
- Release the mouse button to apply the formatting to the selected rows.
How can I apply Format Painter to non-adjacent rows in Excel?
To apply Format Painter to non-adjacent rows in Excel:
- Select the cell with the desired formatting.
- Double-click the Format Painter button on the toolbar. This locks the Format Painter.
- While Format Painter is active, hold down the Ctrl key (Command key on Mac).
- Click on the non-adjacent rows where you want to apply the formatting.
- Release the Ctrl key and the mouse button.
Related Articles
- How to Use Format Painter to Copy Formatting in Excel
- keyboard Shortcuts to Use Format Painter
- How to Use Format Painter in Excel for Multiple Sheets
- How to Use Format Painter Multiple Times in Excel
- [Fixed!] Format Painter Not Working in Excel
<< Go Back to Format Painter in Excel | Excel Cell Format | Learn Excel
Get FREE Advanced Excel Exercises with Solutions!
