In this article, we will demonstrate how to use the Excel IF statement to increment by 1. We will also increment by 1 using the COUNTIF function, and by using the IF and COUNTIF functions combined, with both single and multiple criteria.
Let’s work through 3 examples to illustrate.
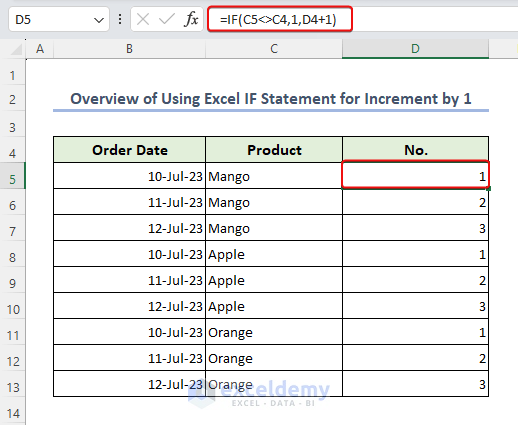
Example 1 – Using the IF Function When the Value Changes in Another Column
Suppose we have a list of products in column C, and want to number the instances of each product name in column D. The products in column C are grouped by product name. In column D, the value should increment for each product until the product name in column C changes. The number increment should then start from 1 again for the next product name.
Steps:
- In cell D5 enter the formula below:
=IF(C5<>C4,1,D4+1)- Drag down the Fill Handle to cell D13.
The result is as in the image below.
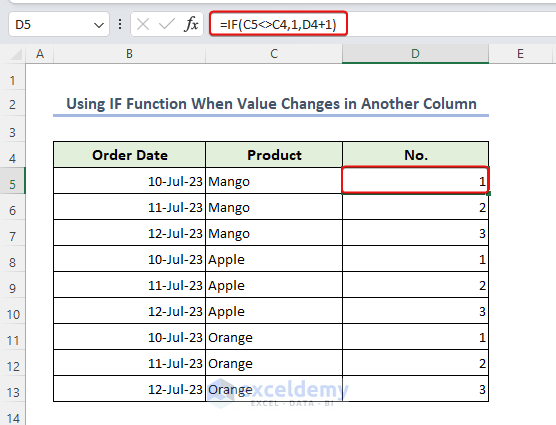
Example 2 – Using the COUNTIF Function to Increment by 1
In the previous method, we used the IF statement to increment the number by 1. Here, we’ll use the COUNTIF function instead to perform the same operation.
Steps:
- In cell D5 enter the following formula:
=COUNTIF($C$5:C5,C5)- Use the Fill Handle tool to apply the formula in the cells below.
The numbers for each product name are incremented correctly, as in the image below.

Example 3 – Combining the IF and COUNTIF Functions
In this example, we will use both IF and COUNTIF functions combined to increment by 1, for both single and multiple criteria.
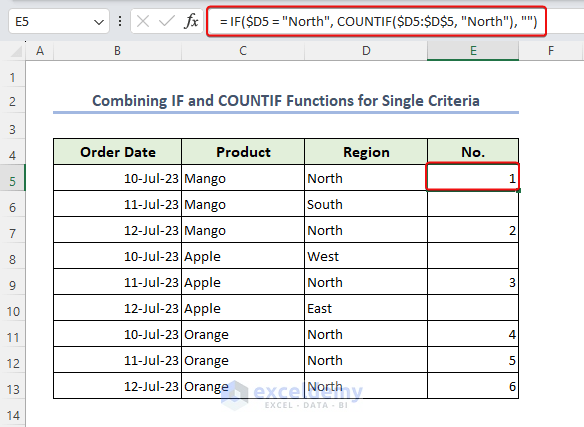
3.1 – Using a Single Criteria
In the dataset below, we will count the number of products coming from the “North” Region.
Steps:
- In cell E5 enter the following formula:
= IF($D5 = "North", COUNTIF($D5:$D$5, "North"), "")- Use the Fill Handle tool to apply the formula in the cells below.
Column E contains some blank cells due to the absence of the word “North” in the adjacent cells in column D.
Formula Breakdown
- $D5=”North”: Checks if the value in cell D5 is equal to “North“. ($D) means that the column reference remains fixed.
- COUNTIF($D5:$D$5, “North”), “”): If the condition in the IF statement is true (cell D5 contains “North“), then the COUNTIF function is used to count the number of cells containing “North” within the range $D5:$D$5. Since this range is just a single cell ($D5), it will return 1 if D5 contains “North“. If the condition in the IF statement is false (cell D5 does not contain “North“), the formula returns an empty string (“”), meaning that the cell containing this formula will be blank if D5 is not “North.”
- IF($D5 = “North”, COUNTIF($D5:$D$5, “North”), “”): Checks if cell D5 contains the text “North.” If it does, it counts how many times “North” appears in the range $D5:$D$5. If D5 is not “North,” it returns an empty string.
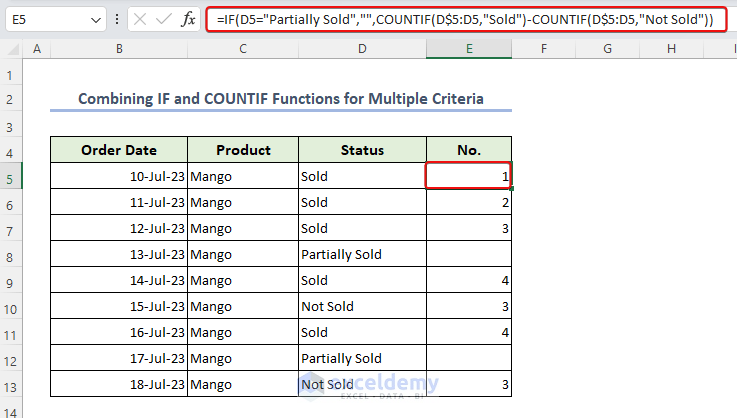
3.2 – Using Multiple Criteria
To use the IF and COUNTIF functions combined to increment by 1 for multiple criteria, we made a slight change in the dataset by adding a column for Status.
If the product Status is Sold we’ll add 1, and if the product is Not Sold then we’ll subtract 1. Moreover, if the product is Partially Sold then we’ll do nothing.
If the number in column E is rising, it means that the products have been sold; if the number is falling, it means that the the products have not been sold.
Steps:
- In cell E5 enter the following formula:
=IF(D5="Partially Sold","",COUNTIF(D$5:D5,"Sold")-COUNTIF(D$5:D5,"Not Sold"))- Drag the Fill Handle down to cell E13.
Formula Breakdown
- D5=”Partially Sold”,””: Checks if cell D5 contains the text “Partially Sold”. If it does, the IF function returns an empty string (“”) because we don’t want to include partially sold items in the count.
- COUNTIF(D$5:D5,”Sold”): Counts the number of cells in the range D$5:D5 that contain the text “Sold.” The $ sign before the row number ensures that the range always starts from cell D5 and expands as you drag the formula down to other cells.
- COUNTIF(D$5:D5,”Not Sold”): Counts the number of cells in the range D$5:D5 that contain the text “Not Sold“.
- COUNTIF(D$5:D5,”Sold”)-COUNTIF(D$5:D5,”Not Sold”): Subtracts the count of “Not Sold” items from the count of “Sold” items.
Things to Remember
- Parentheses usage: Parentheses are used to control the order in which Excel performs calculations. If you have more complex conditions or calculations within the IF statement, make sure to use parentheses correctly.
- Using absolute cell references: If you want certain references to stay constant while copying the formula, use absolute cell references with dollar signs ($).
- Using logical operators: Excel provides various logical operators ( =, <>, >, <, >=, <=) that can be combined to create complex conditions. These operators allow you to test multiple conditions within the IF statement.
Frequently Asked Questions
1. What if the cell contains a formula instead of a value? Will the IF statement still work?
Yes, the IF statement works with formulas as well. If the cell contains a formula that returns a numeric value, the IF statement will treat it like any other number and increment it by 1.
2. What are absolute and mixed cell references, and when should I use them?
Absolute references ($A$1) do not change when copied, while mixed references ( $A1 or A$1) allow either the row or column reference to change when copied. Use absolute references when you want to lock a reference to a specific cell while copying the formula.
3. Will the IF statement work with negative numbers?
Yes, the IF statement works with negative numbers just like positive numbers. You can use it to increment or decrement negative values based on specific conditions.
4. Can I apply the IF statement to increment values in other units or measurements?
Yes, as long as you understand the conversion and adjust the formula accordingly.
Download Practice Workbook
Get FREE Advanced Excel Exercises with Solutions!

