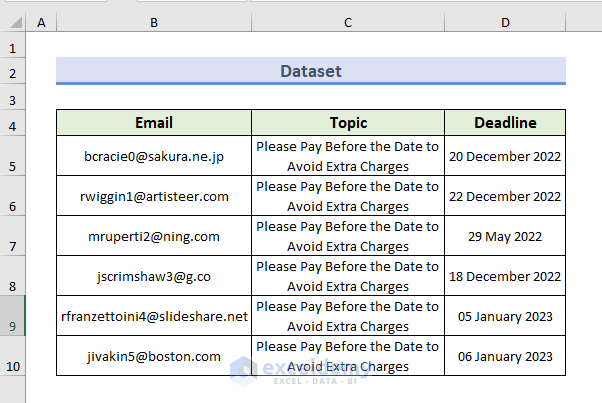
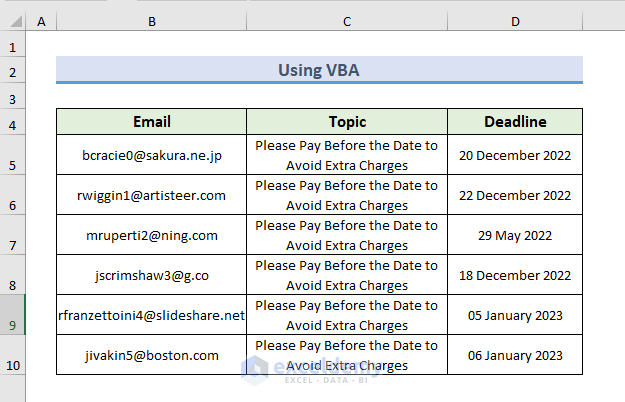
We will use the following dataset that includes emails of various people, as well as the deadlines they must meet, then set up email alerts based on those dates.
Method 1 – Use Power Automate to Generate Automatic Email Alerts in Excel
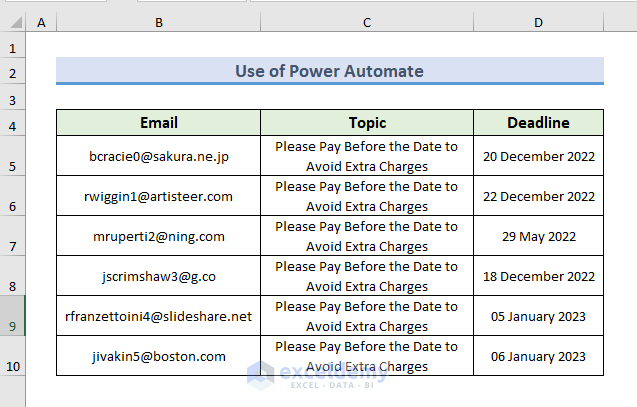
Step 1 – Prepare the Dataset
- We will work with the following dataset mentioned before.
- We will send email alerts automatically according to the deadline.
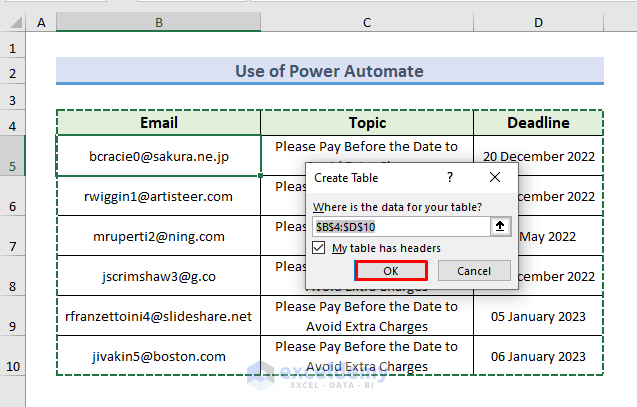
- Select any cell of the dataset and press Ctrl + T.
- A dialog box of Create Table is showing.
- The range of the table is the range of the dataset.
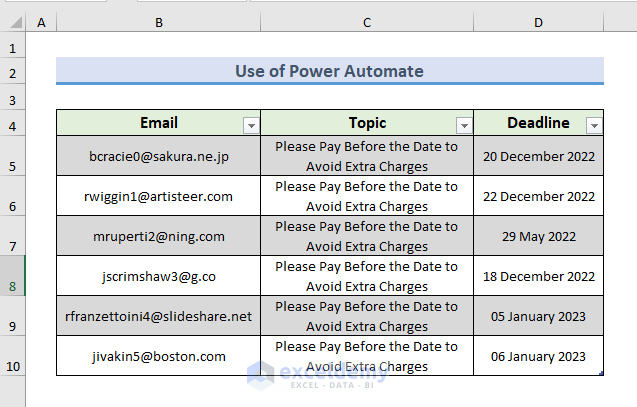
- Press OK to generate the table.
- Save your Excel file on OneDrive for Business or SharePoint.
- Go to the Microsoft 365 application.
Step 2 – Launch Power Automate
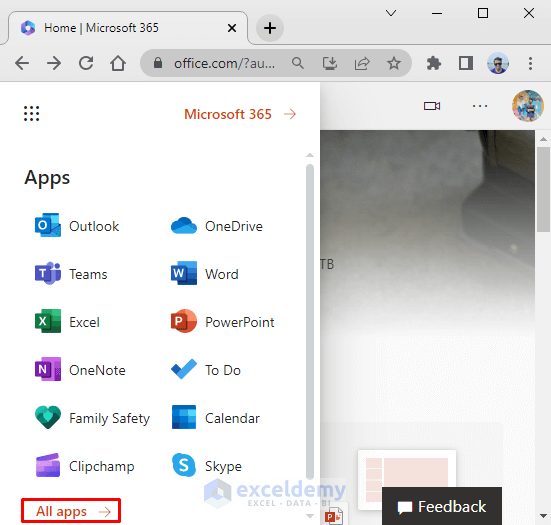
- Click on the icon on the top left (nine dots in a square).

Note: It doesn’t work with OneDrive Personal accounts, and you need a Microsoft 365 account.
- Click on All apps to see the list of apps of MS 365.
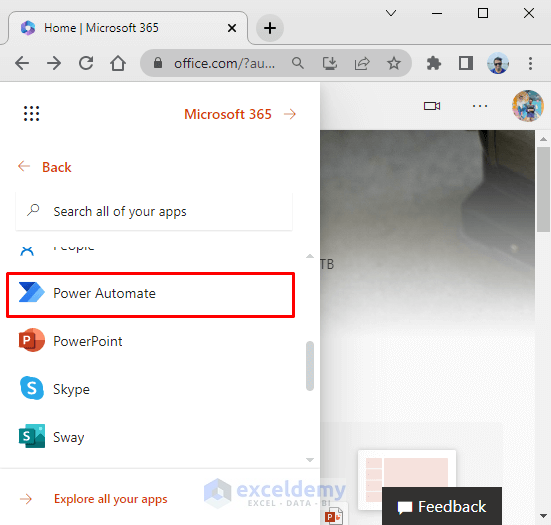
- Select the Power Automate application.
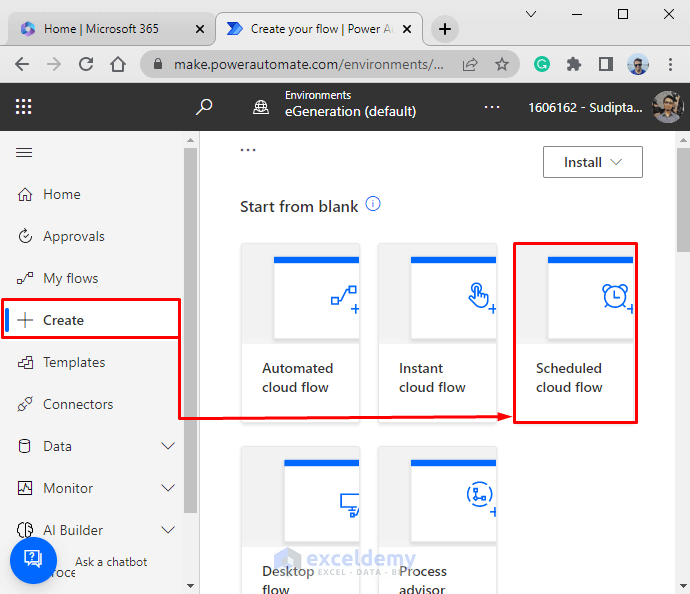
- In Power Automate, click on Create and then choose Scheduled Cloud Flow.
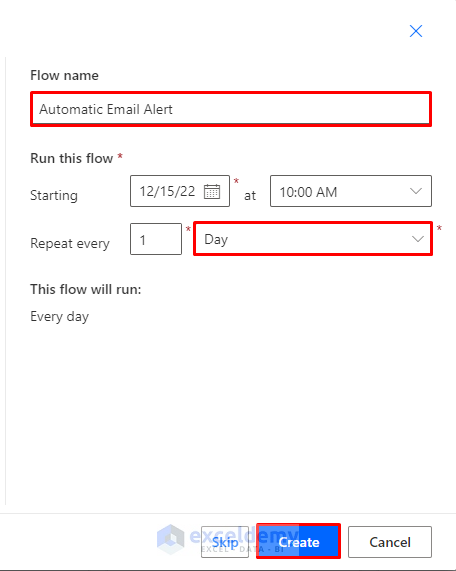
- Give a name to the power flow. We have used the name Automated Email Alert.
- We want the alerts to be sent out daily, so we have selected Repeat every 1 Day.
- Click on Create.
Step 3 – Link Power Automate and Excel
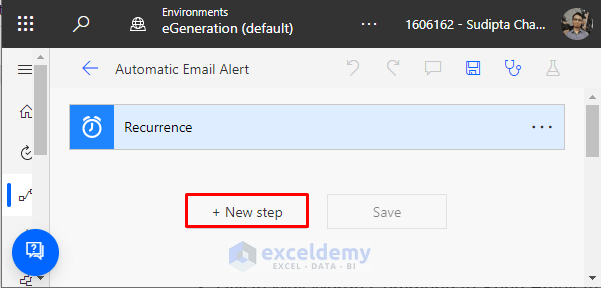
- We have a single step of Recurrence.
- Click on New Step to add other steps.
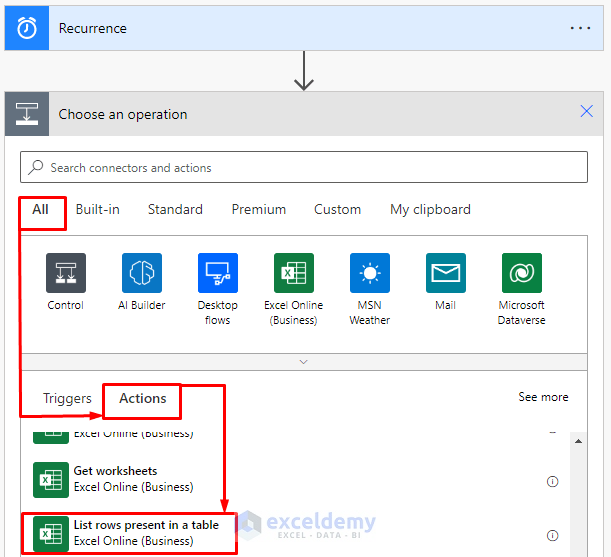
- Choose List rows present in a table from the Actions tab. If you do not see this option, you can also search in the search box.
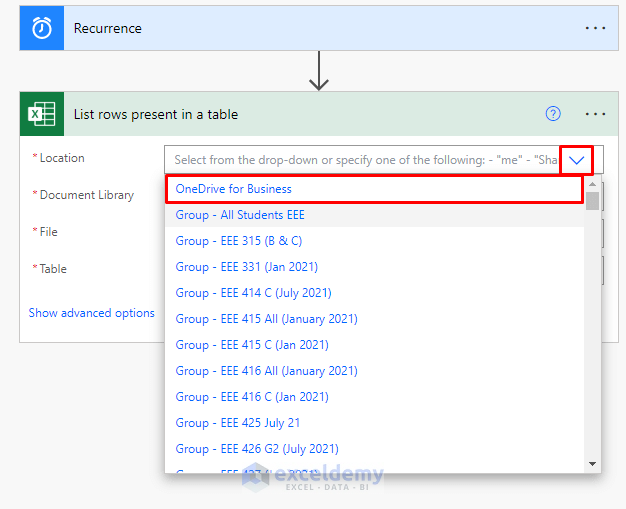
- Click on the drop-down menu for Location.
- Select OneDrive for Business.
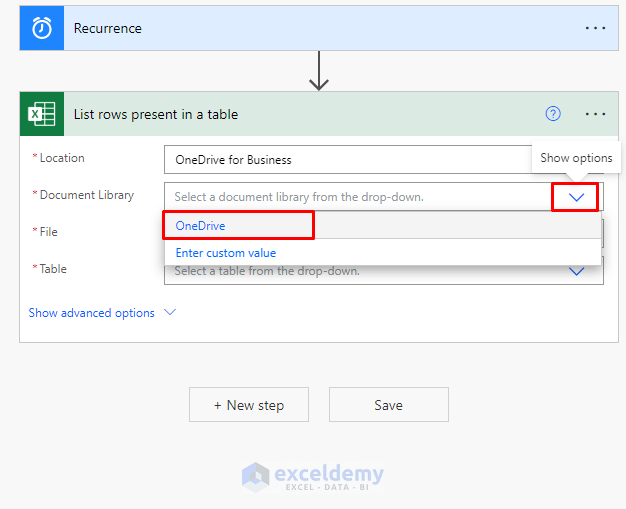
- Select OneDrive for Document Library.
- Navigate to the file location and select the file.
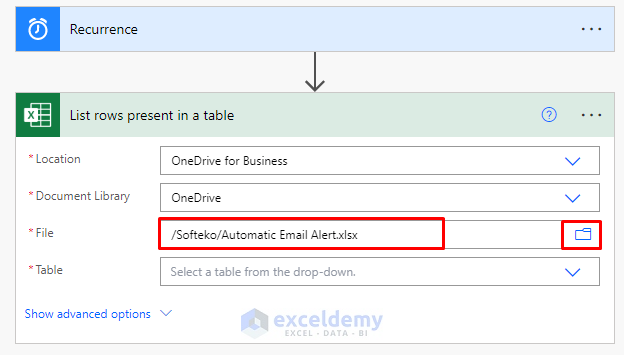
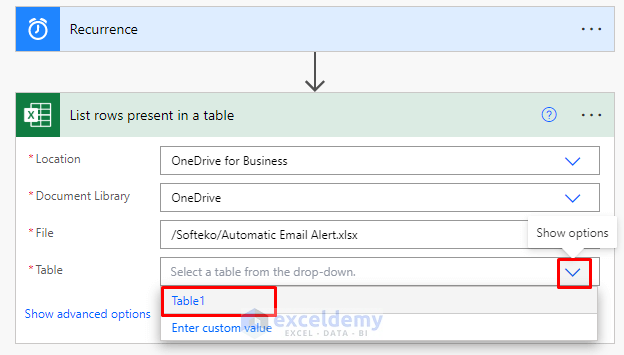
- Select the table name containing your dataset. We have used Table 1 in Excel.
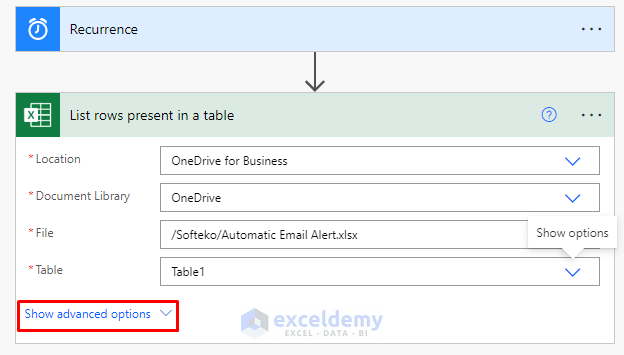
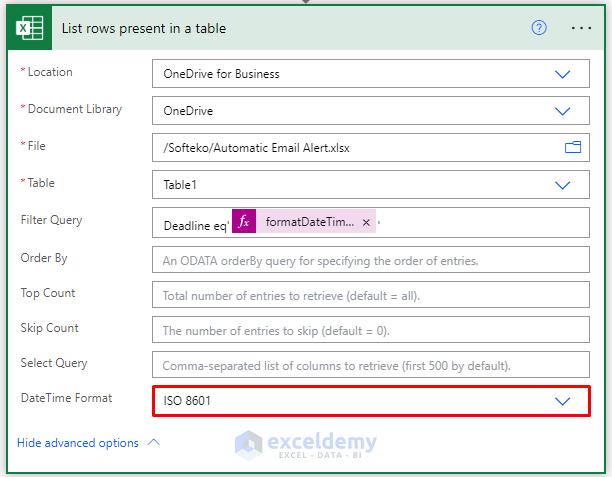
- Click on Show Advanced Options.
- In the Filter Query field, put:
Deadline eq'. - Click on Add dynamic content and it will open a floating wizard.
- Go to the Expression tab and enter this formula in the formula bar:
formateDateTime(convertFromUTC(utcNow(),'Central America Standard Time'),'yyyy-MM-dd')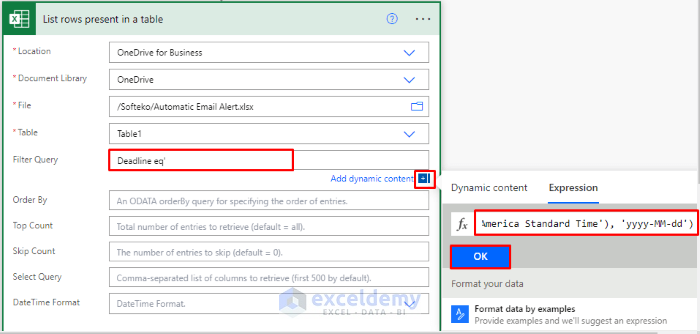
Here, we have formatted the Deadline column of the Excel file in the standard format of Central America Standard Time.
- End with
'.
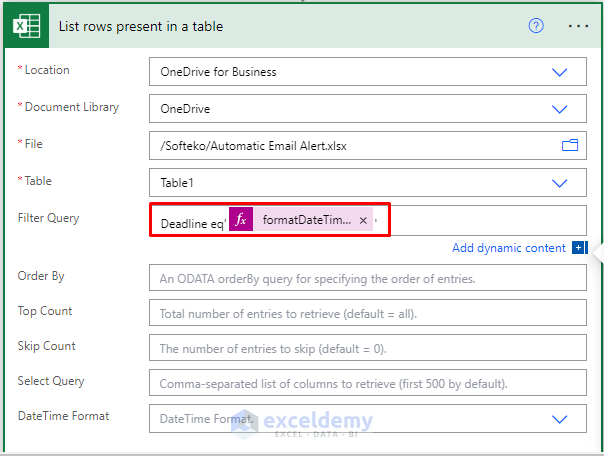
- Set the DateTime Format to ISO 8601.
Step 4 – Extract the List of Emails
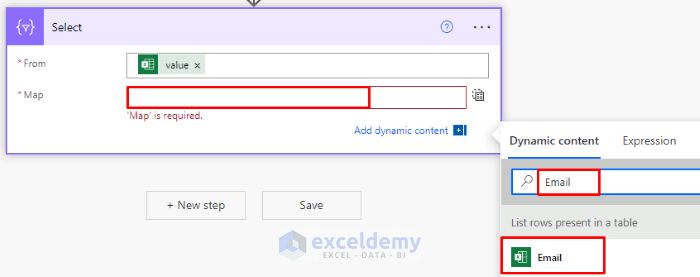
- Select Next step and in the search box type select and choose Select: Data Operation from the list of Actions.

- Click on Add dynamic content and choose Value from the list.
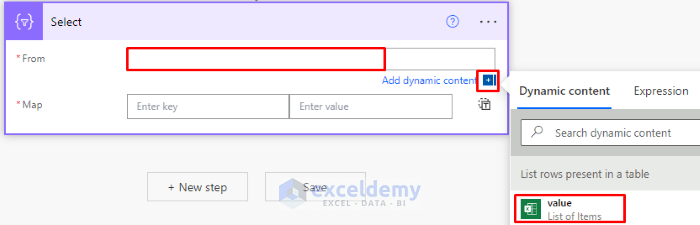
- Click on the Text icon after selecting the Map option.
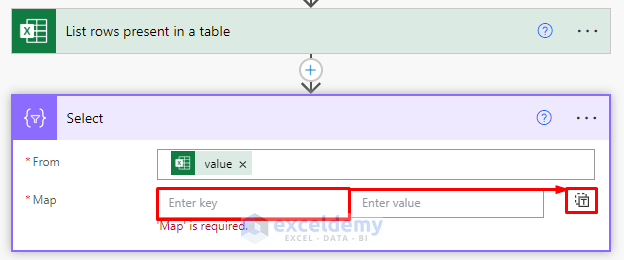
- Search Email in the search bar and select Email from the list.
Step 5 – Compose the Extracted List of Emails
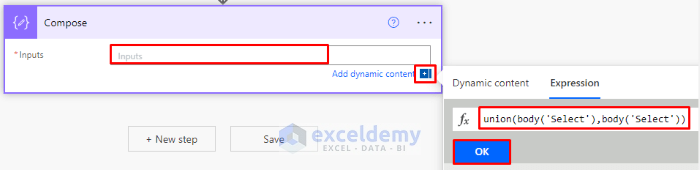
- Add another step and search Compose in the search bar.
- Select Compose.

- The Compose operation will be shown, so click Add dynamic content.
- In the Expression bar, put the following formula:
union(body('Select'),body('Select'))
- Click OK to proceed.
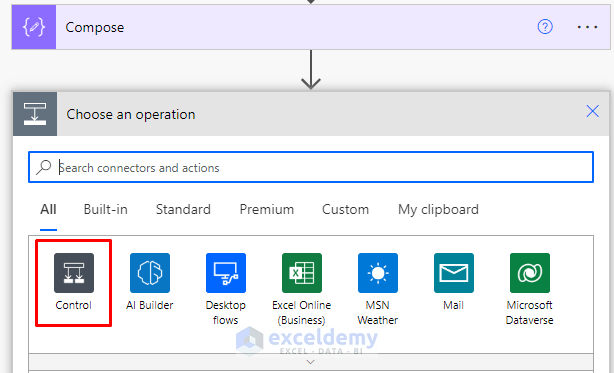
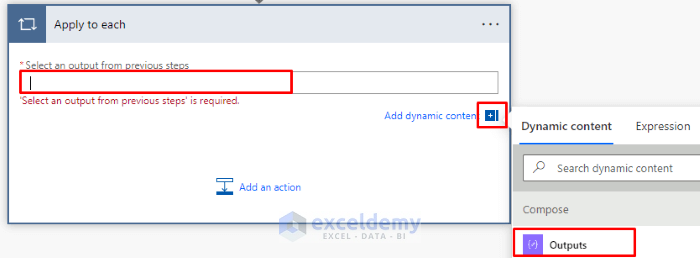
Step 6 – Add Control to Each Email
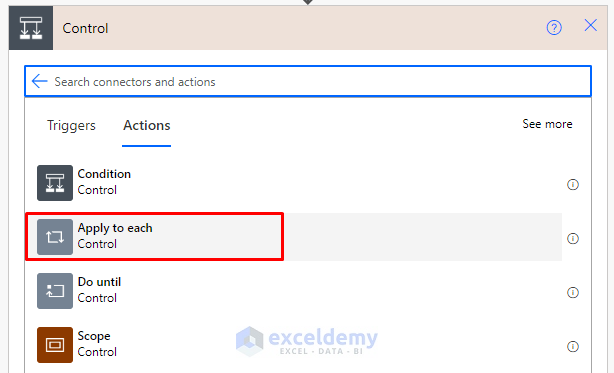
- Select Control.
- Select Apply to each from the Actions tab.
- Click on the box below Select an Output from previous steps.
- Select Outputs using the Add dynamic content icon.
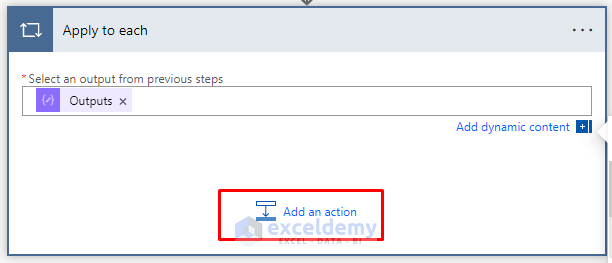
Step 7 – Extract Data for Each Email
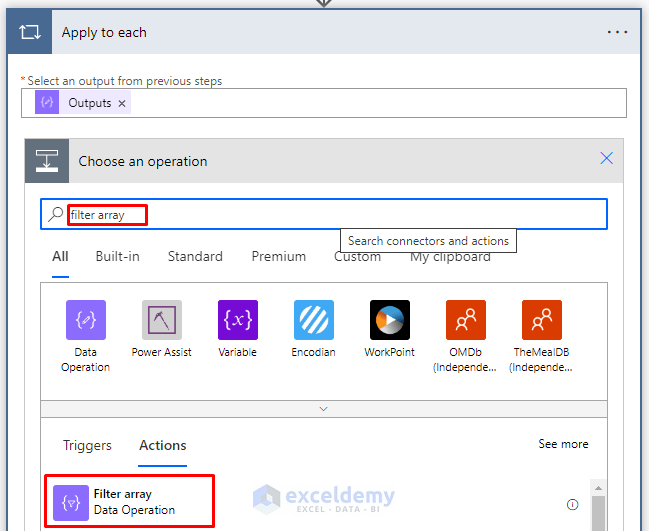
- Click on Add an action.
- Search filter array in the search bar and select Filter array.
- Select Value from the wizard occurred after clicking on the plus icon on the right.
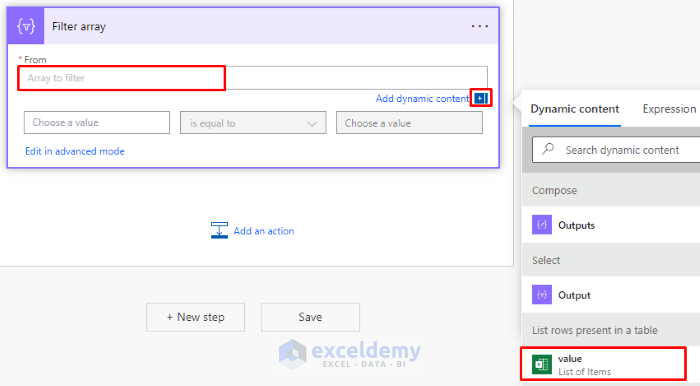
- Choose Add dynamic content and select Email from there.
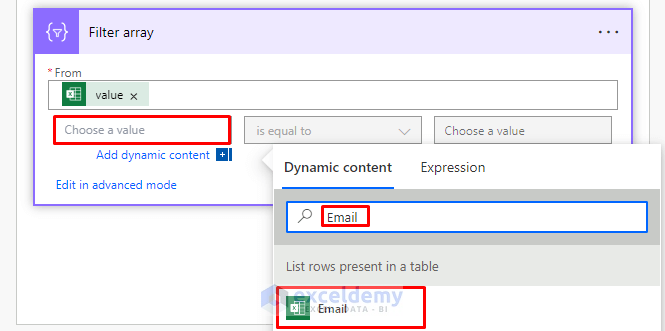
- Select the Current item in the third field.

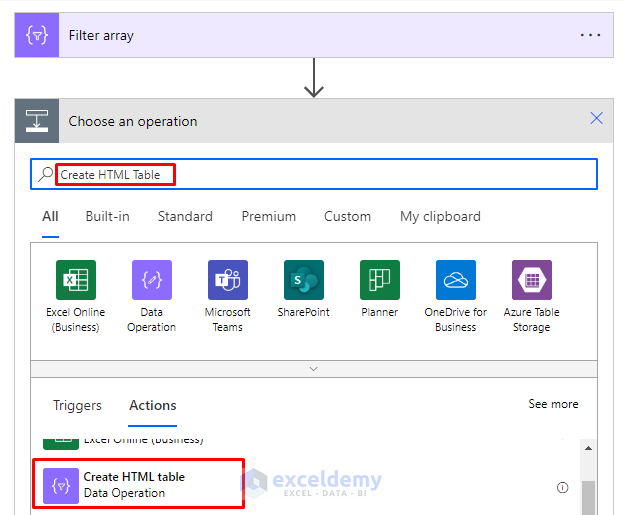
Step 8 – Generate HTML for Email Alerts
- Click on Add an action and search Create HTML Table on the search box.
- Select Create HTML Table.
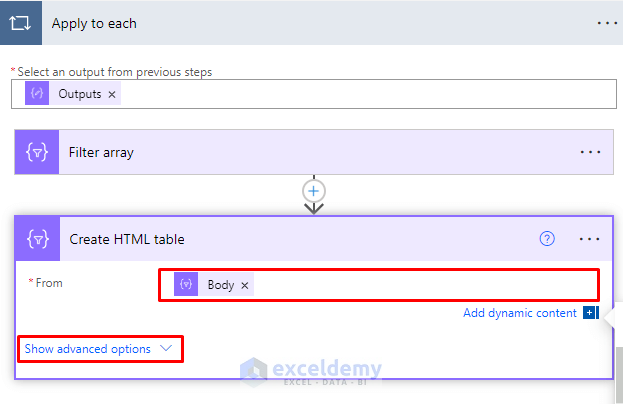
- In the From field, click on the box and then press on the Add dynamic content icon.
- From the floating wizard, select Body.
- Click on Show advanced options.
- From the Columns field, select Custom.
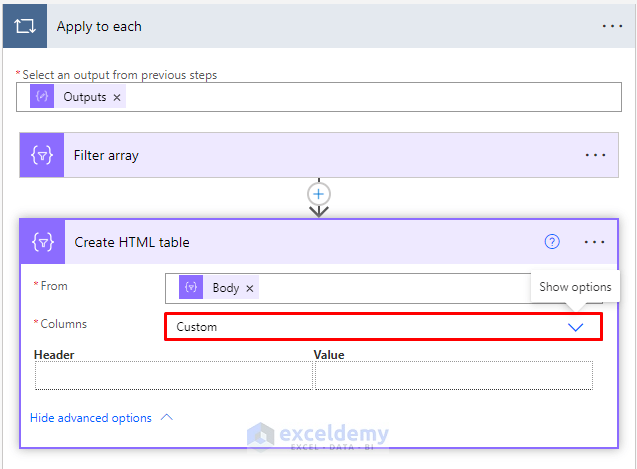
- Enter names for the columns that you want in your table names in the Header column.
- In the 1st column of the Header field, write Deadline.
- In the 2nd column, use the following formula in the Expression bar:
formatDateTime(item()['Deadline'],'MMM d,yyyy')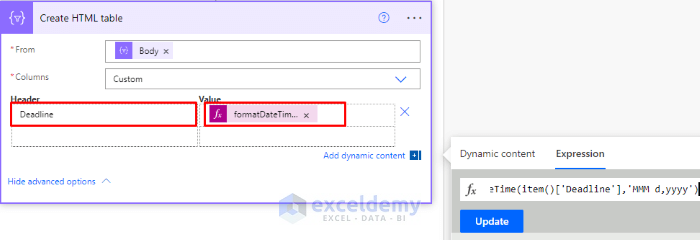
We will format the value of the Deadline column in the definite format.
- Add another column named Topic.
- Set the value of the column by using the following formula in the Expression bar:
item()['Topic']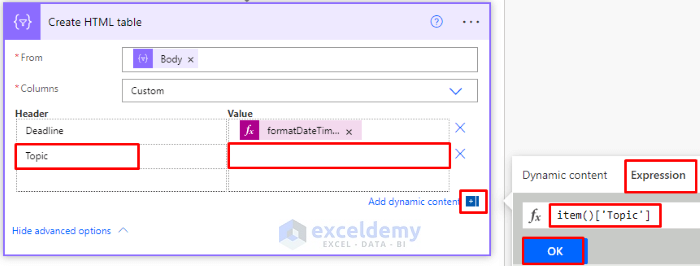
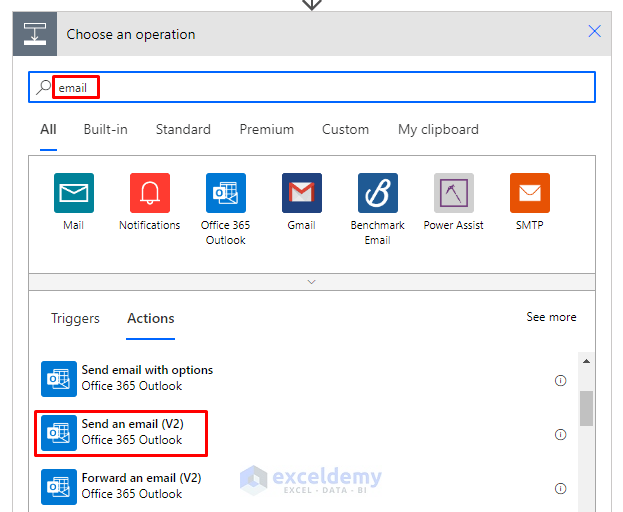
Step 9 – Automatically Create Emails in Outlook
- Add another action named Send an email (V2).
- Click on the To field and click on Add dynamic content.
- From the floating wizard, select the Current item from the list.
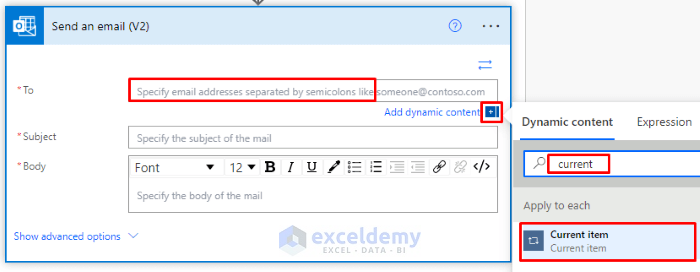
- Write the subject of the mail in the Subject field.
- In the Body field, click Add dynamic content and select Output from the list.
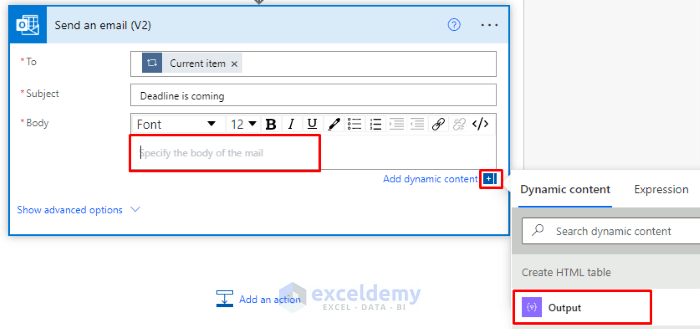
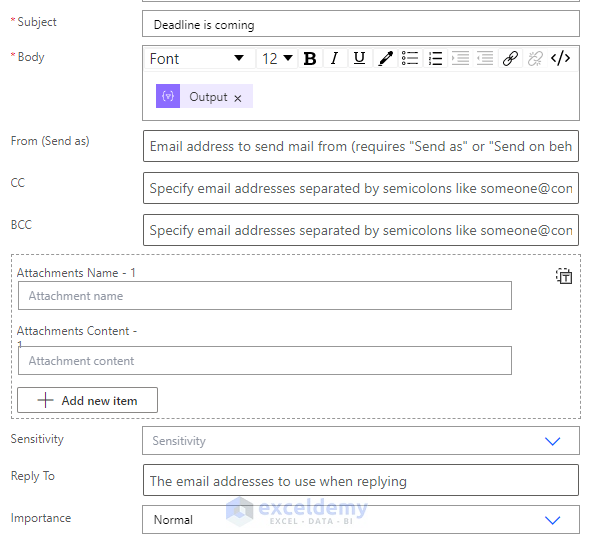
- You can choose advanced options by clicking on Show advanced options.
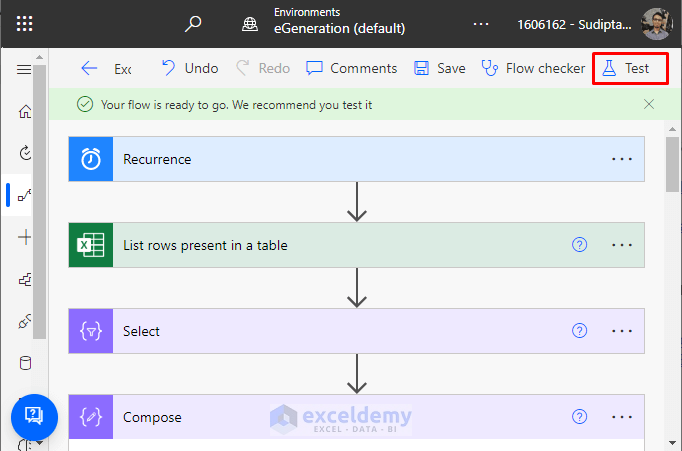
- Select Save.
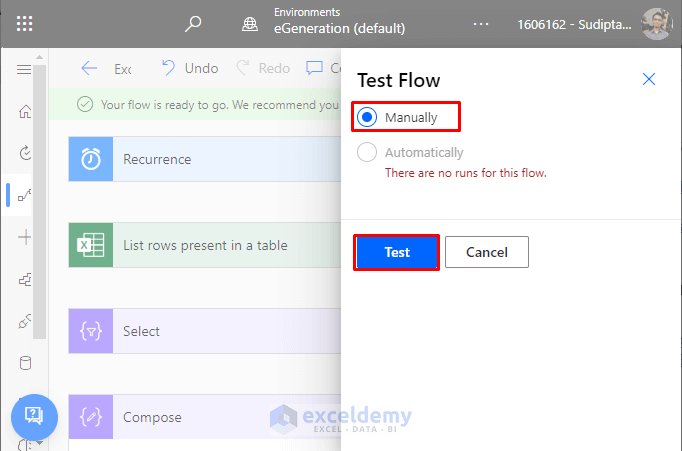
- Your flow is ready. You can test your results by clicking on the Test button.
- Select Manually to manually test the flow.
- Open the Outlook application to check the automated email alerts.
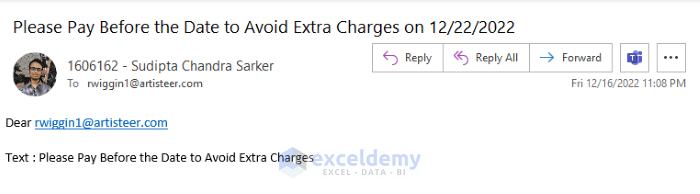
Final Output
- Here’s a sample message on the Outlook application.
Method 2 – Send Automatic Email Alerts from the Excel Worksheet Using VBA
STEPS:
- We will work with the following dataset mentioned before.
- If the deadline is between 1 and 7 days from today, we will generate an automated email alert.
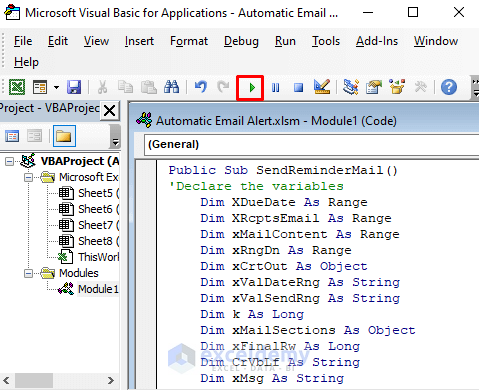
- To open the VBA Macro, press Alt + F11.

- The Microsoft Visual Basic for Application window will pop up.
- From the Insert tab, select the Module option.
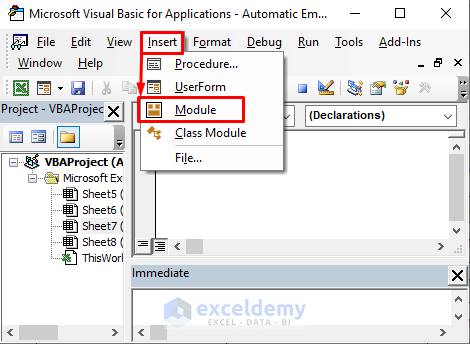
- Paste the following VBA code in the module:
Public Sub SendReminderMail()
'Declare the variables
    Dim XDueDate As Range
    Dim XRcptsEmail As Range
    Dim xMailContent As Range
    Dim xRngDn As Range
    Dim xCrtOut As Object
    Dim xValDateRng As String
    Dim xValSendRng As String
    Dim k As Long
    Dim xMailSections As Object
    Dim xFinalRw As Long
    Dim CrVbLf As String
    Dim xMsg As String
    Dim xSubEmail As String
    On Error Resume Next
    'To select the date column insert a input box
    Set XDueDate = Application.InputBox("Select the column for Deadline/Due Date date column:", "ExcelDemy", , , , , , 8)
    If XDueDate Is Nothing Then Exit Sub
    'Insert a input box for selecting the recipients
    Set XRcptsEmail = Application.InputBox("Choose the column for the email addresses of the recipients:", "ExcelDemy", , , , , , 8)
    If XRcptsEmail Is Nothing Then Exit Sub
    'To enter the text mail, insert a input box
    Set xMailContent = Application.InputBox("In your email, choose the column with the reminded text:", "ExcelDemy", , , , , , 8)
    If xMailContent Is Nothing Then Exit Sub
    'Count rows for the due dates
    xFinalRw = XDueDate.Rows.Count
    Set XDueDate = XDueDate(1)
    Set XRcptsEmail = XRcptsEmail(1)
    Set xMailContent = xMailContent(1)
    'Set command to open MS Outlook Application
    Set xCrtOut = CreateObject("Outlook.Application")
    'Apply For loop to conduct the operation in each row one by one
    For k = 1 To xFinalRw
        xValDateRng = ""
        xValDateRng = XDueDate.Offset(k - 1).Value
        'Apply If condition for the Due Date values
        If xValDateRng <> "" Then
        'Condition set to send mail if the difference between due dates and current date is greater than 1 and less than 7 days
        'Means 1 < X< 7, X = Due Date - Current Date
        If CDate(xValDateRng) - Date <= 7 And CDate(xValDateRng) - Date > 0 Then
            xValSendRng = XRcptsEmail.Offset(k - 1).Value
            'Create the subject, body and text contents with the required variables
            xSubEmail = xMailContent.Offset(k - 1).Value & " on " & xValDateRng
            CrVbLf = "<br><br>"
            xMsg = "<HTML><BODY>"
            xMsg = xMsg & "Dear " & xValSendRng & CrVbLf
            xMsg = xMsg & "Text : " & xMailContent.Offset(k - 1).Value & CrVbLf
            xMsg = xMsg & "</BODY></HTML>"
            'Create the email
            Set xMailSections = xCrtOut.CreateItem(0)
            'Define the position to place the Subject, Body and Recipients Address
            With xMailSections
                .Subject = xSubEmail
                .To = xValSendRng
                .HTMLBody = xMsg
                .Display
                .Send
            End With
            Set xMailSections = Nothing
        End If
    End If
    Next
    Set xCrtOut = Nothing
End Sub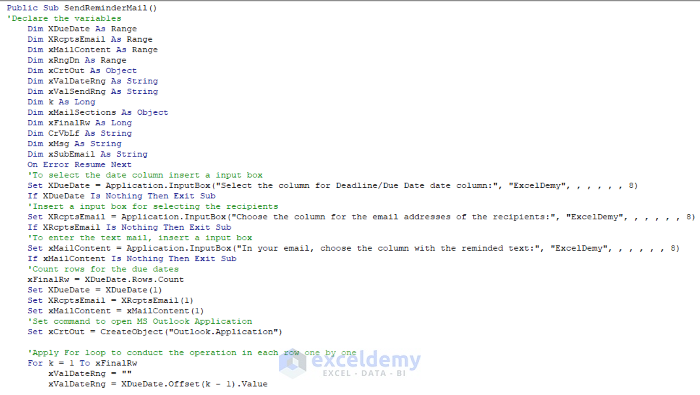
- After saving, press F5 to run the program.
- You can also run the program by clicking on the Play icon.
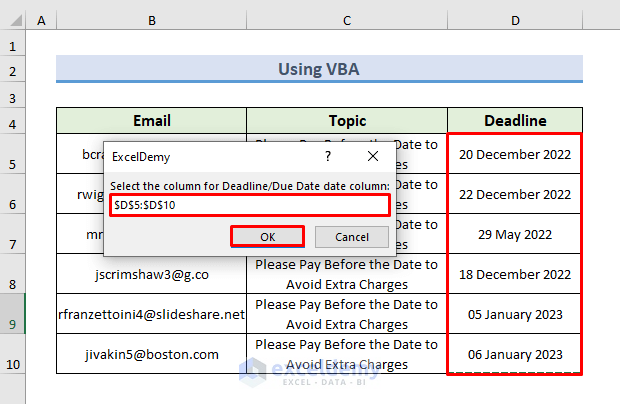
- An input message box will pop up.
- Select the column for the deadline. We have selected the D5:D10 range and pressed OK.
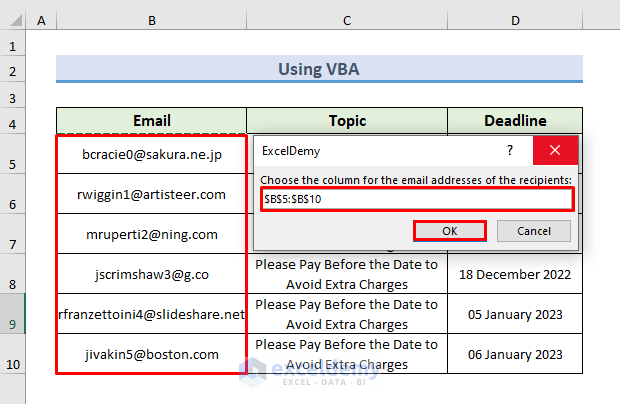
- Another input message box will float up.
- Select the column for the mail addresses. We have selected the B5:B10 range and pressed OK.
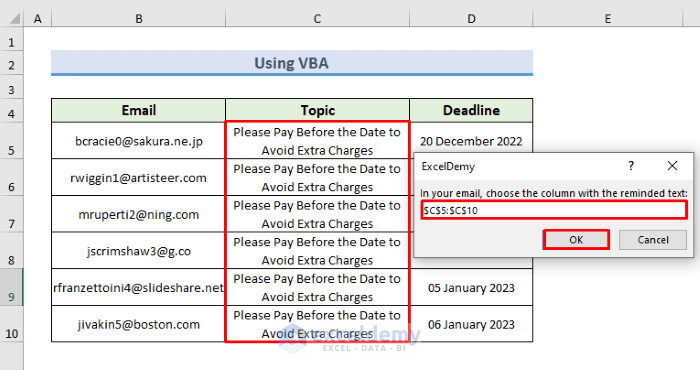
- The final input message box will float up.
- Select the column for the Topic. We have selected the C5:C10 range and pressed OK.
- All of your emails will be sent as reminder emails before the due dates.
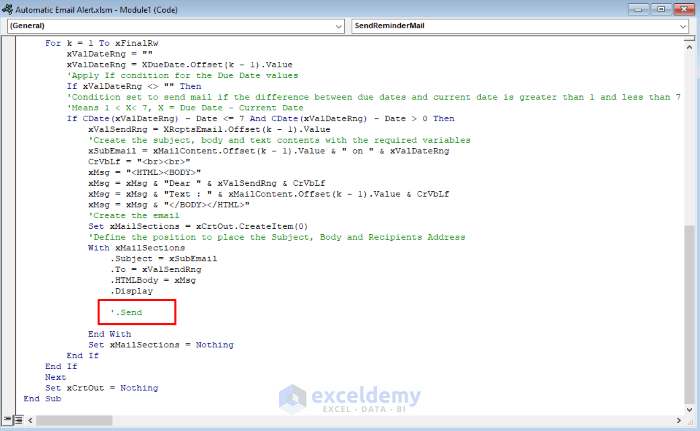
- You can also choose to manually send the emails using the automated program described above. Place an apostrophe (‘) before the (.send) command to disable it, as shown in the image below.
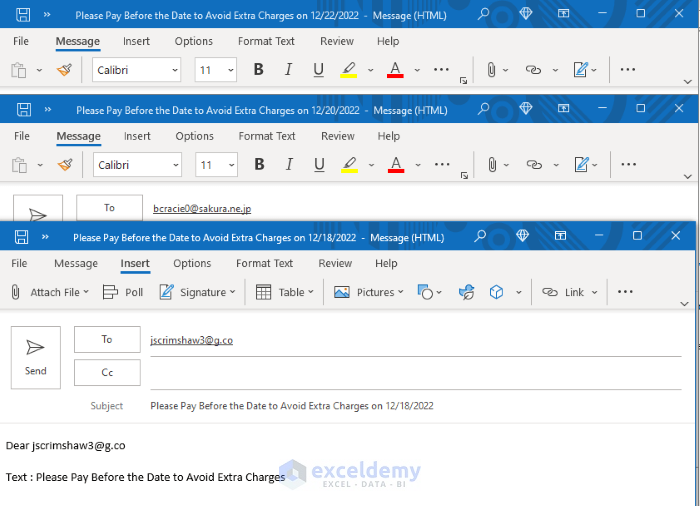
- You will get all the completed drafts in the app.
- By clicking the Send button, select whom you want to send emails to.
Download the Practice Workbook
Related Articles
- How to Create Popup Reminder in Excel
- How to Create Notifications or Reminders in Excel
- How to Create Alerts in Excel
- How to Disable Alerts in Excel VBA
- How to Set Due Date Reminder Formula in Excel
- How to Set Due Date Reminder in Excel
<< Go Back to Alerts in Excel | Learn Excel
Get FREE Advanced Excel Exercises with Solutions!

Hi,
I have tried to use the VBA code and it almost works perfectly.
However, I don’t receive an email every day as I should (I have made my own document that has consecutive dates). But when I run the VBA code then I receive all the emails that I should have received automatically.
Also, I have tried to copy the VBA code in Module1 (does not work) and also the Tabel1 sheet.
Is it meant to receive emails automatically?
Kind regards
Dennis
Thank you DENNIS for your comment.
The code is automatic since whenever you run it, you don’t need to check which deadlines are 1 to 7 days away from the current date. Also, the code creates a draft automatically. However, if you want to automate the whole process, you will have to modify the code slightly and create a task scheduler. Copy the following code and paste it into the VBA module:
Create a task-scheduler:
Now, follow the steps below to create a task scheduler:
1. Type “Task Scheduler” in the Windows search bar and press “Enter”.
2. In the right-hand Actions pane, click on “Create Basic Task”. Set a name and description for your task.
3. Choose Daily in the “Trigger” option and Start a Program in the “Action” part.
4. In the Program/Script box, give the directory of “excel.exe” file.
5. In the “Add arguments” field, specify the full path to your Excel file.
6. Click “Finish.”
Hopefully, following the steps above, you will be able to perform your desired task.
Regards
Md Junaed Ar Rahman
good day, I have tried this code, and it does not work. the first code worked great, except it does not send automatically. how can i get it qutomaticly?
Hello Isaac Chavez
Thanks for visiting our blog and sharing your problem. I have developed an Excel VBA Sub-procedure that automatically sends emails.
SOLUTION Overview:
All you need to do is to click on Allow when the Microsoft Outlook dialog box appears.
Excel VBA Sub-procedure:
When testing the sub-procedure, I accidentally emailed you by pressing Allow in the Microsoft Outlook dialog box. Please ignore that. I hope the sub-procedure will fulfil your goal; good luck.
Regards
Lutfor Rahman Shimanto
Excel & VBA Developer
ExcelDemy
Everything works great for 2. Send Automatic Email Alerts from Excel Worksheet Using VBA.
Now how do I get it to generate automatically daily without having to physically go into excel and manually run macro.
Dear Issac
Thanks for letting us know that the previously provided SendEmails sub-procedure worked on your side. Now, you want to automate this task daily. To achieve this, you create a Workbook_Open event and call the SendEmails sub-procedure. Later, you must use the Task Scheduler to open the workbook daily at a particular time. I have improved the SendEmails sub-procedure and created a solution to your problem using the mentioned idea.
Follow these steps:
Hopefully, you have found the ultimate solution to your requirements. I have attached the solution workbook; good luck.
DOWNLOAD SOLUTION WORKBOOK
Regards
Lutfor Rahman Shimanto
Excel & VBA Developer
ExcelDemy
Hello,
I have the routine for “Public Sub SendReminderMail()” working correctly, however I would like to add an additional filter to the data. Along with returning dates between 0 and x days, I would like it to further filter that dataset by only returning dates in that range and also the corresponding cell in column O is blank (=””). How would I add that?
would it be an “AND” statement in the following line:
If CDate(xValDateRng) – Date 0 Then…
Hi Lutfor,
I can also confirm the SendEmails sub-routine works well. I was trying without success to modify it with another qualifier: as well as returning the values for dates between the declared range (i.e. 0 to 14 days), I would like to further filter the dataset if a respective cell in another column for the returned dataset row was blank (“”). For example, if my Date range is (“A2:A50”), and my Document submittal Date range is (“B2:B50”), I’m trying to send emails where the value in column “A” is within the date range “and” the value in column “B” is blank (“”).
What would that syntax look like?
Thanks!!
Hello Greg
Thanks for visiting our blog and informing us that the previous solution worked perfectly. You want to filter the data that includes the date falling within the specified date range (0 to 14 days). Also, you want to include the rows where the document submittal date is blank.
I have come up with an Excel VBA code. You can try it; if needed, make changes to fulfil your goal.
SOLUTION Overview:
Excel VBA Code:
I have attached the solution workbook; good luck.
DOWNLOAD SOLUTION WORKBOOK
Regards
Lutfor Rahman Shimanto
Excel & VBA Developer
ExcelDemy
Hi! The code doesn’t open my MS Outlook after running the code.
I have a mac and run the lastest software. Does it also work on a MAC?
Thank you!
Lukas
Hello Lukas Cenjar,
This VBA code won’t work on MAC but here we are giving you a sample code that might work on MAC. We updated our existing code based on MAC requirements.
1. We used AppleScript to interact with the Mail application on macOS to create and send the email.
2. Then, used MacScript to run AppleScript commands from VBA to handle Mac-specific scenarios.
Regards
ExcelDemy
Hi,
The second method works for me. However, I would like to ask how can I edit the body of the mail, instead Dear “email address” and change to actual name. Also, the word “text” to be removed on the body of the mail.
Hello Mary Grace,
Please use this updated code to get your desired result:
Here I added an input box to select the column with the names of the recipients (XRcptsName ). Then, updated the email body to include the recipient’s actual name and removed the word “text.”
Regards
ExcelDemy
Hi This code is great! Is there anyway I can change the subject to reflect something else?
Hello Vanessa,
Yes, you can change the subject line by modifying the .Subject property in the VBA code. Look for the line that starts with MailItem.Subject = and replace the text within the quotation marks with your desired subject. Let me know if you need more help!
Regards
ExcelDemy
Hi,
I have an Excel Spreadsheet containing a column Description of Lifting Equipment and a column for the Test Certificate Expiry Date.
I formatted the cells to become yellow when the Expiry Date is within 30 Days of the Actual Date (Todays Date) , and Red when it has Expired…
What I would like for Excel to do is send me a mail when the Cells reach their Conditions to Yellow and Red.
Is that possible?
Can someone help me with the Coding Please?
Regards Vickie
Hello Vickie
Thanks for visiting our blog and sharing an exciting problem with such clarity. I have reviewed your situation and developed two sub-procedures to fulfil your goal. Your problem is about automating email alerts in Excel based on conditional formatting for expiry dates of lifting equipment test certificates.
Don’t worry! I have demonstrated it in an Excel workbook. Please check the following:
Excel VBA Sub-procedure:
I hope you have found the sub-procedures you were looking for. I have attached the solution workbook as well. Good luck.
DOWNLOAD SOLUTION WORKBOOK
Regards
Lutfor Rahman Shimanto
Excel & VBA Developer
ExcelDemy
Is it also possible to fit the system that it only sends 1 email at a time. I am now getting three mails, that are all the same because of an same expiration date? IS there someone who knows this?
Kind regards,
Roel
Hello Roel,
To address your first concern about receiving multiple emails due to the same expiration date, you can modify the code to ensure only one email is sent per unique expiration date. This can be done by adding a simple check to track which dates have already triggered an email. Here’s how you can adjust the code:
This update ensures that for any particular expiration date, only one email will be sent.
Regards
ExcelDemy
Hello, i have the same problem. I want to create a system in which i get an email based of a color change in an excel cell. I have used your new VBA sub procedure. However it won’t send me automatically an email with the expiration date. It does show me the concept version if i put an apostrophe before the send button. How do I fix it to send me an email automatically when the expiration date reaches 30 days?
Hello Roel,
To ensure your system automatically sends an email when the expiration date reaches 30 days, you need to adjust your VBA code slightly. The apostrophe before the .Send line is preventing the email from being sent. Removing that apostrophe will allow the email to be sent automatically.
Here’s how you can modify the SendEmail sub-procedure:
Make sure to replace “[email protected]” with your actual email address. Additionally, ensure that your main subroutine correctly checks for the conditions to trigger the email alert based on cell color changes.
If you follow these steps, you should receive automatic email notifications as intended.
Regards
ExcelDemy
I gave the Power automate procedure a go but I ran into a problem where I can no longer see the option to add dynamic content when the ‘To’ box when I am creating the ‘Send an Email (v2)’ Action.
Is this a bug or something?
Hello Lorcan,
As all the steps are sequential the issue of not seeing the option to add dynamic content in the ‘To’ box when creating the ‘Send an Email (v2)’ action in Power Automate might be due to a bug or a temporary glitch.
Try the following steps to troubleshoot,
1. Refresh your browser or reopen Power Automate.
2. Clear your browser cache.
3. Ensure all fields are properly configured before the ‘Send an Email (v2)’ action.
4. Check for any updates to Power Automate.
If the issue persists, consider reaching out to Microsoft support for further assistance. You can try our 2nd method until the issue is solved.
Regards
ExcelDemy
Hi – the VBA code is just what I need. Is there a way to use this with email hosts that are not Outlook (specifically Gmail host)? Or a way to incorporate the code into a Google Sheets?
Thank you
Hello Dan,
Gmail doesn’t natively allow sending emails via VBA due to security restrictions. However, you can try to send emails via Gmail by using CDO (Collaboration Data Objects) with SMTP.
Google may block this unless you’ve allowed less secure apps or set up an app-specific password if you’re using two-factor authentication (2FA).
For Google Sheets, using Google Apps Script would be more appropriate since it integrates seamlessly with Gmail. Here’s how you can approach both:
Apps Script is directly integrated with Google’s ecosystem, making it an easier option for automating email alerts, and it’s more secure than trying to bypass restrictions in Gmail for VBA.
Regards
ExcelDemy
I am getting this error:
Syntax error at position 23 in ‘Deadline eq’2024-10-03’ ‘.
inner exception: Syntax error at position 23 in ‘Deadline eq’2024-10-03’ ‘.
clientRequestId: af7fc979-3139-434f-b116-401b0fde8af9
when i try using Power Automate, can you help with a fix?
Hello Matthew Senko,
It seems that you’re encountering a syntax error in your Power Automate flow. The issue is likely related to how the date is formatted in your query. Make sure that the date is enclosed in double quotes and use the correct format.
Instead of: Deadline eq ‘2024-10-03’
Try using: Deadline eq ‘2024-10-03T00:00:00Z’
If the issue persists, please double-check your query syntax. Let me know if you need further assistance!
Regards
ExcelDemy
Hello,
I am still getting the same error.
Hello Matt Senko,
Thank you for your update. If you’re still getting the same syntax error, please check these points:
1. Correct Quotes: Make sure you are using straight single ‘ or double ” quotes (not curly quotes or backticks) in your expression.
2. OData Query Format: If you are using OData filter queries (common in Power Automate when filtering SharePoint or similar), the syntax should look like this:
Deadline eq ‘2024-10-03T00:00:00Z’
Or, if your column is of type Date and you’re only comparing the date (not time), try:
Deadline eq 2024-10-03
But most APIs expect the value in single quotes and sometimes require the full date-time with “T” and “Z” for UTC.
3. Field Name: Double-check that the column name Deadline is spelled exactly as it appears in your source (case-sensitive and no extra spaces).
4. Connector-specific Format: If you’re using SharePoint, the correct OData query is:
Deadline eq ‘2024-10-03T00:00:00Z’
If you are querying a table with just a date (not datetime), use:
Deadline eq ‘2024-10-03’
5. Spaces: Make sure there are no extra spaces in the query string.
If you’re still having issues, could you please share a screenshot of your filter query or let us know which connector/service you’re using in Power Automate? This will help to give you a more targeted solution.
Let me know how it goes!
Regards
ExcelDemy
Hi
Thank you for providing this, it’s really helpful.
In the power query version, when I am adding this
“union(body(‘Select’),body(‘Select’))”
I get an error message to say this expression is invalid
Any idea what I have done wrong?
Hello Lucie,
You are most welcome. Glad you found the guide helpful! Regarding the error with union(body(‘Select’),body(‘Select’)), it’s possible the issue might be with the apostrophes. Make sure you’re using straight quotes (‘) instead of curly ones (‘ or ’). Additionally, double-check that both body(‘Select’) expressions reference valid and correctly named outputs.
If everything looks correct and the issue persists, feel free to share more details. I’d be happy to help troubleshoot further!
Regards
ExcelDemy
Hi
I am getting an error on the power query. It says ‘the expression is invalid’ when i am entering this union(body(‘Select’),body(‘Select’))
Hello Lucie,
You are most welcome. Glad you found the guide helpful! Regarding the error with union(body(‘Select’),body(‘Select’)), it’s possible the issue might be with the apostrophes. Make sure you’re using straight quotes (‘) instead of curly ones (‘ or ’). Additionally, double-check that both body(‘Select’) expressions reference valid and correctly named outputs.
If everything looks correct and the issue persists, feel free to share more details. I’d be happy to help troubleshoot further!
Regards
ExcelDemy
Hi I am getting the following error in power automate in the List rows present in a a table: ‘Unable to process template language expressions in action ‘List_rows_present_in_a_table’ inputs at line ‘0’ and column ‘0’: ‘The template function ‘formateDateTime’ is not defined or not valid.’.
Hello Edel Whelan,
It looks like you’re encountering a problem with the formatDateTime function in Power Automate. This issue often arises if the syntax for the formatDateTime function is incorrect or if there’s a typo.
Double-check that you’re using the function as formatDateTime(triggerOutputs()?[‘headers’][‘Date’],’yyyy-MM-dd’) or a similar format. Ensure that the date format aligns with Power Automate’s requirements and that all parentheses are correctly placed.
Regards
ExcelDemy
Hello, I am having an issue with the power automate script. I get the following error: Action ‘Send_an_email_(V2)’ failed: The ‘inputs.parameters’ of workflow operation ‘Send_an_email_(V2)’ of type ‘OpenApiConnection’ is not valid. Error details: Input parameter ’emailMessage/To’ is required to be of type ‘String/email’. The source type/format ‘Object’ of the value ‘{“[email protected]”:””}’ is not convertible to type/format ‘String/email’.
It seems to think the email is an object not a string.
Hello Connor,
The error indicates that Power Automate is receiving an object instead of a string for the ‘To’ field in your email action. To fix this, ensure the email address is passed as a string, not an object. You can use string() in your expression or directly input the email as “[email protected]”. Double-check any dynamic content or expressions used in this field to ensure the correct format.
Regards
ExcelDemy
Hello,
I had this macro and it was working perfectly in Windows 10. When I upgraded to Windows 11, it no longer works. I have done all the security updates related to windows 11 – any advice?
Hello Corey,
The issue might be related to the enhanced security settings in Windows 11 or Microsoft Office. Here are some steps to help resolve the problem:
Check Macro Security Settings:
1. Open Excel, go to File > Options > Trust Center > Trust Center Settings > Macro Settings.
2. Ensure that “Enable all macros” is selected (only if you trust the source of the macro).
Enable Programmatic Access to Outlook (If Using Outlook for Emails):
1. Open Outlook, go to File > Options > Trust Center > Trust Center Settings > Programmatic Access.
2. Select “Never warn me about suspicious activity” (only if you are confident in your macro’s security).
Ensure VBA is Enabled: Go to File > Options > Customize Ribbon, and ensure Developer tab is enabled.
Check Windows Defender and Antivirus Settings:
1. Windows 11 may block macros as a security measure.
2. Go to Windows Security > Virus & Threat Protection > Manage Settings and disable Real-time protection temporarily to test if the macro works.
Run Excel as Administrator: Right-click on Excel and choose Run as administrator to bypass certain permission issues.
Ensure References Are Correct:
1. Press Alt + F11 to open the Visual Basic Editor.
2. Go to Tools > References and verify that all necessary libraries are checked (e.g., Microsoft Outlook Object Library if using Outlook).
Compatibility Mode: Right-click on the Excel application shortcut, choose Properties > Compatibility, and try running Excel in Windows 10 compatibility mode.
If the issue persists, try re-registering Outlook with this command:
Press Win + R, type `outlook.exe /regserver`, and press Enter.
Let me know if this works!
Regards
ExcelDemy
Hello
I have tried the Power Automate option, the flow test said that ran successfully, but i didn’t see any example output like the email that I suppose to receive. is there anything that I might be missing or doing wrong? Thank you.
Hello Kelly,
Thanks for trying it out. Yes, this is a common situation. Even if the flow test says “successful”, the email won’t appear unless the trigger condition is actually met.
A few things to double-check:
1. Make sure the condition (e.g., cell value change / threshold) is truly met in Excel after the flow is turned on.
2. Confirm the email action is correctly configured (recipient address, subject, body).
3. Check the Run History in Power Automate and open the run details to see if the email step was skipped.
3. If you’re using Excel Online, ensure the file is saved in OneDrive(Business) or SharePoint, not locally.
4. Try updating the data again after enabling the flow. That usually fixes it. Hope this helps!
Regards,
ExcelDemy