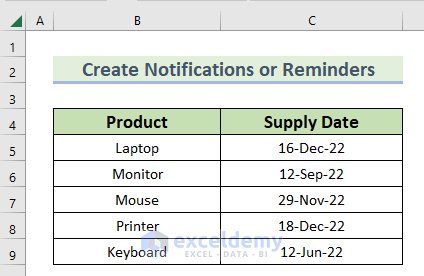
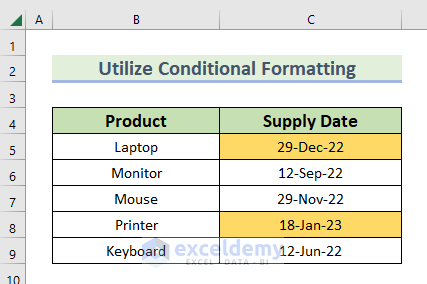
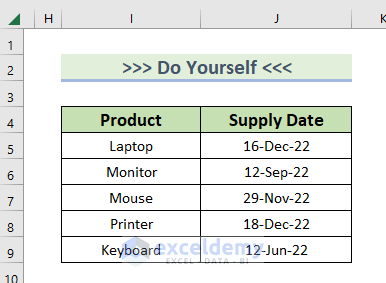
In the following dataset, you can see the Product and Supply Date columns. We have several Supply Dates that include dates both in the future and the past. We’ll use these dates to create notifications or reminders.
Method 1 – Utilize Excel Conditional Formatting to Make Notification or Reminders
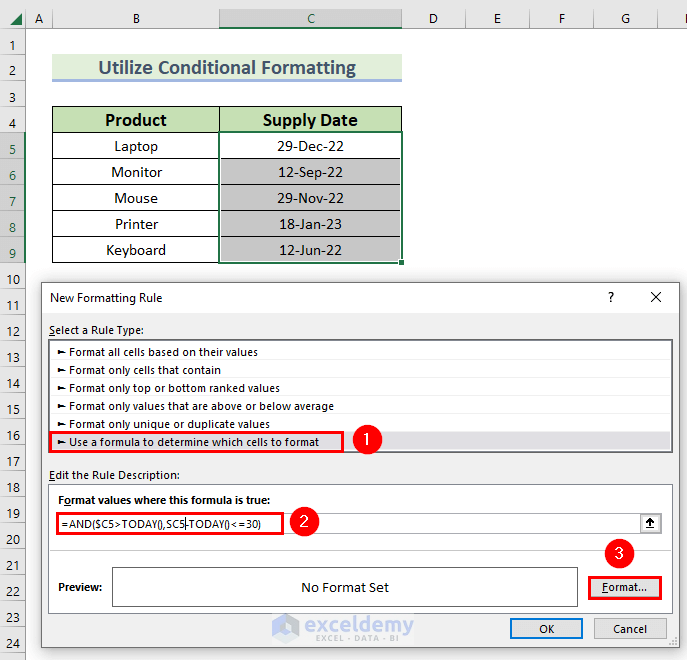
We will mark the dates that are up to 30 days from today’s date.
Steps:
- Select cells C5:C9.
- Go to the Home tab and select Conditional Formatting.
- Select New Rule.

- A New Formatting Rule dialog box will appear.
- Select Use a formula to determine which cells to format as the rule type.
- In the Format values where this formula is true box, insert the following formula.
=AND($C5>TODAY(),SA1-TODAY()<=30)- This formula will find the dates that are up to 30 days away from today’s date.
- Click on Format.
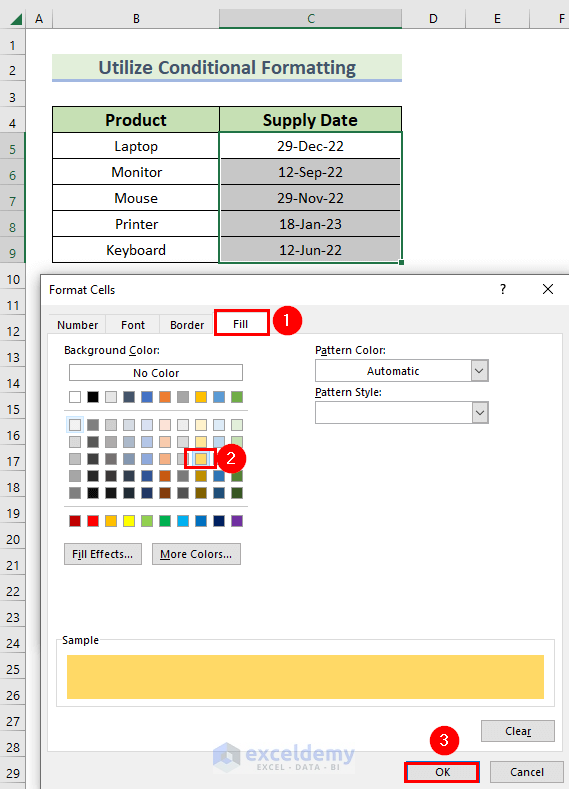
- Click on Fill.
- Select a color to format the cells. We chose the Yellow color.
- You can see the sample of the color.
- Click OK.
- You can see the Preview of the highlighting in the New Formatting Rule dialog box.
- Click OK.
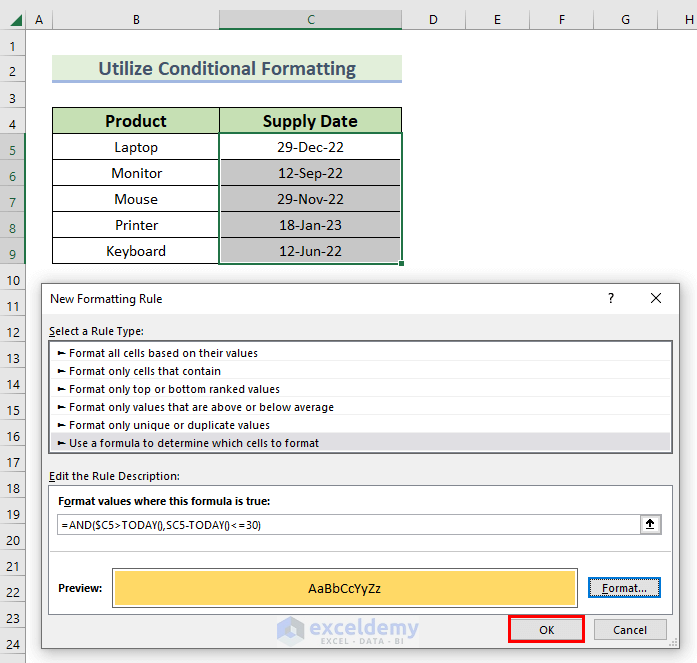
- The dates that are up to 30 days away from today’s date have been marked with a Yellow color.
Method 2 – Combine IF and TODAY Functions to Generate Notifications
Steps:
- Use the following formula in cell D5.
=IF(C5<TODAY(),"Date Expire","")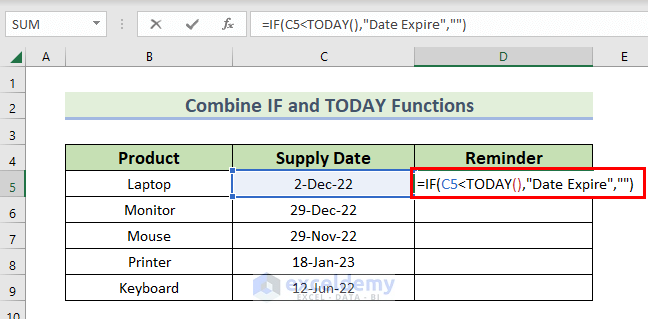
Formula Breakdown
- IF(C5<TODAY(),”Date Expire”,””) → the IF function makes a logical comparison between a given data and a data we expect.
- The TODAY function returns the date of today.
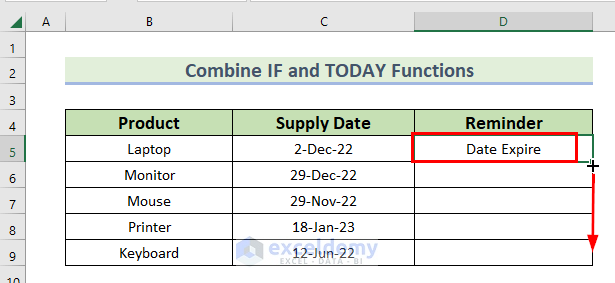
- Output: Date Expire
- Explanation: Since the logical test of the IF function is true, it returns Date Expire.
- Press Enter.
- Yu can see the result in cell D5.
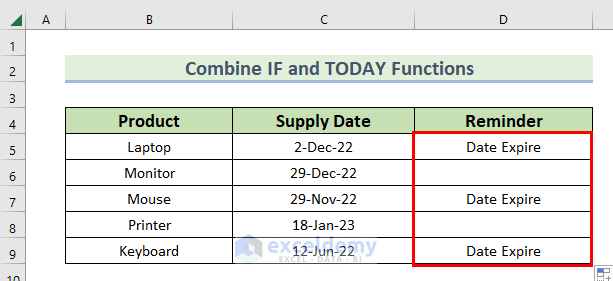
- Drag down the formula with the Fill Handle tool.
- You’ll get text in the row for every Supply Date that has passed.
Read More: How to Set Due Date Reminder Formula in Excel
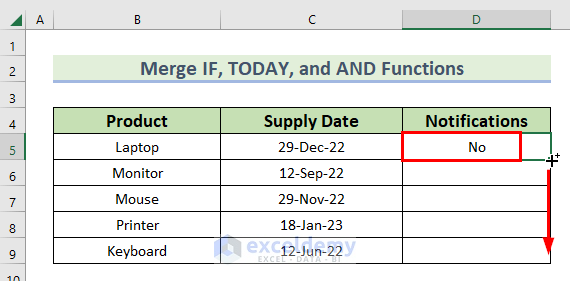
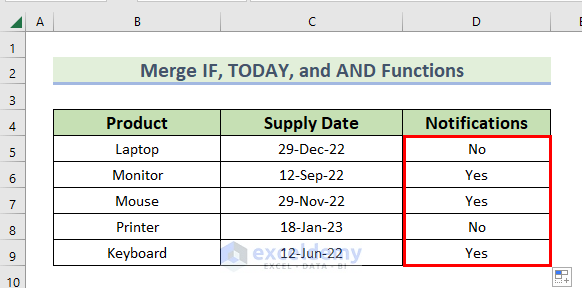
Method 3 – Merge IF, TODAY, and AND Functions to Create Reminders in Excel
We want a reminder No for the dates that are ahead of today and Yes for the dates that are behind today.
Steps:
- Use the following formula in cell D5.
=IF(AND(C5<>"",TODAY()+7>=C5),"Yes","No")
Formula Breakdown
- The TODAY function finds out the date for today.
- The AND function finds out whether all conditions are true in a logical test.
- The IF function makes a logical comparison between a given data and the data we expect.
- IF(AND(C5<>””,TODAY()+7>=C5),”Yes”,”No”) becomes
- Output: No.
- Explanation: Since the logical test is not true, the formula returns No.
- Hit Enter.
- Drag down the formula with the Fill Handle tool.
- Here are the results.
Method 4 – Apply Excel VBA Macros to Get Pop-Up Notification or Reminders
Steps:
- Right-click on the Sheet name and select Visual Basic.
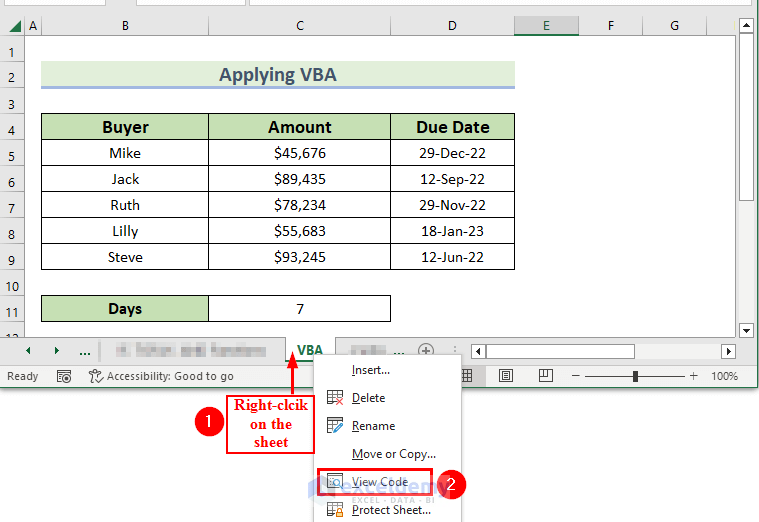
- A VBA Editor window will appear.
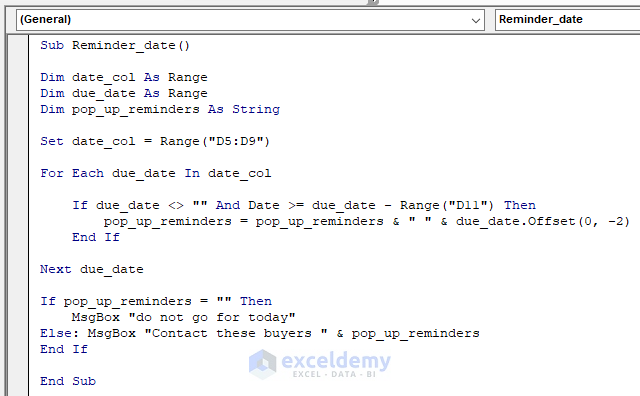
- Insert the following code in the VBA Editor window.
Sub Reminder_date()
Dim date_col As Range
Dim due_date As Range
Dim pop_up_reminders As String
Set date_col = Range("D5:D9")
For Each due_date In date_col
    If due_date <> "" And Date >= due_date - Range("D11") Then
        pop_up_reminders = pop_up_reminders & " " & due_date.Offset(0, -2)
    End If
Next due_date
If pop_up_reminders = "" Then
    MsgBox "do not go for today"
Else: MsgBox "Contact these buyers " & pop_up_reminders
End If
End Sub
Code Breakdown
- We declared the Reminder_date as the Sub.
- We put Date_Col as Range, Due_date as Range, and pop_up_Reminders as String.
- For loop is used to run the code until it finds the last date.
- Else statement is used to set up a condition to show the notifications.
- Save the code and Run the code with F5.
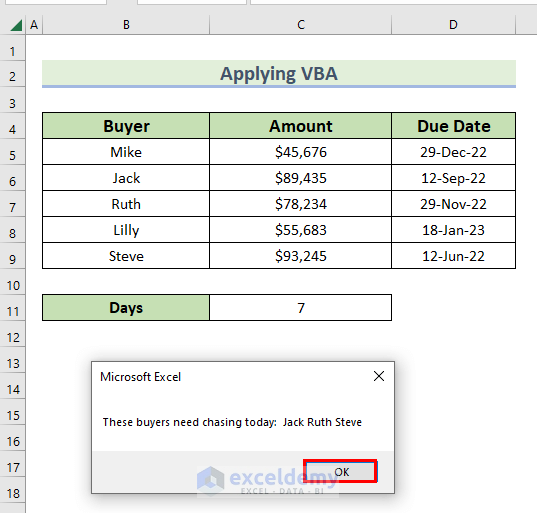
- You can see the pop-up notification in the Worksheet. The notification displays the names of the buyers who need to be reminded.
Method 5 – Add a New Ribbon and Insert VBA to Get Notifications in Excel
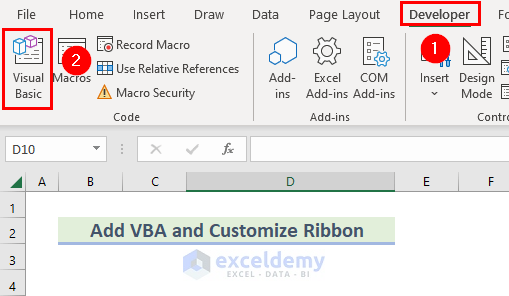
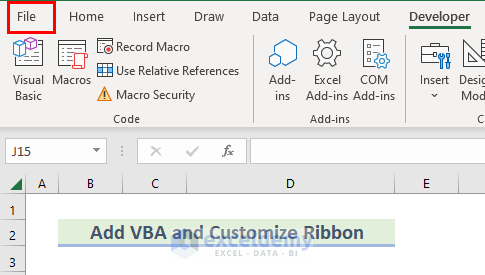
Step 1 – Insert VBA
- Go to the Developer tab and select Visual Basic or press Alt + F11.
- This will open the VBA Editor window.
- From the Insert tab, select Module.
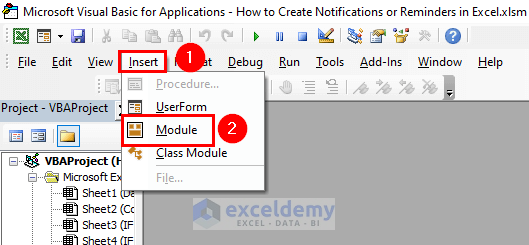
- Insert the following code in the Module.
Dim time As Double
Dim message As String
Sub Pop_up_Notifications()
Dim what_time As String
If time = 0 Then
what_time = InputBox("when you want the reminder to Popup?")
If what_time <> "" And what_time <> "False" Then
message = InputBox("enter notification message")
On Error Resume Next
time = Date + TimeValue(what_time)
On Error GoTo 0
Application.OnTime Alarm, "Pop_up_Notifications"
End If
Else
Beep
Application.Speech.Speak message
MsgBox message
message = " "
time = 0
End If
End Sub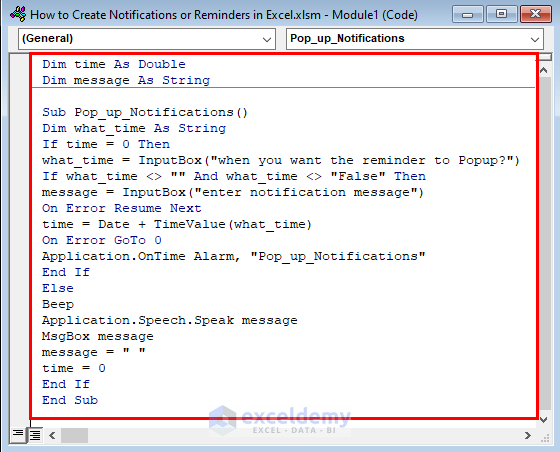
Code Breakdown
- We take Pop_up_Notifications as the Sub.
- We take time as Double, message, and what_time as String.
- An Input box is used to input the time for notifications.
- If…Then statement is used to show the second message box.
- onTime Alarm method is used to show the notifications on time.
- Speech method is used to hear the notifications.
- Save the code and go back to the Worksheet.
Step 2 – Add a Customized Ribbon
We want the customized ribbon in the View tab, next to the Macro group.
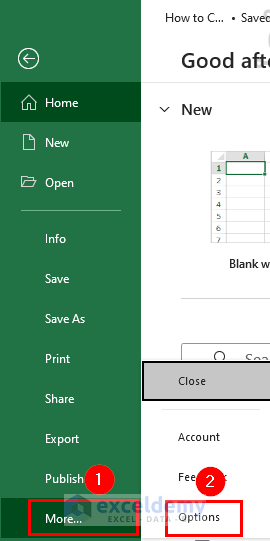
- Go to the File tab.
- Select Options.
- The Excel Options dialog box will appear.
- From Customize Ribbon, go to the View tab and expand the View tab.
- Select Macros and click on New Group.
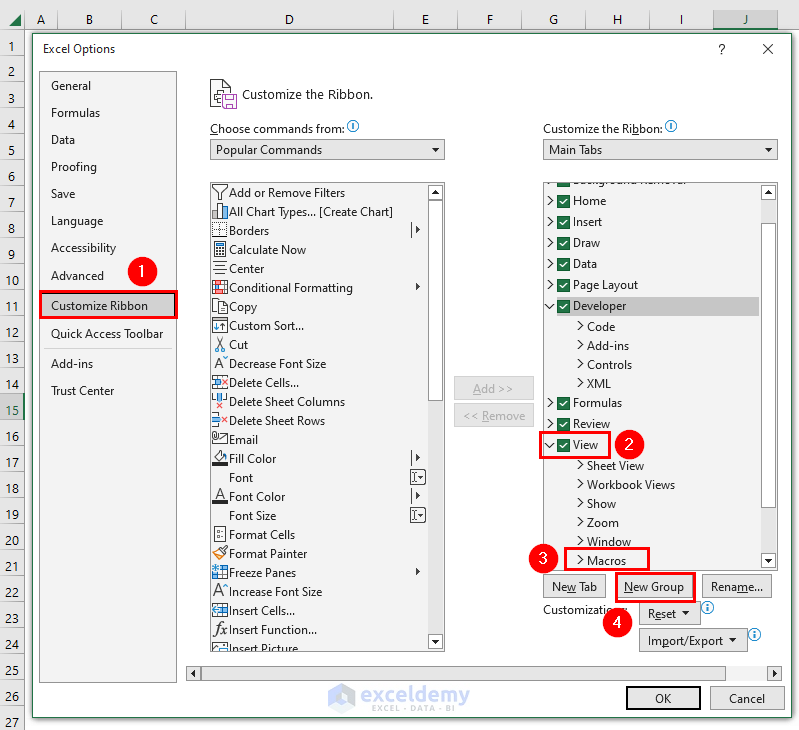
- You can see a New Group under the Macro group.
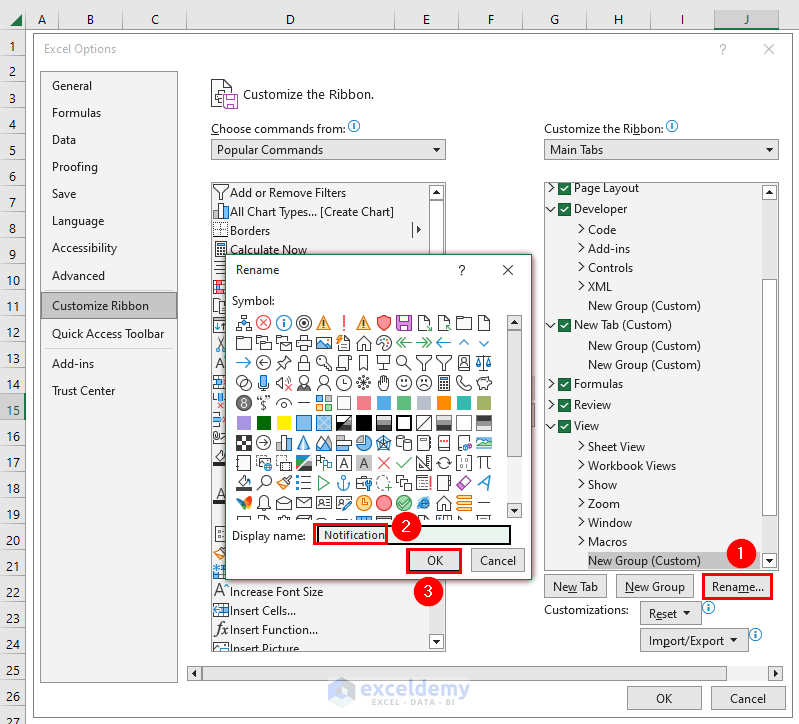
- Click on Rename.
- A Rename dialog box will appear.
- Type Notifications in the Display Name box and click OK.
- Click on the drop-down icon in the Choose commands from box and select Macros.
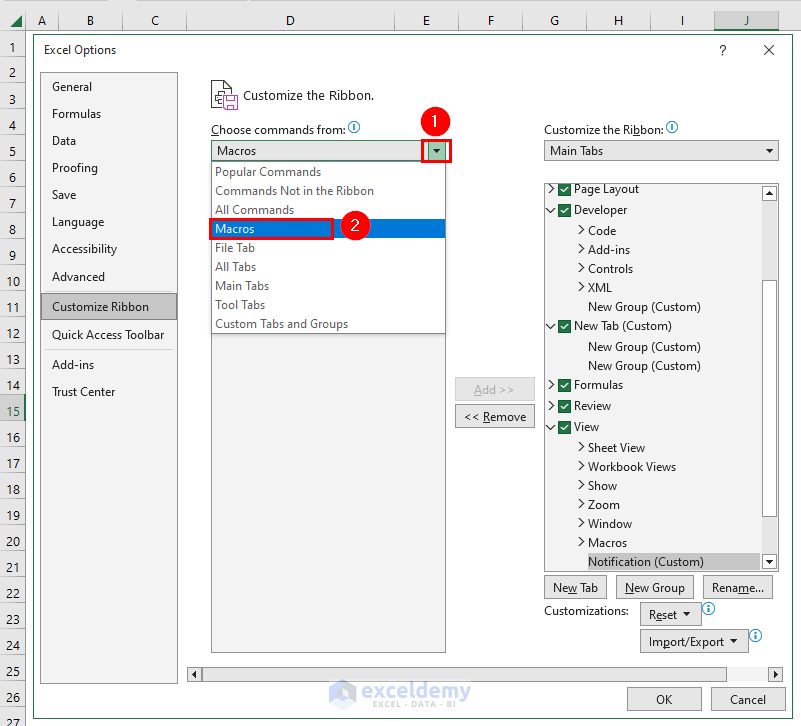
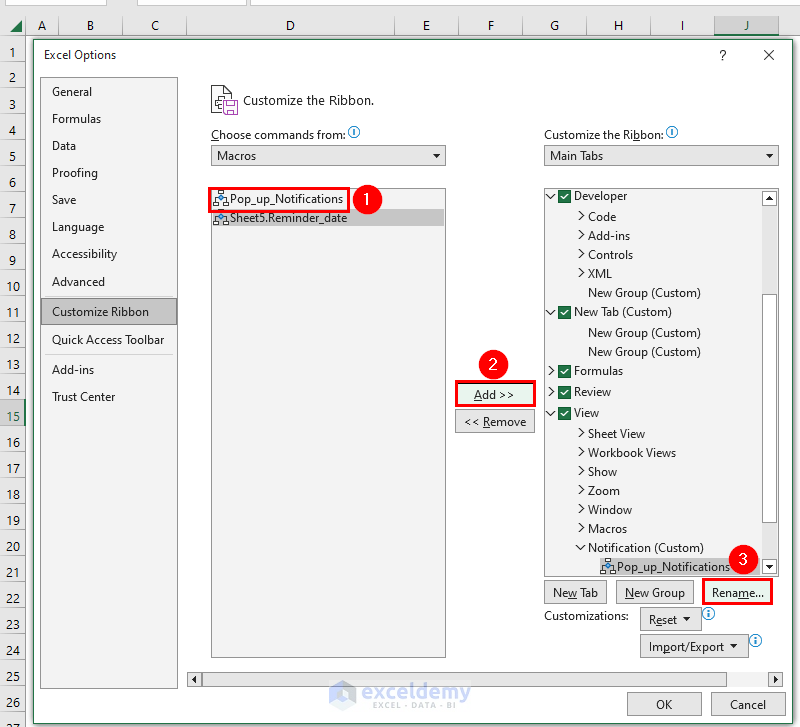
- Select Pop_up_Notification which is the Sub of our code.
- Click on Add and select Rename.
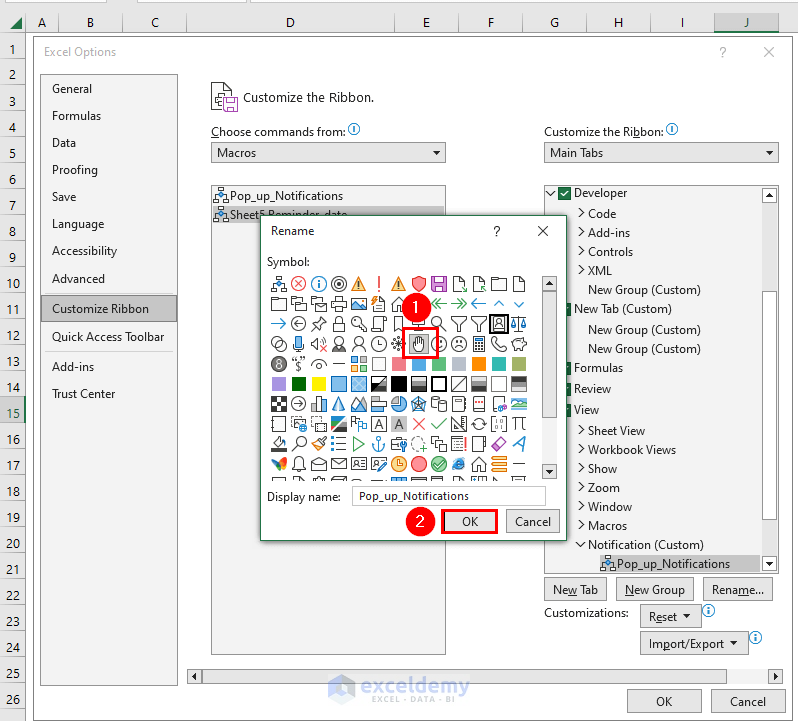
- Select a Symbol to show the ribbon. We selected a Hand symbol.
- Click OK.
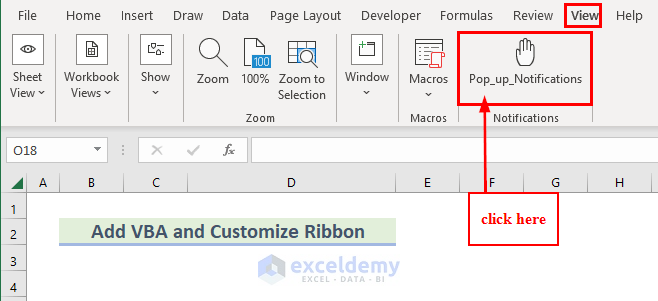
- You can see a Pop_up_Notifications ribbon in the View tab.
- Click on Pop_up_Notifications.
- An Input box will appear.
- Input a time at which you want the notification and click OK.

- Another message box will appear.
- Type the message and click OK.

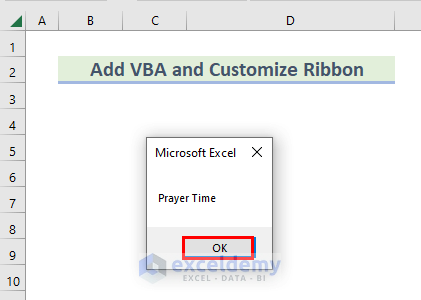
- Excel will send a notification at the set time and you’ll hear a notification sound.
Note: You must add the customized ribbon and assign the code if you want this method to work in your Excel sheet. Otherwise, downloading the above Excel file will not execute this method.
Practice Section
You can download the following Excel file and practice the explained methods.
Download the Workbook
Related Articles
- How to Generate Automatic Email Alerts in Excel
- How to Create Alerts in Excel
- How to Disable Alerts in Excel VBA
<< Go Back to Alerts in Excel | Learn Excel
Get FREE Advanced Excel Exercises with Solutions!

Good morning,
Your VBA code for 4th example does not work.
The Next Due line of code does not run.
Hello Rupert,
Sorry to hear about your trouble. But this code is working for use. You can try the following steps to run this code successfully.
• You can Right-click on the sheet name to open the code window for writing the code.
• After writing down the code in the window when you will try to run it, you will see the sheet name before the sub procedure name like below.
• After running the code in this way, we got the following result.
• Moreover, you can try to remove Option Explicit from the first line of the code.
Hope this will work for you.
Best Regards
ExcelDemy
The VBA code has not worked for me either!…. I get a Compile error: Invalid Next control variable reference, and I cut and paste your code in, to make sure I did not misprint any detail
Hi Paulie,
Thanks for your comment. The VBA code is working completely fine from our end. Can you please share your workbook (.xlsm) file so we can check and find out the error easily?
Regards
ExcelDemy Team
I see the error the other users have found in the code snippet specifically on this page vs in the download —The code on this page starts using the variable “due_date”, but part way down changes to “Due”; the code as downloaded uses “Due” all the way through and does not use “due_date”.
Code as on this page:
Sub Reminder_date()
Dim date_col As Range
Dim due_date As Range
Dim pop_up_reminders As String
Set date_col = Range(“D5:D9”)
For Each due_date In date_col
If due_date “” And Date >= due_date – Range(“D11″) Then
pop_up_reminders = pop_up_reminders & ” ” & Due.Offset(0, -2)
End If
Next Due
If pop_up_reminders = “” Then
MsgBox “do not go for today”
Else: MsgBox “Contact these buyers ” & pop_up_reminders
End If
End Sub
Code from download:
Option Explicit
Sub Reminder_date()
Dim DueDate_Col As Range
Dim Due As Range
Dim PopUp_Notification As String
Set DueDate_Col = Range(“D5:D9”)
For Each Due In DueDate_Col
If Due “” And Date >= Due – Range(“D11″) Then
PopUp_Notification = PopUp_Notification & ” ” & Due.Offset(0, -2)
End If
Next Due
If PopUp_Notification = “” Then
MsgBox “No need to chase any buyer today.”
Else: MsgBox “These buyers need chasing today: ” & PopUp_Notification
End If
End Sub
Hello JULIA MANDEVILLE,
We hope you are doing well. You got the exact mismatch between the code on the article and the code on the Excel file. That was very unfortunate and we really appreciate your feedback, thank you so much. We have fixed it on the article and Excel file.
Thanks and regards,
Md. Sourov Hossain Mithun
Team ExcelDemy