
Image by Editor
Collaboration on documents is an essential part of any professional or academic project. Microsoft Word’s Track Changes and Comments features are powerful tools for collaborative document editing. It helps teams work together efficiently, providing a seamless method for editing and reviewing documents.
In this tutorial, we will show how to use track changes and comments for efficient collaboration in Microsoft Word.
Track Changes Basics
First, let’s enable Track Changes so that all edits and changes are visible to collaborators.
Enabling Track Changes:
- Open the document you want to collaborate on in MS Word.
- Go to the Review tab >> from Tracking >> select Track Changes.

- The button will become highlighted, indicating that Track Changes is now active.

Understanding Tracked Changes:
- Insertions: Any new text you type will appear underlined. Typically shown in a different color.
- Deletions: Any deleted text will be crossed out. Usually displayed as strikethrough text or in balloons in the margin.
- Formatting changes: Changes in formatting (like bold, italics, font size, etc.) will also be highlighted. Indicated by small markers or in the markup area.

Viewing Options:
In the Review tab, click the All Markup dropdown to choose:
- Simple Markup: Shows the final document with indicators where changes exist.
- All Markup: Displays all edits visibly in the document.
- No Markup: Shows how the document will look with all changes accepted.
- Original: Shows the document before any edits were made.

Example: If you switch from All Markup to Simple Markup, the red vertical line in the margin indicates where changes exist, but the text appears as final without visible edits.
Working with Comments
Adding Comments:
- Select the part of the document where you want to add a comment.
- Go to the Review tab >> from Comments group >> select New Comment.
- A comment balloon will appear on the right side of the document.
- Type your comment in the comment bubble that appears.

Collaborative Workflow
Let’s consider a scenario where you created the initial draft of the “Global Product Launch Proposal” on the team’s SharePoint.
1. Share with Track Changes Enabled
- Enable Track Changes.
- Click Share in the top-right corner.
- Types colleagues’ emails: [email protected] and [email protected]
- Adds a note: “Please review and edit with Track Changes enabled. Focus on the Sales section, John, and Marketing data, Sara.

2. Making Edits with Track Changes
Once Track Changes is enabled, users can start editing the document. Edits are automatically tracked and shown in a different color.
Original Text:
” will target the market through online and offline campaigns.”
After enabling Track Changes, let’s update the original text.
Modified Text:
“will target the market through online campaigns like social media ads and offline campaigns such as trade shows.”
Changes:
- The inserted parts, “online campaigns” and “offline campaigns,” are underlined.
- The “trade shows” in bold format emphasize the offline approach, which will appear in bold formatting.

- Go to the Review tab >> select Reviewing Pane.

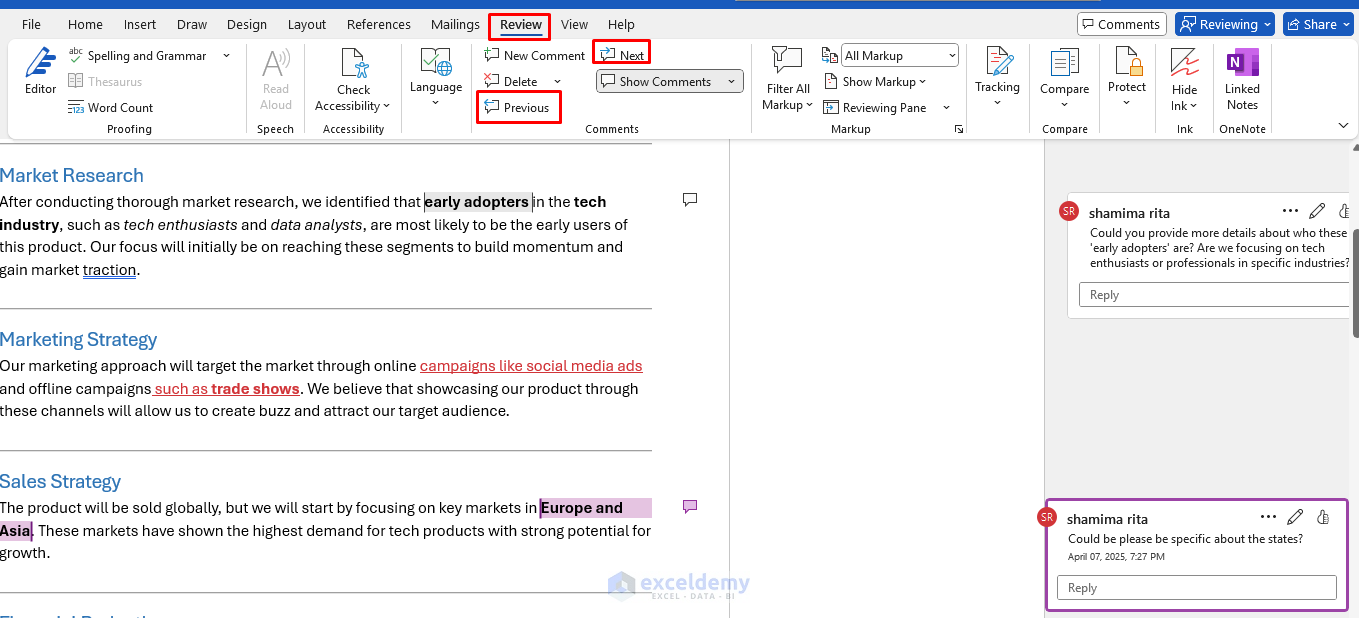
3. Using Comments for Feedback
Comments allow you to leave feedback or ask questions without directly changing the text. This is especially useful for asking for clarifications or suggesting improvements.
- Select the part of the document where you want to add a comment.
- Go to the Review tab >> from Comments group >> select New Comment.
- Type the following comment in the comment bubble that appears.
In the business proposal, you might want to clarify a specific section. For example, the sentence might be:
“We will target early adopters as our first customer segment.”
- Highlight early adopters and add a comment:
Comment: “Could you provide more details about who these ‘early adopters’ are? Are we focusing on tech enthusiasts or professionals in specific industries?”

This allows the document’s author to clarify or expand on the target customer segment before finalizing the proposal.
4. Reviewing and Accepting Changes
Once edits and comments have been made, the next step is to review them and decide which changes should be kept or rejected.
Navigate Changes:
- Go to the Review tab >> select Next and Previous buttons to move between tracked changes and comments.

Accept or Reject Changes:
To accept a change, you can use the Accept option. This will incorporate the change into the document.
- Go to the Review tab >> select Tracking >> select Accept >> select options from the drop-down.

To reject a change, use the Reject option. This will remove the change and return the document to its original state.
- Go to the Review tab >> select Tracking >> click Reject >> select options from the drop-down.

Review Comments:
- Go to the Review tab >> from the Comments section >> click Next or Previous to navigate between comments.
- Click directly on comment bubbles in the margin.
- To see the Comments pane, go to the Review tab >> from the Comments section >> select Show Comments.
- Respond to any feedback or provide clarifications.
Let’s say the comment on “early adopters” raised a question that needed clarification. After reviewing, you could decide to accept the added detail “tech enthusiasts” and incorporate it into the text. The final sentence would look like this:
“We will target early adopters such as tech enthusiasts as our first customer segment.”
5. Finalizing the Document
Once all the changes have been reviewed and accepted, the final version of the document can be completed.
Finalize the Document:
- Turn off Track Changes: Go back to the Review tab >> select Tracking >> click Track Changes to deactivate it.
- Accept or Reject Changes: Go back to the Review tab >> select Tracking >> select Accept or Reject to finalize the document.
- Resolve Comments: Click on the three dots of the comments >> select Resolve thread.
- Delete Comments: Go to the Review tab >> click on Delete >> choose Delete All Comments in Document to remove all comments.
- Save or Print: Save the finalized document or prepare it for distribution.
The document would now be clean, and the final version could look like this:

Advanced Features
Comparing Documents:
If collaborators have worked on separate versions:
- Go to the Review tab >> from Compare >> select Compare.
- Select the original and revised documents.
- Choose comparison settings and click OK.

Restricting Editing:
- Go to the Review tab >> select Protect>> select Restrict Editing.
- Choose which types of changes are allowed.
- Set password protection if needed.

Best Practices for Collaborative Editing
To improve collaboration, consider the following best practices:
- Be Clear and Specific: When adding comments or changes, provide clear and actionable feedback.
- Example: “Consider adding a budget breakdown for the first quarter of the year” instead of a vague comment like “More details are needed.”
- Review Changes Regularly: Stay on top of edits and comments so that everyone’s feedback is addressed in a timely manner.
- Example: Set a review timeline (e.g., “Review by Friday, finalize by Monday”) to keep everyone on track.
- Use Color Coding: Word automatically assigns different colors to different reviewers. This makes it easy to track who made what changes, especially in larger documents.
- Ensure Consistency: When editing, try to maintain consistency across the document, especially for things like style, tone, and terminology.
Conclusion
By using Track Changes and Comments, you can collaborate effectively on professional documents, such as business proposals, contracts, reports, and more. These features provide a streamlined way to make, review, and finalize changes, ensuring that all collaborators have an opportunity to contribute, provide feedback, and review modifications in an organized manner. Our tutorial includes the use of track changes, comments, and collaboration with other users in MS Word.
Get FREE Advanced Excel Exercises with Solutions!
