Overview of Balloon Payments
The balloon payment is a type of payment that does not fully amortize over a due transaction period. So it has to be paid as a sum either at the end or in the middle of the period. In other words, it is the large payment due at the end of the balloon loan. These types of loans can be any type of amortized loan. The earlier payments of these loans are structured in such a way that the amount is way smaller in comparison and a large payment is generally due at the end of the period.
Mathematically, the formula for a balloon payment can be summed up as:
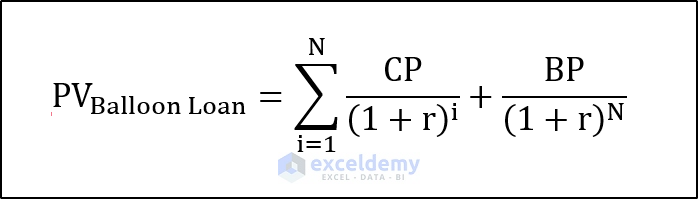
CP = Constant Payment,
BP = Balloon Payment,
N = Number of Payments,
r = Discount/Interest Rate.
How to Calculate a Balloon Payment in Excel: 2 Easy Methods
Method 1 – Using the FV Function
Steps:
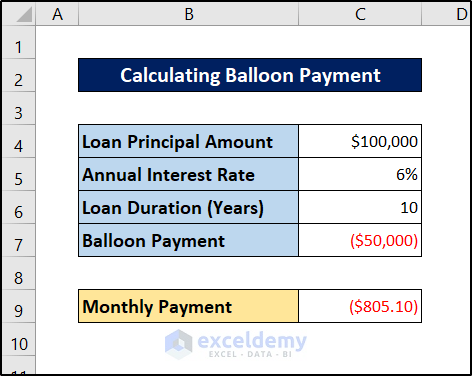
- Enter the parameters in your Excel sheet: the principal amount, interest, duration, and monthly payment.

- Select a cell to store the balloon payment value. We chose cell C9 for this.

- Insert the following formula in it.
=FV(C5/12,C6*12,C7,-C4)
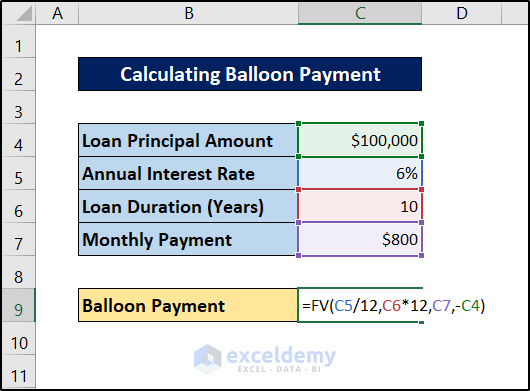
- Press Enter.
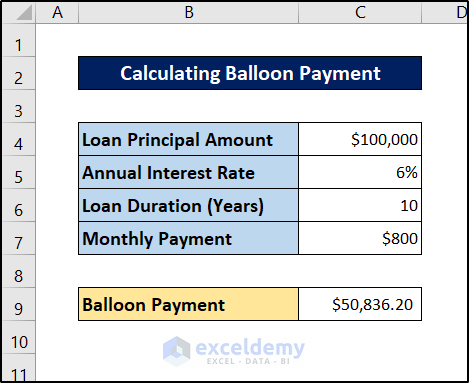
This is the amount you have to pay after the ten years if you continue to pay eight hundred dollars each month.
Read More: How to Calculate Monthly Mortgage Payment in Excel
Method 2 – Utilizing the PV Function
Steps:
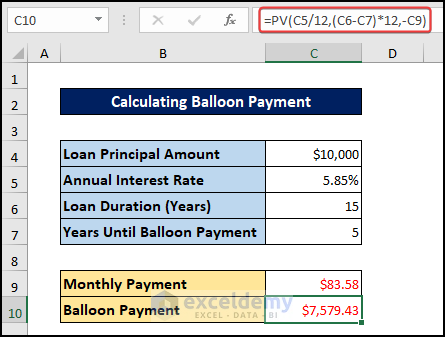
- Enter the parameters in your Excel spreadsheet.
- Select a cell to store monthly payments in the spreadsheet. For example, we are selecting cell C9.

- Insert the following formula in it.
=PMT(C5/12,C6*12,C4)
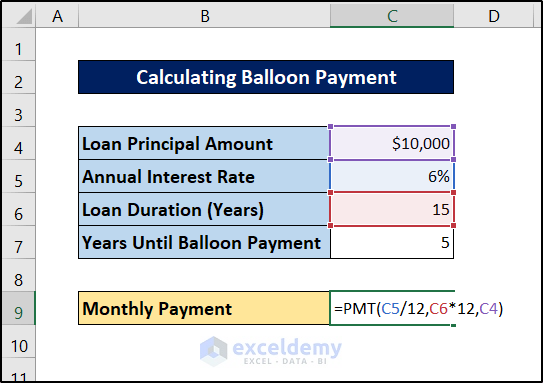
- Press Enter.

- Select a cell to store the balloon payment value. We are selecting cell C10.
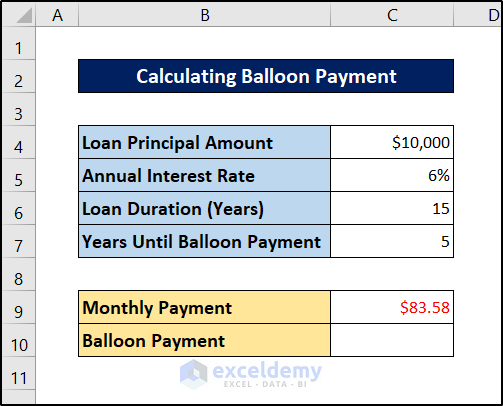
- Insert the following formula.
=PV(C5/12,(C6-C7)*12,-C9)

- Press Enter.

Note
Both the monthly payment and the balloon payment values here are cash outflows, which show as negative values.
Read More: How to Calculate Monthly Payment with APR in Excel
How to Calculate a Monthly Payment from the Balloon Payment in Excel
Let’s assume we have a balloon payment already fixed. You can calculate the monthly payment from the balloon payment considering the interest.
Steps:
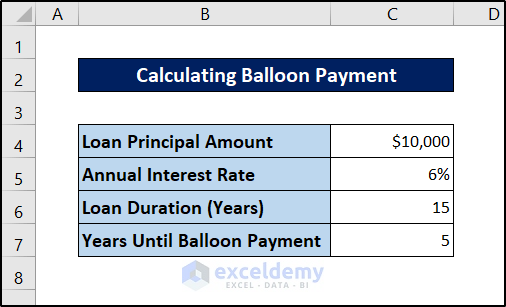
- Enter the parameters on your Excel spreadsheet. Put the balloon payment in a negative value.
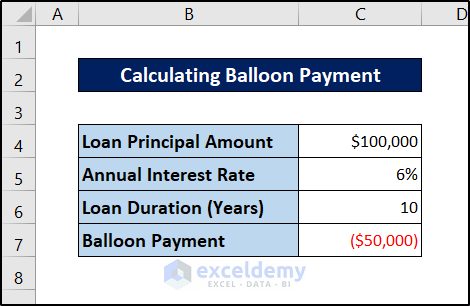
- Select a cell to store the monthly payment value. We have selected cell C9 for the demonstration.

- Insert the following formula.
=PMT(C5/12,C6*12,C4,C7)
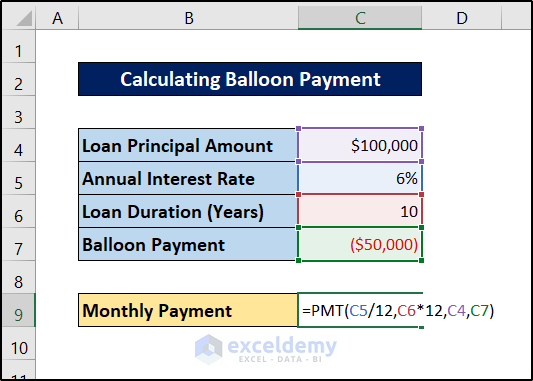
- Press Enter.
The value will be a negative number as it represents cash outgoing cash.
Read More: How to Calculate Loan Payment in Excel
Things to Remember
- Use the FV function to calculate the balloon value if you have the amount you will pay at each transaction already fixed.
- Use the PV function to calculate balloon payments if you have a period already fixed after which you want to pay in bulk.
- Interest rate and loan duration should be in the same time units. Divide or multiply these values to match each other.
Download the Practice Workbook
Related Articles
- How to Calculate Down Payment in Excel Using VLOOKUP
- How to Calculate a Lease Payment in Excel
- How to Calculate Coupon Payment in Excel
- How to Calculate Auto Loan Payment in Excel
- How to Calculate Car Payment in Excel
<< Go Back to Calculate Payment in Excel | Excel for Finance | Learn Excel
Get FREE Advanced Excel Exercises with Solutions!

I was following along with your tutorial and getting different results from those shown. In particular, I was using 6% as the interest rate. I downloaded the example file and found that the interest rate was displaying 6% as a rounded number, but was calculating based on an interest rate of 5.85%.
Hi Tom R,
Thanks for your comment. The numeric values are not a big issue. Our main focus is to demonstrate the procedure so that you can understand it and implement it in your regular life. Moreover, we also recommend our users download our Excel workbook first to overcome such misunderstandings.
However, we are providing an updated image of that part for your convenience.
is there a way to use the FV to calculate a balloon payment that incorporates quarterly extra principal payments?
Hello Andrea L McCormack,
Yes, you can adapt the FV function to calculate a balloon payment with extra quarterly principal payments. To do this, you would adjust the payment parameter in the FV function to include both the regular payment and the extra principal.
However, depending on the loan structure, this might require setting up a more detailed cash flow model. Excel’s PMT and IPMT functions can also be useful for tracking how each payment impacts the remaining balance leading to the final balloon payment.
Let’s consider an example:
Loan amount: $50,000
Interest rate: 5% annually (1.25% quarterly)
Loan term: 5 years (20 quarters)
Regular quarterly payment: $1,000
Additional quarterly payment: $200
Determine the adjusted quarterly payment: Sum your regular payment and extra principal payment:
1000+200=1200
Use the FV formula: In Excel, use =FV(rate, nper, pmt, pv):
=FV(1.25%, 20, -1200, -50000)
The result will be the remaining balance after 20 quarters, giving you the balloon payment amount at the end of the term with quarterly extra payments.
Regards
ExcelDemy