The use of screenshots is very common today. In terms of Excel when we do not want to share the whole Excel file with others, just want to share only a single sheet or a part of a sheet. We can do this by taking a screenshot of the required section and sharing that. There is also an advantage in taking a screenshot of an Excel worksheet, others will not get the formula or other technique used in the worksheet. Now, here we will discuss how to take a screenshot and attach it in Excel.
How to Take a Screenshot of an Excel Sheet on a Laptop
Before demonstrating how to attach screenshots in Excel, here, we will learn how to take a screenshot of an Excel sheet on a laptop or desktop. We can use different applications to take a screenshot like PicPick, ShareX, Snagit, etc. But Windows has dedicated features to take a screenshot. One is a keyboard shortcut and the other is a built-in application named Snip & Sketch.
Using Keyboard Shortcut:
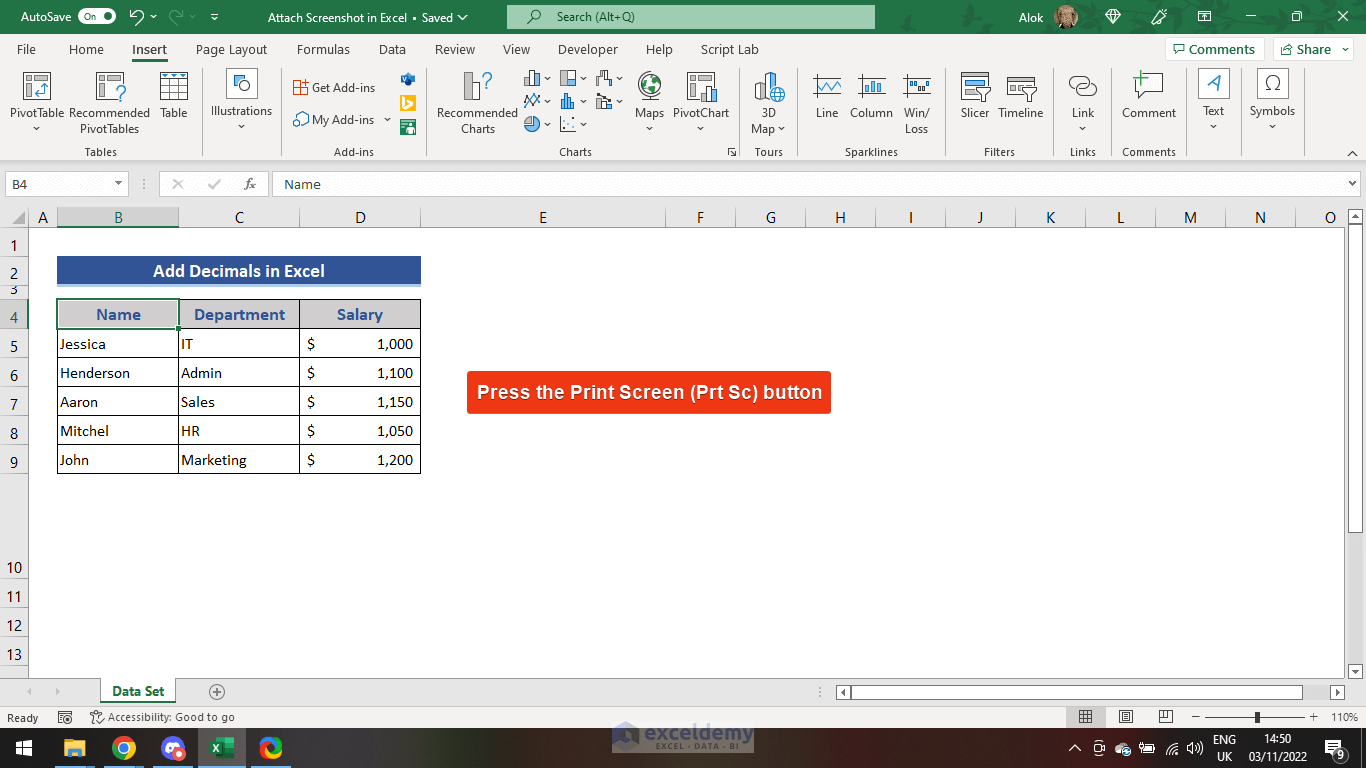
- Open the Excel worksheet. Then, press the Prt Sc button from the keyboard.
- Now, open a Microsoft Word file and press Ctrl + V.
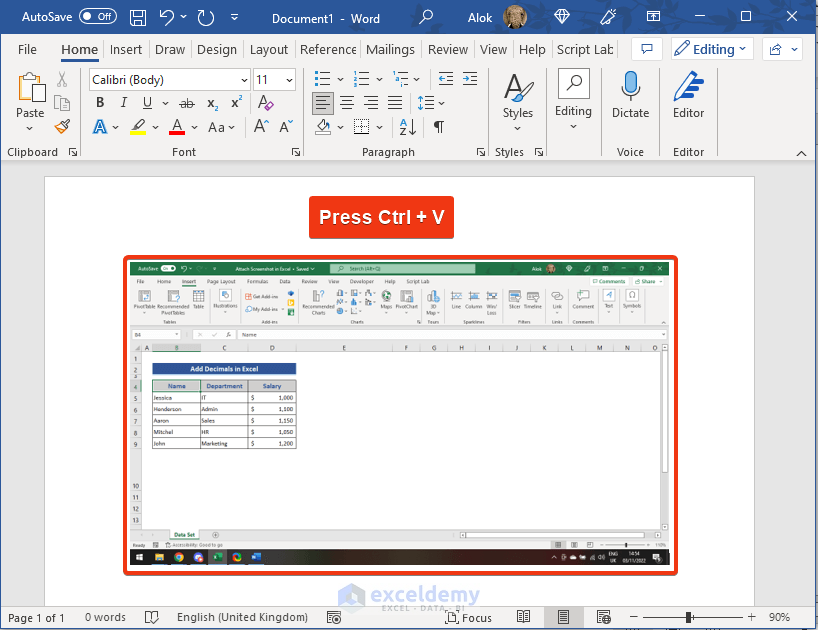
A captured screenshot has been placed in the word file. We can also paste the screen into any other document file like Google Docs. We can paste that in Paint to resize or for any kind of customization.
Use of Spin & Sketch Application:
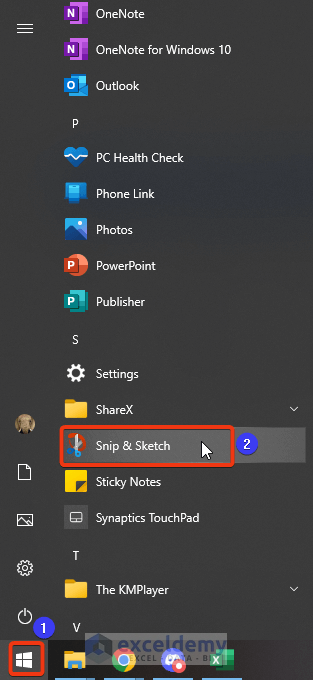
- Click on the Start button from the desktop taskbar.
- Select the Snip & Sketch option from the list.
- The Snip & Sketch window appears. Click on the New option from that window.
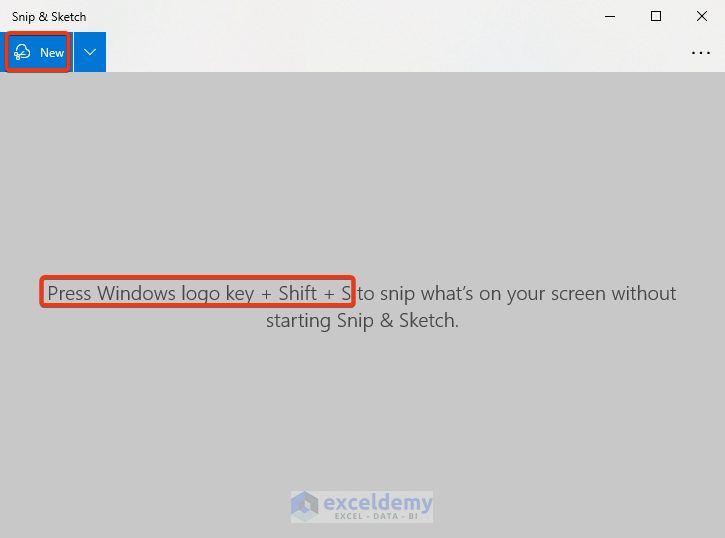
There is also a keyboard shortcut for this app. Press the Window + Shift + S and enable this feature.
- A Plus symbol (+) is showing on the screen. Scrolling this symbol will select our desired part from the screen.
- Before doing this, we need to choose the shape of the screenshot from the section marked 1.
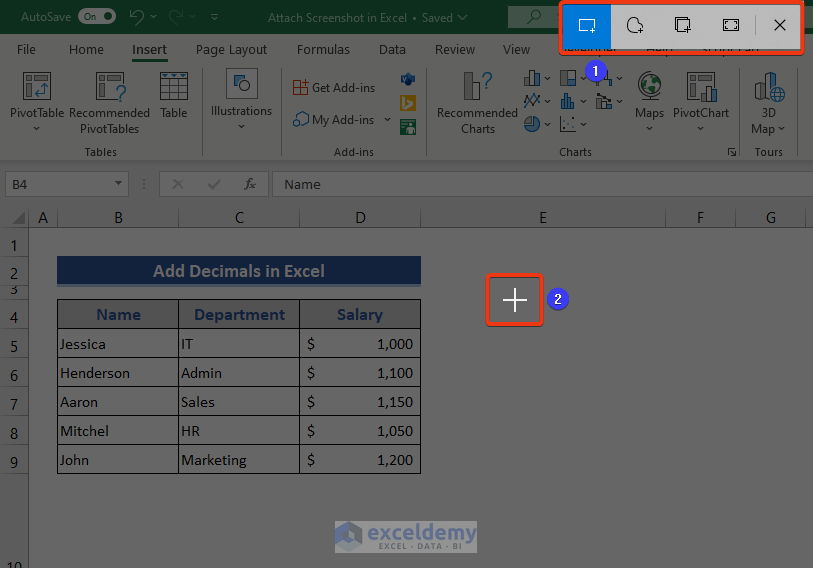
- Now, keep pressing the left button of the mouse. Then, choose our desired part from the screen by cursor showing as a plus symbol.
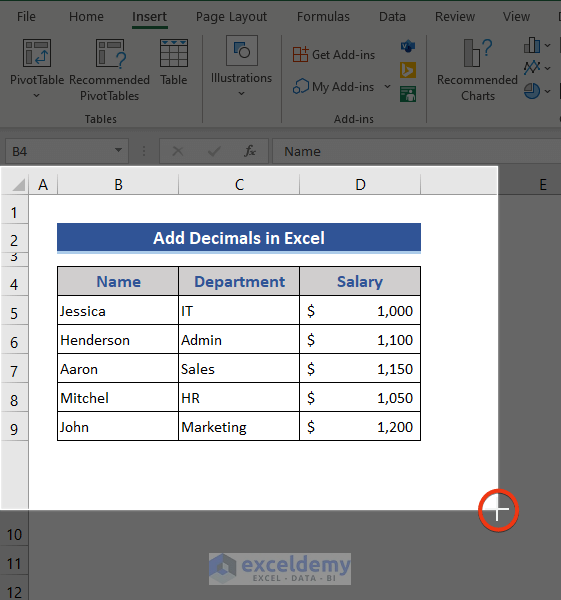
- Leave the mouse button. Our screenshot is showing here.
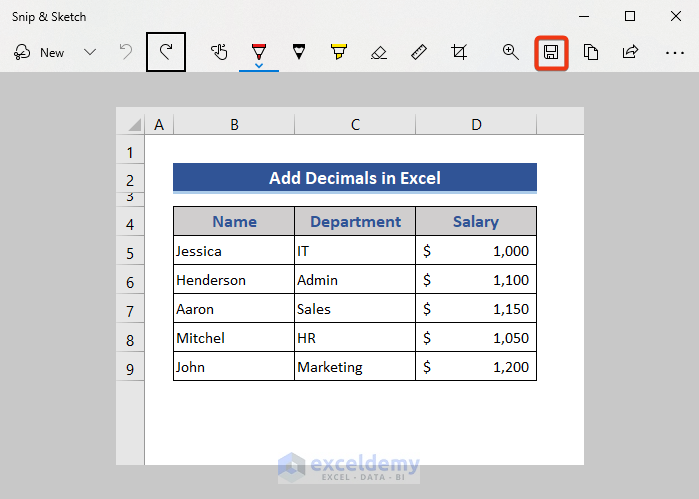
- Now, save the image from the Save button marked at the upper side of the window.
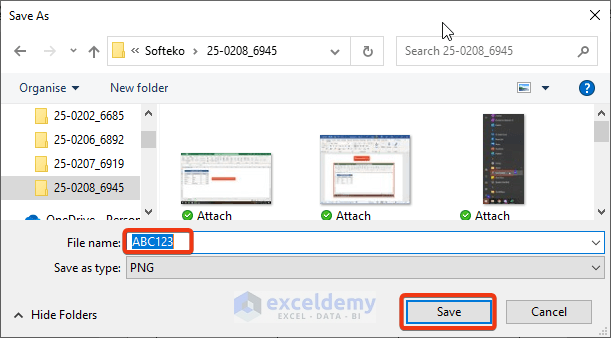
- Then, we will enter the File Explorer and save the image in the desired location inputting a name.
- Finally, press the Save button.
How to Attach Screenshot in Excel
In this section, we will discuss all the steps in detail to attach a screenshot in Excel.
Step 1: Choose the Screenshot
- First, open a new Excel file.
- Then go to the Insert tab.
- Choose the Screenshot option from the Illustrations field.
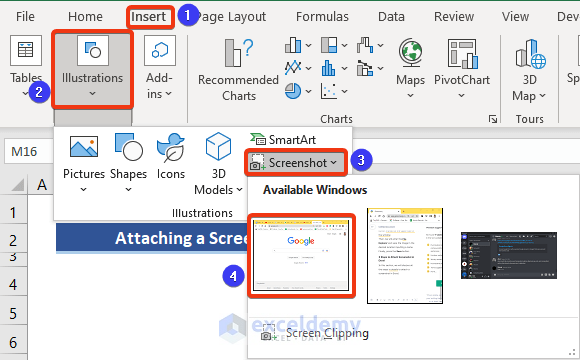
From the Screenshot, we get the available windows open on the laptop. Select the desired one.
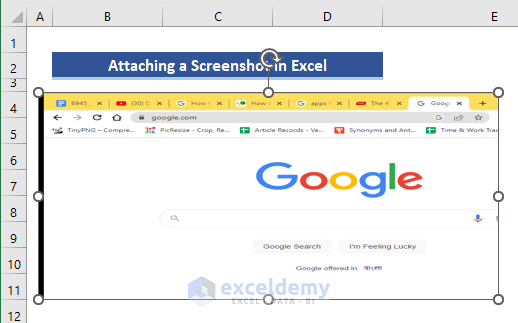
- Look at the worksheet.
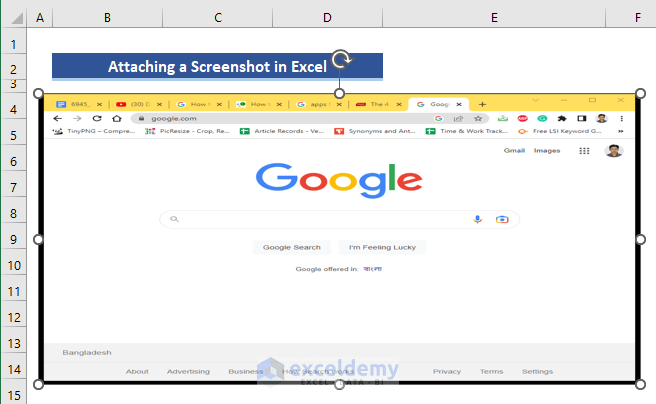
We can see a screenshot has been attached.
Read More: How to Insert PDF as Image in Excel
Step 2: Crop the Screenshot
It may not be necessary to use the whole image in the worksheet. We need to attach a certain part of the image.
- Now, click on the screenshot. The Picture Format tab added here. We can perform a different operation on the image using this tab.
- Click on the Crop option from the Size group.
- We can see an 8-border mark in the screenshot.
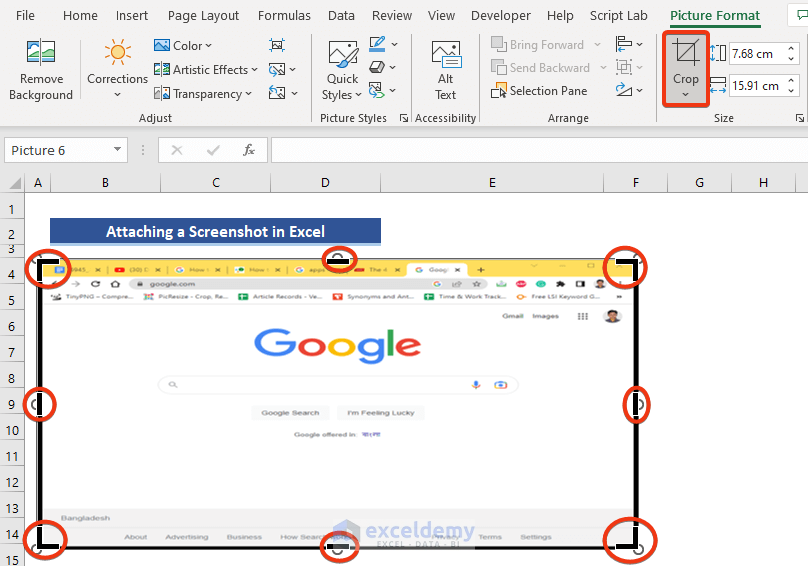
- Now, place the cursor on the right-bottom border mark. Keep pressing the left button of the mouse and scroll to the left-upper side to select the desired part.
- Leave the mouse button and click on the Crop option.
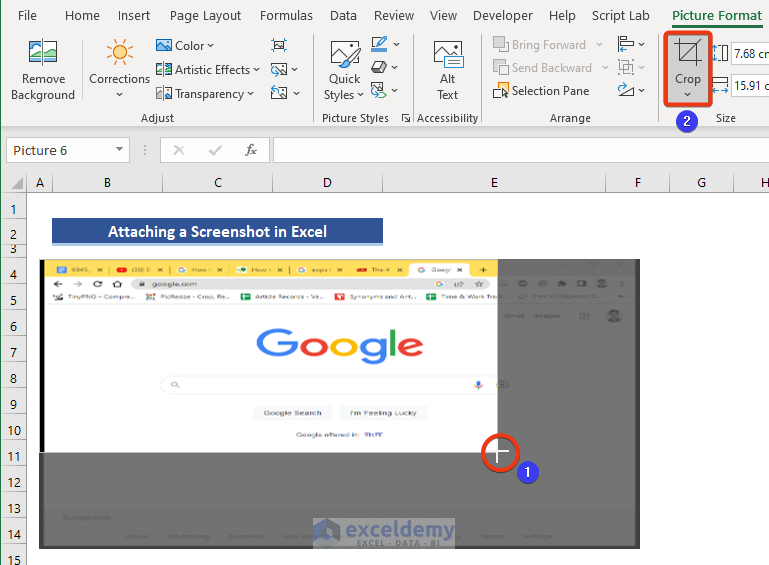
- We can see the unnecessary portion of the screenshot has been removed.
Step 3: Resize the Screenshot
Now, we will learn how to resize the screenshot.
- We get this option in the Size group.

We can customize this image according to our requirements. There is another option to attach a screenshot in Excel.
Alternative Way to Attach Screenshot:
There is another option to attach a screenshot in Excel.
- If we save our required screenshots previously, we can use the Picture option from the Illustrations section.
- Then, choose the This Device option.
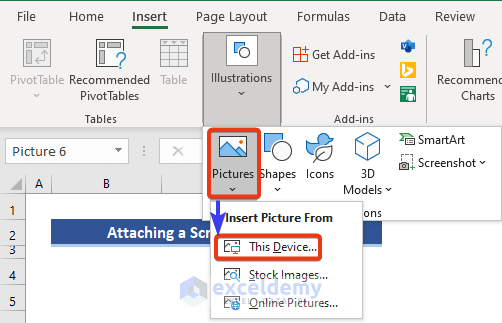
By selecting this option we will enter the File Explorer and choose our desired screenshot that was previously taken.
Read More: How to Attach PDF File in Excel
Download Practice Workbook
Download this practice workbook to exercise while you are reading this article.
Conclusion
In this article, we described the whole process of how to attach a screenshot in Excel. We also showed how to take screenshots in Excel. I hope this will satisfy your needs. For any further queries, comment below.
Related Articles
- How to Insert an Excel File into Another Excel File
- How to Attach Email in Excel
- [Fixed!] Cannot Insert Object in Excel
- [Fixed!] Cannot Insert PDF into Excel
- How to Attach Zip File in Excel
- How Do I Insert a Multiple Page PDF into Excel
- How to Attach Documents in Excel
<< Go Back to Attach File in Excel | Learn Excel
Get FREE Advanced Excel Exercises with Solutions!
