Excel can turn into a mini app platform when it’s structured with clear formatting, a hidden logic layer, buttons, forms, and dynamic interactive features. By combining buttons, form controls, and hidden logic, you can build interactive tools for data entry, dashboards, or process tracking.
In this tutorial, we will show how to turn Excel into a basic app using buttons, forms, and hidden logic.
Step 1: Plan the App Features
To turn Excel into an app, you need to plan what you want and what your app will do. Let’s assume we will create an app that takes orders using a form and stores the order data.
To do so, create these sheets:
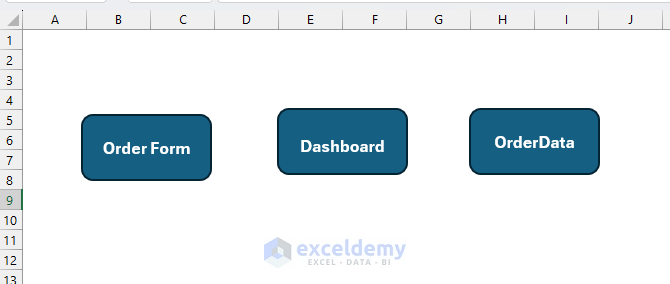
- Home: A clean landing page with big buttons (“Add Order”, “OrderData” “Dashboard”).
- Form: User-facing inputs (drop-downs, date, number fields) with Submit Order button.
- OrderData: A single Excel Table that stores all records (think of it as your database).
- Logic: A hidden sheet for helper tables, named ranges, validation rules, and ID counters.
- Dashboard: If you want, you can create a dashboard from the sales data with small KPI cards and charts fed by the Logic sheet.
Step 2: Create the Order Form Sheet
- Create a new sheet named Order Form.
- In column A, list the following input labels:
- Order ID
- Date
- Category
- Product
- Units
- Unit Price
- Total Amount
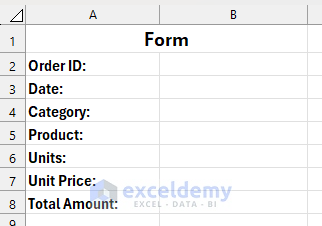
- In column B, leave empty cells for entry:
- Format the form nicely:
- Adjust column widths.
- Add cell borders.
Step 3: Add Form Controls
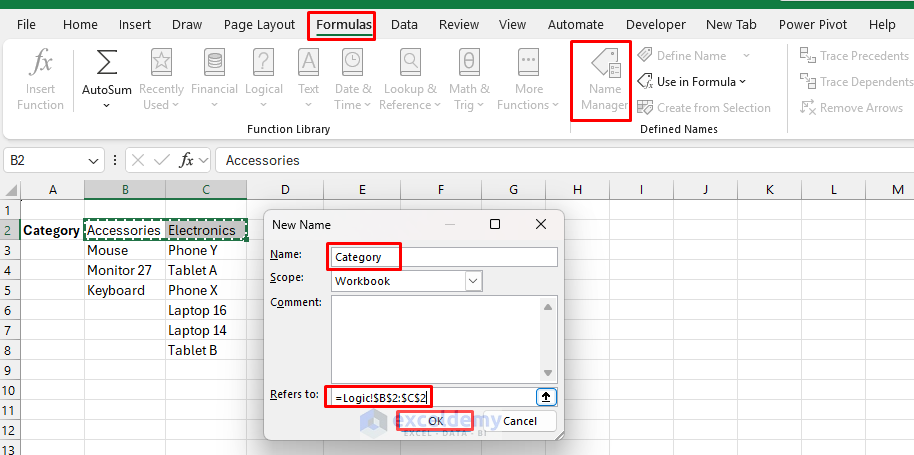
To make the form dynamic and interactive, you can use Drop-down Lists. In a logic sheet, list all the information like Category, Product, Price, etc. Then create named ranges to use in the form controls.
Create Named Ranges:
- List category with product names.
- Go to the Formulas tab >> select Name Manager >> select New.
Category:
- In Name: Category.
- In Refers to:
=Logic!$B$2:$C$2
Products:
- Select the category and products.
- Go to the Formulas tab >> select Create from Selection.
- Select the Top row.
- Click OK.

Unit_Price:
- Select product name and price.
- Go to the Formulas tab >> select Create from Selection.
- Select the Left column.
- Click OK.

Create Drop-Down Lists:
Category:
- Select cell B4.
- Go to the Data tab >> select Data Validation.
- Under Allow >> select List.
- In Source: Insert the named range.
- Click OK.
=Category

Product:
- Select cell B5 and create a dependent drop-down list.
- Go to the Data tab >> select Data Validation.
- Under Allow >> select List.
- In Source: Insert the following formula.
- Click OK.
=INDIRECT(B4)
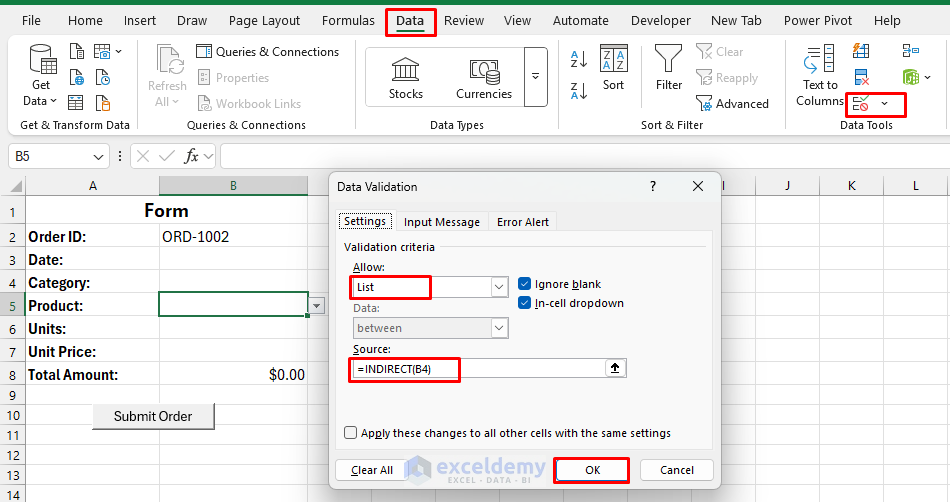
- You can select a product based on a category.
Units:
- Select cell B6.
- Go to the Data tab >> select Data Validation.
- Under Allow >> select List.
- In Source: Insert the list upto 10.
- Click OK.
1,2,3,4,5,6,7,8,9,10

Units Price:
- Select cell B7.
- Go to the Data tab >> select Data Validation.
- Under Allow >> select List.
- In Source: Insert the following formula.
- Click OK.
=INDIRECT(SUBSTITUTE(B5, " ", "_"))
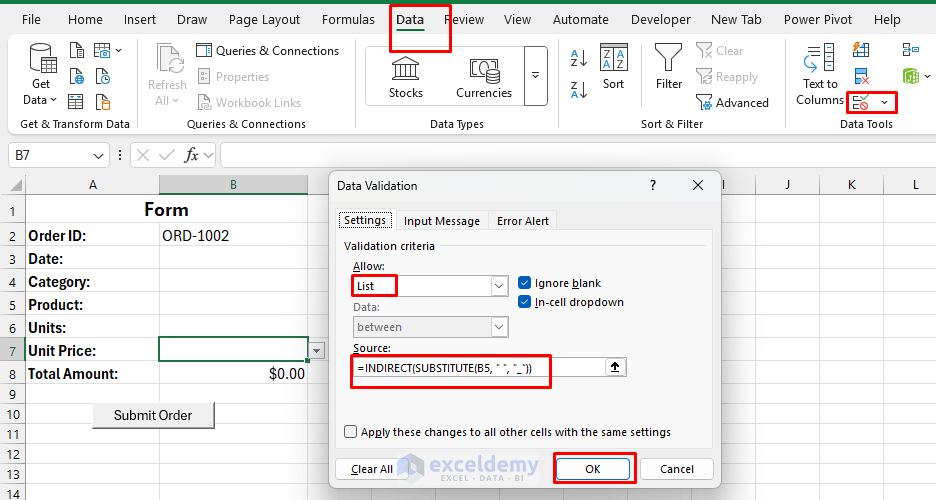
- It’s a dependent drop-down list.
- You can select a price based on the product.
Add a Submit Button:
- Go to the Developer tab >> select Insert >> select Button from Form Controls.
- Draw the button under the form.
- Name it “Submit Order”.
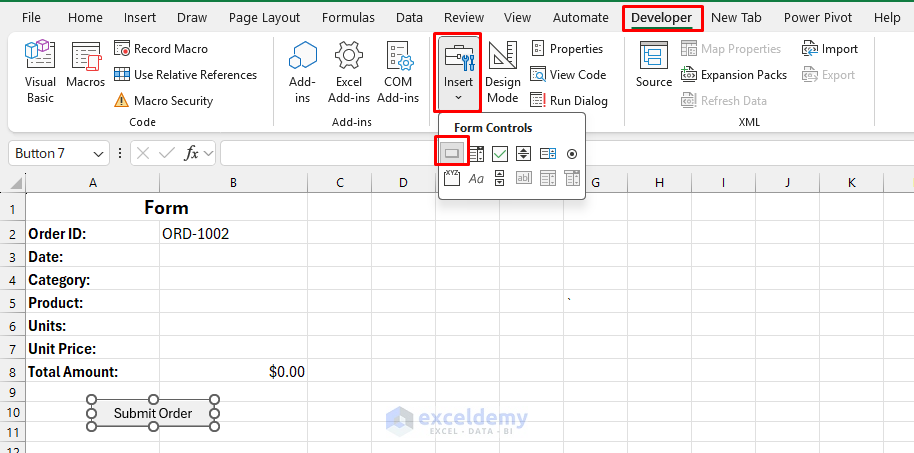
- Leave it for now, we’ll assign a macro in Step 5.
Step 4. Create an Order Database and Dashboard Sheet
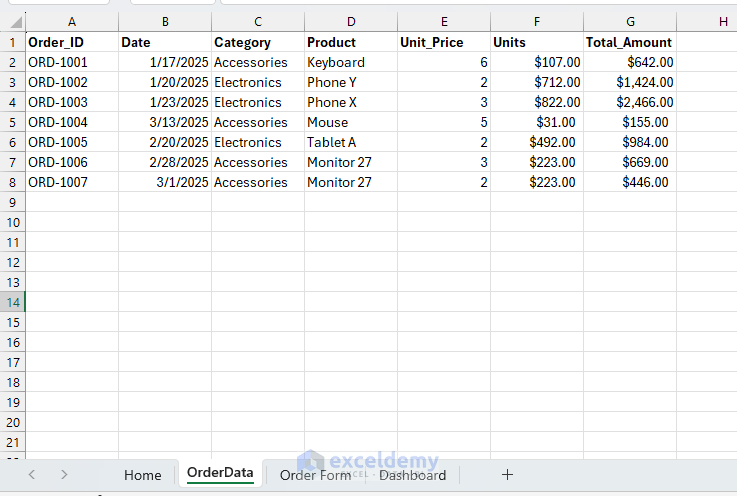
- Add a new sheet named OrderData.
- In Row 1, add the following headers:
- Order_ID
- Date
- Category
- Product
- Unit_Price
- Units
- Total_Amount

- We’ll hide this sheet later to keep the backend away from users.
Step 5: Add the VBA Logic
Now, we will use VBA code to submit the form data in the orderdata sheet. This VBA code will copy the form data to the database and clear the form for the next entry.
- Right-click the SubmitOrder button >> Assign Macro >> click New.

- Insert the following code.
Sub SubmitOrder()
    Dim wsForm As Worksheet, wsDB As Worksheet
    Dim nextRow As Long
    Dim lastOrderID As String
    Dim newOrderNum As Long

    Set wsForm = ThisWorkbook.Sheets("Order Form")
    Set wsDB = ThisWorkbook.Sheets("OrderData")

    ' Find the next empty row in the database
    nextRow = wsDB.Cells(wsDB.Rows.Count, "A").End(xlUp).Row + 1

    ' Get last order ID (skip header)
    If nextRow = 2 Then
        ' No orders yet ? start from 1001
        newOrderNum = 1001
    Else
        lastOrderID = wsDB.Cells(nextRow - 1, 1).Value ' e.g., ORD-1005
        newOrderNum = CLng(Replace(lastOrderID, "ORD-", "")) + 1
    End If

    ' Save the current order to database
    wsDB.Cells(nextRow, 1).Value = "ORD-" & newOrderNum
    wsDB.Cells(nextRow, 2).Value = wsForm.Range("B3").Value ' Date
    wsDB.Cells(nextRow, 3).Value = wsForm.Range("B4").Value ' Category
    wsDB.Cells(nextRow, 4).Value = wsForm.Range("B5").Value ' Product
    wsDB.Cells(nextRow, 5).Value = wsForm.Range("B6").Value ' Units
    wsDB.Cells(nextRow, 6).Value = wsForm.Range("B7").Value ' Unit Price
    wsDB.Cells(nextRow, 7).Value = wsForm.Range("B8").Value ' Revenue

    ' === Safe clear: only values ===
    Application.EnableEvents = False
    wsForm.Range("B3").Value = vbNullString
    wsForm.Range("B4").Value = vbNullString   ' Category (keeps DV)
    wsForm.Range("B5").Value = vbNullString   ' Product (keeps DV)
    wsForm.Range("B6").Value = vbNullString   ' Units (keeps DV)
    wsForm.Range("B7").Value = vbNullString   ' Unit Price (keeps DV)
    wsForm.Range("B8").Formula = "=B6*B7"     ' Restore Revenue formula
    Application.EnableEvents = True

    ' Generate the next Order ID for the next entry
    wsForm.Range("B2").Value = "ORD-" & (newOrderNum + 1)

    MsgBox "Order submitted successfully!", vbInformation
End Sub
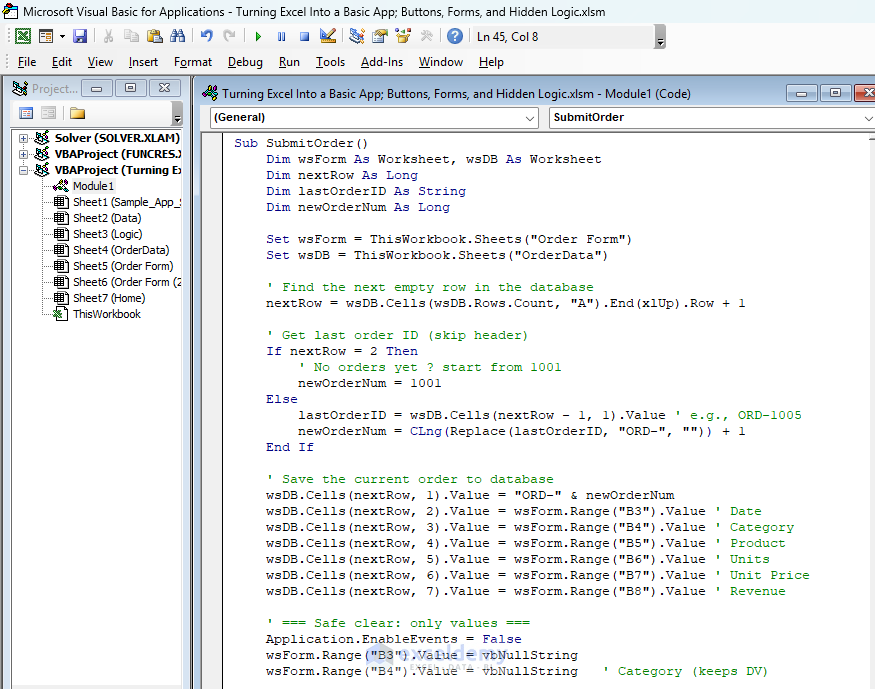
Explanation:
- The Order ID increments automatically after each submission.
- First submission starts at ORD-1001 if the database is empty.
- After each click:
- The macro checks the last stored order number.
- It increments it by 1.
- It fills B2 on the form with the next available ID.
- It will only clear values, not formulas or data validations, so the next entry starts fresh.
Step 6: Create Dashboard Sheet
Now you can create a dashboard based on the order data.
- Create KPIs: Calculate Total Order, Sales, Units Sold, Average Order Value, etc.
- Insert Chart: Create a dynamic chart or insert a PivotChart.

Step 7: Format the Sheets to Give APP Look
Create Homepage:
- Go to the Insert tab >> select Illustrations >> select Shapes.
- Select Button.
- Drag the button into the cell.

- Right-click shape >> select Link.

- Select Place in This Document >> select sheet cell (navigation button, no code).
- Select Order Form.
- Click OK.
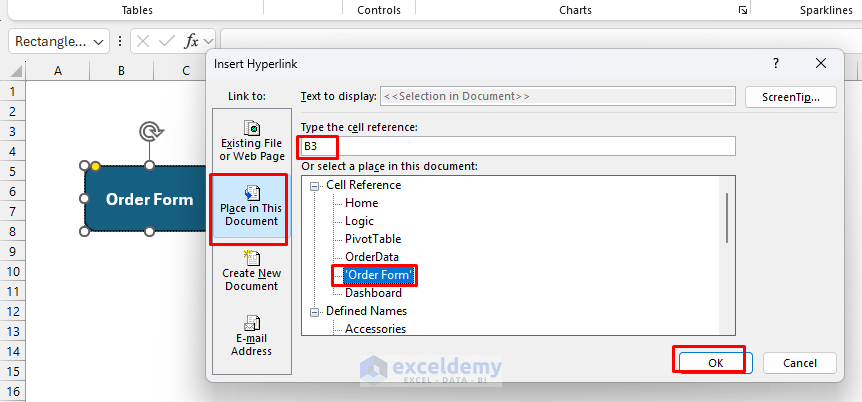
- By following similar steps, insert a hyperlink for the Dashboard and OrderData sheet.
- Later lock orderdata for security purposes.
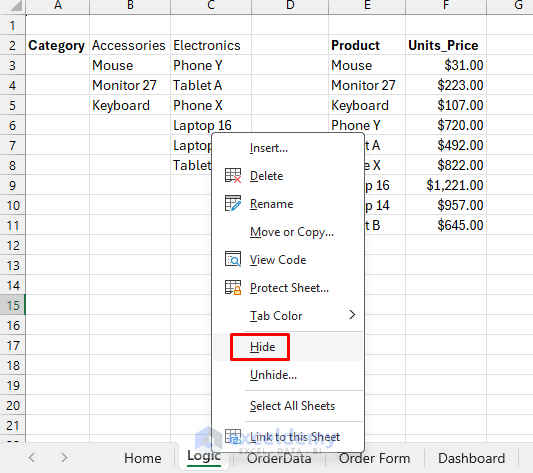
Hide the Logic:
To make Excel act more like an app:
- Select the sheet.
- Right-click >> select Hide.
- Protect the Order Form sheet so that only input cells can be changed.
- Go to the View tab:
- Uncheck Formula Bar.
- Uncheck Gridline.
Step 8: Test the Order App
- Enter an example order:
- Order ID: It will auto-enter the Order ID.
- Date: Insert the date 3/1/2025
- Category: Select category from the drop-down list.
- Product: Select Mouse from the dependent drop-down.
- Units: Select Units number from the list.
- Unit Price: Select Price from the dependent drop-down.
- Revenue: Auto-calculates.
- Click Submit Order.

- The next Order ID will appear automatically.
- The form will be cleared for the next order.
- A message box will pop up if the form submission is successful.
- Click OK.
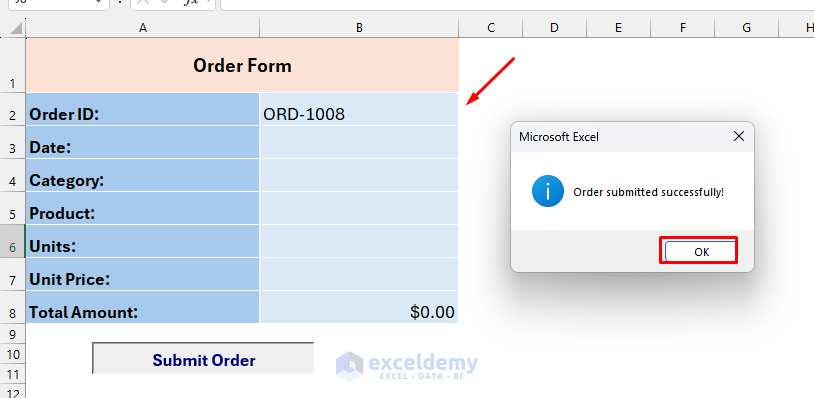
- Check the OrderData sheet; the entry will appear there automatically.
Conclusion
You can follow the above steps to turn an Excel sheet into an App. You can use buttons, forms, and hidden logic to create a dynamic App. Such an app-like tool is a powerful way to streamline data entry and reduce user errors, without investing in specialized software. By combining a clean front-end form, data validation drop-downs, a hidden database sheet, and VBA automation, we created a fully functional order management system. You can extend this setup with dashboards, summary reports, or even Power Query integration for more advanced analytics.
Get FREE Advanced Excel Exercises with Solutions!
