
Creating a self-clearing Form with VBA and Named Ranges in Excel simplifies data entry tasks and enhances productivity. It automatically clears its input fields after data is submitted, making it ideal for data entry scenarios where you need to input multiple records quickly.
In this tutorial, we will show how to create a self-cleaning form with VBA and named ranges.
Let’s create a simple employee information form that accepts employee data, saves the data to a database sheet, and automatically clears the form after submission.
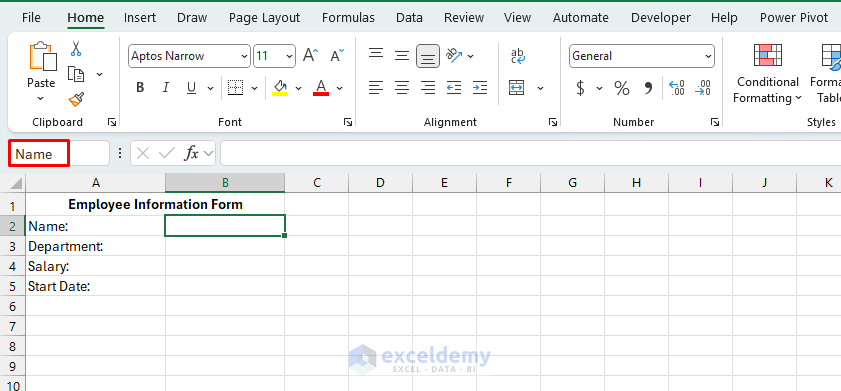
Step 1: Setting Up the Worksheet Structure
- Open a new Excel workbook.
- Create your form layout.
- Rename Sheet1 to “Form”.
- Create the following layout on the Form sheet.

- Next to each label, provide blank cells (B2, B3, B4, B5) for data entry.
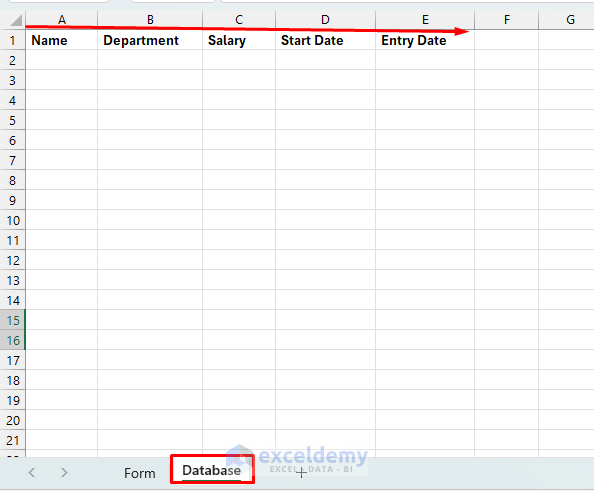
Setting Up the Database Sheet:
- Insert a new worksheet and rename it to “Database”.
- Create headers in row 1:
- Name
- Department
- Salary
- Start Date
- Entry Date
Step 2: Creating Named Ranges
Named ranges make referencing cells in VBA easier and clearer. We’ll create named ranges for all form inputs.
- Select cell B2.
- In the Name Box (left side of the formula bar), type Name.
- Press Enter.
- Repeat this process for each cell:
- B3: Name it Department.
- B4: Name it Salary.
- B5: Name it StartDate.
Verifying Named Ranges:
- Go to the Formulas tab >> select Name Manager or press Ctrl+F3.
- Verify all named ranges are created correctly.
- Select Close.

Step 3: Creating Form Buttons
Adding Submit Button:
- Go to the Form sheet.
- Go to Developer tab >> select Insert >> from Form Controls >> select Button.

- Draw the button in the cell.
- When prompted, name the macro SubmitandClearForm.
- Click OK.

- Right-click the button >> select Edit Text.

- Change to Submit and Clear Form.

Adding Clear Button:
- Insert another button.
- Name the macro ClearForm.
- Change button text to Clear Form.

Note: If you don’t see the Developer tab, enable it via File → Options → Customize Ribbon → check Developer.
Step 4: Writing the VBA Code
- Go to the Developer tab >> select Visual Basic.
- From the menu, click Insert >> select Module.

- Copy-paste the following VBA code.
SubmitForm VBA Code:
Sub SubmitandClearForm()
    Dim ws As Worksheet
    Dim dbSheet As Worksheet
    Dim lastRow As Long
    Dim formValid As Boolean

    ' Set worksheet references
    Set ws = ThisWorkbook.Sheets("Form")
    Set dbSheet = ThisWorkbook.Sheets("Database")

    ' Find the next empty row in database
    lastRow = dbSheet.Cells(dbSheet.Rows.Count, 1).End(xlUp).Row + 1

    ' Copy data from form to database
    dbSheet.Cells(lastRow, 1).Value = Range("Name").Value
    dbSheet.Cells(lastRow, 2).Value = Range("Department").Value
    dbSheet.Cells(lastRow, 3).Value = Range("Salary").Value
    dbSheet.Cells(lastRow, 4).Value = Range("StartDate").Value
    dbSheet.Cells(lastRow, 5).Value = Now() ' Entry timestamp

    ' Clear the form
    ClearForm

    ' Provide feedback
    MsgBox "Employee data submitted successfully!", vbInformation, "Success"

    ' Set focus back to name field
    Range("Name").Select
End Sub

Explanation:
- Takes input from named ranges on the Form sheet.
- Adds this data to the next row in the Database sheet, along with a timestamp.
- Calls the ClearForm macro to reset the form fields.
- Shows a confirmation message and sets the cursor to the Name field.
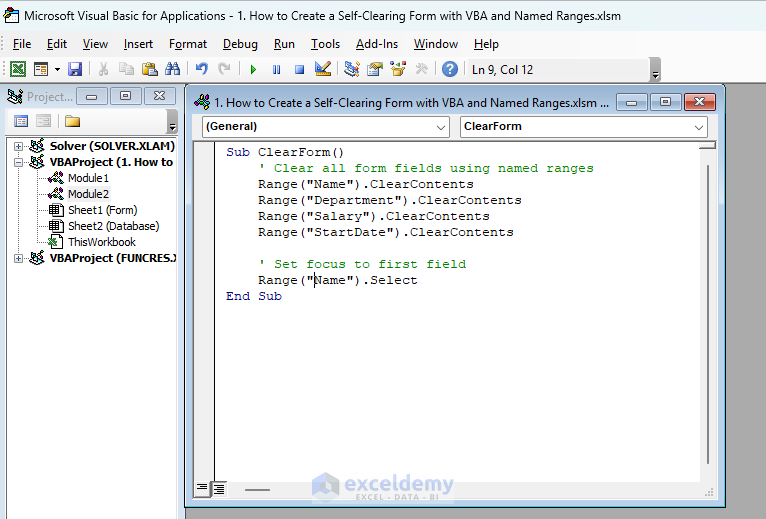
ClearForm VBA Code:
Sub ClearForm()
    ' Clear all form fields using named ranges
    Range("Name").ClearContents
    Range("Department").ClearContents
    Range("Salary").ClearContents
    Range("StartDate").ClearContents

    ' Set focus to first field
    Range("Name").Select
End Sub
Explanation:
- Clears the content of all form fields (Name, Department, Salary, StartDate) on the Form sheet.
- Sets the cursor back to the Name field for quick data entry.
Step 6: Testing Self-Clearing Form
- Save your workbook as an Excel Macro-Enabled Workbook (.xlsm).
- Enter data in your form fields.
- Click Submit and Clear Form.

- The form fields automatically submit data to the database sheet. Automatically clear the form data, and the cursor will return to the first field, ready for new data entry.

- Submitted data is stored in the database sheet.

- Additionally, you can use the Clear Form button. It will remove the form data, whether it is submitted or not.

- Returns the cursor to the first field.

Benefits of Using Self-Clearing Forms
- Efficiency: Saves time by eliminating manual deletion of input.
- Accuracy: Reduces human error from repetitive tasks.
- Convenience: Enhances user experience and data-entry speed.
Conclusion
By following the above steps, you can create a fully functional self-clearing form with VBA and named ranges. Now your Excel form will clear itself after each entry, enhancing your workflow dramatically. The use of named ranges makes the code more maintainable and easier to understand, while the self-clearing functionality ensures efficient data entry workflows.
Get FREE Advanced Excel Exercises with Solutions!

This is really very use full.
Can we create something like this for a employee survey also??
Hello L Muralidhar,
Thank you! Yes—you can build a self-clearing employee survey with the same approach (named ranges + a submit macro).
1. On a sheet (e.g., Survey_Form), create inputs: Name, Department, Q1, Q2, Q3 (use Data Validation for Likert choices if you like).
2. Give each input a Named Range: EmpName, Dept, Q1, Q2, Q3.
3. Create a data sheet named Survey_Data with headers in row 1:
4. Add a Submit button and adjust the existing VBA code and assign it to SubmitForm.
Regards
ExcelDemy