In VBA, the Target value refers to the cell or range that was changed by the user or by a macro. By setting the Target value, users can create macros that respond to specific changes in their spreadsheets, making it easier to manage large amounts of data.
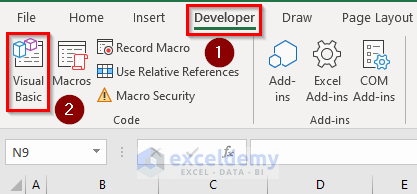
How to Launch Visual Basic Editor in Excel
Click on Visual Basic under the Developer tab.
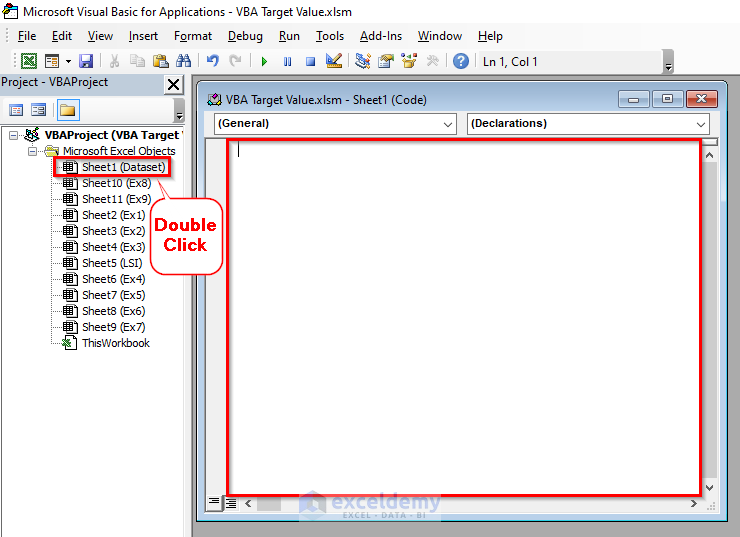
Double-click on the sheet name inside of which you want to write the code.
Inside the worksheet event, you can write code to get your required output. (If you are using VBA for the first time, you may need to add the Developer tab to the ribbon in Excel)
Overview of Target.Value Property in Excel VBA
In Excel VBA, a Target Value refers to the value of a specific cell or range of cells in a worksheet that triggers a certain action or set of actions. When the target value is changed, VBA can be programmed to respond with various behaviors, such as recalculating formulas, updating other cells, or displaying messages.
The Worksheet_Change event is commonly used to detect changes in target values. This event is triggered when a user makes a change to a cell or range of cells in the worksheet.
You can check the value of a target cell or range by using the Target object. The Target object is automatically populated with the cell or range that was changed when the Worksheet_Change event is triggered.
This is the syntax to check the value of a single target cell:
Private Sub Worksheet_Change(ByVal Target As Range)
If Target.Address = "$A$1" Then
'Check if the value of the target cell is "Hello"
If Target.Value = "Hello" Then
'do something
End If
End If
End Sub
In this example, the If statement checks if the target cell’s address is equal to $A$1. If the target cell matches the specified address, the code inside the If statement is executed.
An additional condition is added to check if the value of the target cell is Hello. If the value is true, then the code inside the If statement will be executed. You can modify this condition to check for any specific value that you need.
You can also check the value of a range of cells by using the Intersect() method.
The Intersect() method returns a range that represents the overlapping area between two or more ranges.
Here is an example that checks if any cell in the range A1:C5 was changed:
Private Sub Worksheet_Change(ByVal Target As Range)
Dim checkRange As Range
Set checkRange = Range("A1:C5")
If Not Intersect(Target, checkRange) Is Nothing Then
'do something
End If
End Sub
Here the Intersect() method checks if the Target range intersects with the checkRange range. If there is any overlap between the two ranges, the code inside the If statement is executed.
Target Value in VBA: 9 Suitable Examples
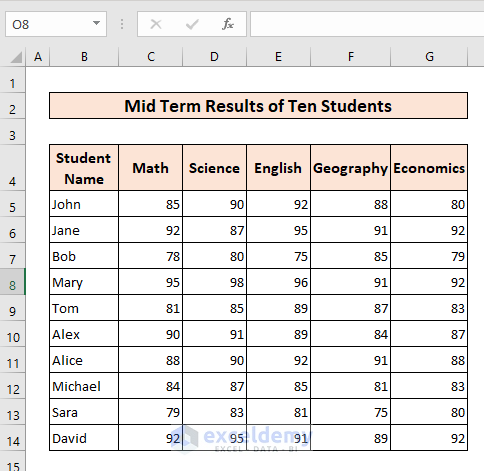
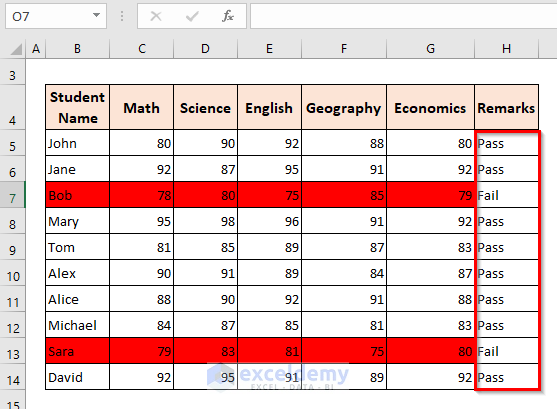
The sample dataset contains the Mid-Term Results of Ten Students.
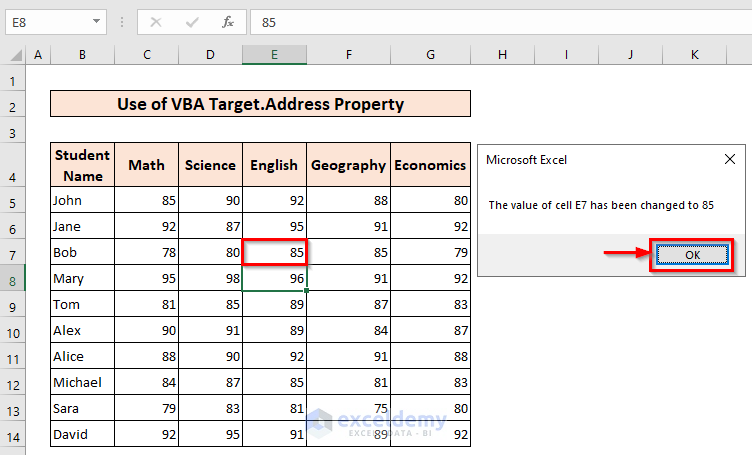
Method 1 – Use of VBA Target.Address Property
This property monitors changes made to a specific cell in an Excel worksheet, and when the cell is changed, it displays a message box that informs the user of the new value of the cell.
Steps:
- Double-click on the worksheet named Ex1 as shown before.
- Enter the following code inside the Worksheet.
Code Syntax:
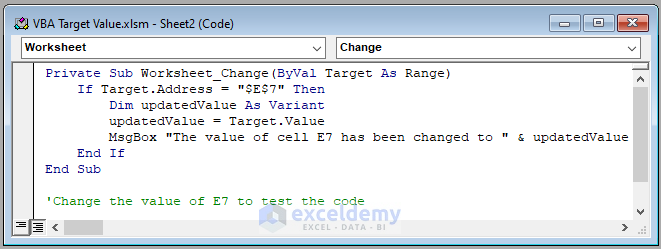
Private Sub Worksheet_Change(ByVal Target As Range)
If Target.Address = "$E$7" Then
Dim updatedValue As Variant
updatedValue = Target.Value
MsgBox "The value of cell E7 has been changed to " & updatedValue
End If
End Sub
Code Breakdown:
- “Private Sub Worksheet_Change(ByVal Target As Range)”: This line starts the subroutine that will run whenever there is a change made to the worksheet. The “Private” keyword means that this subroutine can only be accessed within the worksheet where it is contained. “Worksheet_Change” is the event that will trigger the code to run, and “Target” is a variable that represents the cell or range of cells that was changed.
- “If Target.Address = “$E$7″ Then”: This line checks whether the cell that was changed is “$E$7”. If the condition is true, the code inside the “If” statement will run. If the condition is false, the code inside the “If” statement will be skipped.
- “Dim updatedValue As Variant”: This line declares a variable called “updatedValue” as a variant data type. This is a data type that can hold any type of data.
- “updatedValue = Target.Value”: This line assigns the value of the changed cell to the “updatedValue” variable. This represents the value that is currently stored in the cell.
- “MsgBox “The value of cell E7 has been changed to ” & updatedValue”: This line displays a message box that informs the user the value of cell E7 has been changed, and displays the new value of the cell. The “&” symbol is used to concatenate (combine) the text string “The value of cell E7 has been changed to ” with the value of the “updatedValue” variable.
- “End If”: This line ends the “If” statement that began on line 2.
- “End Sub”: This line ends the subroutine.
- Changing cell E7 causes the following output.
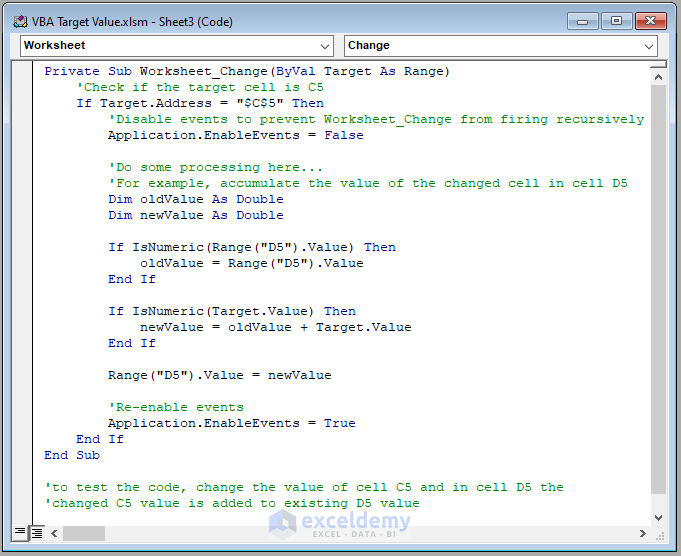
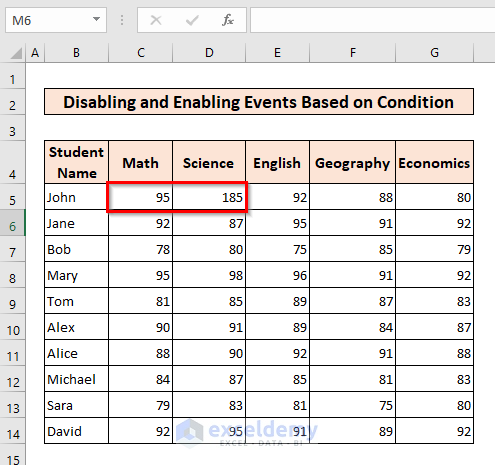
Method 2 – Enabling Events Based on Conditions
This code monitors changes made to a specific cell in an Excel worksheet ($C$5), and when the cell is changed, it accumulates the value of the changed cell in another cell (D5). It uses the IsNumeric function to check if the values in the cells are numeric before performing the accumulation.
Steps:
- Double-click on the worksheet named “Ex2” as shown before.
- Enter the following code inside the Worksheet.
Code Syntax:
Private Sub Worksheet_Change(ByVal Target As Range)
'Check if the target cell is C5
If Target.Address = "$C$5" Then
'Disable events to prevent Worksheet_Change from firing recursively
Application.EnableEvents = False
'Do some processing here...
'For example, accumulate the value of the changed cell in cell D5
Dim oldValue As Double
Dim newValue As Double
If IsNumeric(Range("D5").Value) Then
oldValue = Range("D5").Value
End If
If IsNumeric(Target.Value) Then
newValue = oldValue + Target.Value
End If
Range("D5").Value = newValue
'Re-enable events
Application.EnableEvents = True
End If
End Sub
Code Breakdown:
- “Private Sub Worksheet_Change(ByVal Target As Range)”: This line starts the subroutine that will run whenever there is a change made to the worksheet. The “Private” keyword means that this subroutine can only be accessed within the worksheet where it is contained. “Worksheet_Change” is the event that will trigger the code to run, and “Target” is a variable that represents the cell or range of cells that was changed.
- “‘Check if the target cell is C5”: This explains what the code does.
- “If Target.Address = “$C$5″ Then”: This line checks whether the cell that was changed is the one with the address “$C$5”. If the condition is true, the code inside the “If” statement will run. If the condition is false, the code inside the “If” statement will be skipped.
- “Application.EnableEvents = False”: This line disables events to prevent the “Worksheet_Change” event from firing recursively.
- “Dim oldValue As Double” and “Dim newValue As Double”: These lines declare two variables called “oldValue” and “newValue” as Double data types. The Double data type is a data type that can hold decimal numbers.
- “If IsNumeric(Range(“D5″).Value) Then”: This line checks whether the value in cell D5 is numeric. If it is, the value is assigned to the “oldValue” variable.
- “If IsNumeric(Target.Value) Then”: This line checks whether the value in the changed cell is numeric. If it is, the “newValue” variable is assigned the sum of the “oldValue” and the value of the changed cell.
- “Range(“D5″).Value = newValue”: This line sets the value of cell D5 to the value stored in the “newValue” variable.
- “Application.EnableEvents = True”: This line re-enables events.
- “End If”: This line ends the “If” statement that began on line 3.
- “End Sub”: This line ends the subroutine.
- Changing the value in C5 replaces the current value of cell D5.
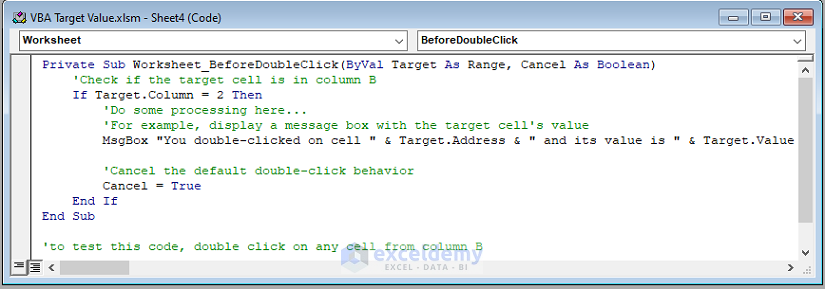
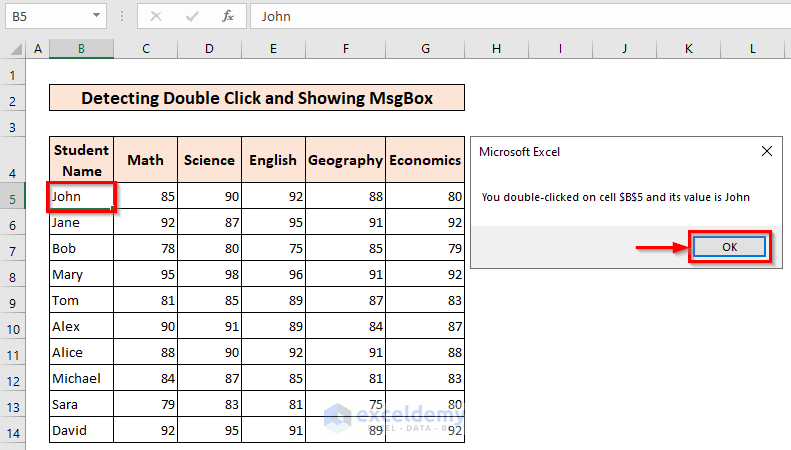
Method 3 – Detecting Double-Click and Showing MsgBox
This code runs whenever a user double-clicks on a cell in the worksheet.
Steps:
- Double-click on the worksheet named “Ex3” as shown before.
- Enter the following code inside the Worksheet.
Code Syntax:
Private Sub Worksheet_BeforeDoubleClick(ByVal Target As Range, Cancel As Boolean)
'Check if the target cell is in column B
If Target.Column = 2 Then
'Do some processing here...
'For example, display a message box with the target cell's value
MsgBox "You double-clicked on cell " & Target.Address & " and its value is " & Target.Value'Cancel the default double-click behavior
Cancel = True
End If
End Sub
Code Breakdown:
- “Private Sub Worksheet_BeforeDoubleClick(ByVal Target As Range, Cancel As Boolean)”: This line starts the subroutine that will run whenever a user double-clicks on a cell in the worksheet. The “Private” keyword means that this subroutine can only be accessed within the worksheet where it is contained. “Worksheet_BeforeDoubleClick” is the event that will trigger the code to run, and “Target” is a variable that represents the cell or range of cells that was double-clicked on. “Cancel” is a Boolean variable that controls whether the default double-click behavior is canceled.
- “‘Check if the target cell is in column B”: This explains what the code does.
- “If Target.Column = 2 Then”: This line checks whether the column of the cell that was double-clicked on is column B (column number 2). If the condition is true, the code inside the “If” statement will run. If the condition is false, the code inside the “If” statement will be skipped.
- “MsgBox “You double-clicked on cell ” & Target.Address & ” and its value is ” & Target.Value“: This line displays a message box with information about the cell that was double-clicked on, including its address and value.
- “Cancel = True”: This line cancels the default double-click behavior.
- “End If”: This line ends the “If” statement that began on line 3.
- “End Sub”: This line ends the subroutine.
- Double-clicking on any cell in Column B creates following output.
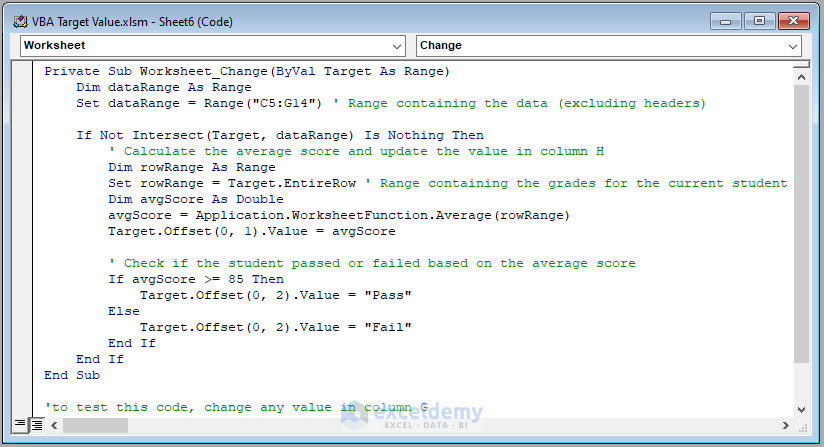
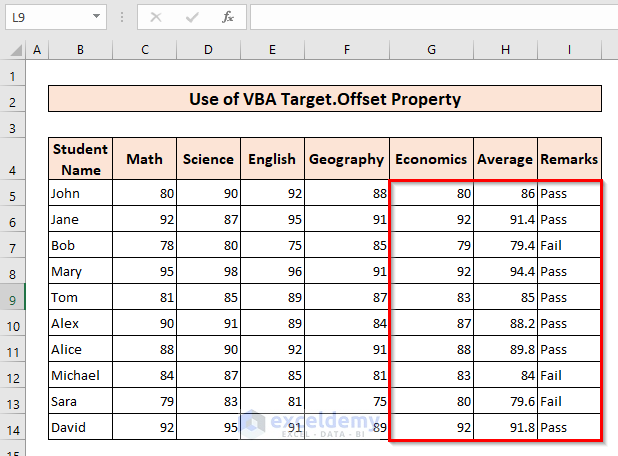
Method 4 – Use of VBA Target.Offset Property
Steps:
- Double-click on the worksheet named “Ex4” as shown before.
- Enter the following code inside the Worksheet.
Code Syntax:
Private Sub Worksheet_Change(ByVal Target As Range)
Dim dataRange As Range
Set dataRange = Range("C5:G14") ' Range containing the data (excluding headers)If Not Intersect(Target, dataRange) Is Nothing Then
' Calculate the average score and update the value in column H
Dim rowRange As Range
Set rowRange = Target.EntireRow ' Range containing the grades for the current student
Dim avgScore As Double
avgScore = Application.WorksheetFunction.Average(rowRange)
Target.Offset(0, 1).Value = avgScore' Check if the student passed or failed based on the average score
If avgScore >= 85 Then
Target.Offset(0, 2).Value = "Pass"
Else
Target.Offset(0, 2).Value = "Fail"
End If
End If
End Sub
Code Breakdown:
- “Private Sub Worksheet_Change(ByVal Target As Range)”: This line starts the subroutine that will run whenever a user makes a change to the worksheet. The “Private” keyword means that this subroutine can only be accessed within the worksheet where it is contained. “Worksheet_Change” is the event that will trigger the code to run, and “Target” is a variable that represents the cell or range of cells that was changed.
- “Dim dataRange As Range”: This line declares a variable called “dataRange” that will be used to store the range of cells containing the data (excluding headers).
- “Set dataRange = Range(“C5:G14″)”: This line sets the value of the “dataRange” variable to a range containing the data (excluding headers). In this case, the range is cells C5 to G14.
- “If Not Intersect(Target, dataRange) Is Nothing Then”: This line checks whether the changed cell or range of cells intersects with the “dataRange” variable. If the condition is true, the code inside the “If” statement will run. If the condition is false, the code inside the “If” statement will be skipped.
- “Dim rowRange As Range”: This line declares a variable called “rowRange” that will be used to store the range of cells containing the grades for the current student.
- “Set rowRange = Target.EntireRow”: This line sets the value of the “rowRange” variable to the entire row containing the changed cell or range of cells.
- “Dim avgScore As Double”: This line declares a variable called “avgScore” that will be used to store the average score for the current student.
- “avgScore = Application.WorksheetFunction.Average(rowRange)”: This line calculates the average score for the current student and stores it in the “avgScore” variable.
- “Target.Offset(0, 1).Value = avgScore”: This line updates the value in the cell one column to the right of the changed cell (i.e., in column H) with the average score for the current student.
- “If avgScore >= 85 Then”: This line checks whether the average score for the current student is greater than or equal to 85.
- “Target.Offset(0, 2).Value = “Pass””: This line updates the value in the cell two columns to the right of the changed cell (i.e., in column I) with the text “Pass” if the average score is greater than or equal to 85.
- “Target.Offset(0, 2).Value = “Fail””: This line updates the value in the cell two columns to the right of the changed cell (i.e., in column I) with the text “Fail” if the average score is less than 85.
- “End If”: This line ends the “If” statement that began on line 10.
- “End If”: This line ends the “If” statement that began on line 4.
- “End Sub”: This line ends the subroutine.
- Changing the value of Column G creates the following output.
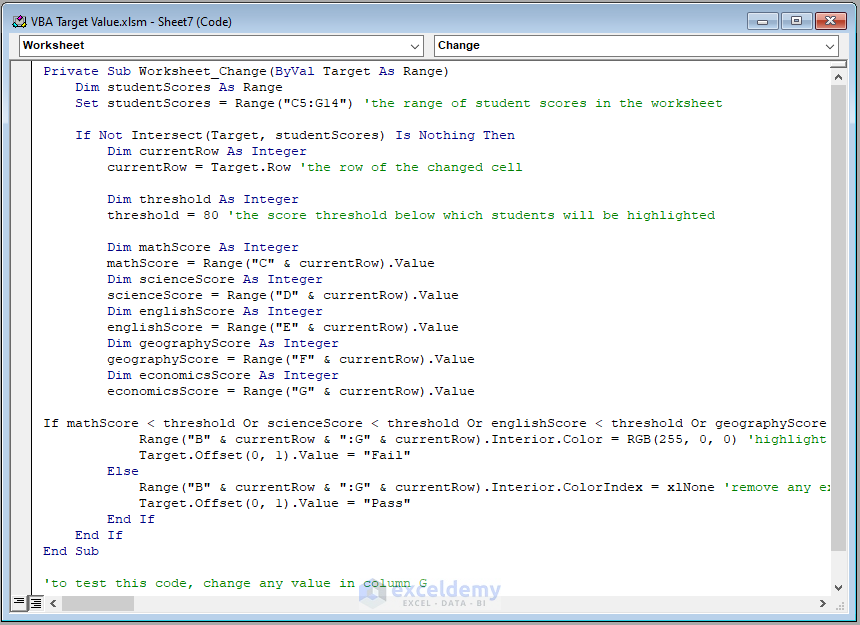
Method 5 – Highlighting Cells Based on Cell Value
Steps:
- Double-click on the worksheet named “Ex5” as shown before.
- Enter the following code inside the Worksheet.
Code Syntax:
Private Sub Worksheet_Change(ByVal Target As Range)
Dim studentScores As Range
Set studentScores = Range("C5:G14") 'the range of student scores in the worksheetIf Not Intersect(Target, studentScores) Is Nothing Then
Dim currentRow As Integer
currentRow = Target.Row 'the row of the changed cellDim threshold As Integer
threshold = 80 'the score threshold below which students will be highlightedDim mathScore As Integer
mathScore = Range("C" & currentRow).Value
Dim scienceScore As Integer
scienceScore = Range("D" & currentRow).Value
Dim englishScore As Integer
englishScore = Range("E" & currentRow).Value
Dim geographyScore As Integer
geographyScore = Range("F" & currentRow).Value
Dim economicsScore As Integer
economicsScore = Range("G" & currentRow).ValueIf mathScore < threshold Or scienceScore < threshold Or englishScore < threshold Or geographyScore < threshold Or economicsScore < threshold Then
Range("B" & currentRow & ":G" & currentRow).Interior.Color = RGB(255, 0, 0) 'highlight the row in red
Target.Offset(0, 1).Value = "Fail"
Else
Range("B" & currentRow & ":G" & currentRow).Interior.ColorIndex = xlNone 'remove any existing highlighting
Target.Offset(0, 1).Value = "Pass"
End If
End If
End Sub
Code Breakdown:
- “Private Sub Worksheet_Change(ByVal Target As Range)”: This line defines the worksheet event that triggers the macro when a cell value in the worksheet is changed.
- “Dim studentScores As Range”: This line declares a Range variable called “studentScores”.
- “Set studentScores = Range(“C5:G14″)”: This line sets the value of the “studentScores” variable to the range “C5:G14” in the worksheet.
- “If Not Intersect(Target, studentScores) Is Nothing Then”: This line checks if the changed cell is within the “studentScores” range.
- “Dim currentRow As Integer”: This line declares an Integer variable called “currentRow”.
- “currentRow = Target.Row”: This line sets the value of the “currentRow” variable to the row number of the changed cell.
- “Dim threshold As Integer”: This line declares an Integer variable called “threshold”.
- “threshold = 80”: This line sets the value of the “threshold” variable to 80.
- “Dim mathScore As Integer”: This line declares an Integer variable called “mathScore”.
- “mathScore = Range(“C” & currentRow).Value”: This line sets the value of the “mathScore” variable to the value of the cell in column C and the current row.
- “Dim scienceScore As Integer”: This line declares an Integer variable called “scienceScore”.
- “scienceScore = Range(“D” & currentRow).Value”: This line sets the value of the “scienceScore” variable to the value of the cell in column D and the current row.
- “Dim englishScore As Integer”: This line declares an Integer variable called “englishScore”.
- “englishScore = Range(“E” & currentRow).Value”: This line sets the value of the “englishScore” variable to the value of the cell in column E and the current row.
- “Dim geographyScore As Integer”: This line declares an Integer variable called “geographyScore”.
- “geographyScore = Range(“F” & currentRow).Value”: This line sets the value of the “geographyScore” variable to the value of the cell in column F and the current row.
- “Dim economicsScore As Integer”: This line declares an Integer variable called “economicsScore”.
- “economicsScore = Range(“G” & currentRow).Value”: This line sets the value of the “economicsScore” variable to the value of the cell in column G and the current row.
- “If mathScore < threshold Or scienceScore < threshold Or englishScore < threshold Or geographyScore < threshold Or economicsScore < threshold Then”: This line checks if any of the scores are below the threshold value.
- “Range(“B” & currentRow & “:G” & currentRow).Interior.Color = RGB(255, 0, 0)”: This line sets the interior color of the row containing the changed cell to red.
- “Target.Offset(0, 1).Value = “Fail” “: This line sets the value of the cell one column to the right of the changed cell to “Fail”.
- “Else”: This line is the alternative condition when the scores are above the threshold.
- “Range(“B” & currentRow & “:G” & currentRow).Interior.ColorIndex = xlNone”: This line removes any existing interior color highlighting from the row containing the changed cell.
- “Target.Offset(0, 1).Value = “Pass” “: This line sets the value of the cell one column to the right of the changed cell to “Pass”.
- “End If”: This line ends the conditional statement.
- “End Sub”: This line ends the macro subroutine.
- Changing the values of Column G creates the following output.
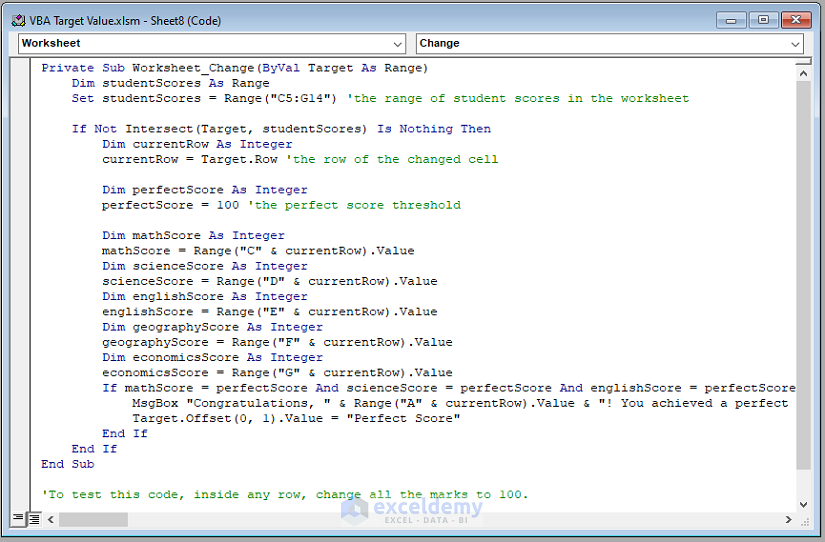
Method 6 – Displaying MsgBox Based on Certain Conditions
In this example, the code is a VBA macro that is triggered whenever a cell value is changed in a specified range on a worksheet.
Steps:
- Double-click on the worksheet named “Ex6” as shown before.
- Enter the following code inside the Worksheet.
Code Syntax:
Private Sub Worksheet_Change(ByVal Target As Range)
Dim studentScores As Range
Set studentScores = Range("C5:G14") 'the range of student scores in the worksheetIf Not Intersect(Target, studentScores) Is Nothing Then
Dim currentRow As Integer
currentRow = Target.Row 'the row of the changed cellDim perfectScore As Integer
perfectScore = 100 'the perfect score thresholdDim mathScore As Integer
mathScore = Range("C" & currentRow).Value
Dim scienceScore As Integer
scienceScore = Range("D" & currentRow).Value
Dim englishScore As Integer
englishScore = Range("E" & currentRow).Value
Dim geographyScore As Integer
geographyScore = Range("F" & currentRow).Value
Dim economicsScore As Integer
economicsScore = Range("G" & currentRow).Value
If mathScore = perfectScore And scienceScore = perfectScore And englishScore = perfectScore And geographyScore = perfectScore And economicsScore = perfectScore Then
MsgBox "Congratulations, " & Range("A" & currentRow).Value & "! You achieved a perfect score in all subjects!" 'display a message box
Target.Offset(0, 1).Value = "Perfect Score"
End If
End If
End Sub
Code Breakdown:
- “Dim studentScores As Range”: This line declares a variable named “studentScores” as a Range data type.
- “Set studentScores = Range(“C5:G14″)”: This line sets the “studentScores” variable to the range of cells C5 to G14.
- “If Not Intersect(Target, studentScores) Is Nothing Then”: This line checks if the “Target” range intersects with the “studentScores” range, and executes the code inside the If statement if the condition is true.
- “Dim currentRow As Integer”: This line declares a variable named “currentRow” as an Integer data type.
- “currentRow = Target.Row”: This line sets the value of “currentRow” to the row number of the cell in the “Target” range.
- “Dim perfectScore As Integer”: This line declares a variable named “perfectScore” as an Integer data type.
- “perfectScore = 100”: This line sets the value of “perfectScore” to 100.
- “Dim mathScore As Integer”: This line declares a variable named “mathScore” as an Integer data type.
- “mathScore = Range(“C” & currentRow).Value”: This line sets the value of “mathScore” to the value of the cell in column C of the row number stored in “currentRow”.
- “Dim scienceScore As Integer”: This line declares a variable named “scienceScore” as an Integer data type.
- “scienceScore = Range(“D” & currentRow).Value”: This line sets the value of “scienceScore” to the value of the cell in column D of the row number stored in “currentRow”.
- “Dim englishScore As Integer”: This line declares a variable named “englishScore” as an Integer data type.
- “englishScore = Range(“E” & currentRow).Value”: This line sets the value of “englishScore” to the value of the cell in column E of the row number stored in “currentRow”.
- “Dim geographyScore As Integer”: This line declares a variable named “geographyScore” as an Integer data type.
- “geographyScore = Range(“F” & currentRow).Value”: This line sets the value of “geographyScore” to the value of the cell in column F of the row number stored in “currentRow”.
- “Dim economicsScore As Integer”: This line declares a variable named “economicsScore” as an Integer data type.
- “economicsScore = Range(“G” & currentRow).Value”: This line sets the value of “economicsScore” to the value of the cell in column G of the row number stored in “currentRow”.
- “If mathScore = perfectScore And scienceScore = perfectScore And englishScore = perfectScore And geographyScore = perfectScore And economicsScore = perfectScore Then”: This line checks if all the subject scores in the current row are equal to the perfect score, and executes the code inside the If statement if the condition is true.
- “MsgBox “Congratulations, ” & Range(“A” & currentRow).Value & “! You achieved a perfect score in all subjects!””: This line displays a message box with a congratulatory message and the name of the student whose scores achieved a perfect score in all subjects.
- “Target.Offset(0, 1).Value = “Perfect Score” “: This line sets the value of the cell one column to the right of the changed cell to “Perfect Score”.
- “End If”: This line ends the conditional statement.
- “End Sub”: This line ends the macro subroutine.
- Changing the result of any of the students to 100 in all columns will create the following output.

Read More: Excel VBA: How to Use Target Row
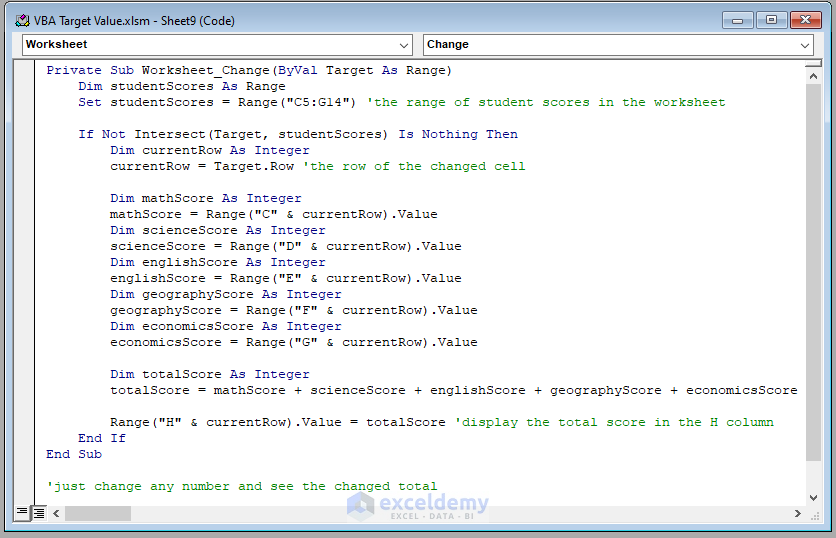
Method 7 – Doing Mathematical Operation and Display Result
Steps:
- Double-click on the worksheet named “Ex7” as shown before.
- Enter the following code inside the Worksheet.
Code Syntax:
Private Sub Worksheet_Change(ByVal Target As Range)
Dim studentScores As Range
Set studentScores = Range("C5:G14") 'the range of student scores in the worksheetIf Not Intersect(Target, studentScores) Is Nothing Then
Dim currentRow As Integer
currentRow = Target.Row 'the row of the changed cellDim mathScore As Integer
mathScore = Range("C" & currentRow).Value
Dim scienceScore As Integer
scienceScore = Range("D" & currentRow).Value
Dim englishScore As Integer
englishScore = Range("E" & currentRow).Value
Dim geographyScore As Integer
geographyScore = Range("F" & currentRow).Value
Dim economicsScore As Integer
economicsScore = Range("G" & currentRow).ValueDim totalScore As Integer
totalScore = mathScore + scienceScore + englishScore + geographyScore + economicsScore 'calculate the total scoreRange("H" & currentRow).Value = totalScore 'display the total score in the H column
End If
End Sub
Code Breakdown:
- “Private Sub Worksheet_Change(ByVal Target As Range)”: This line defines the worksheet event that triggers the macro when a cell value in the worksheet is changed.
- “Dim studentScores As Range”: This line declares a variable named “studentScores” as a range.
- “Set studentScores = Range(“C5:G14″)”: This line sets the “studentScores” range to cover the cells from C5 to G14.
- “If Not Intersect(Target, studentScores) Is Nothing Then”: This line checks if the changed cell is within the “studentScores” range.
- “Dim currentRow As Integer”: This line declares a variable named “currentRow” as an integer.
- “currentRow = Target.Row”: This line sets the value of “currentRow” to the row number of the changed cell.
- “Dim mathScore As Integer”: This line declares a variable named “mathScore” as an integer.
- “mathScore = Range(“C” & currentRow).Value”: This line sets the value of “mathScore” to the value of the cell in column C of the current row.
- “Dim scienceScore As Integer”: This line declares a variable named “scienceScore” as an integer.
- “scienceScore = Range(“D” & currentRow).Value”: This line sets the value of “scienceScore” to the value of the cell in column D of the current row.
- “Dim englishScore As Integer”: This line declares a variable named “englishScore” as an integer.
- “englishScore = Range(“E” & currentRow).Value”: This line sets the value of “englishScore” to the value of the cell in column E of the current row.
- “Dim geographyScore As Integer”: This line declares a variable named “geographyScore” as an integer.
- “geographyScore = Range(“F” & currentRow).Value”: This line sets the value of “geographyScore” to the value of the cell in column F of the current row.
- “Dim economicsScore As Integer”: This line declares a variable named “economicsScore” as an integer.
- “economicsScore = Range(“G” & currentRow).Value”: This line sets the value of “economicsScore” to the value of the cell in column G of the current row.
- “Dim totalScore As Integer”: This line declares a variable named “totalScore” as an integer.
- “totalScore = mathScore + scienceScore + englishScore + geographyScore + economicsScore”: This line calculates the total score by adding the values of all subject scores.
- “Range(“H” & currentRow).Value = totalScore”: This line sets the value of the cell in column H of the current row to the total score.
- “End If”: This line ends the conditional statement.
- “End Sub”: This line ends the macro subroutine.
- Consequently, change any cell value(s) inside the table and the total value would be changed accordingly.
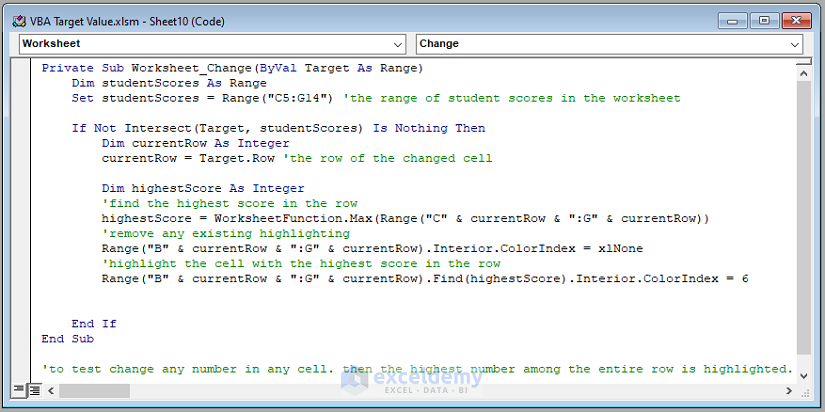
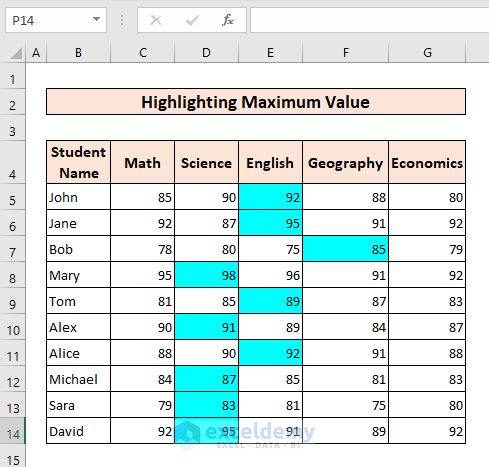
Method 8 – Highlighting Maximum Value
Steps:
- Double-click on the worksheet named “Ex8” as shown before.
- Enter the following code inside the Worksheet.
Code Syntax:
Private Sub Worksheet_Change(ByVal Target As Range)
Dim studentScores As Range
Set studentScores = Range("C5:G14") 'the range of student scores in the worksheetIf Not Intersect(Target, studentScores) Is Nothing Then
Dim currentRow As Integer
currentRow = Target.Row 'the row of the changed cellDim highestScore As Integer
'find the highest score in the row
highestScore = WorksheetFunction.Max(Range("C" & currentRow & ":G" & currentRow))
'remove any existing highlighting
Range("B" & currentRow & ":G" & currentRow).Interior.ColorIndex = xlNone
'highlight the cell with the highest score in the row
Range("B" & currentRow & ":G" & currentRow).Find(highestScore).Interior.ColorIndex = 6End If
End Sub
Code Breakdown:
- “Private Sub Worksheet_Change(ByVal Target As Range)”: This line defines the worksheet event that triggers the macro when a cell value in the worksheet is changed.
- “Dim studentScores As Range”: This line declares a Range variable named studentScores.
- “Set studentScores = Range(“C5:G14″)”: This line assigns the range of student scores in the worksheet to the studentScores variable.
- “If Not Intersect(Target, studentScores) Is Nothing Then”: This line checks if the changed cell is within the studentScores range.
- “Dim currentRow As Integer”: This line declares an Integer variable named currentRow.
- “currentRow = Target.Row”: This line assigns the row number of the changed cell to the currentRow variable.
- “Dim highestScore As Integer”: This line declares an Integer variable named highestScore.
- “highestScore = WorksheetFunction.Max(Range(“C” & currentRow & “:G” & currentRow))”: This line finds the highest score in the row using the Max function and assigns it to the highestScore variable.
- “Range(“B” & currentRow & “:G” & currentRow).Interior.ColorIndex = xlNone”: This line removes any existing highlighting from the cells in columns B to G of the current row.
- “Range(“B” & currentRow & “:G” & currentRow).Find(highestScore).Interior.ColorIndex = 6″: This line finds and highlights the cell with the highest score in columns B to G of the current row with a color index of 6 (which is yellow).
- “End If”: This line ends the conditional statement.
- “End Sub”: This line ends the macro subroutine.
- Changing any of the values in the table and the highest value in the corresponding row will now be highlighted.
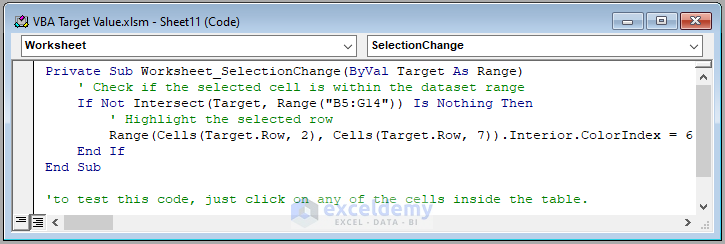
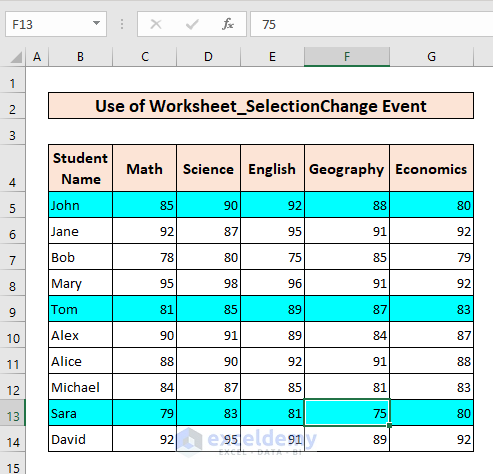
Method 9 – Use of Worksheet_SelectionChange Event
Steps:
- Double-click on the worksheet named “Ex1” as shown before.
- Enter the following code inside the Worksheet.
Code Syntax:
Private Sub Worksheet_SelectionChange(ByVal Target As Range)
' Check if the selected cell is within the dataset range
If Not Intersect(Target, Range("B5:G14")) Is Nothing Then
' Highlight the selected row
Range(Cells(Target.Row, 2), Cells(Target.Row, 7)).Interior.ColorIndex = 6
End If
End Sub
Code Breakdown:
- “Private Sub Worksheet_SelectionChange(ByVal Target As Range)”: This line defines the worksheet event that triggers the macro when a cell selection is changed.
- “‘Check if the selected cell is within the dataset range”: This comment explains the purpose of the code that follows.
- “If Not Intersect(Target, Range(“B5:G14″)) Is Nothing Then”: This line checks if the selected cell is within the specified range of cells (B5:G14) using the Intersect method.
- “‘Highlight the selected row”: This line is a comment that explains the purpose of the code that follows.
- “Range(Cells(Target.Row, 2), Cells(Target.Row, 7)).Interior.ColorIndex = 6”: This line highlights the entire row of the selected cell by setting the background color of cells in columns B to G to yellow (color index 6).
- “End If”: This line ends the conditional statement.
- “End Sub”: This line ends the macro subroutine.
- Selecting any of the cells inside the table will result in the row containing that selected cell being highlighted.
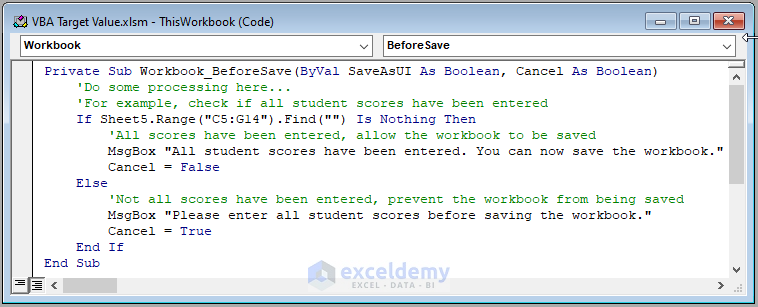
Perform Necessary Tasks Before Saving Excel Workbook Using Workbook_BeforeSave Event
The Worksheet_BeforeSave event is a VBA event that is triggered when a user tries to save changes made to a worksheet.
Steps:
- Double-click on the worksheet named “LSI” as shown before.
- Enter the following code inside the Worksheet.
Code Syntax:
Private Sub Workbook_BeforeSave(ByVal SaveAsUI As Boolean, Cancel As Boolean)
'Do some processing here...
'For example, check if all student scores have been entered
If Sheet5.Range("C5:G14").Find("") Is Nothing Then
'All scores have been entered, allow the workbook to be saved
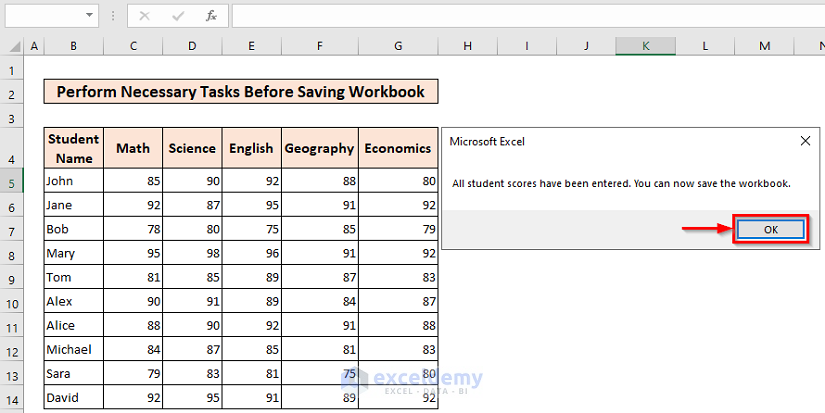
MsgBox "All student scores have been entered. You can now save the workbook."
Cancel = False
Else
'Not all scores have been entered, prevent the workbook from being saved
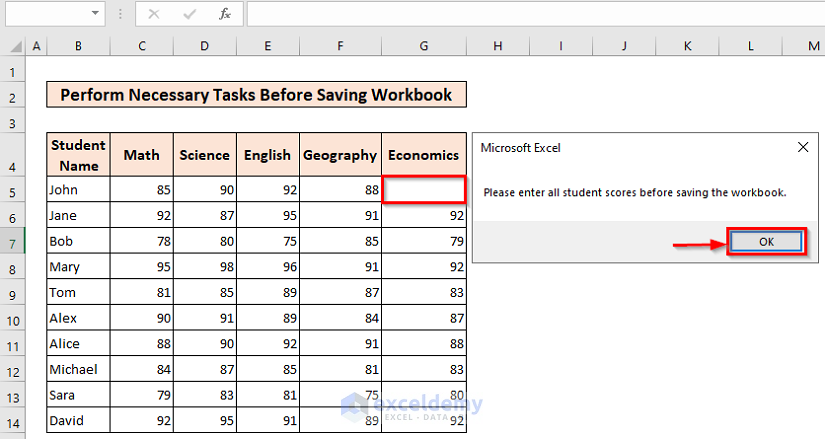
MsgBox "Please enter all student scores before saving the workbook."
Cancel = True
End If
End SubCode Breakdown:
- “Private Sub Workbook_BeforeSave(ByVal SaveAsUI As Boolean, Cancel As Boolean)”: This line defines the Workbook event that triggers the macro before the workbook is saved. It takes two parameters, SaveAsUI and Cancel, which are both Boolean values.
- “If Sheet5.Range(“C5:G14”).Find(“”) Is Nothing Then”: This line checks if there are any empty cells in the range of student scores in Sheet5. If there are no empty cells, then all student scores have been entered.
- “MsgBox “All student scores have been entered. You can now save the workbook.””: This line displays a message box notifying the user that all student scores have been entered and the workbook can be saved.
- “Cancel = False”: This line sets the Cancel parameter to False, which allows the workbook to be saved.
- “Else”: This line begins the alternative code to execute if there are empty cells in the range of student scores.
- “MsgBox “Please enter all student scores before saving the workbook.””: This line displays a message box notifying the user that all student scores must be entered before the workbook can be saved.
- “Cancel = True”: This line sets the Cancel parameter to True, which prevents the workbook from being saved.
- “End If”: This line ends the conditional statement.
- “End Sub”: This line ends the macro subroutine.
- Attempting to save the LSI sheet with empty cells in the table will cause the following MsgBox to be displayed.
- If all the cells are filled it will be saved and the following MsgBox will be displayed.
Things to Remember
- Target is a reserved keyword in VBA, which means it cannot be used as a variable name.
- When using Target in an event procedure, it is important to check if the Target cell falls within the expected range. This is done to avoid errors when the user selects or changes cells outside of the expected range.
- If you are using Target in a Worksheet_Change event, be aware that any changes made to the worksheet within the event procedure can trigger the event again, which can cause an infinite loop. To avoid this, you can temporarily turn off event handling before making any changes to the worksheet and turn it back on afterwards.
Download Practice Workbook
Download the Excel workbook file from the link below to practice.

