What Is the Target Range in Excel VBA?
The Target in Excel VBA refers to the object that was last selected or clicked by the user.
How to Launch the VBA Editor in Excel
To enter a VBA code, go to the Developer tab and select Visual Basic or press Alt + F11.
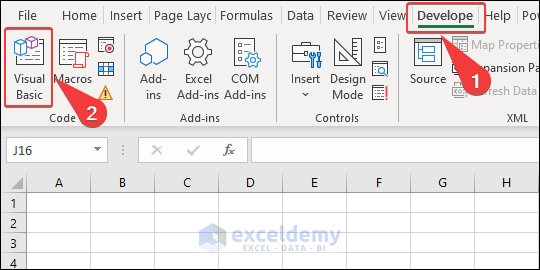
You can enable the Developer tab in Excel if it isn’t active.
After opening the VBA window, double-click the worksheet name.
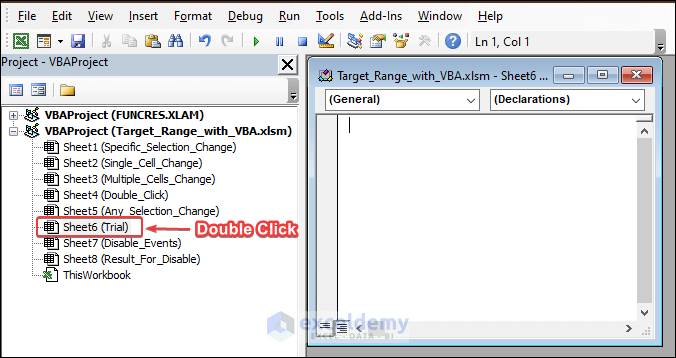
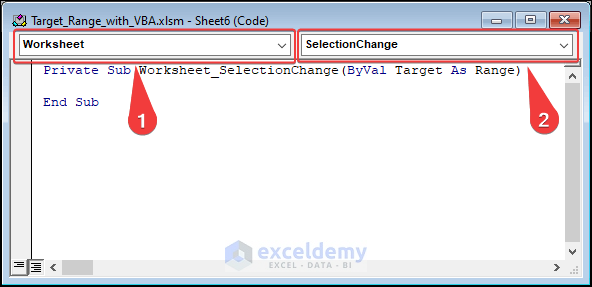
Select Worksheet from the upper left list and the event name from the upper right list in the code module.
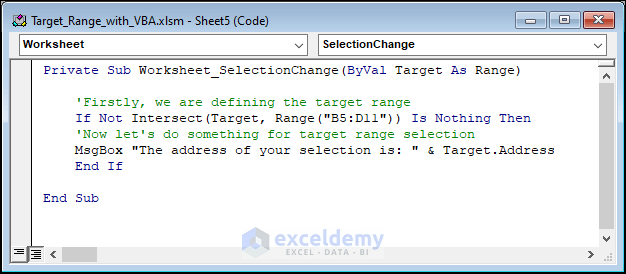
Example 1 – Showing Cell Address with a MsgBox to Change the Selection in the Target Range
- Use this code in the module. Select any cell in the Target Range.
Code:
Private Sub Worksheet_SelectionChange(ByVal Target As Range)
'Firstly, we are defining the target range
If Not Intersect(Target, Range("B5:D11")) Is Nothing Then
'Now let's do something for target range selection
MsgBox "The address of your selection is: " & Target.Address
End If
End Sub
Code Breakdown:
- declares a private sub-procedure: Worksheet_SelectionChange. Target is a built-in variable of range type for this private sub.
- checks if the Target (currently selected cell) is within B5:D11 using the Intersect function.
- If the target is within our defined range, a MsgBox is displayed in the selected cell.
Read More: How to Use Target Address in Excel VBA
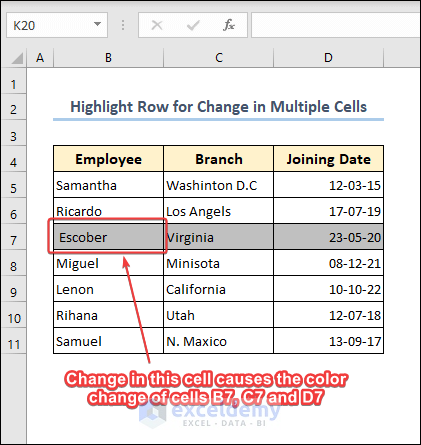
Example 2 – Highlight a Row for Any Change in Multiple Cells Within the Target Range
- Enter the following code in the module. Change the cell property of cells in the Target Range.
Code:
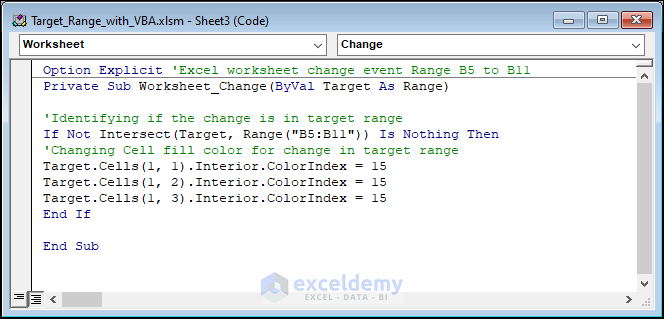
Option Explicit
'Excel worksheet change event Range B5 to B11
Private Sub Worksheet_Change(ByVal Target As Range)
'Identifying if the change is in target range
If Not Intersect(Target, Range("B5:B11")) Is Nothing Then
'Changing Cell fill color for change in target range
Target.Cells(1, 1).Interior.ColorIndex = 15
Target.Cells(1, 2).Interior.ColorIndex = 15
Target.Cells(1, 3).Interior.ColorIndex = 15
End If
End Sub
Code Breakdown:
- Option Explicit declares the variables.
- checks whether our Target (currently selected cell) is within B5:B11.
- Cells(1,1) refers to the cells beside Target and fills them with color by setting the ColorIndex property to 15.
This is the output.
Read More: Excel VBA: How to Use Target Row
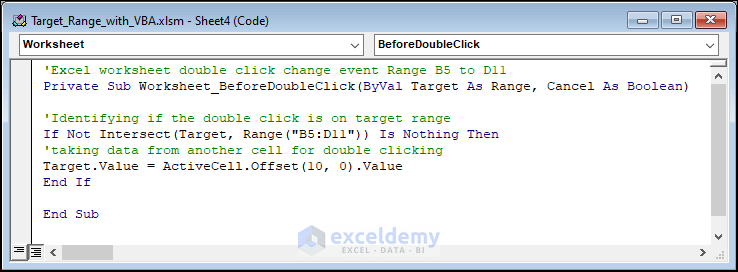
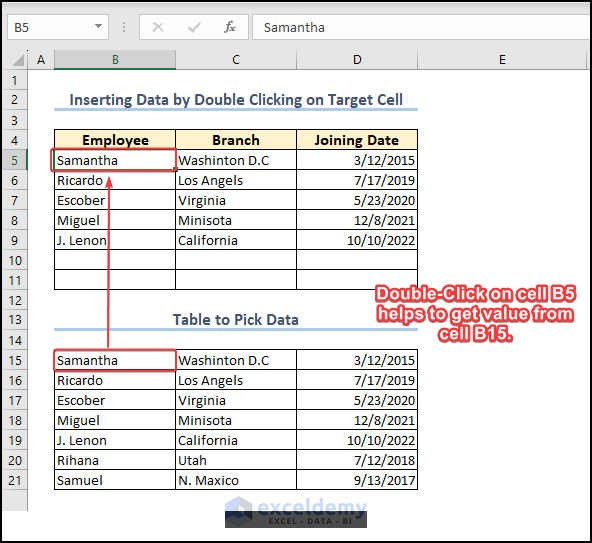
Example 3 – Insert Data from Another Range by Double Clicking Within the Target Range in Excel
- Double-click cells in Target Range to fill them with data from another range in the worksheet.
- Enter the code in the module. Double-click the cells within Target Range.
Code:
'Excel worksheet double click change event Range B5 to D11
Private Sub Worksheet_BeforeDoubleClick(ByVal Target As Range, Cancel As Boolean)
'Identifying if the double click is on target range
If Not Intersect(Target, Range("B5:D11")) Is Nothing Then
'taking data from another cell for double clicking
Target.Value = ActiveCell.Offset(10, 0).Value
End If
End Sub
Code Breakdown:
- declares a private sub-procedure for double-clicking.
- checks if the double-clicked Target is within B5:D11.
- If it’s true, a value for the Target is set. The value is taken from a cell which is located using the Offset property.
This is the output.
Read More: How to Use Target Value in Excel VBA
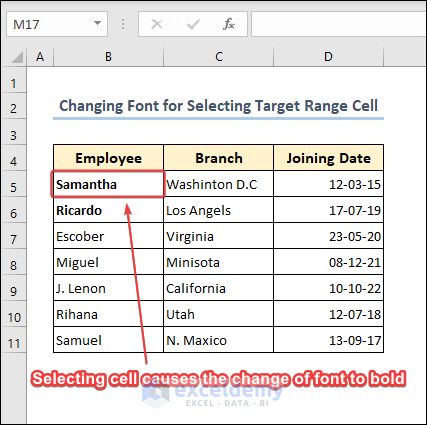
Example 4 – Change the Font After Selecting Any Cell in the Target Range
- Enter the following code in the module. Select cells in the Target Range.
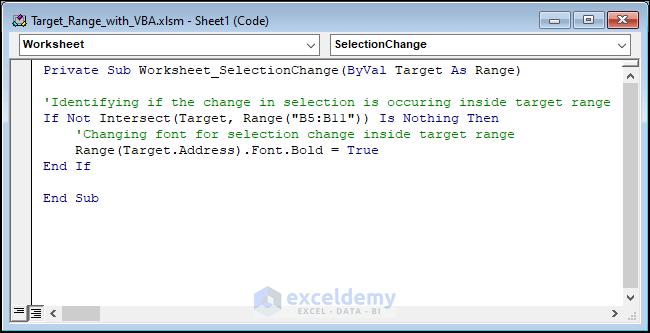
Code:
Private Sub Worksheet_SelectionChange(ByVal Target As Range)
'Identifying if the change in selection is occurring inside target range
If Not Intersect(Target, Range("B5:B11")) Is Nothing Then
'Changing font for selection change inside target range
Range(Target.Address).Font.Bold = True
End If
End Sub
The code checks if the Target (selected cell) is within B5:B11. If that’s true, the Font.Bold property is applied to the selected cell.
Read More: Excel VBA Target Cell
How to Use a Single Cell as a Target Address in Excel VBA
Here, B8 is set as Target.
- Enter the code in the module. Select B8.
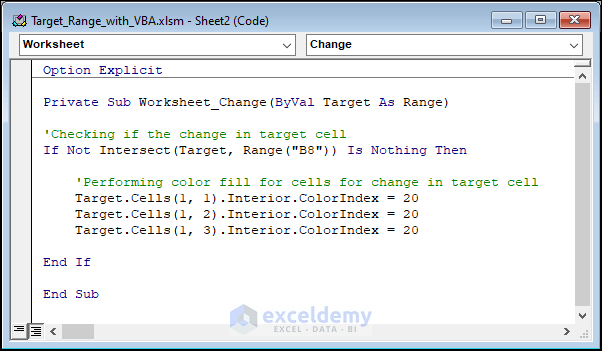
Code:
Option Explicit
Private Sub Worksheet_Change(ByVal Target As Range)
'Checking if the change in target cell
If Not Intersect(Target, Range("B8")) Is Nothing Then
'Performing color fill for cells for change in target cell
Target.Cells(1, 1).Interior.ColorIndex = 20
Target.Cells(1, 2).Interior.ColorIndex = 20
Target.Cells(1, 3).Interior.ColorIndex = 20
End If
End Sub
Code Breakdown:
- checks if the Target (Selected cell) is B8 using the Intersect property.(You can also use the “Target.Address = B8” condition with an If statement).
- If that is true, the Target cell and the cells beside it are selected with the Cells property, and the ColorIndex property set to 20, highlights those cells.
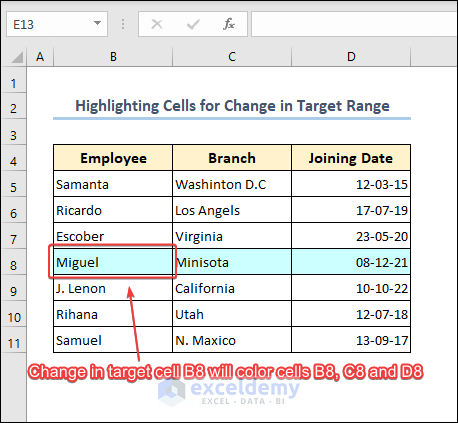
The value of B8 changed.
Things to Remember
- Don’t forget to save the workbook as xlsm after entering the VBA code.
Download Practice Workbook
Download the practice workbook here.
Get FREE Advanced Excel Exercises with Solutions!

