
CRM stands for customer relationship management (CRM) and refers to tools that track companies, contacts, activities, and deals. It doesn’t always have to be an expensive software package. For small businesses, freelancers, or startups, you can build a simple yet functional CRM directly in Excel.
In this article, we show how to build a simple CRM in Excel that actually works.
Why Use Excel for CRM?
- Low cost: No subscription fees.
- Flexibility: Customize fields and reports to your business.
- Accessibility: Most people already have Excel installed.
- Scalability: Works well for small-to-medium customer lists before upgrading to dedicated CRM software.
Step 1: Create Controlled Picklists
- Insert a new sheet named Lists.
- Type these items in four columns.
- Stage → Prospect, Qualified, Proposal, Negotiation, Won, Lost.
- Source → Referral, Website, LinkedIn, Event, Cold Email, Cold Call.
- Activity Type → Call, Email, Meeting, Demo, Note, Task.
- Status → Active, Dormant, Invalid.
Now make quick names so you can use them in dropdowns:
- Go to the Formulas tab >> select Define Name.
- In Name: type StageList.
- In Refers to: insert Lists!$A$2:$A$7.
- Click OK.

- Create named ranges for other lists also.
- SourceList → Lists!$B$2:$B$7
- ActivityTypeList → Lists!$C$2:$C$7
- StatusList → Lists!$D$2:$D$4

These names will power the Data Validation dropdowns later.
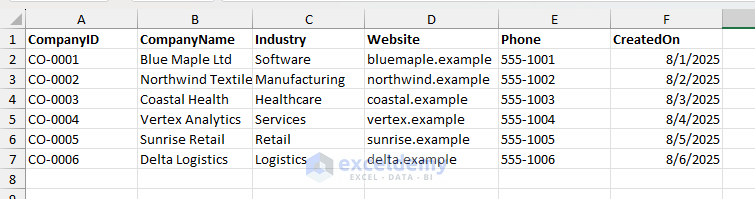
Step 2: Build Companies Database
- Add a sheet named Companies.
- Insert the following columns.
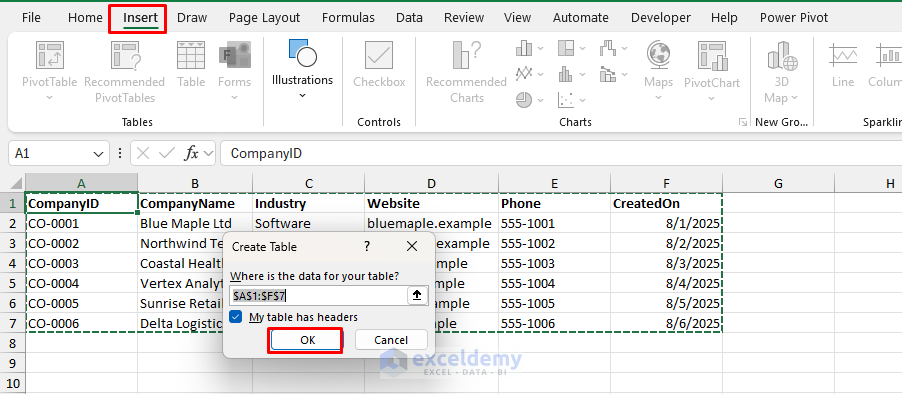
- Create a table.
- Go to the Insert tab >> select Table.
- Check “My table has headers”.
- Click OK.
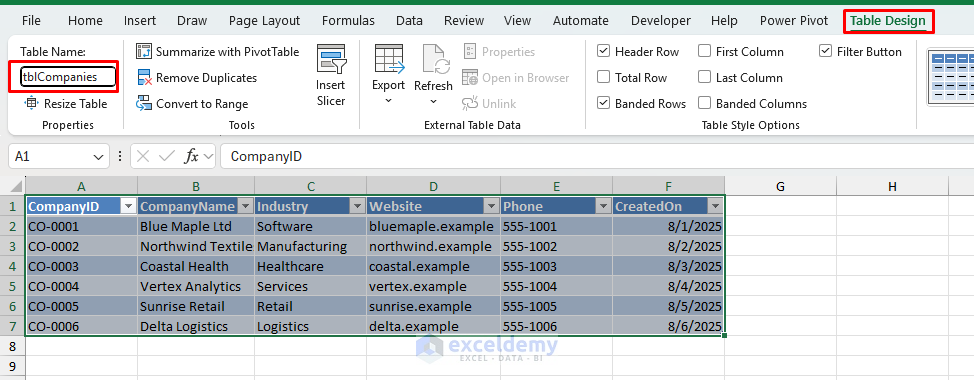
- Go to the Table Design tab >> select Table Name.
- Name it tblCompanies.
Tip: Avoid deriving IDs from row numbers to prevent accidental changes when sorting or deleting rows.
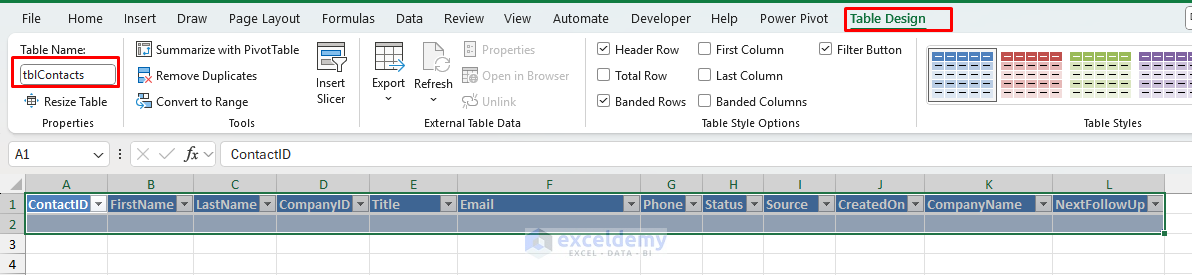
Step 3: Build Contacts Database (with Lookups & Alerts)
- Add a sheet and name it Contacts.
- Create a table tblContacts with the following columns.
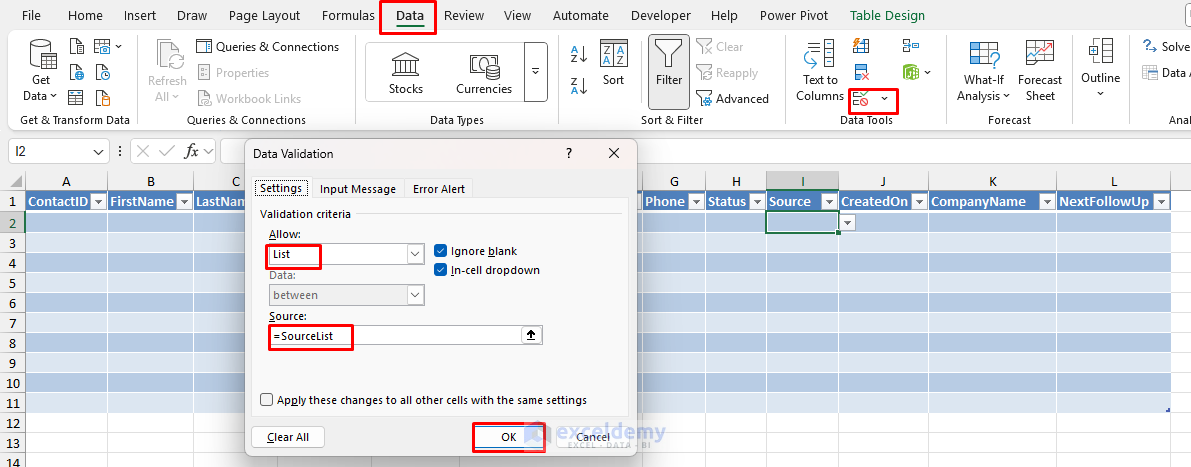
- Apply Data Validation for Status and Source columns.
- Go to the Data tab >> select Data Validation.
- For Status:
- In Allow: select List.
- In Source: type =StatusList

- For Source:
- In Allow: select List
- In Source: type =SourceList
- Fill CompanyName automatically from CompanyID.
=XLOOKUP([@CompanyID], tblCompanies[CompanyID], tblCompanies[CompanyName], "")

- For a simple version, just type a date when you promise to follow up, or calculate the NextFollowUp date (one week after you last spoke).
- To get an automatic follow-up date, use the following formula.
=IF([@CreatedOn]="","", [@CreatedOn] + 7)

You can refine this later to roll up the latest activity date.
Step 4: Build Activities Table (Interaction Log)
- Add a sheet and name it Activities.
- Create a table tblActivities with the following columns.

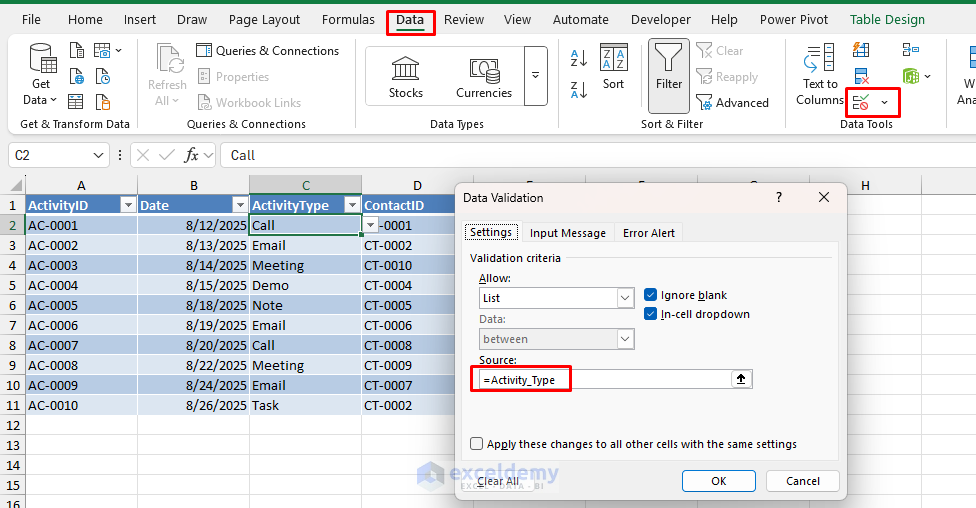
- Apply Data Validation to ActivityType:
- In Allow: select List.
- In Source: type =ActivityTypeList
- Default the next due date (NextDue) to one week after the activity:
=IF([@Date]="","", [@Date] + 7)

- Log every call, email, meeting, or task here.
Step 5: Create Deals Table (Pipeline)
- Add a sheet and name it Deal.
- Create a table tblDeal with the following columns.

- Apply Data Validation for the Stage and Source columns.
- Stage: =StageList
- Source: =SourceList
- Extract CompanyName from the Companies sheet.
=XLOOKUP([@CompanyID], tblCompanies[CompanyID], tblCompanies[CompanyName], "")

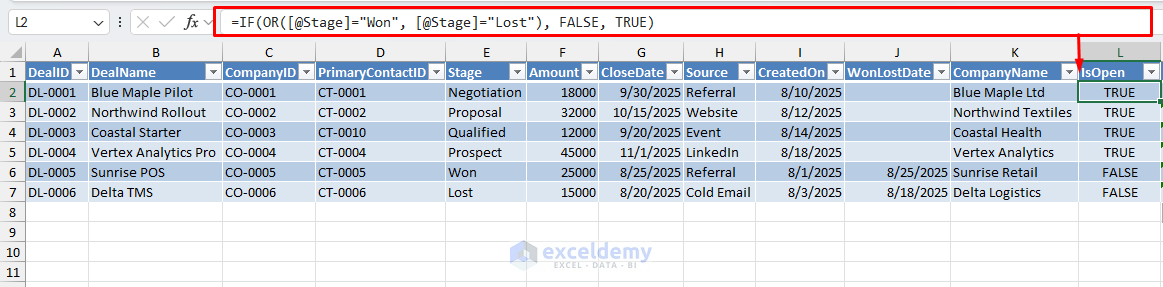
- Mark open deals (IsOpen):
=IF(OR([@Stage]="Won", [@Stage]="Lost"), FALSE, TRUE)
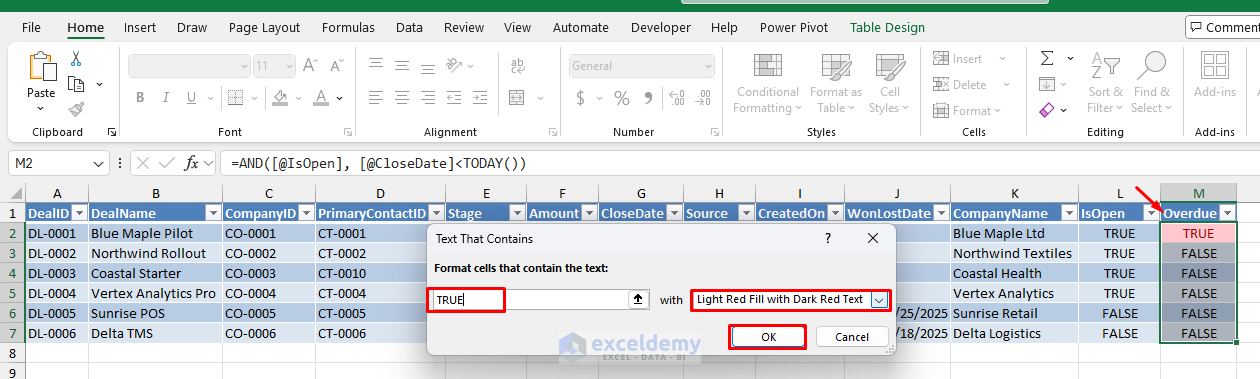
- Flag overdue opportunities (Overdue):
=AND([@IsOpen], [@CloseDate]<TODAY())

- Add Conditional Formatting to color Overdue rows light red. That is enough to keep deals honest.
- Go to the Home tab >> select Conditional Formatting >> select Highlight Cells Rules >> select Text that Contains.

- Insert TRUE >> select Light Red Fill with Dark Red Text.
- Click OK.
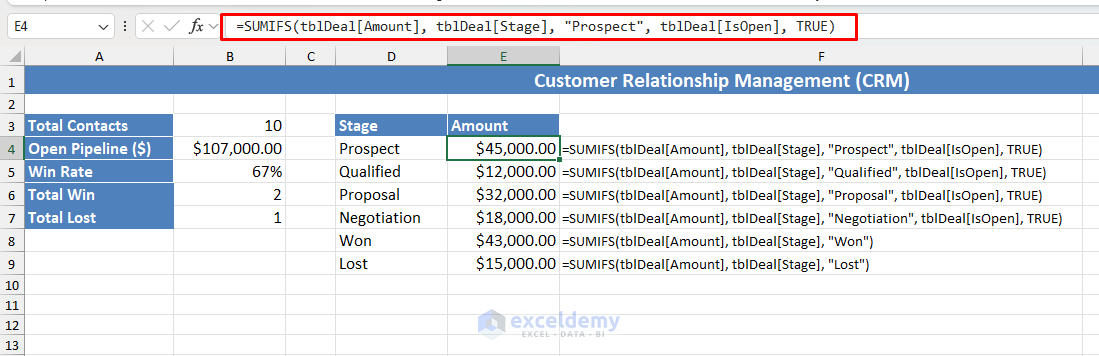
Step 6: Build The Dashboard (KPIs And Charts)
KPI Cards:
- Total Contacts
=COUNTA(tblContacts[ContactID])
- Open Pipeline ($)
=SUMIFS(tblDeal[Amount], tblDeal[IsOpen], TRUE)
- Win Rate (format as Percentage).
=LET(
closed, COUNTIFS(tblDeal[Stage], "Won") + COUNTIFS(tblDeal[Stage], "Lost"),
IF(closed=0, 0, COUNTIFS(tblDeal[Stage], "Won")/closed)
)
- Total Won
=COUNTIF(tblDeal[Stage], "Won")
- Total Lost
=COUNTIF(tblDeal[Stage], "Lost")

Pipeline By Stage:
- Create a two-column helper block:
- Stage: Prospect, Qualified, Proposal, Negotiation, Won, Lost.
- Amount:
- For open stages (Prospect/Qualified/Proposal/Negotiation):
- Repeat for each open stage.
=SUMIFS(tblDeal[Amount], tblDeal[Stage], "Prospect", tblDeal[IsOpen], TRUE)
- For Won and Lost:
=SUMIFS(tblDeal[Amount], tblDeal[Stage], "Won")
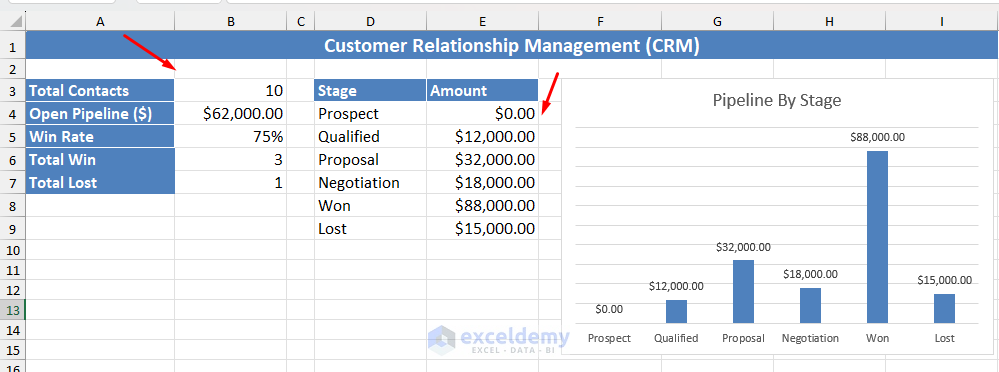
- Insert a clustered column chart from this block and add data labels.
- Select the Stage and Amount columns.
- Go to the Insert tab >> select Clustered Column chart.

You can use PivotTables and PivotCharts to analyze and visualize your pipeline and progress.
- Select the Deal table.
- Go to the Insert tab >> select PivotTables.
- Deal Value by Status.
- Deals per Sales Rep (if you add a “Rep” column).
Test Dashboard:
- Go to the Deal sheet and either change the stage or insert a new row.

- The dashboard updates automatically.
Step 7: Daily Workflow So It Actually Gets Used
- Add or update a company when needed.
- Create a contact tied to that company.
- Log every interaction in Activities; let NextDue guide follow-ups.
- Create deals, keeping Stage, Amount, and Close Date current.
- Check the dashboard each day for open pipeline and upcoming follow-ups.
This routine keeps your CRM living and accurate.
Conclusion
By following the above steps, you can create a CRM in Excel that actually works. With just a few sheets, formulas, and visual aids, you can create a working CRM in Excel that helps manage relationships, track interactions, and monitor your sales pipeline. It’s not a full replacement for professional CRM software, but for small-scale needs, it’s surprisingly powerful.
Get FREE Advanced Excel Exercises with Solutions!

GRACIAS POR SU COLABORACION PARA APRENDER
Hello Jorge Washington Rosero Castillo,
You’re very welcome! I’m glad this helped you in your learning journey. Thanks for your feedback and appreciation.
Keep exploring Excel with ExcelDemy!
Regards,
ExcelDemy