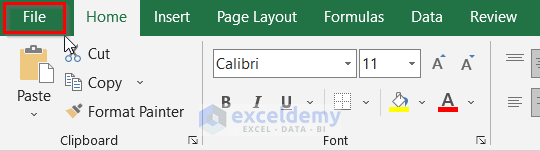
Method 1 – Turning On Excel Track Changes
- Go to the File tab.
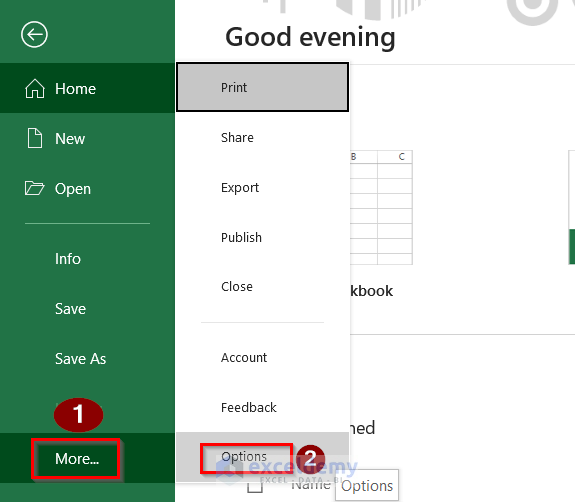
- Click the More option if needed to select the Options.
- Go to ‘Customize Ribbon’, in the right panel with ‘Main tabs’ find Review, right-click on the Review option, and ’Add new group’.
- In the left panel ‘Choose commands from’ select ‘Commands Not in the ribbon’, find ‘Track changes (Legacy)’ and Add>> to your New Group(Custom).
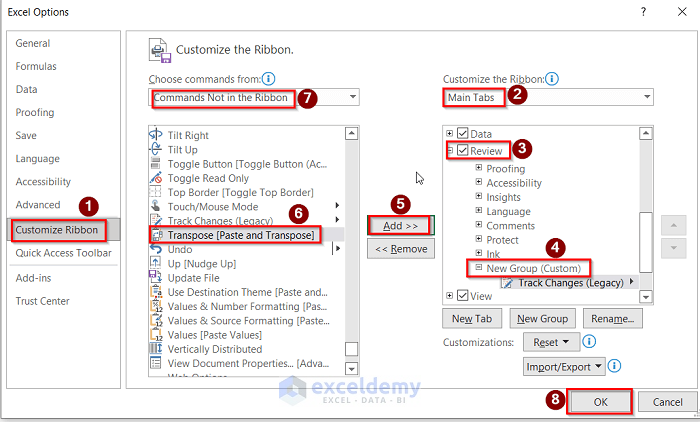
- The ‘Track Changes (Legacy)’ option is added in the main tabs section.
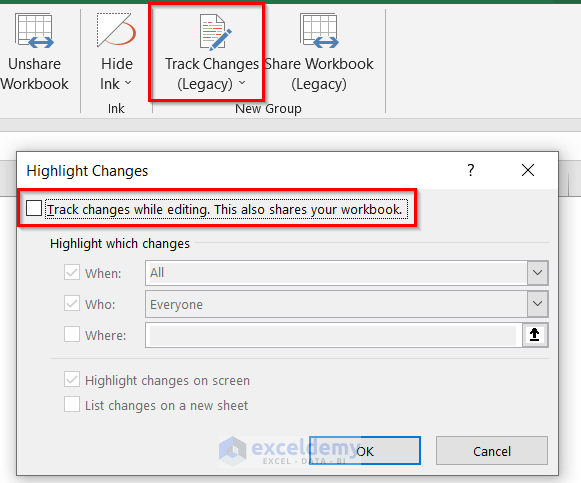
Step 2 – Highlighting Changes on the Display
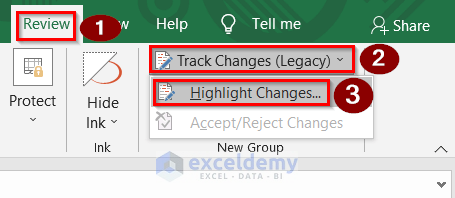
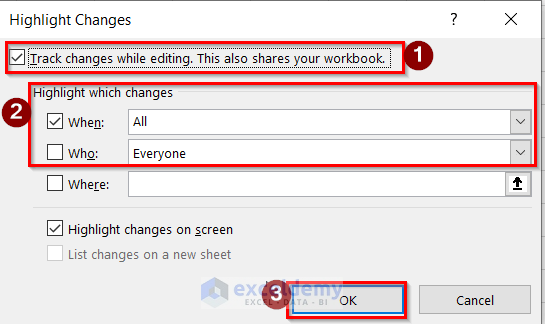
- Go to the Review tab.
- Click on the ‘Track Changes (Legacy)’ and Select the Highlight Changes option.
- Check the option ‘List changes on a new sheet’ from the’ Highlight Changes dialog box.
- From the When field, we can specify if we want all changes or changes that are not reviewed or ‘changes since last saved’.
- Click OK.
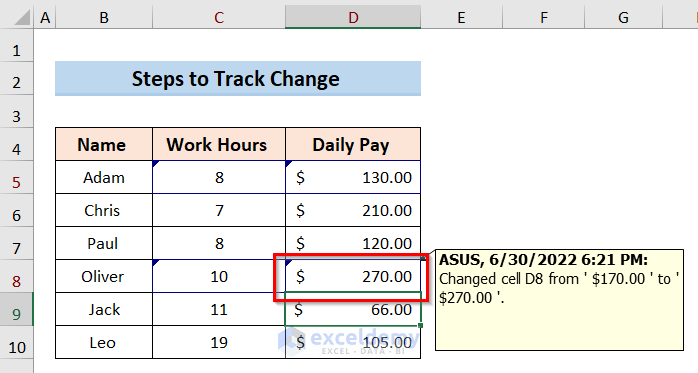
- If we make any changes, we’ll get comment boxes to display them.
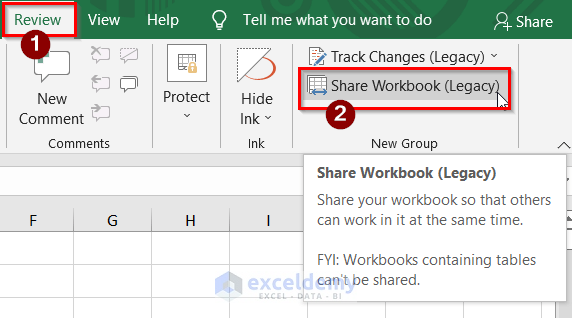
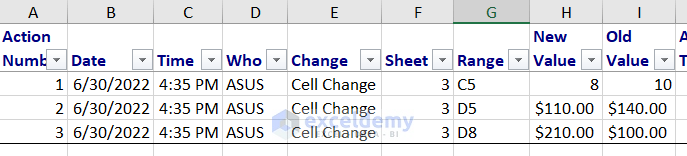
Method 3 – Viewing Tracked Changes in the History Sheet
- Turn on the Excel Track Changes feature following Method 1.
- Select the ‘Share Workbook(Legacy)’ option from the Review tab button.
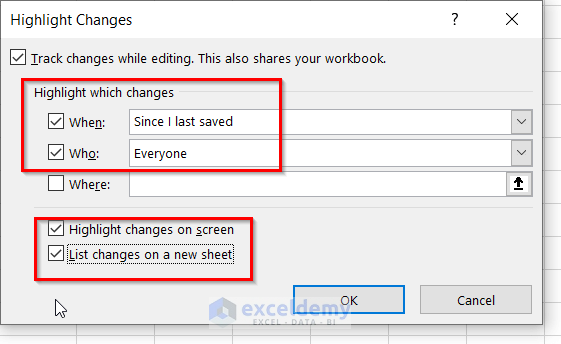
- A new dialog box named Highlight Changes will open.
- Go to the Highlight which changes box. Type the values from the following image in the When and Who field.
- Check the option ‘List changes on a new sheet‘ box and click OK.
- The following result will show up on the ‘History Sheet’.
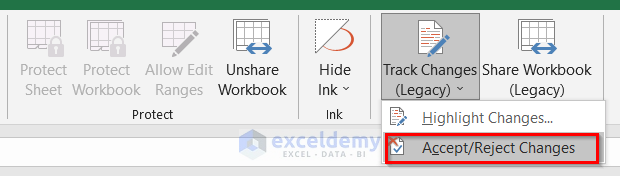
Method 4 – Accepting or Rejecting Changes
- Go to the Review tab.
- Select the option Accept/Reject Changes from the Track Changes(Legacy) drop-down.
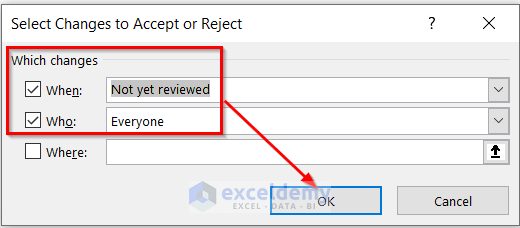
- Open the Select Changes to Accept or Reject dialog box, and edit the following options.
- Go to the text field When. Select ‘Not yet reviewed’. We can also select Since.
- Go to the text field Who. Select the user type, that we want to review.
- Uncheck the box named Where and click OK.
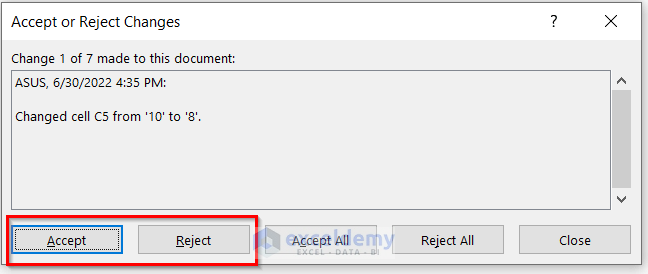
- You will see the changes in order, and you must select either Reject or Accept to cancel or keep the changes individually.
Method 5 – Setting a Duration to Keep the Change History
- Select the Share Workbook option from the Review tab.
- Go to the Advanced tab.
- In Keep change history for box, insert the duration.
- Click OK.

Turning Off Track Changes
Steps:
- Go to the Review tab.
- Go to Track Changes and select Highlight Changes
- Uncheck the option Track changes while editing from the Highlight Changes dialog box,
Track Cell Changes in Excel
Method 1 – Using the Cell Function
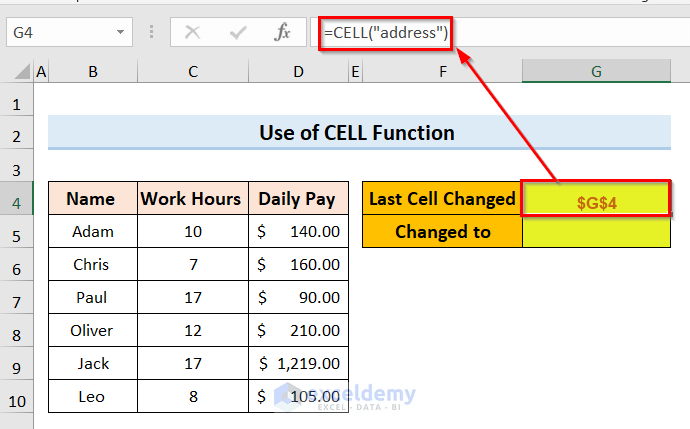
Steps:
- In cell G4, apply the following formula to track the Cell Address:
=CELL(“address”)
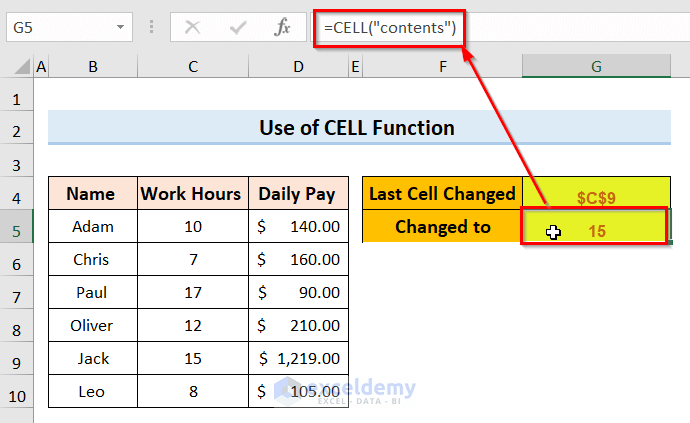
- In cell G5, insert the following formula to track the Cell Content:
=CELL(“contents”)
- In cell G6, create the following formula to track the File Address:
=CELL(“filename”)
- If any change is made, the last change will be shown on the screen in the following way.

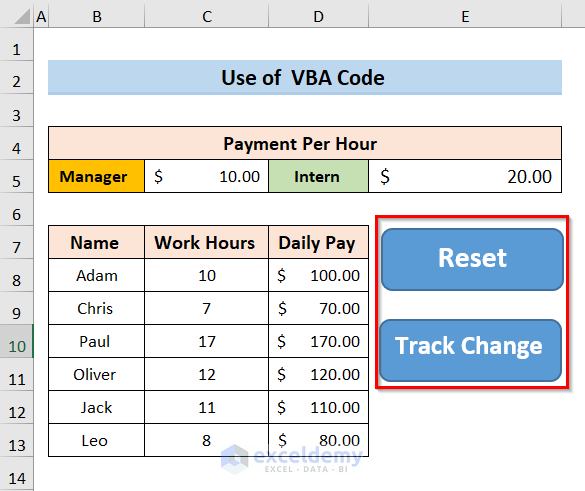
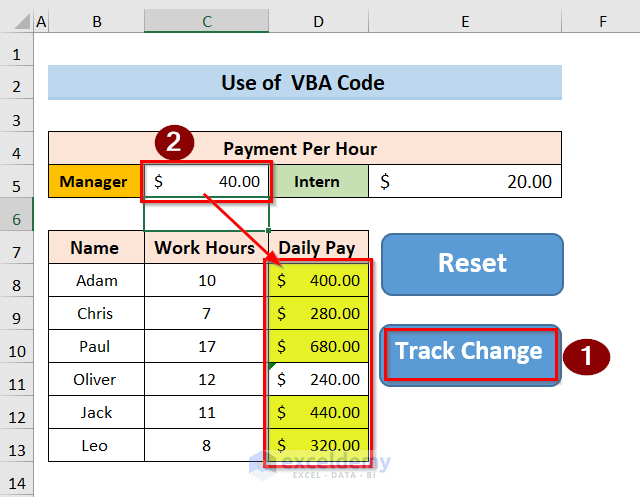
Method 2 – Applying VBA Code
Steps:
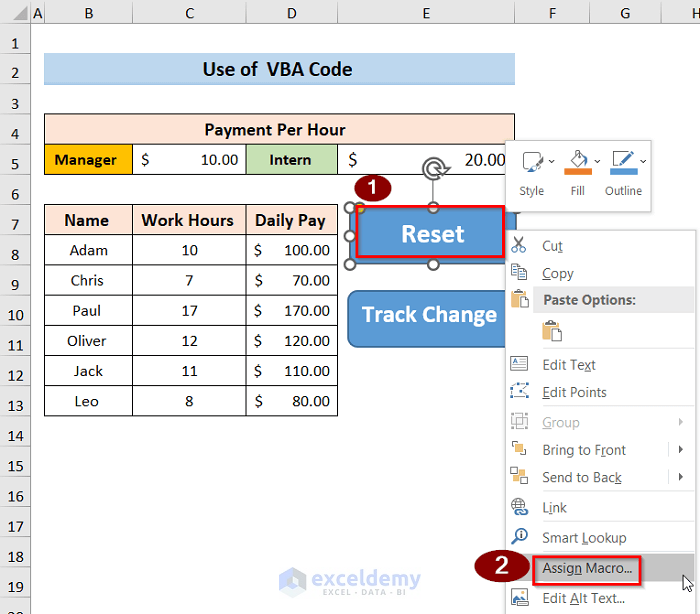
- Putting two shapes for a Reset button and a Track Change.
- Press ALT + F11 to open the VBA window, then select Insert and choose Module.
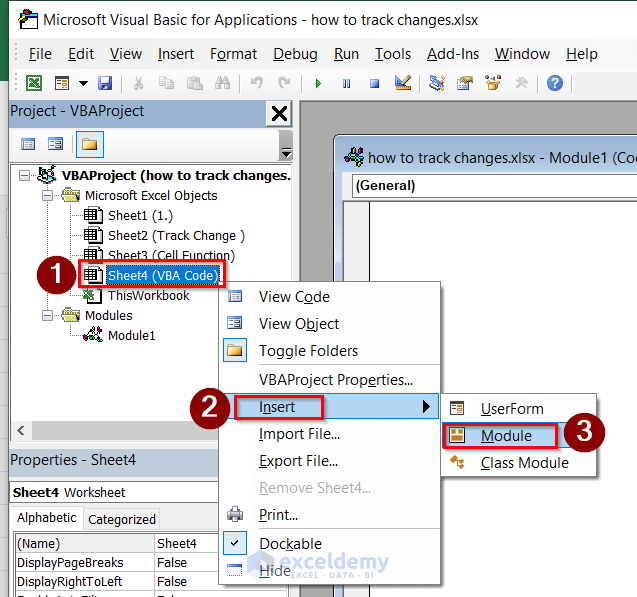
- Copy the following code and insert it into the blank space.
Sub DeleteFormat()
Cells.FormatConditions.Delete
End Sub
Sub TrackCellChange()
For Each sheetw In ActiveWorkbook.Worksheets
sheetw.Cells.FormatConditions.Delete
Err.Clear
On Error Resume Next
x = sheetw.Cells.SpecialCells(xlCellTypeFormulas, 23).Count
If Err.Number = 0 Then
For Each cell In sheetw.Cells.SpecialCells(xlCellTypeFormulas, 23)
cell.FormatConditions.Add Type:=xlCellValue, Operator:=xlNotEqual, _
Formula1:="=" & cell.Value
cell.FormatConditions(cell.FormatConditions.Count).SetFirstPriority
With cell.FormatConditions(1).Interior
.Color = 2552550
.TintAndShade = 0
End With
cell.FormatConditions(1).StopIfTrue = False
Next cell
End If
Next sheetw
End Sub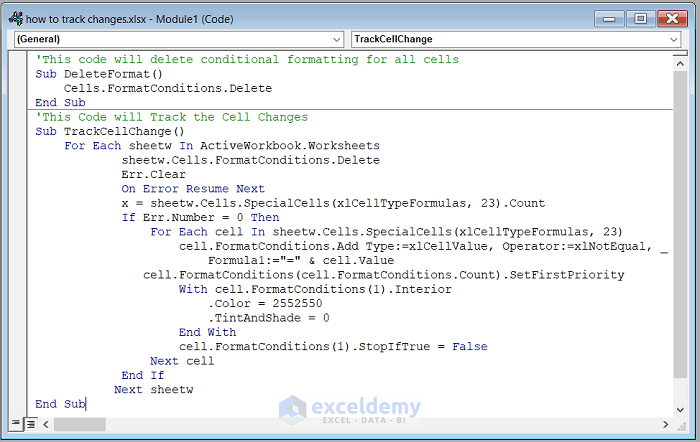
- Right-click on the Reset shape and select the ‘Assign Macro’.
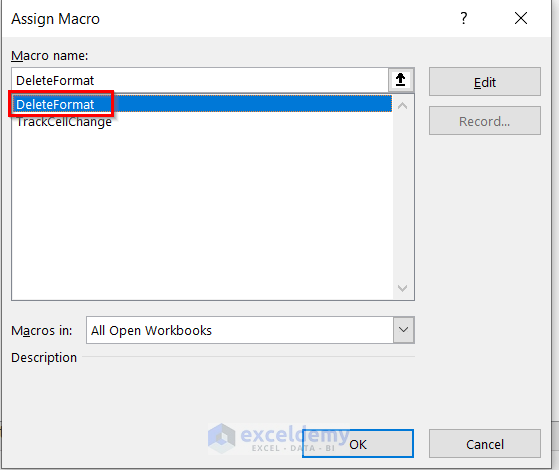
- Press the Delete Format option and click OK.
- Assign the Trackcellchange macro to Track Change.
Things to Remember
- The purpose of the history sheet is to show the saved changes, so try to save the latest work by pressing Ctrl + S.
- If the history sheet is unable to show the list of all the changes, go to All using the When box and make the Who and Where boxes empty.
- If you want your track change of Excel to look similar to Word’s track changes, then you can get help by reading this macro post by the Microsoft Excel Support Team.
Download the Practice Workbook
Track Changes in Excel: Knowledge Hub
<< Go Back to Share Workbook | Workbook in Excel | Learn Excel
Get FREE Advanced Excel Exercises with Solutions!
