Looking for ways to know how to Consolidate Data in Excel from Multiple Columns? Then, this is the right place for you. Sometimes, we need to consolidate data from multiple columns in Excel to do work more precisely. Here, you will find 7 different step-by-step explained ways to consolidate data from multiple columns in Excel.
How to Consolidate Data from Multiple Columns in Excel: 7 Easy Ways
We can consolidate data from multiple columns in Excel by using some easy ways.
1. Applying Consolidate Feature to Consolidate Data from Multiple Columns
In the first method, we will apply the Consolidate Feature to consolidate data from multiple columns in Excel.
Here, we have 3 datasets containing the Names and Purchases of some customers for consecutive 3 months (January, February, and March).
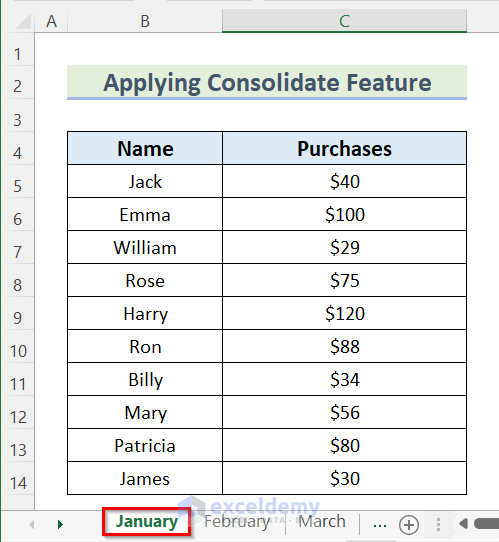
Here, the above data set shows the values of Purchases of the customers in January.

The above data set shows the values of Purchases of the customers in February.
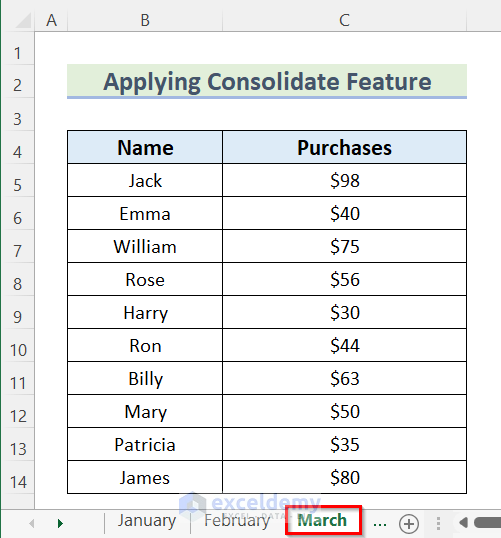
Finally, the above data set shows the values of Purchases of the customers in March.
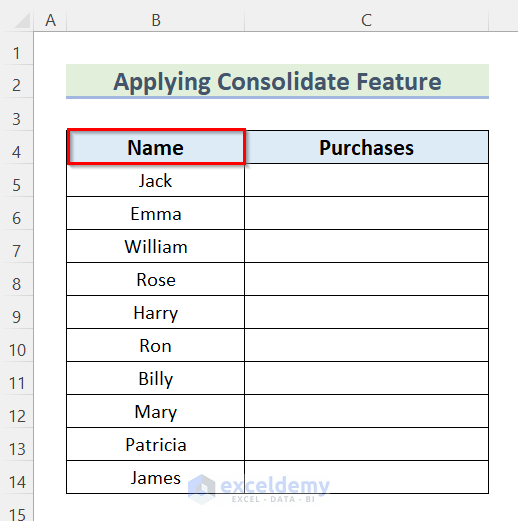
Now, we will consolidate the Purchase value of the 3 months using the Consolidate Feature. Follow the steps below to do it on your own.
Steps:
- First, open a new Worksheet and prepare the worksheet for the consolidated data.
- Then, select Cell B4.
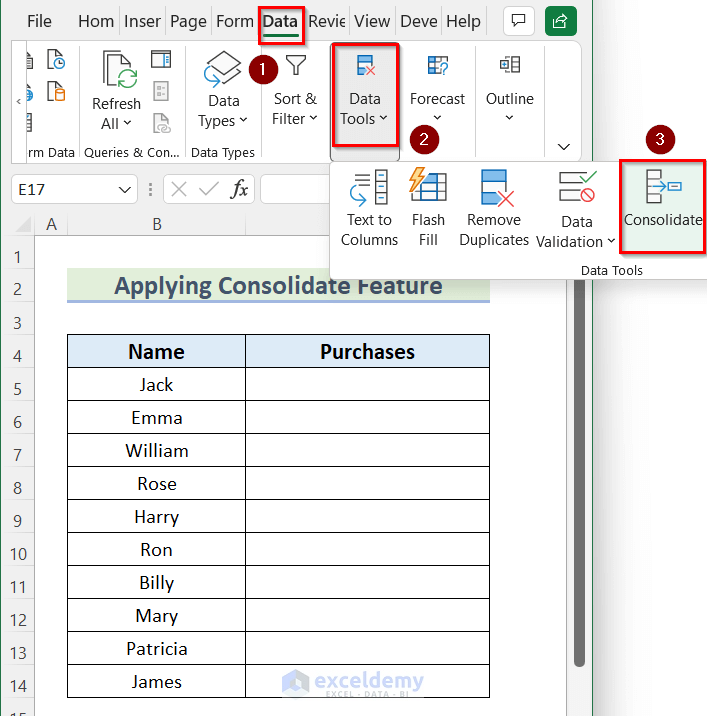
- After that, go to the Data tab >> click on Data Tools >> select Consolidate.
- Then, the Consolidate dialog box will open.
- Now, select Sum as a Function.
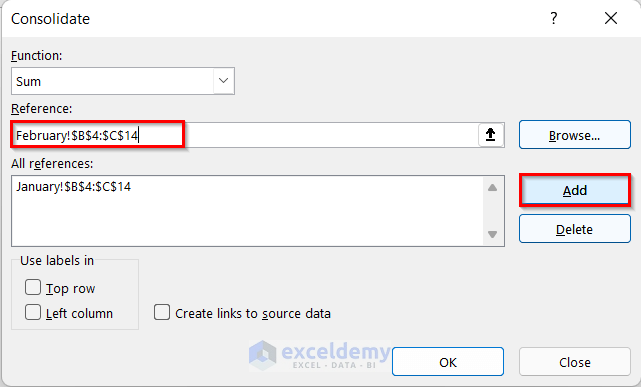
- Next, in the Reference box, insert the Cell range B4:C14 from the worksheet January.
- After that, press Add.

- Then, again in the Reference box, insert the Cell range B4:C14 from the worksheet February.
- After that, press Add.
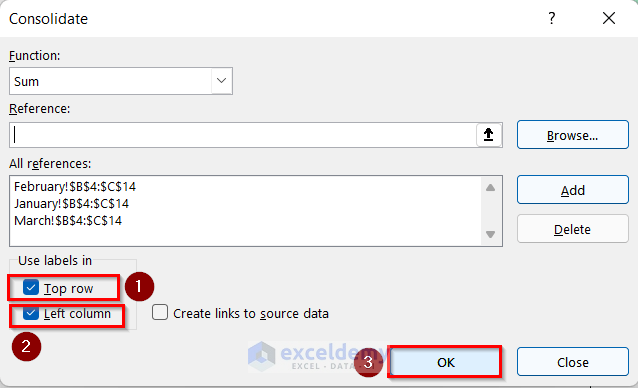
- Now, in the Reference box, insert the Cell range B4:C14 from the worksheet February.
- Then, press Add.

- After that, activate the Top row and Left column.
- Then, press OK.
- Finally, you will find the consolidated sum Purchase values of the three consecutive months applying the Consolidate Feature.

2. Use of Combined Functions to Consolidate Data in Excel
Now, we will use the INDEX, INT, ROW, COLUMNS, and MOD functions to consolidate data in Excel from multiple columns.
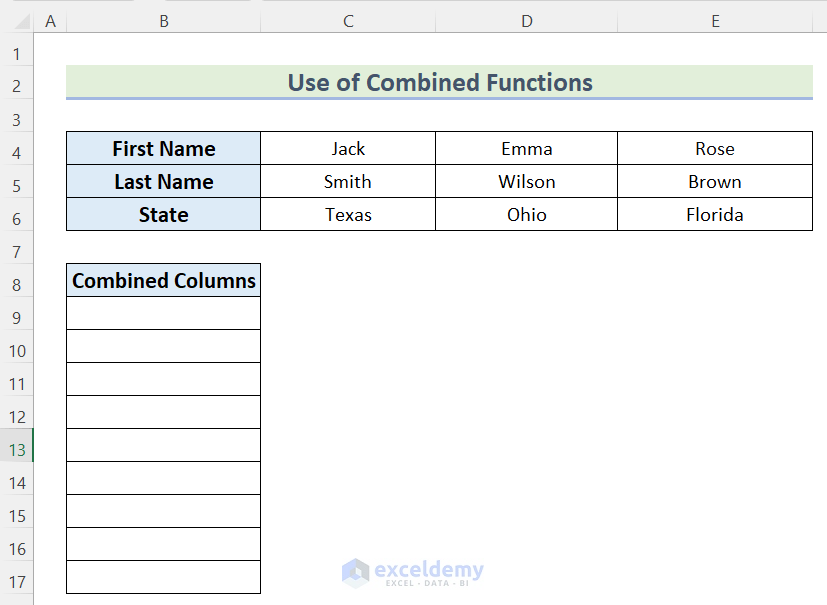
Here, we have a dataset containing the First Name, Last Name, and State of some people. We will consolidate the date of these columns into a column named the Combined Columns.
Go through the steps to take it on your own.
Steps:
- First, select Cell B9.
- Then, insert the following formula.
=INDEX($C$4:$E$6,1+INT((ROW(A1)-1)/COLUMNS($C$4:$E$6)),MOD(ROW(A1)-1+COLUMNS($C$4:$E$6),COLUMNS($C$4:$E$6))+1)
Formula Breakdown
- COLUMNS($C$4:$E$6) ——> The COLUMNS function returns the column number.
- Output: {3}
- ROW(A1) ——> The ROW function returns the row number.
- Output: {1}
- MOD(ROW(A1)-1+COLUMNS($C$4:$E$6),COLUMNS($C$4:$E$6)) ——> the MOD function returns the remainder of selected numbers by division.
- MOD({1}-1+3,3) ——> turns into
- Output: {0}
- MOD({1}-1+3,3) ——> turns into
- INT((ROW(A1)-1)/COLUMNS($C$4:$E$6)) ——> the INT function returns the integer part of a number.
- INT(({1}-1)/3) ——> turns into
- Output: {0}
- INT(({1}-1)/3) ——> turns into
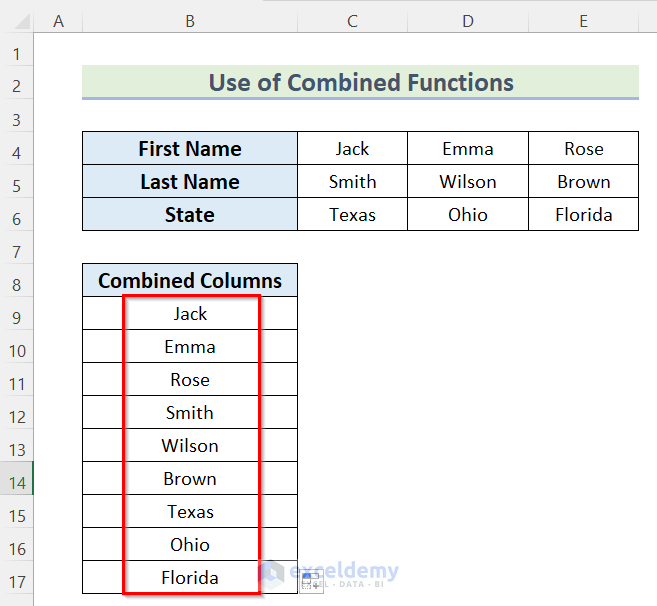
- INDEX($C$4:$E$6,1+{0},{0}+1) ——> the INDEX function returns the value of a given location in a range or array.
- Output: “Jack”
- After that, press ENTER.
- Then, drag down the Fill Handle tool to AutoFill the formula for the rest of the cells.

- Finally, you will get the Combined Columns column using the Combined functions.
3. Using Ampersand (&) Operator to Consolidate Data in Excel
We can use the Ampersand (&) operator to consolidate data from multiple columns in Excel.
Here, we have a dataset containing the First Name and Last Name of some people. Now, we will consolidate these two data into a column using the Ampersand(&) operator.

Go through the steps to take it on your own dataset.
Steps:
- First, select the Cell D5.
- Then, insert the following formula.
=B5&" "&C5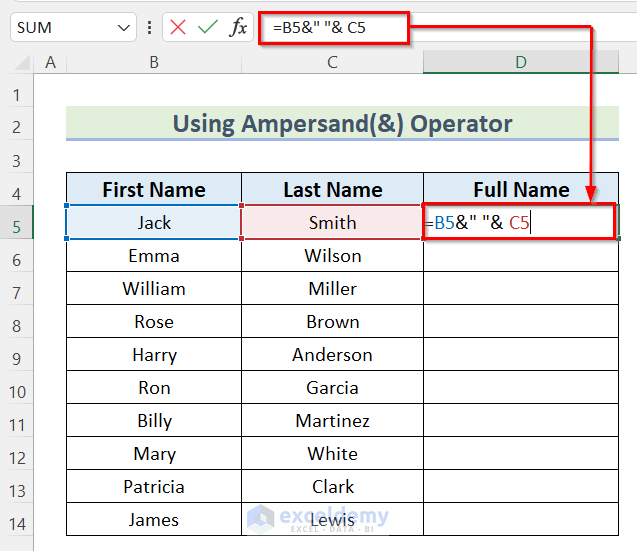
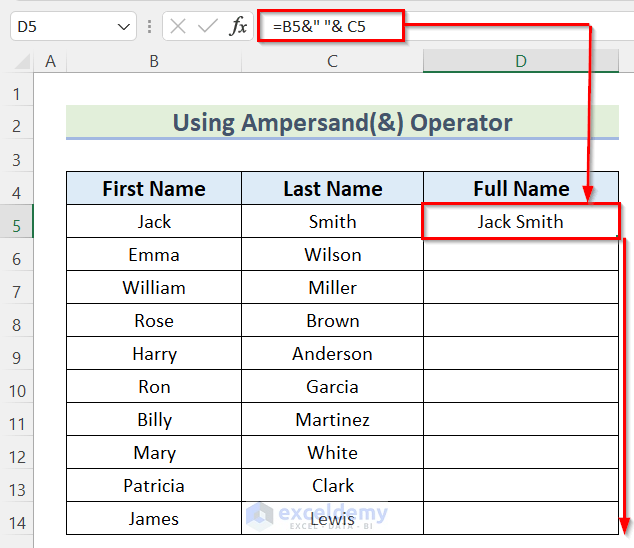
Here, we consolidated the data of Cell B5 and Cell C5 using the Ampersand(&) operator. We also added a space between the two cells.
- Now, press ENTER.
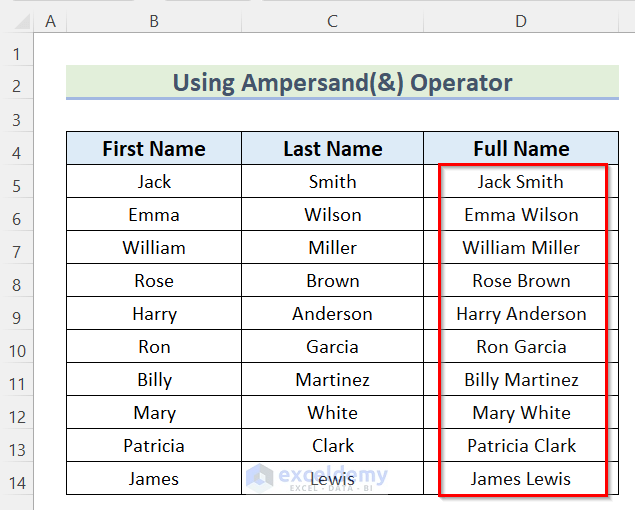
- Then, drag down the Fill Handle tool to AutoFill the formula for the rest of the cells.
- Finally, you will get the consolidated Name column using the Ampersand operator.
4. Using CONCAT or CONCATENATE Function to Consolidate Data in Excel
We can also use the CONCAT or CONCATENATE functions to consolidate data in Excel. These two functions can consolidate text from multiple columns following some steps.
Steps:
- First, select cell D5.
- Next, insert the following formula.
=CONCATENATE(B5," ",C5)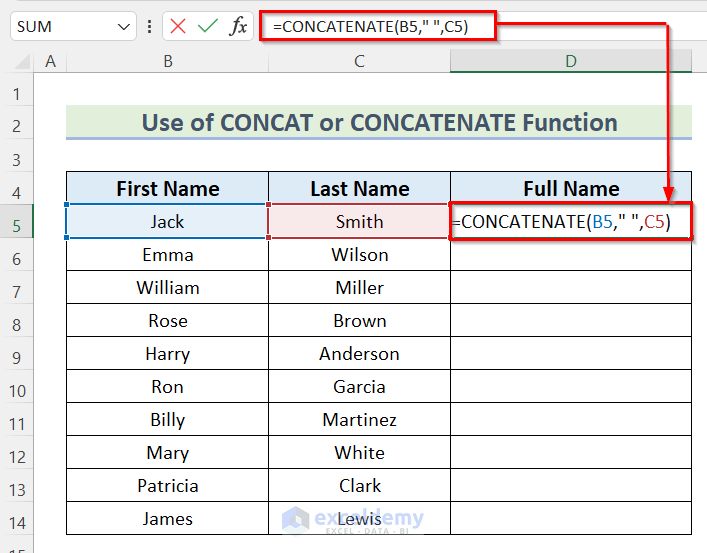
Here, in the CONCATENATE function, we selected Cell B5 as text1, typed blank (“”) as text2, and selected Cell C5 as text3 to consolidate the data of Cell B5 and Cell C5.
- Now, press ENTER.
- Then, drag down the Fill Handle tool to AutoFill the formula for the rest of the cells.

- Finally, you will get the consolidated Name column using the CONCATENATE function.

5. Applying TEXTJOIN Function to Consolidate Data in Excel
In the fifth method, we will use the TEXTJOIN function to consolidate the data of the First Name and Last Name column as the Name column in Excel. Follow the steps given below to do it on your own.
Steps:
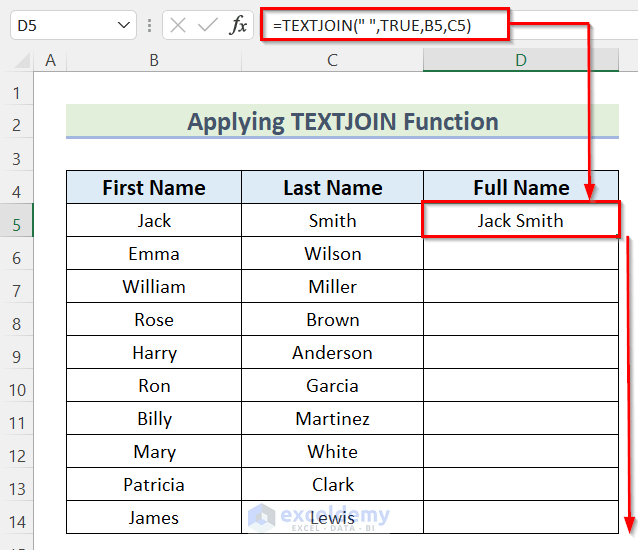
- In the beginning, select Cell D5.
- Then, insert the following formula.
=TEXTJOIN(" ",TRUE,B5,C5)
Here, in the TEXTJOIN function, we typed blank (“”) as delimiter to give space between selected cells. Then select TRUE to ignore_empty cells. Next, select Cell B5 as text1 and Cell C5 as text2.
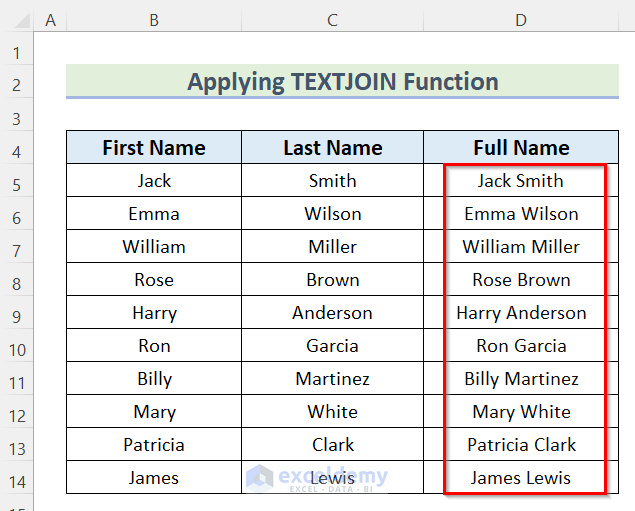
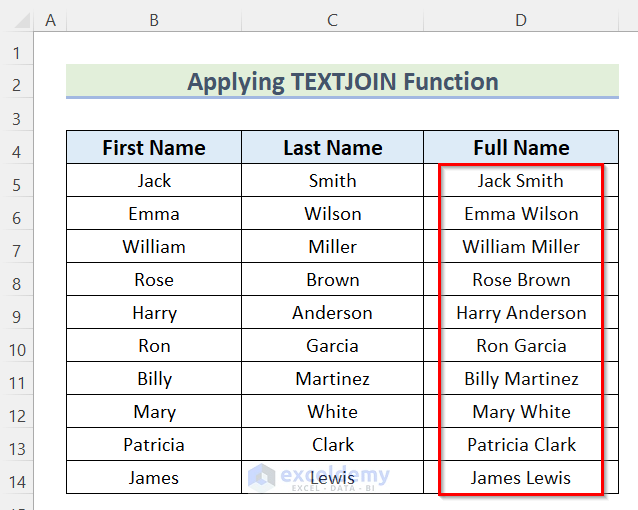
- After that, press ENTER.
- Next, drag down the Fill Handle tool to AutoFill the formula for the rest of the cells.
- Finally, you will find the consolidated Name column using the TEXTJOIN function.
6. Use of Notepad App to Consolidate Data in Excel
Now, we will use Notepad to consolidate data from multiple columns in Excel. Go through the steps given below to do it on your own.
Steps:
- First, select Cell range B5:C14.
- Then, press CTRL+C to copy the Cell range.

- After that, open a Notepad file.
- Then, press CTRL+V to paste the selected range here in the Notepad.

- Next, press CTRL+H to open the Replace dialog box.
- Then, select the space between the two texts in the notepad file and Copy it.
- After that, Paste it into the box.

- Then, type blank (“”) in the Replace box.
- Next, press Replace.

- Now, you will find all the data in the image given below.

- Then, Copy the entire text from the Notepad using the keyboard shortcut CTRL+C.

- Now, Paste it using the keyboard shortcut CTRL+V in Cell D5.
- Finally, you will find the consolidated Name column using Notepad.
7. Using VBA to Consolidate Data in Excel
In the final method, we will show you how you can use VBA to consolidate data from multiple columns in Excel.

Follow the steps below to do it on your own.
Steps:
- In the beginning, open the Developer tab >> click on Visual Basic.
Alternatively, you can use the keyboard shortcut ALT+F11 too.
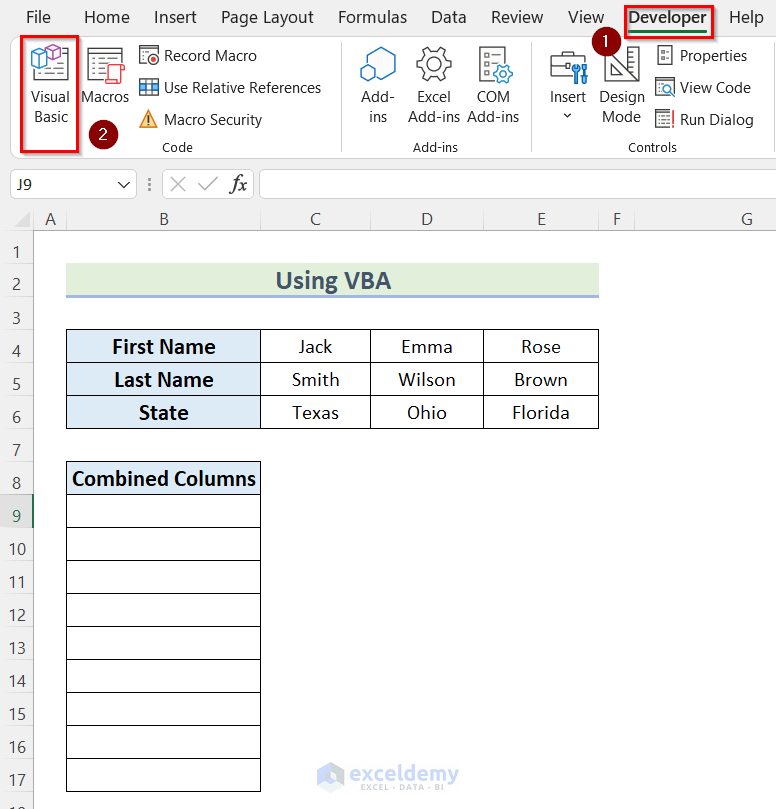
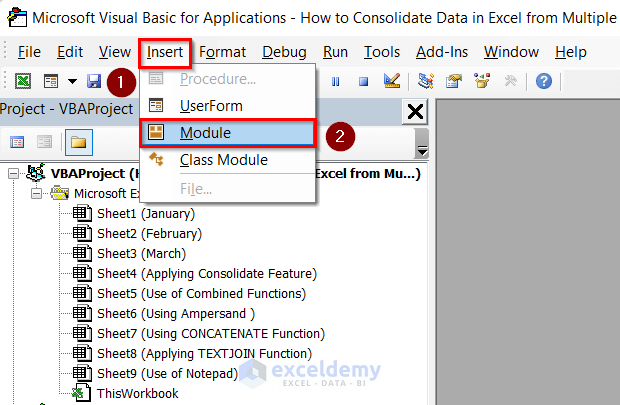
- Then go to Insert >> select Module.
- After that, write the following code in your Module.
Option Explicit
Sub Consolidate_Multiple_Columns()
Dim Column1 As Range
Dim Column2 As Range
Dim ranges As Range
Dim Row_Number As Integer
Set Column1 = Application.Selection
Set Column1 = Application.InputBox("Insert Range:", _
"Consolidating Multiple Columns", Column1.Address, Type:=8)
Set Column2 = Application.InputBox("Consolidated Column:", _
"Consolidating Multiple Columns", Type:=8)
Row_Number = 0
Application.ScreenUpdating = False
For Each ranges In Column1.Rows
    ranges.Copy
    Column2.Offset(Row_Number, 0).PasteSpecial _
    Paste:=xlPasteAll, Transpose:=True
    Row_Number = Row_Number + ranges.Columns.Count
Next
Application.CutCopyMode = False
Application.ScreenUpdating = True
End Sub
Code Breakdown
- First, Sub Procedure as Consolidate_Multiple_Columns().
- Then, we declared Column1, Column2 and ranges as Range and Row_Number as Integer.
- After that, we set Column1 as Application.Selection.
- Then, we set the InputBox in Column1 variable to select the range that we want to consolidate.
- Next, we set another InputBox in Column2 to select the cell where we want to keep the consolidated values.
- Then, we selected Row_Number=0.
- Next, we set the Screen Updating to False.
- After that, we used a For loop to go through the selected ranges.
- Then, copied and pasted the values one after another for that used Offset not to overlap any values.
- After that, incremented the Row_Number by using Row_Number= Row_Number+ranges.Columns.Count.
- Next, we set Cut Copy Mode as False and Screen Updating as True.
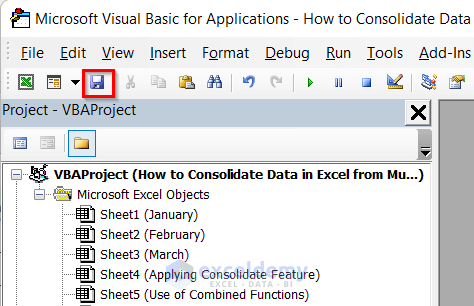
- Then, click on the Save box to save the Module.
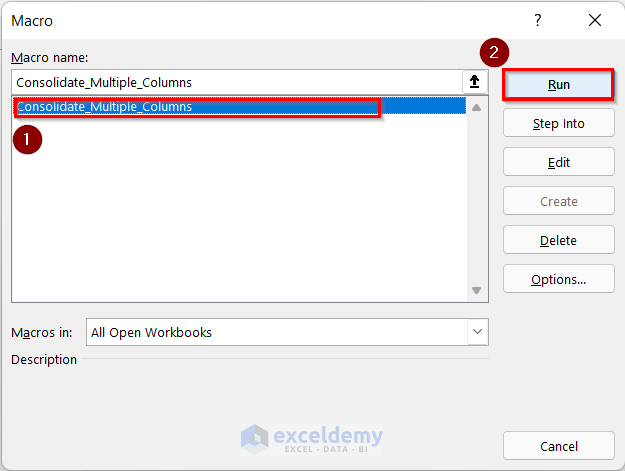
- After that, go to the Developer tab >> click on Macros.

- Now, this will open the Macro dialog box.
- Then, inside the box choose your Macro. Here, we will choose the Consolidate_Multiple_Column code.
- After that, press Run.
- Now, the Consolidating Multiple Column box will open.
- Then, in the Insert Range box insert the Cell range C4:E6.
- After that, press OK.
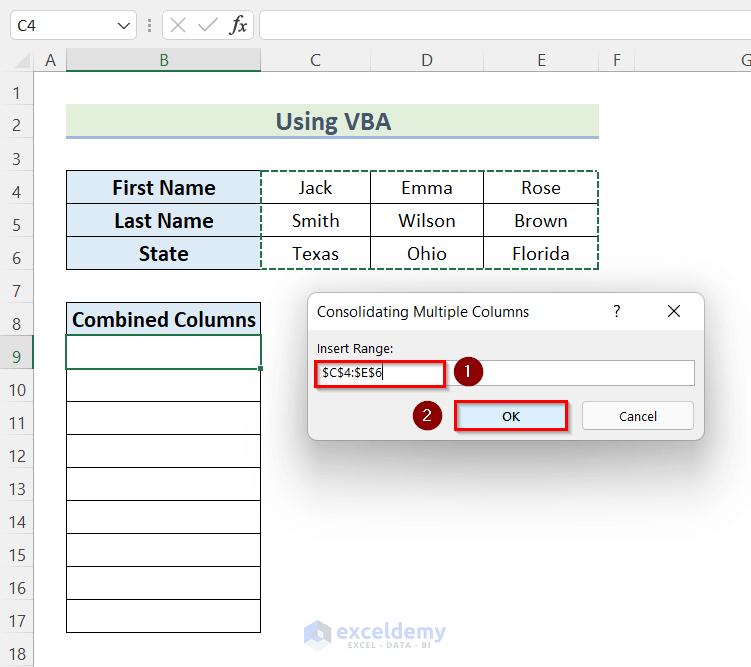
- Next, the Consolidating Multiple Column box will open again.
- Now, in the Consolidated Column box select the Cell range B9.
- After that, press OK.
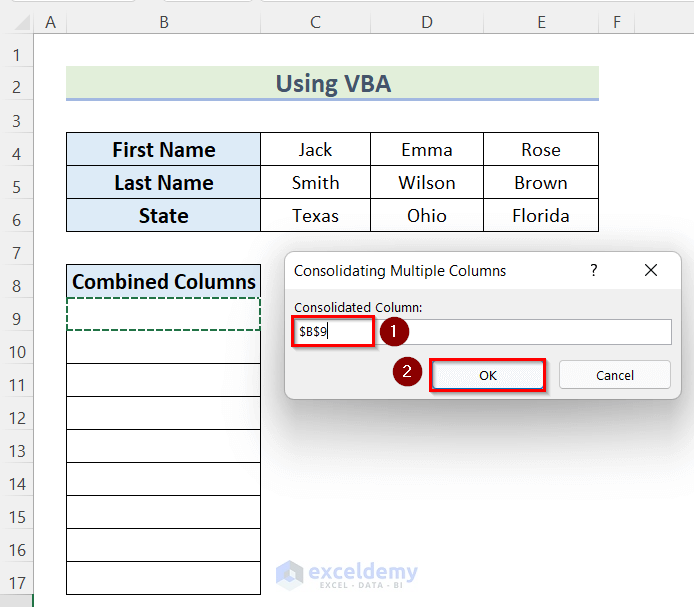
- Finally, you will find the Combined Columns column using VBA.

Practice Section
In the article, you will find an Excel workbook like the image given below to practice on your own.

Things to Remember
- The INT function will show #VALUE! Error when a value is inserted as text rather than in number.
- The MOD function will show #DIV/0 Error if the divisor is 0.
Download Practice Workbook
Conclusion
So, in this article, we have shown you ways to consolidate data from multiple columns in Excel. I hope you found this article interesting and helpful. If something seems difficult to understand, please leave a comment. Please let us know if there are any more alternatives that we may have missed.
<< Go Back To Consolidation in Excel | Merge Sheets in Excel | Merge in Excel | Learn Excel
Get FREE Advanced Excel Exercises with Solutions!
