In this article, we will demonstrate how to use Excel VBA to iterate through each row in a range effectively, where the rows contain either single or multiple columns.
Use VBA for Each Row in a Range in Excel (Quick View)
First, we’ll discuss how to use VBA to iterate through each row of a range that contains a single column, then we’ll cover the process for multiple columns.
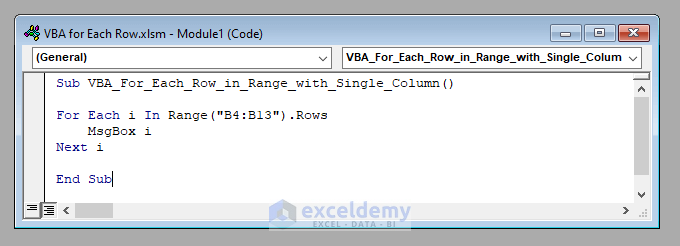
Method 1 – Using VBA for Each Row in a Range with a Single Column
To use VBA to iterate through each row in a range, we’ll use a for-loop.
For example, if the range is B4:B13, we can use:
For Each i In Range("B4:B13").RowsHere, the variable i will hold each row of the range B4:B13 one by one.
As each row in the range contains a single column, we can use i directly to access the value of that row. For example, to display the value of each row in a message box one by one, we can use:
MsgBox iWe end the for-loop thereafter with the line:
Next i
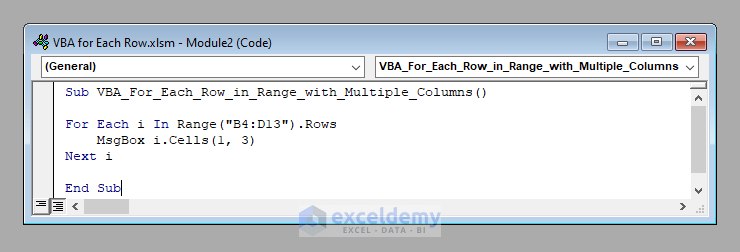
Method 2 – Using VBA for Each Row in a Range with Multiple Columns
If the range contains multiple columns, we can’t access the value from each row directly.
Instead, start the same for-loop in the previous Method. For example, if the range is B4:D13, use:
For Each i In Range("B4:D13").RowsSince we can’t access i directly, as with each iteration it contains values from 3 columns (B, C, and D), to access a specific value each iteration we have to specify the column number of that value. We can use the Cells property of VBA for this purpose.
For example, to display the value of the 3rd column (Column D) one by one, use:
MsgBox i.Cells(1, 3)And, of course, end the iteration with a Next statement thereafter.
Next i
Read More: Loop through a Range for Each Cell with Excel VBA
How to Use VBA for Each Row in a Range in Excel: 4 Practical Examples
Let’s work through a few examples of using VBA to iterate through each row of a range in a worksheet.
Suppose we have a worksheet with the names of some students and their marks in Physics and Chemistry.
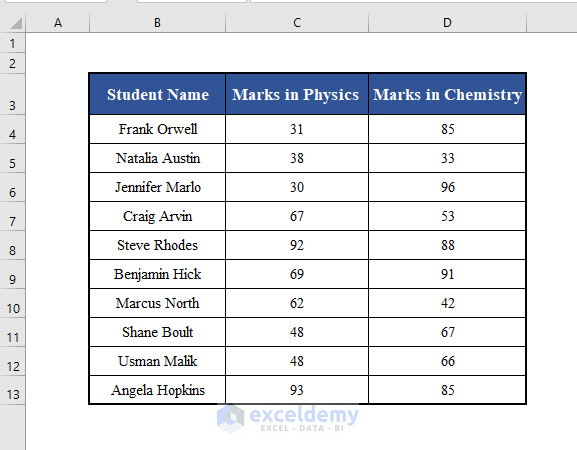
We’ll use use this dataset to illustrate the examples.
Example 1 – VBA to Collect Data from Each Row of a Single Column of a Given Range
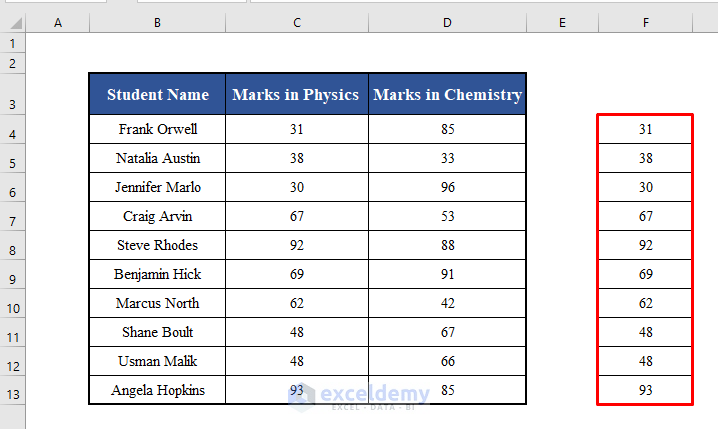
Let’s gather the marks in Physics of all the students (C4:C13) in a new range F4:F13 with VBA. As the range consists of a single column, we can access the value of each row directly in this case.
The VBA code is:
VBA Code:
Sub Collecting_Data_from_a_Single_Column()

Output_Row = 1

For Each i In Range("C4:C13").Rows
    Range("F4:F13").Cells(Output_Row, 1) = i
    Output_Row = Output_Row + 1
Next i

End Sub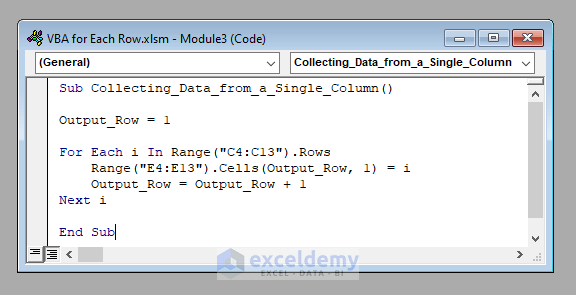
Output:
Running this code will collect the marks in Physics of each student (C4:C13) and copy them to the range F4:F13.
Read More: How to Use VBA for Each Cell in Range in Excel
Example 2 – VBA to Collect Data from Each Row of a Single Column of a Given Range with a Criterion
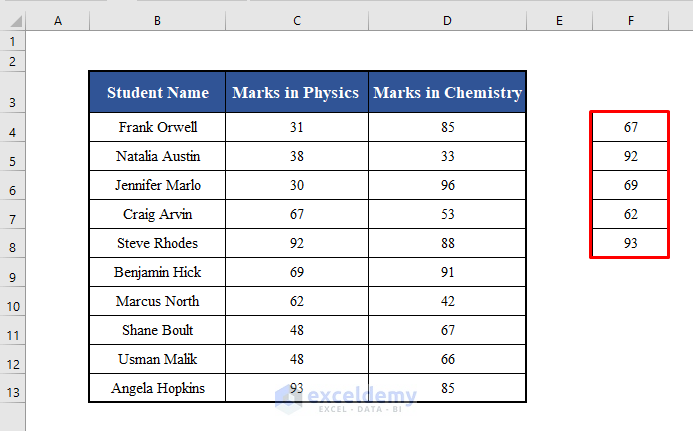
Now, we’ll collect data from a column of a given range with a criterion: the marks in Physics of the students (C4:C13) who achieved higher marks than 60. We’ll store these values in a new range (F4:F13)
As the range consists of a single column again, we can access the value of each row directly.
The VBA code is:
VBA Code:
Sub Collecting_Data_from_a_Single_Column_with_Criterion()

Output_Row = 1

For Each i In Range("C4:C13").Rows
    If i > 60 Then
        Range("F4:F13").Cells(Output_Row, 1) = i
        Output_Row = Output_Row + 1
    End If
Next i

End Sub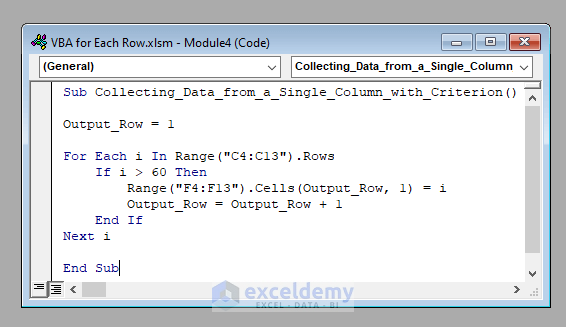
Output:
Running this code will collect the marks in Physics of the students (C4:C13) who achieved a mark of more than 60, and copy them to the range F4:F13.
Example 3 – VBA to Collect Data from Each Row of Multiple Columns of a Given Range
This time we’ll collect data from multiple columns of a given range.
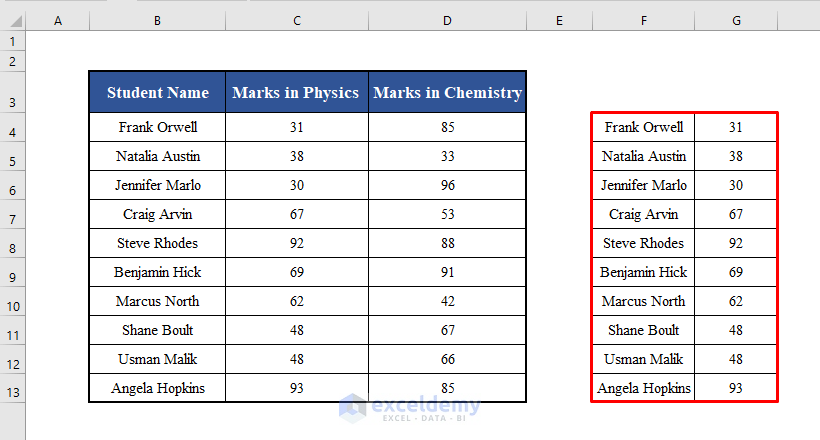
Let’s collect the marks in Physics of all the students along with their names (B4:C13) in a new range (F4:G13). Since the output range involves two columns (B4:C13), we’ll use the Cells property of VBA to collect the values.
The VBA code is:
VBA Code:
Sub Collecting_Data_from_Multiple_Columns()

Row_Number = 1

For Each i In Range("B4:C13").Rows
    Range("F4:G13").Cells(Row_Number, 1) = i.Cells(1, 1)
    Range("F4:G13").Cells(Row_Number, 2) = i.Cells(1, 2)
    Row_Number = Row_Number + 1
Next i

End Sub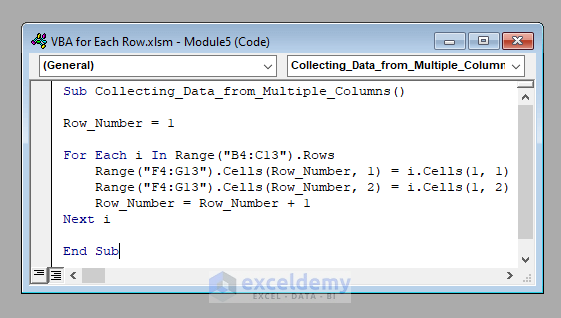
Output:
Running the code will collect the name of each student along with his / her marks in Physics in the range F4:G13.
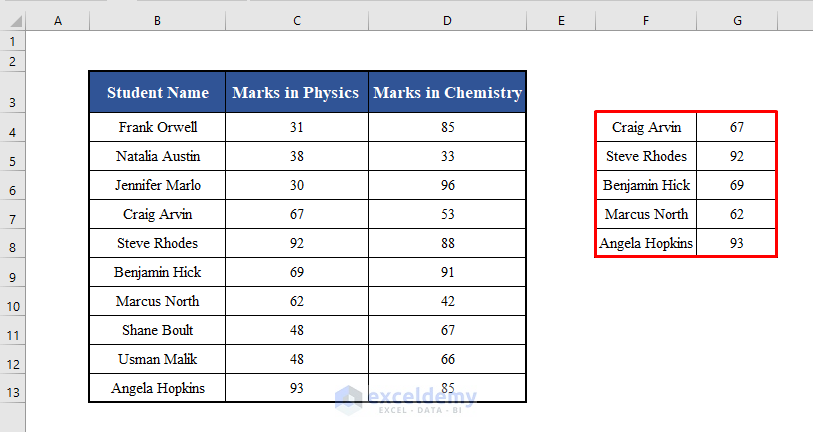
Example 4 – VBA to Collect Data from Each Row of Multiple Columns of a Given Range with a Criterion
In our last example, we’ll collect data from multiple columns of a given range with a criterion.
Let’s collect the marks in Physics of all the students who achieved a mark of more than 60 along with their names (B4:C13) in a new range (F4:G13). Since the output range involves two columns (B4:C13), we’ll again use the Cells property of VBA.
The VBA code is:
VBA Code:
Sub Collecting_Data_from_Multiple_Columns_with_Criterion()

Row_Number = 1

For Each i In Range("B4:C13").Rows
    If i.Cells(1, 2) > 60 Then
        Range("F4:G13").Cells(Row_Number, 1) = i.Cells(1, 1)
        Range("F4:G13").Cells(Row_Number, 2) = i.Cells(1, 2)
        Row_Number = Row_Number + 1
    End If
Next i

End Sub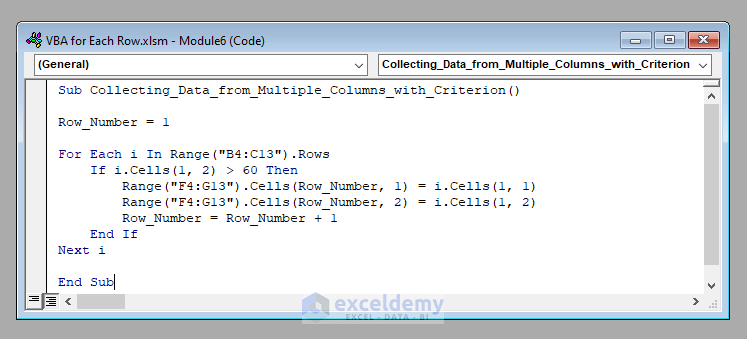
Output:
Running the code will collect the name of each student who got more than 60 in Physics along with the corresponding marks in the range F4:G13.
Download Practice Workbook
Related Articles
- How to Use For Next Loop in Excel VBA
- Excel VBA to Exit For Each Loop
- How to Use For Each Loop in Excel VBA


Bonjour,
Je voudrai connaitre comment utiliser For each pour donner une hauteur Précise en fonction de la couleur de la ligne d’une plage de donnée ou d’un tableau nommé.
Exemple ligne de couleur bleu aura une hauteur = 25
Ligne de couler rouge aura une hauteur = 20
Merci pour votre aide
Hello Amghar,
Thanks a lot for submitting Excel related problem at Exceldemy. Here you can use the VBA code mentioned below.
In that code, you need to mention the cell address inside the VBA code range property(as shown in the image). After this, if the condition satisfied, the cell row height will adjust accordingly.