Method 1 – Encrypt an Excel File Using Encrypt with Password Feature
- Go to File>> Info>> Protect Workbook>> Encrypt with Password.

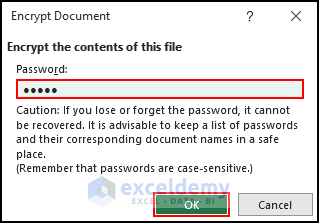
- Insert a password in the Encrypt Document dialog box and click OK.
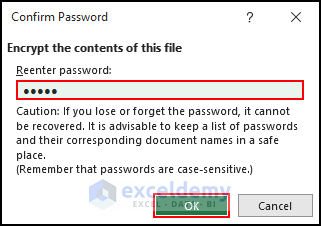
- Re-enter the password in the Confirm Password dialog box and click OK.
- Try opening your workbook again to see if the method worked.
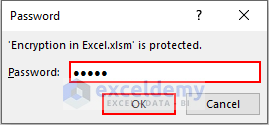
- A password prompt should automatically appear in Excel to enter the password to access data.
- Enter password 12345 and click OK.
We can encrypt our Excel workbook with a password.
Method 2 – Apply VBA Macros to Encrypt Cell Contents
- Press ALT + F11 on your keyboard to open Visual Basic.
- Click Insert and select Module.
- In Module 1 write down the below VBA code.
Option Explicit
Function SToByteArray(str As String) As Variant
    Dim A() As Byte
    A = str
    SToByteArray = A
End Function
Function ByteArrayToS(A() As Byte) As String
    Dim str As String
    str = A
    ByteArrayToS = str
End Function
Function scramble(str As String) As String
    Const Hidden_Password As String = "K*4HD%f#nwS%sdf032#gfl!HLKN*pq7"
    Dim stringA() As Byte, passwordA() As Byte
    stringA = SToByteArray(str)
    passwordA = SToByteArray(Hidden_Password)
    Dim upperLim As Long
    upperLim = UBound(stringA)
    ReDim scrambledA(0 To upperLim) As Byte
    Dim i As Long
    For i = LBound(stringA) To upperLim
        scrambledA(i) = stringA(i) Xor passwordA(i)
    Next i
    scramble = ByteArrayToS(scrambledA)
End Function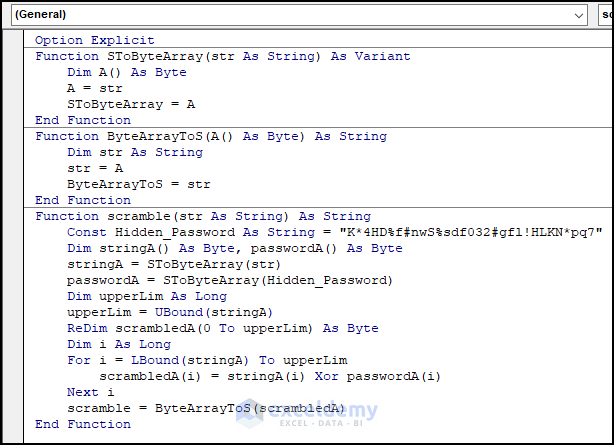
- Insert another module named Module 2 and insert the following code.
Sub EncryptData()
Dim r
r = 5
Do While Cells(r, 4) <> ""
Cells(r, 4) = scramble(Cells(r, 4))
r = r + 1
Loop
End Sub- Press F5 to run the entire code and your work will be done.

We can apply VBA macro encrypt cell contents.
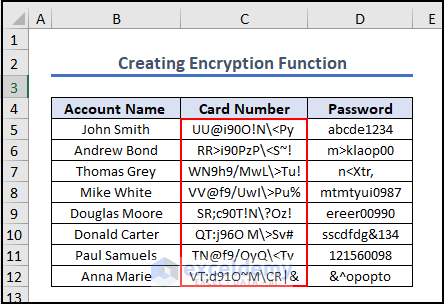
Method 3 – Create Encryption Function with VBA to Protect Data
- Press ALT + F11 on your keyboard to open Visual Basic Editor.
- Click Insert and select Module.
- In the new module, write down the below VBA code.
Private Function iStrTPsd(ByVal Txt As String) As Long
Dim xVl As Long
Dim xCha As Long
Dim xSf1 As Long
Dim xSf2 As Long
Dim J As Integer
Dim xLn As Integer
xLn = Len(Txt)
For J = 1 To xLn
xCha = Asc(Mid$(Txt, J, 1))
xVl = xVl Xor (xCha * 2 ^ xSf1)
xVl = xVl Xor (xCha * 2 ^ xSf2)
xSf1 = (xSf1 + 7) Mod 19
xSf2 = (xSf2 + 13) Mod 23
Next J
iStrTPsd = xVl
End Function
Private Function iEncryption(ByVal Pd As String, ByVal InTx As String, Optional ByVal Encc As Boolean = True) As String
Dim xOfset As Long
Dim xLn As Integer
Dim J As Integer
Dim xCha As Integer
Dim xOutTx As String
xOfset = iStrTPsd(Pd)
Rnd -1
Randomize xOffset
xLn = Len(InTx)
For J = 1 To xLn
xCha = Asc(Mid$(InTx, J, 1))
If xCha >= 32 And xCha <= 126 Then
xCha = xCha - 32
xOfset = Int((96) * Rnd)
If Encc Then
xCha = ((xCha + xOfset) Mod 95)
Else
xCha = ((xCha - xOfset) Mod 95)
If xCha < 0 Then xCha = xCha + 95
End If
xCha = xCha + 32
xOutTx = xOutTx & Chr$(xCha)
End If
Next J
iEncryption = xOutTx
End Function
Sub xEncryption_Range()
Dim xxRg As Range
Dim xxPsd As String
Dim xxTxt As String
Dim xxEnc As Boolean
Dim xxRet As Variant
Dim xxCell As Range
On Error Resume Next
xxTxt = ActiveWindow.RangeSelection.Address
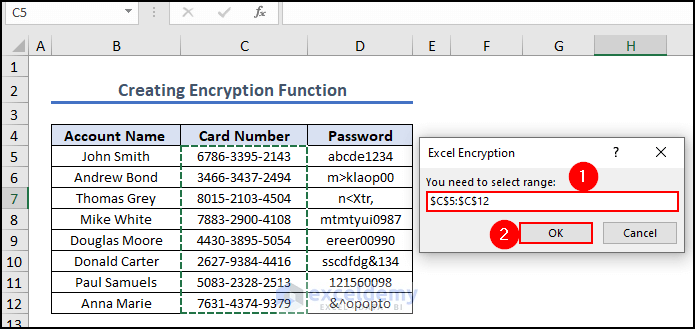
Set xxRg = Application.InputBox("You need to select range:", "Excel Encryption", xxTxt, , , , , 8)
Set xxRg = Application.Intersect(xxRg, xxRg.Worksheet.UsedRange)
If xxRg Is Nothing Then Exit Sub
xxPsd = InputBox("Type your password:", "Excel Encryption")
If xxPsd = "" Then
MsgBox "Your password can't be empty", , "Excel Encryption"
Exit Sub
End If
xxRet = Application.InputBox("Insert 1 to encrypt cells or Insert 2 to decrypt cells", "Excel Encryption", , , , , , 1)
If TypeName(xxRet) = "xBoolean" Then Exit Sub
If xxRet > 0 Then
xxEnc = (xxRet Mod 2 = 1)
For Each xxCell In xxRg
If xxCell.Value <> "" Then
xxCell.Value = iEncryption(xxPsd, xxCell.Value, xxEnc)
End If
Next
End If
End Sub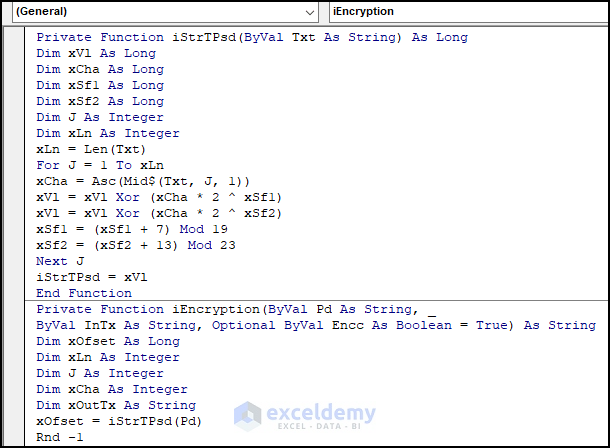
- Press F5 to run the entire code.
- An Excel Encryption dialog box will appear.
- Select the desired cell range that you want to encrypt and press OK.
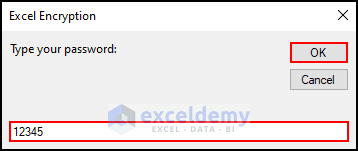
- A dialog box will appear.
- Enter the password there and press OK.
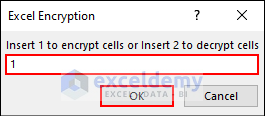
- Consecutively, another dialog box will appear where you need to enter 1 to encrypt the data.
- Press OK.
- The data in the Card Number column got encrypted.
Encryption Alternative: Masking Cell Contents with Excel Functions
- Select the entire column in which you want to put a mask. In our case, it is the Password column.
- Right-click on your mouse and go to the Format Cells option.
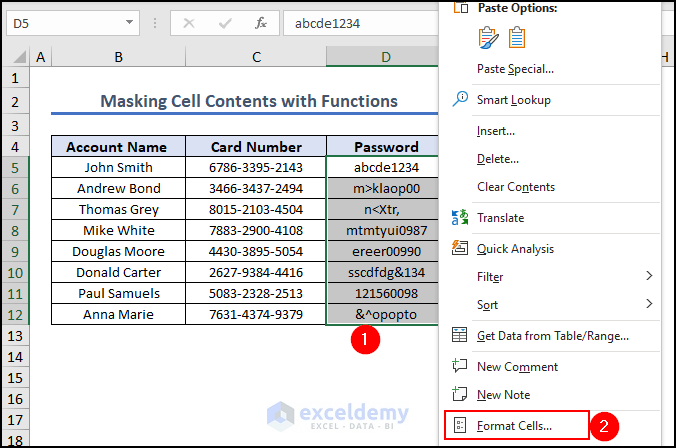
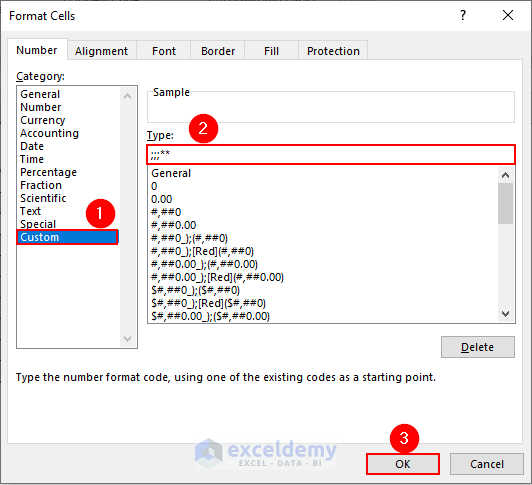
- The Format Cells dialog box appears.
- Choose Custom and put
;;;**as Type. - Click OK.
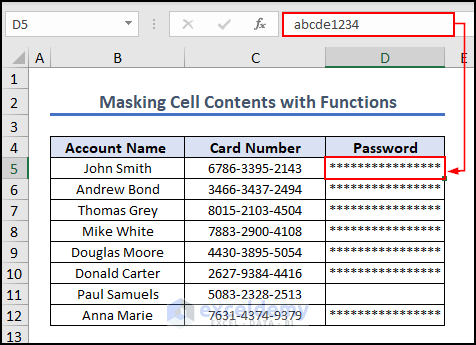
- We masked our data, but it is showing in the Formula Box (see the image). It is not secured yet.
- To make it fully secured we need to lock the worksheet.
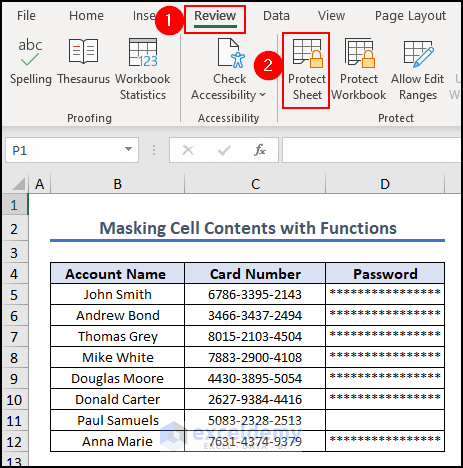
- Go to the Review tab >> choose Protect Sheet.
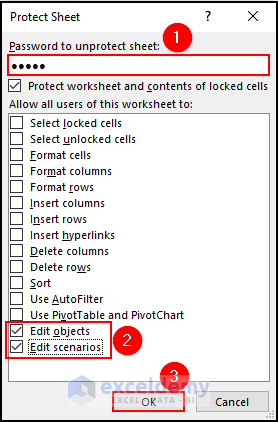
- The Protect Sheet window appears.
- Enter the password.
- Uncheck all the boxes except the Edit Objects and Edit Scenarios boxes.
- Click Ok.
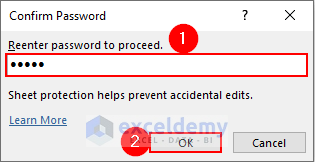
- Re-enter the password to confirm and click OK.
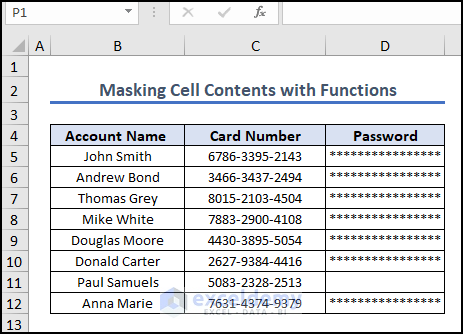
- We locked the dataset since the Formula Box shows nothing for the masked data.
Key Takeaways from the Article
- In this article, we have discussed how to encrypt data in Excel in a simple and straightforward manner.
- First, we have discussed what it means to encrypt data and how encryption works in Excel.
- Then we showed a step-by-step procedure of all methods to encrypt data in an Excel file.
- We have also explained how to encrypt Excel workbooks using VBA macro.
- Also discussed an alternative option of encryption in Excel.
- Provide solutions to frequently asked questions by readers.
Download Practice Workbook
You can download the practice workbook from here:
The password for the file is- 12345.
Frequently Asked Questions
1. What are the 2 types of data encryption?
There are two forms of encryption in use today: symmetric encryption and asymmetric encryption. The term is derived from the usage of the same key for encryption and decryption.
2. Can I open an encrypted Excel file on a different computer?
Yes, you can open an encrypted Excel file on a different computer as long as you have the password to unlock it.
3. Which files need to be encrypted?
There are many times when we want to add an extra layer of security to our personal files. It’s especially important when we’re dealing with private or secret information, like money, personal information, or trade secrets.
Encryption in Excel: Knowledge Hub
<< Go Back to Excel Protect | Learn Excel
Get FREE Advanced Excel Exercises with Solutions!

there is a bug in your code as listed on this page.
once fixed your code worked as expected.
I noticed an error. When I use your script, the letter ä (and probably also the letters Ä, Ö and Ü – untested) is not processed. These letters are missing when decoding. How can I correct this error? Other than this error, I really like your solution! Greetings Dirk
Hello Drik,
Thank you very much for pointing this out and for your kind words. You’re absolutely right—this issue happens because the script is not handling special (non-ASCII) characters like ä, Ä, Ö, Ü correctly. By default, many encoding/decoding scripts assume ASCII or a limited character set, so those characters can get lost during decoding.
How to fix it:
The solution is to explicitly use UTF-8 encoding when converting or processing the text. UTF-8 fully supports German umlauts and other special characters.
For example, if the script uses VBA or a text-based encoding step, make sure:
1. The text is converted using UTF-8 (not ASCII).
2. Any StrConv, Chr, Asc, or byte-array conversion is replaced with a UTF-8–aware approach.
Once UTF-8 encoding is applied consistently in both the encoding and decoding steps, characters like ä, Ä, Ö, Ü will be preserved correctly.
Thanks again for reporting this, feedback like yours helps improve the solution for everyone. Glad to hear you liked it overall!
Regards,
ExcelDemy