
Image by Editor
In Power Query, Table.SelectRows stands out as one of the most versatile and powerful tools for filtering data. It allows you to apply conditions to the rows in a table and return only the rows that meet those conditions. In this tutorial, we will show how to use Table.SelectRows to efficiently sift through data using Power Query M language.
Introduction to Table.SelectRows
The Table.SelectRows function is used to filter rows from a table based on a condition. It allows you to specify a filter criterion using an expression that evaluates to true or false. Only the rows that evaluate to true will be kept in the resulting table.
Syntax:
Table.SelectRows(table as table, condition as function) as table
- table: The input table from which you want to filter rows.
- condition: A function that defines the condition. The function takes a record as input and outputs true or false. This condition is a function that:
- Takes a row as input (implicitly referenced).
- Returns true if the row should be included.
- Returns false if the row should be excluded.
The ‘each’ Keyword:
In Power Query M, the each keyword creates an anonymous function where the current row is implicitly available. This is the most common way to specify the condition for the Table.SelectRows.
How to Insert M Language Code in Power Query
To manually enter M Language code inside Power Query Editor, follow these steps:
Step 1: Open Power Query Editor
- In Excel:
- Select your data range.
- Go to the Data tab >> select From Table/Range.

-
- Or load a dataset, then select Transform Data to open the Power Query Editor.
- Or you can create a table in Power Query.
- In Power BI:
- Click on Transform Data to open the Power Query Editor.
Step 2: Open the Advanced Editor
Once in Power Query:
- Go to the Home tab >> click on Advanced Editor.
- A new window will open where you can write M code.
- Click Done to close the Advanced Editor.
- Click Close & Load to load the transformed table into Excel or Power BI.
Alternative: Use a Blank Query
If you do not have an existing dataset and want to create a new table or want to insert separate queries using M code, you can use a blank query.
- Go to the Home tab >> select New Source >> select Other Sources >> select Blank Query.
- Open Advanced Editor and paste your M Language code.
- Click Done.
- Rename each query and Load the data.

Basic Use of Table.SelectRows
Consider a dataset of customer details, we will use it to show the use of Table.SelectRows. The most straightforward use of Table.SelectRows is to filter rows based on an exact match. Let’s filter out only customers who live in a particular city.
Power Query M Code:
let

Source = Excel.CurrentWorkbook(){[Name="Table1"]}[Content],

// Show only rows where city is "New York"
FilteredRows = Table.SelectRows(Source, each [City] = "New York")

in

FilteredRows

You can create a table in Power Query and then use it for further filtration.
Power Query M Code:
let
Source = Table.FromRecords({

[CustomerID=1, Name="John Doe", City="New York", Age=30],
[CustomerID=2, Name="Jane Smith", City="Chicago", Age=25],
[CustomerID=3, Name="Sam Brown", City="New York", Age=35],
[CustomerID=4, Name="Lucy Gray", City="Dallas", Age=28]
}),

FilteredRows = Table.SelectRows(Source, each [City] = "New York")

in

FilteredRows
Here, Table.SelectRows will return only the rows where the city is “New York”.
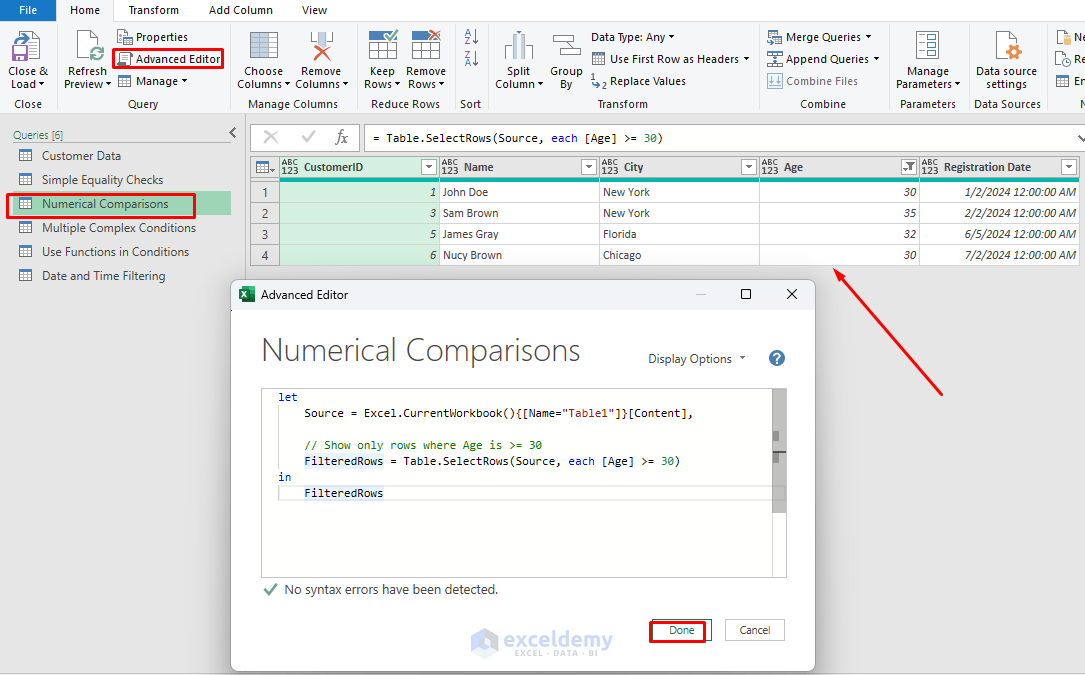
Numerical Comparisons to Select Specific Rows
You can use standard comparison operators (<, >, <=, >=, =, <>) for numerical filtering. Select rows where the age is older and equal to 30.
Power Query M Code:
let

Source = Excel.CurrentWorkbook(){[Name="Table1"]}[Content],

// Show only rows where Age is >= 30
FilteredRows = Table.SelectRows(Source, each [Age] >= 30)

in

FilteredRows
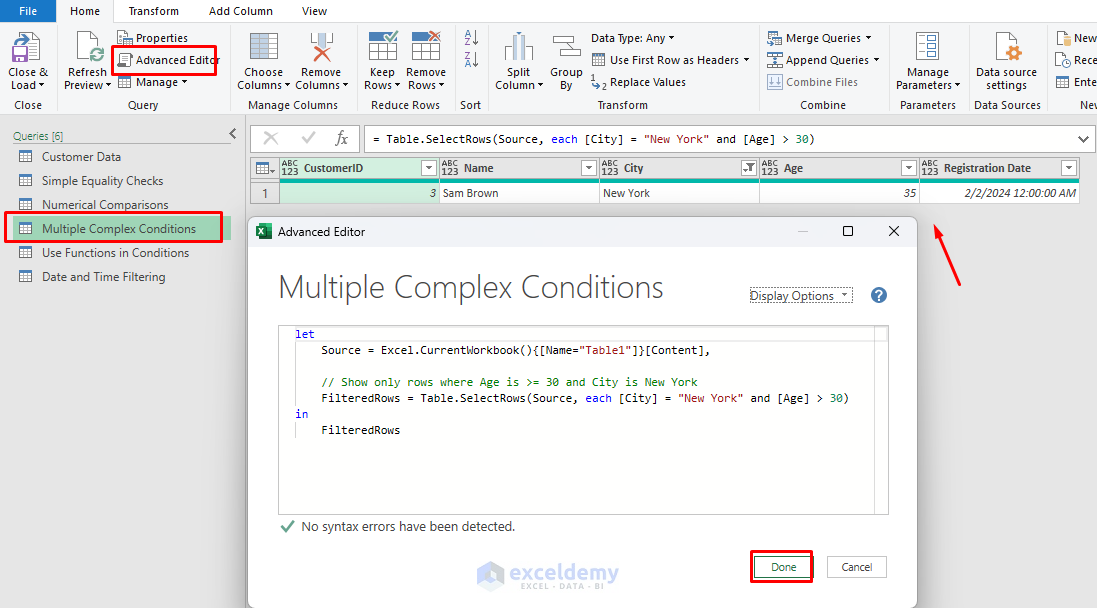
Logical Operators for Complex Conditions
You can create more complex filtering conditions using logical operators like and, or, and not. Select rows where the customer’s age is older than and equal to 30 and lives in New York.
Power Query M Code:
let

Source = Excel.CurrentWorkbook(){[Name="Table1"]}[Content],

// Show only rows where Age is >= 30 and City is New York
FilteredRows = Table.SelectRows(Source, each [City] = "New York" and [Age] > 30)

in

FilteredRows
Advanced Filtering Techniques
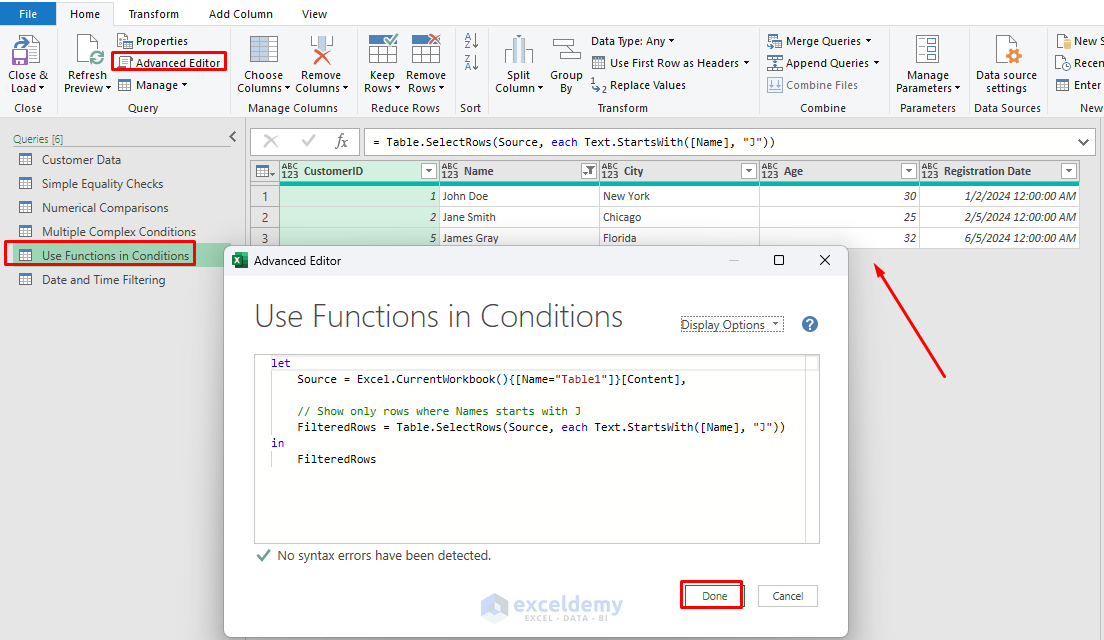
Use Other Functions in Conditions
You can also use functions in the condition. For example, if you want to filter out rows where the name starts with “J”, you can use the Text.StartsWith function.
Power Query M Code:
let

Source = Excel.CurrentWorkbook(){[Name="Table1"]}[Content],

// Show only rows where Names starts with J
FilteredRows = Table.SelectRows(Source, each Text.StartsWith([Name], "J"))

in

FilteredRows
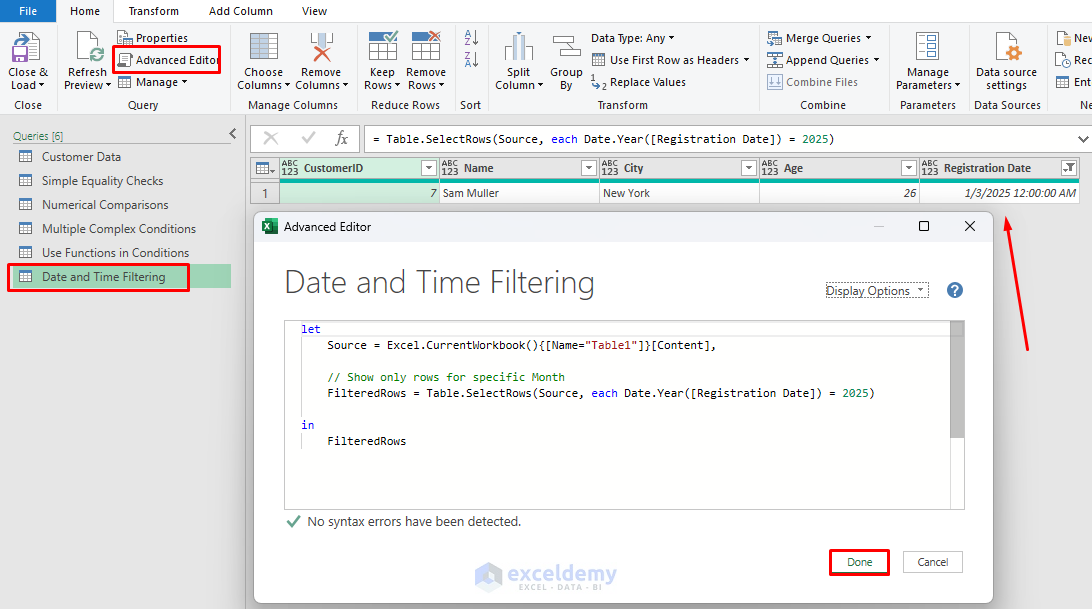
Date and Time Filtering
Working with dates is a common requirement in data analysis. Let’s find out the customer details for those who registered in the year 2025.
Power Query M Code:
let

Source = Excel.CurrentWorkbook(){[Name="Table1"]}[Content],

// Show only rows for specific Month
FilteredRows = Table.SelectRows(Source, each Date.Year([Registration Date]) = 2025)

in

FilteredRows
Performance Tips for Efficient Filtering
While Table.SelectRows is an efficient way to filter data, here are some performance tips to ensure your queries run efficiently:
- Minimize Columns Before Filtering: If you’re working with large datasets, try to minimize the columns before applying the filter. This reduces the amount of data being processed.
let

Source = Table.SelectColumns(YourTable, {"City", "Age"}),
FilteredRows = Table.SelectRows(Source, each [City] = "New York" and [Age] > 30)

in
FilteredRows
- Avoid Complex Functions in the Condition: Functions like Text.Contains or Text.EndsWith can be slower, especially with large datasets. If possible, try to use simpler comparisons like = or <>.
- Use Early Filtering: If you’re applying multiple filters, applying them early in the query (closer to the source) can help reduce the amount of data processed in later steps.
Conclusion
Table.SelectRows is a powerful and efficient way to filter data in Power Query using the M language. You can apply basic complex conditions to filter or select rows based on your requirements. By understanding this function, you can use it to streamline your data preparation process and transform it more efficiently. Remember to keep your conditions as simple as possible and apply filters early in your query pipeline for the best performance.
Get FREE Advanced Excel Exercises with Solutions!
