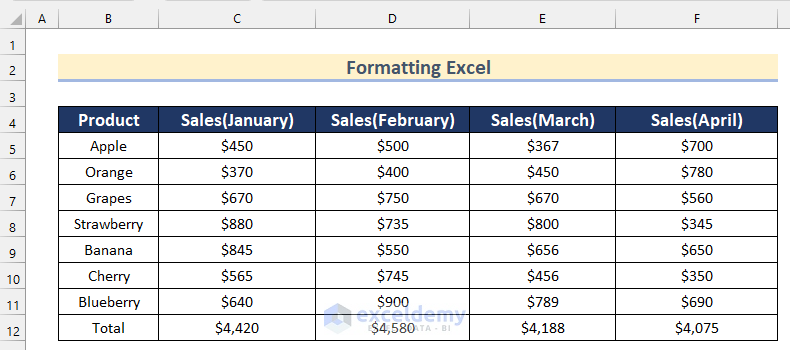
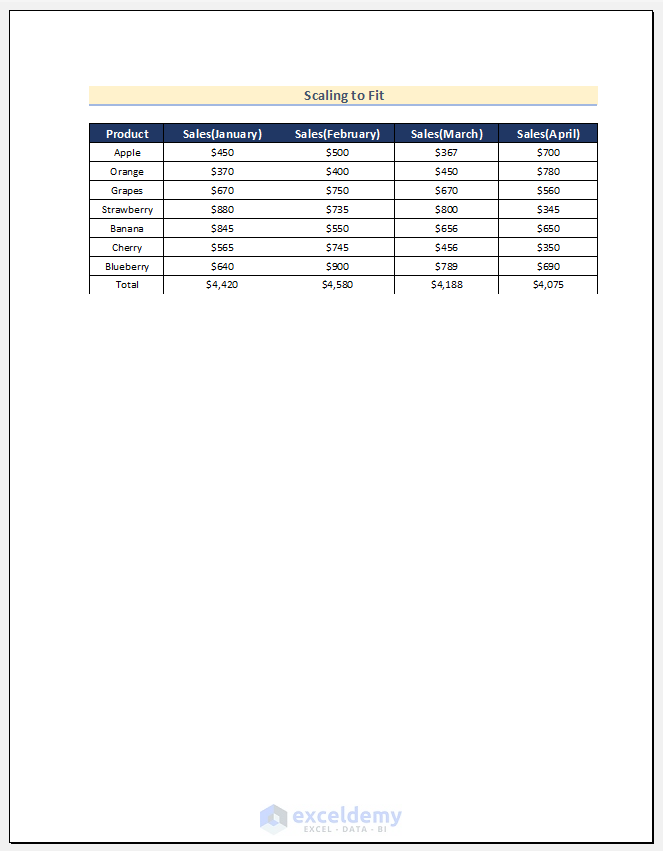
Dataset Overview
We’ll use a dataset containing some names of fruits under Product and their Sales value of 4 months (January to April) to demonstrate how you can format Excel to print.
1. Formatting Page Orientation
When preparing your Excel sheet for printing, consider the page orientation. Follow these steps:
Steps:
- Go to the Page Layout tab.
- Click on the Page Setup button.
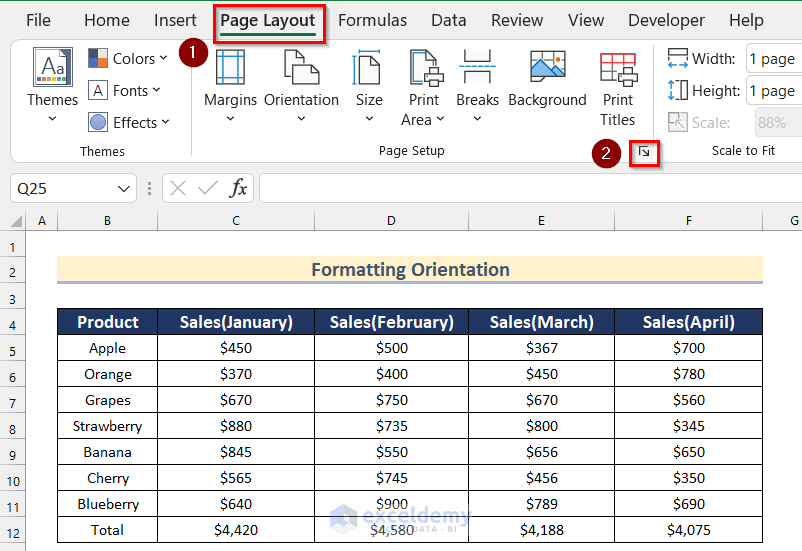
- In the Page Setup dialog, choose your preferred orientation (Portrait or Landscape).
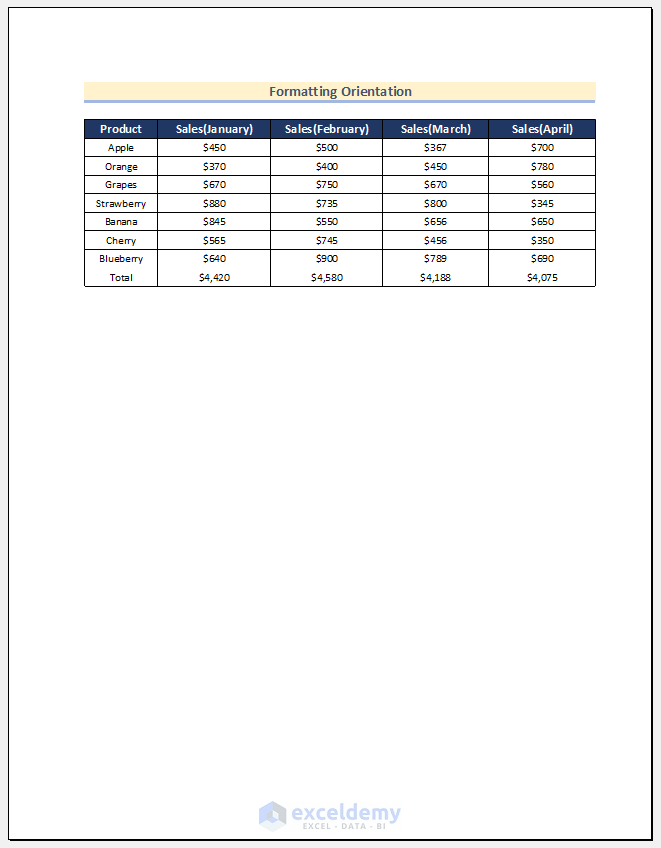
- Preview the printed version using Print Preview.
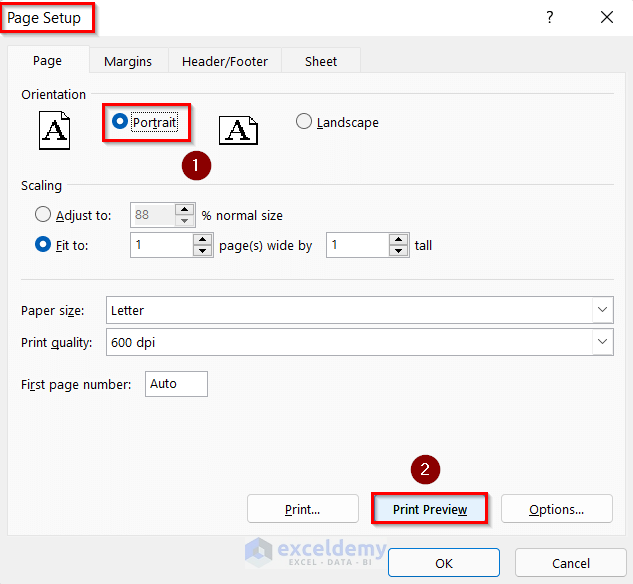
- Click OK to confirm.
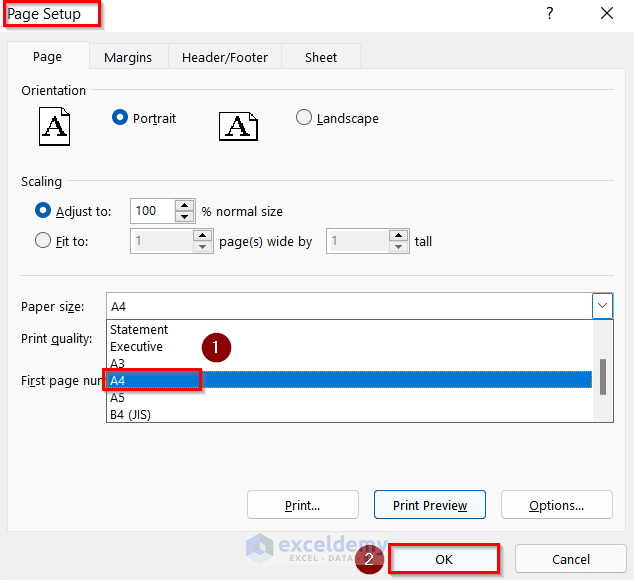
2. Selecting Paper Size
To set the paper size for printing, follow these steps:
Steps:
- Open the Page Setup dialog (as described in Method 1).
- Select your desired paper size (e.g., A4).
- Click OK.
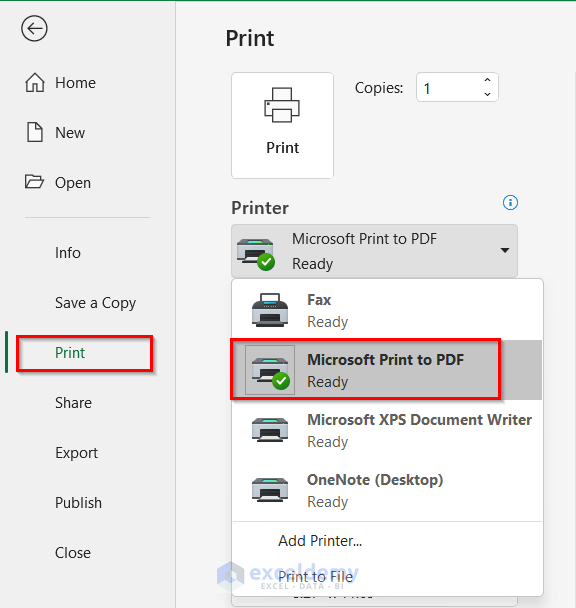
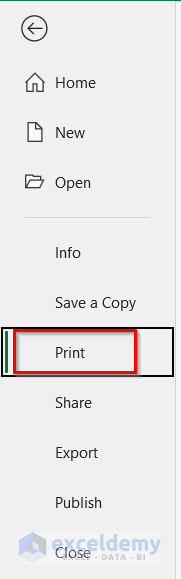
3. Choosing a Printer
Before printing, select the appropriate printer:
Steps:
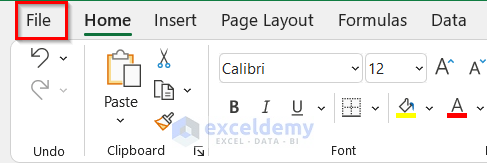
- Go to the File tab.
- Choose Print.
- Select your preferred printer (e.g., Microsoft Print to PDF).
4. Defining the Print Area
Specify which part of your worksheet to print:
Steps:
- Go to the File tab.

- Choose the Print option.
- Decide whether to print active sheets or the entire workbook.
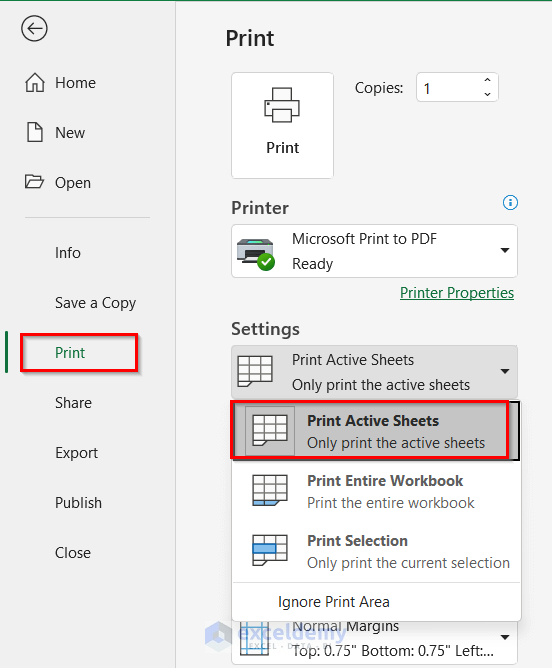
- Optionally, select a specific range (e.g., B2:F12).
- Go to the Page Layout tab and click Print Area, then choose Set Print Area.
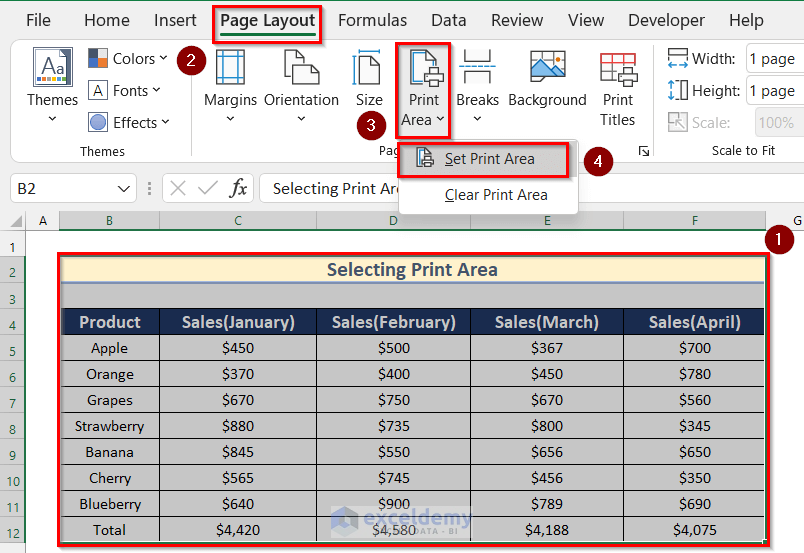
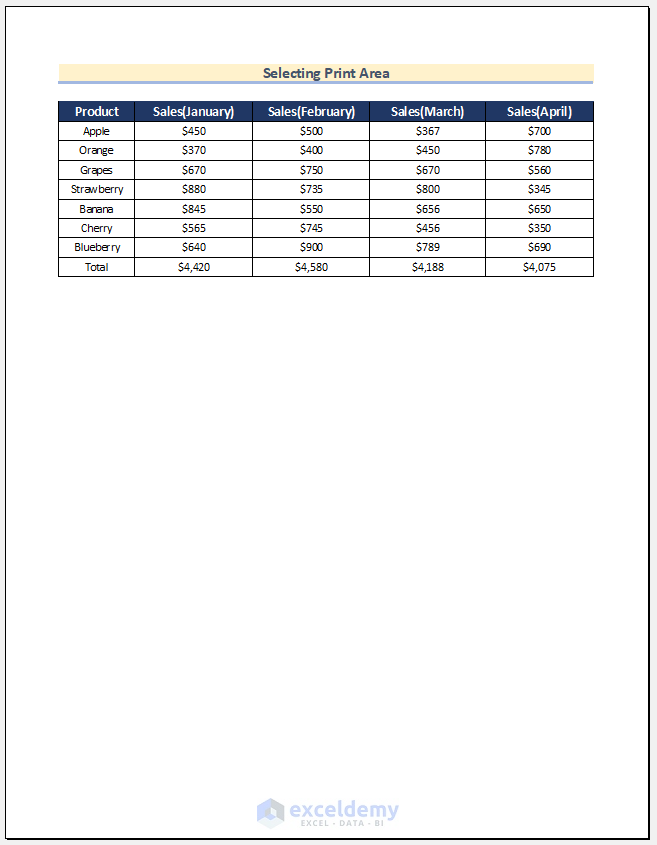
- The output will look like the image below.
5. Formatting Print Titles
Ensure consistent headings on every printed page:
Steps:
- Access the Page Layout tab.
- Click Print Titles.

- In the Page Setup dialog, go to the Sheet tab.
- Specify the following:
- Print Area: Select the entire data range (e.g., B2:F12).
- Rows to repeat at the top: Choose the heading row(s) you want on every page (e.g., Row 4).
- Columns to repeat at the left: If needed, select specific columns.
- Click OK.
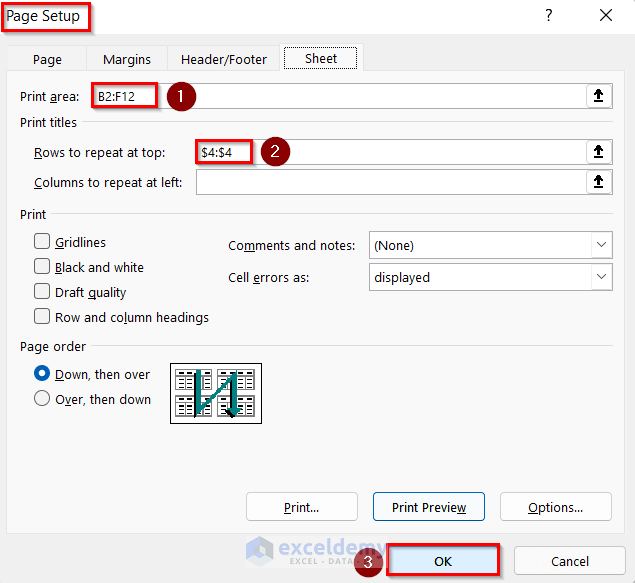
- When you print your data, the heading row and left column will appear consistently on each page.

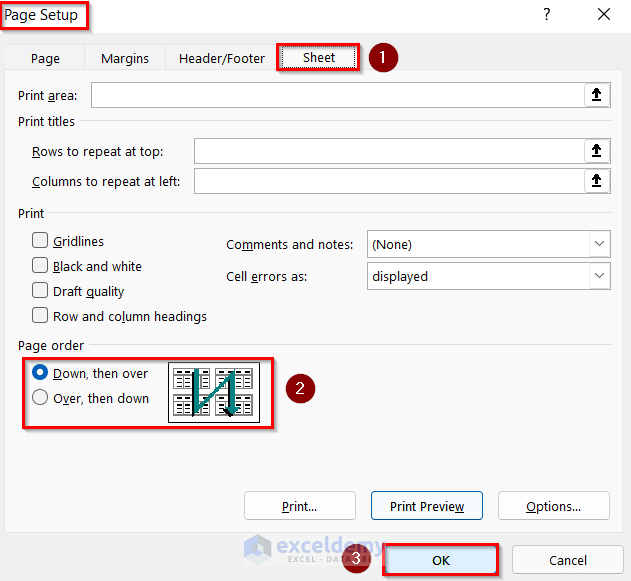
6. Selecting Page Order
When dealing with a large number of pages to print, the Page Order option becomes handy. You can specify the order in which pages should be printed. Follow these steps:
Steps:
- Open the Page Setup box as described in Method1.
- Go to the Sheet tab.
- Choose one of the following options:
- Down, then over: Print pages in vertical order.
- Over, then down: Print pages in horizontal order.
- Click OK to confirm your selection.
7. Printing Comments
Print comments in Excel can be tricky. Instead of printing them alongside the data, consider placing them at the end of the sheet. Here’s how:
Steps:
- Open the Page Setup box (as described in Method 1).
- Go to the Sheet tab.
- In the Print section, select At the end of the sheet using the comment dropdown.
- Click OK.
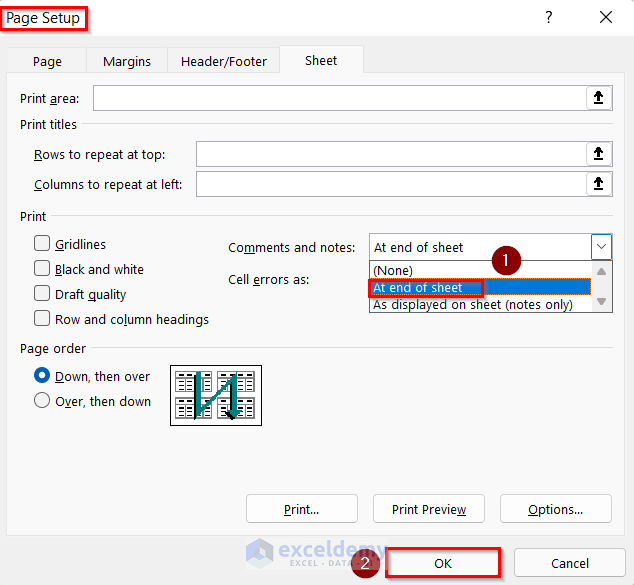
- All comments will appear neatly at the end of the sheet.

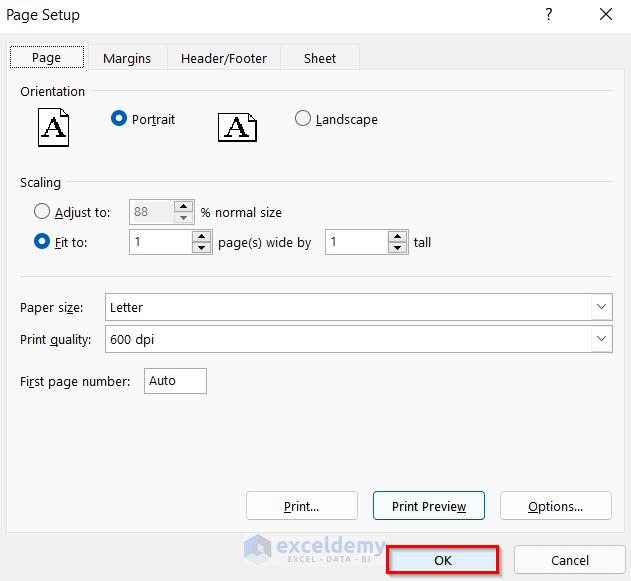
8. Using “Fit to” Scaling
When your data doesn’t fit neatly on a single page, use the “Fit to” option to adjust it. Follow these steps:
Steps:
- Open the Page Setup box as described in Method1.
- Under Scaling, choose one of the following:
- Adjust using a percentage of normal size.
- Specify the number of pages (e.g., 1 page wide).
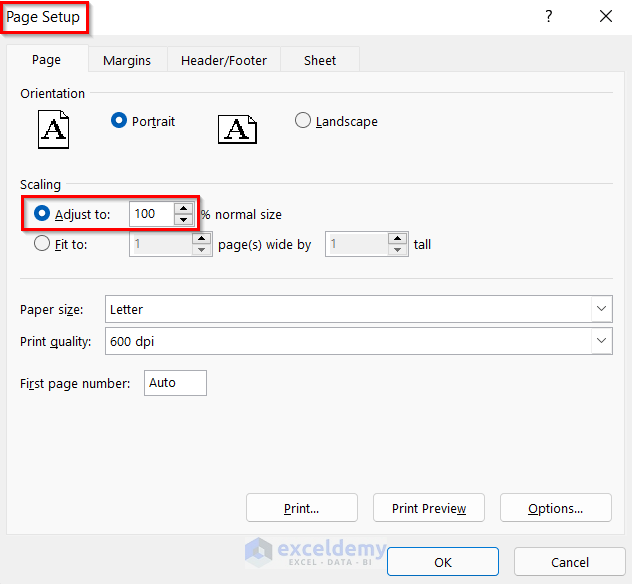
- Click OK.
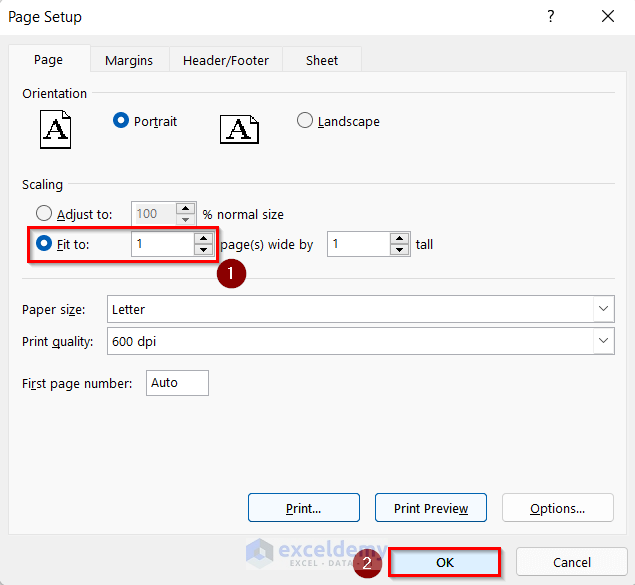
- Preview the adjusted layout.
Remember that there are limits to how much data you can fit on a single page using this method.
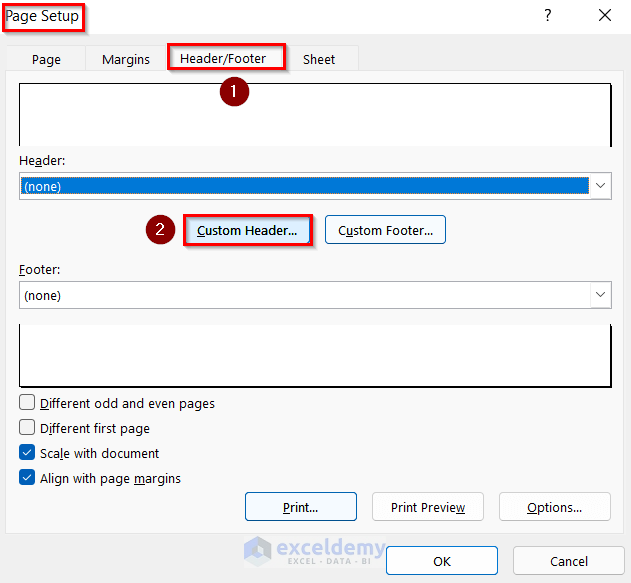
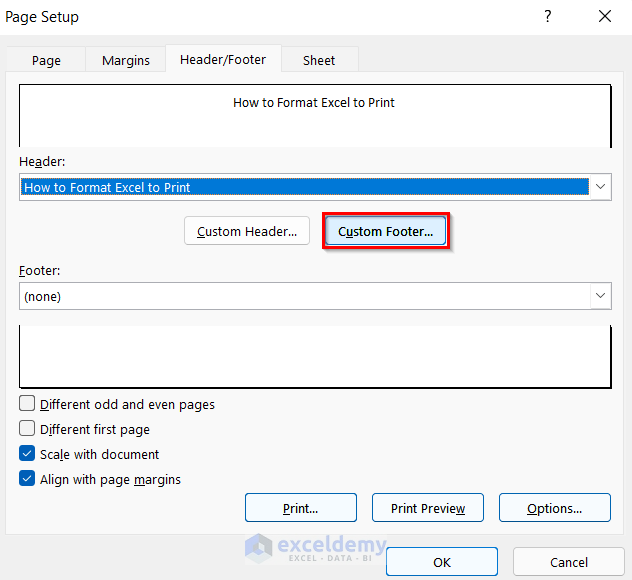
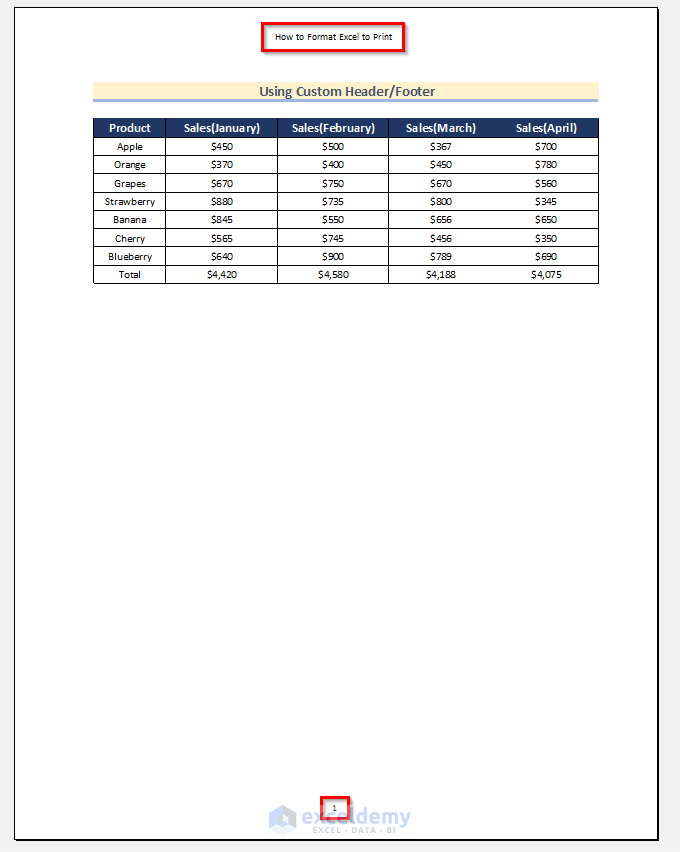
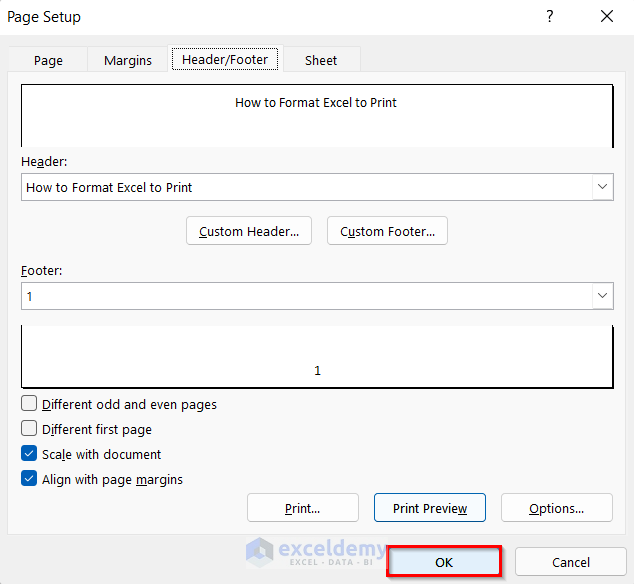
9.Custom Header/Footer
Customize your header and footer with additional information beyond page numbers. Here’s how:
Steps:
- Open the Page Setup box (as described in Method1).
- Go to the Header/Footer tab.
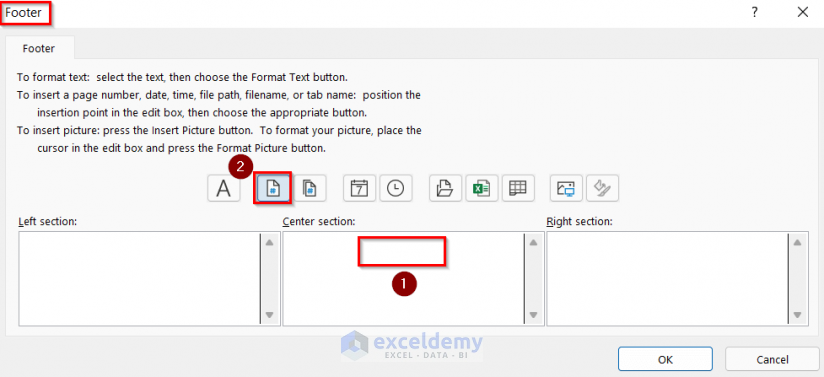
- Click the Custom Header/ Footer button.
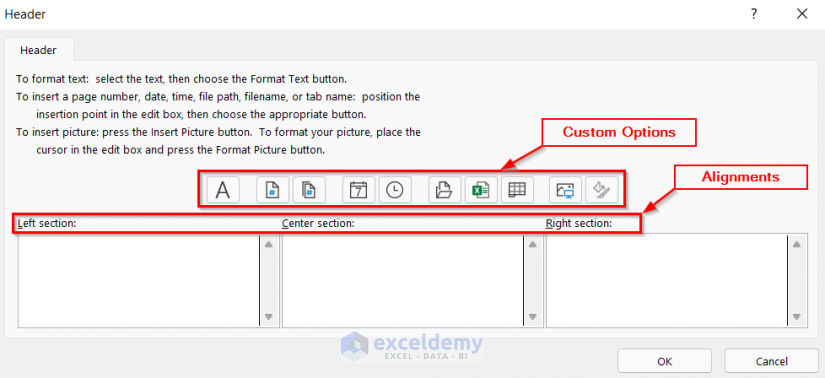
- Choose alignment options.
- Available options include:
- Page Number
- Page Number with total pages.
- Date
- Time
- File Path
- File Name
- Sheet Name
- Image
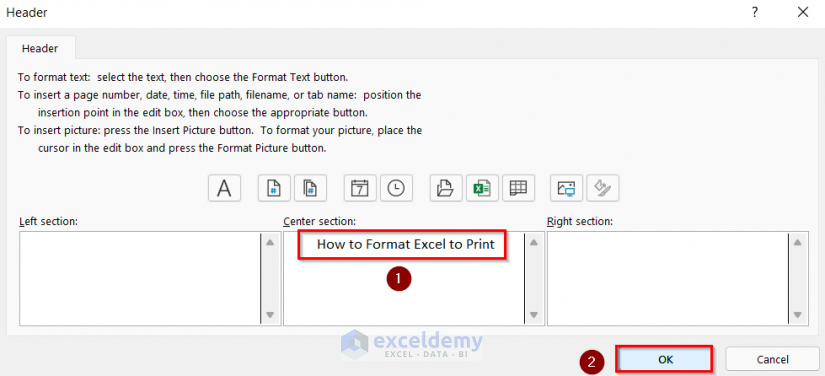
- Insert the text How to Format Excel to Print in the Center section.
- Click OK.
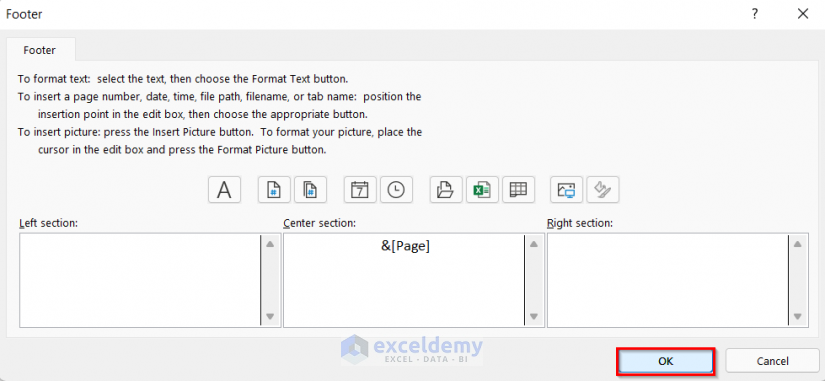
- Configure the footer similarly.
- Click OK.
- Preview the printed page using Print Preview.
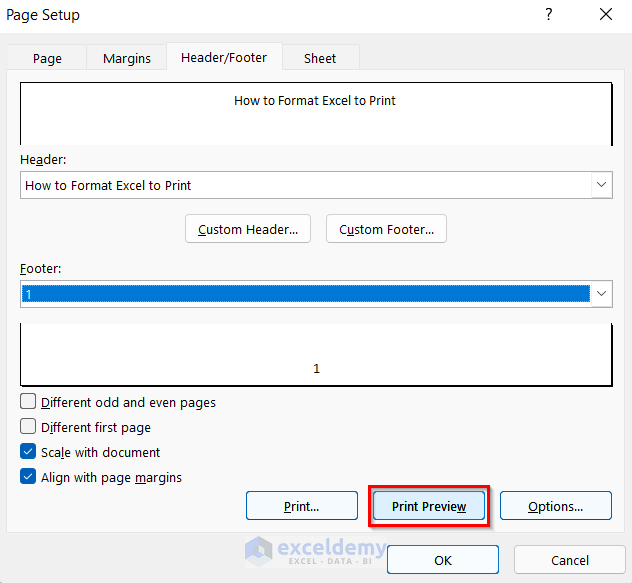
- Now your header and footer will enhance the professional appearance of your printed Excel sheets.
- Click OK.
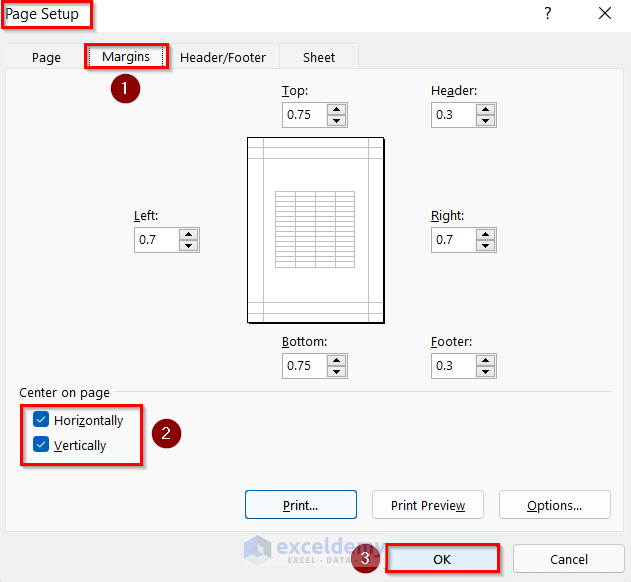
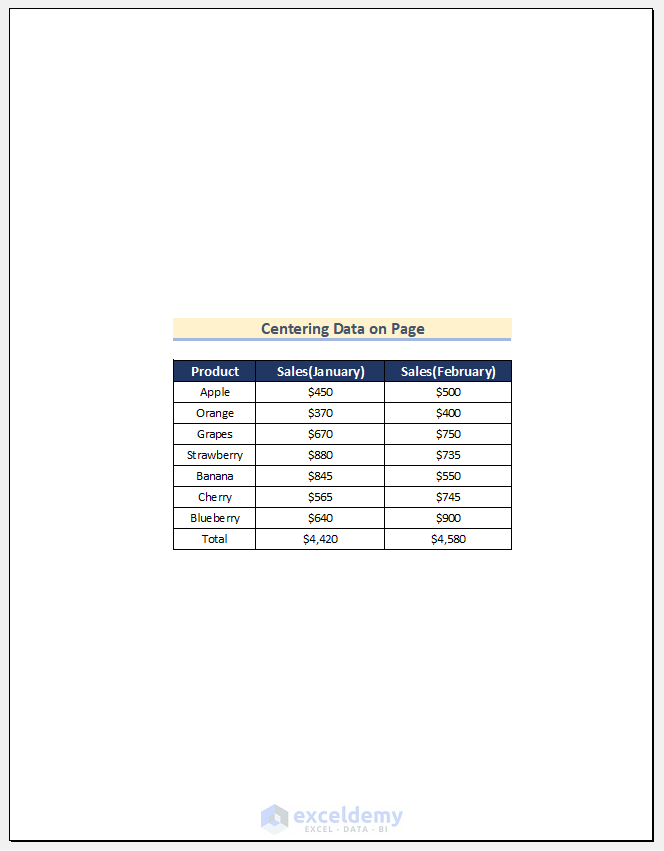
10. Centering Data
This option is useful when you have limited data to print on a single page. Let’s say you want to print data from cell range B2:D12. You can align this data in the center of the page for a neat presentation. Follow these steps:
Steps:
- Open the Page Setup box (as described in Method1).
- Go to the Margins tab.
- Under Center on Page, you have two options:
- Horizontally: Aligns your data in the center horizontally.
- Vertically: Aligns your data in the middle of the page vertically.
- Enable both options.
- Click OK.
- Now your page will look similar to the image below. You can use this option whenever you print pages to ensure proper data alignment.
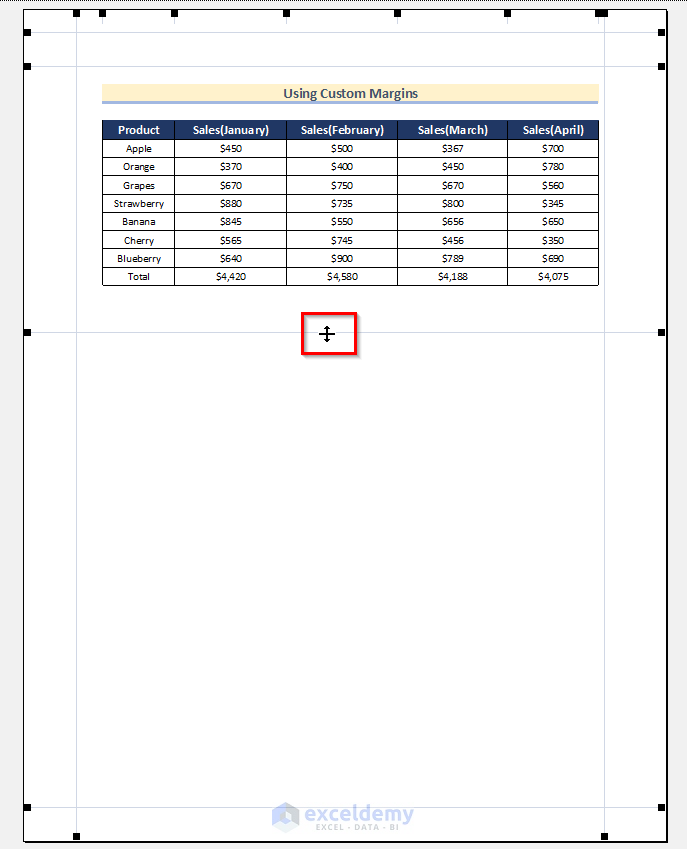
11. Using Custom Margins
Custom margins allow you to adjust the spacing around your content. Here’s how:
Steps:
- Go to the File tab.

- Select Print to view the instant print preview.
- From the bottom-right corner of the window, click on the Show Margins button.
- The applied margins will be displayed.
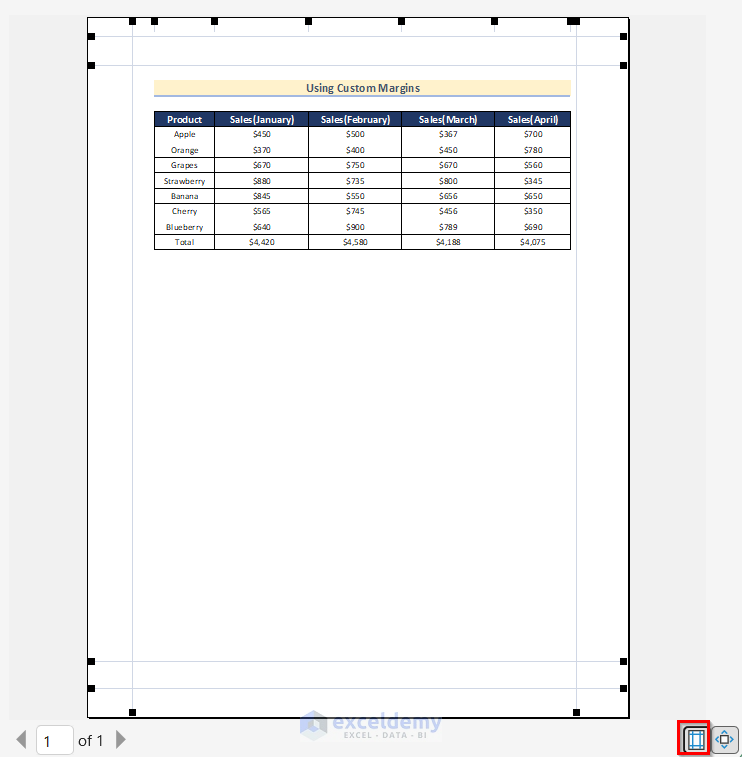
- Adjust them by dragging and dropping.
12. Changing Cell Error Values
Sometimes, you encounter error values (like #DIV/0!) in your dataset. To replace these errors while printing, follow these steps:
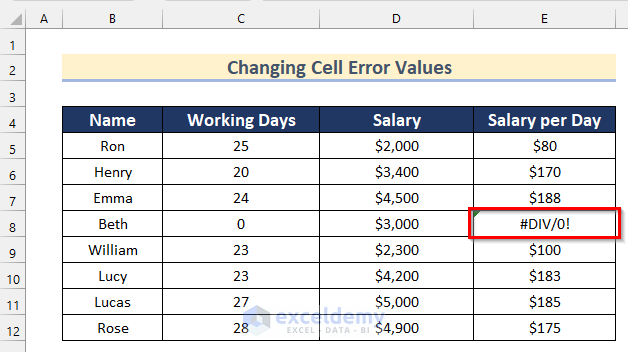
Steps:
- Open the Page Setup box (as described in Method1).
- Go to the Sheet tab.
- In the Cell error as dropdown, choose a replacement value:
- Blank
- Double minus sign.
- #N/A Error (for all the errors)
- Here, I recommend selecting <blank> as the replacement value.
- Click OK.
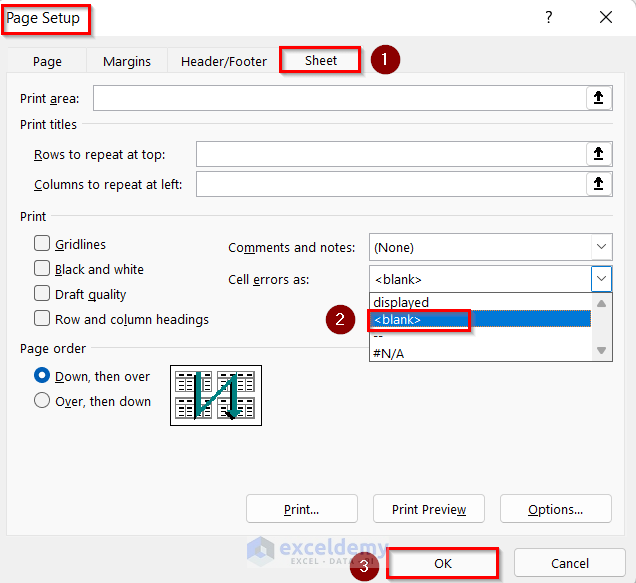
- When you print your data, the error values will be replaced with the chosen replacement value.
13. Customizing Number Format for Page Number in Excel to Print
Customizing the page number format in Excel for printing is a straightforward process. Let’s say you’re creating a report and want to start the page numbering from a specific custom number (e.g., 5). Follow these steps:
Steps:
- Open the Page Setup box (as described in Method1).
- Locate the input box labeled First page number.
- Enter the desired starting page number (in this case, 5).
- Click OK to confirm your settings.

- When you print your document, the page numbers will begin from the specified custom number.
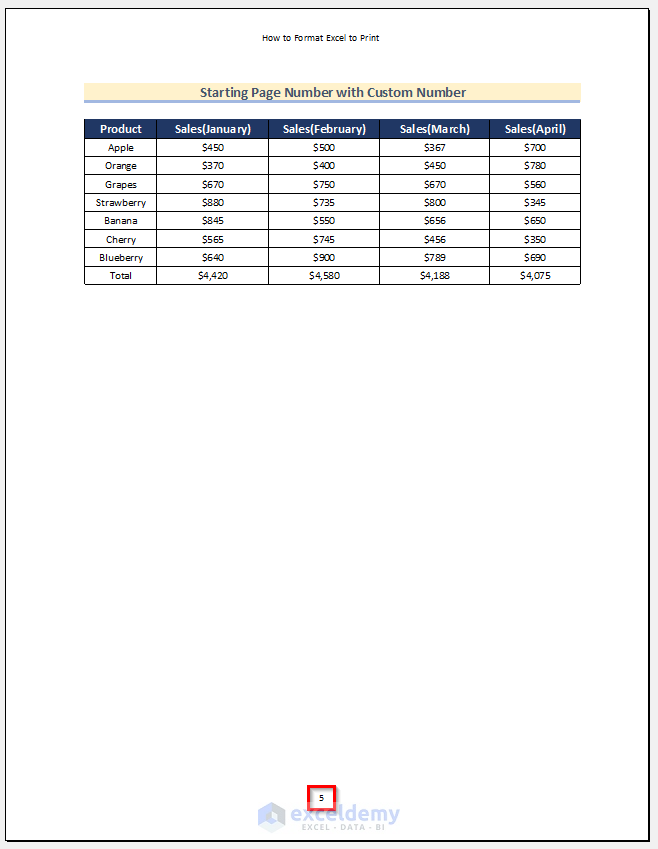
Important Note: Keep in mind that this option only works if you’ve applied a header or footer to your worksheet.
Download Practice Workbook
You can download the practice workbook from here:
Related Articles
<< Go Back to Print in Excel | Learn Excel
Get FREE Advanced Excel Exercises with Solutions!
