In this article, we will learn how to create an Excel add-in easily. What the add-in basically does is give Excel additional functionality that is highly customizable. Excel is supposed to make things easy, and VBA tries to make them easier. But this has a hell of a lot of complications. You might have to create a macro that takes in an input file and performs the process. A very simple way of doing it would be by converting your code into an Add-in.
What Is an Excel Add-In?
Add-in is an additional functionality of Excel. Sometimes we need to use a specific function or VBA multiple times. We need to call that function or VBA code every time. To get relief from the repeated task, we can set an add-in to perform that task.
How to Create an Excel Add-In: Step by Step Procedure
To create an Excel Add-in, we need to follow some steps sequentially to perform that Add-in successfully. Those are:
- Step 1: Record an Excel Add-in
- Step 2: Save the Add-in in .xlam format
- Step 3: Install the Add-in
- Last Step: Run the Add-in
We will discuss all the steps in detail in the below section.
We will create an Excel Add-in to calculate the interest on the investment, like a bank or other financial organization. Have a look at the below discussion.
Step 1: Record an Excel Add-In
The first step of this process is to record a macro to create an Excel Add-in.
- First, open a blank Excel workbook.
- Go to the bottom section that contains the sheet name.
- Press the right button on the mouse.
- Choose the View Code option from the Context Menu.
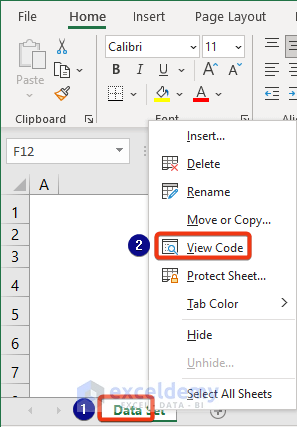
- We enter the VBA window.
- Select Module from the Insert tab.
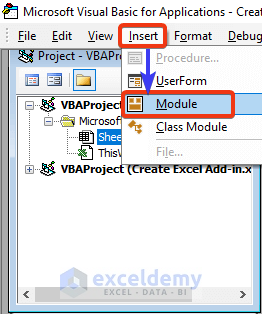
- Now, the VBA module window appears, and we enter the following VBA code:
Function bank_int(principle As Double, rate As Double, timeperiod As Integer)
bank_int = (principle * (1 + rate) ^ timeperiod) - principle
End Function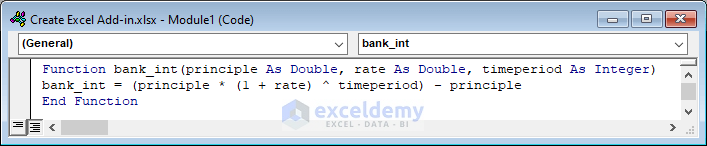
This VBA defines the operation performed by the Add-in.
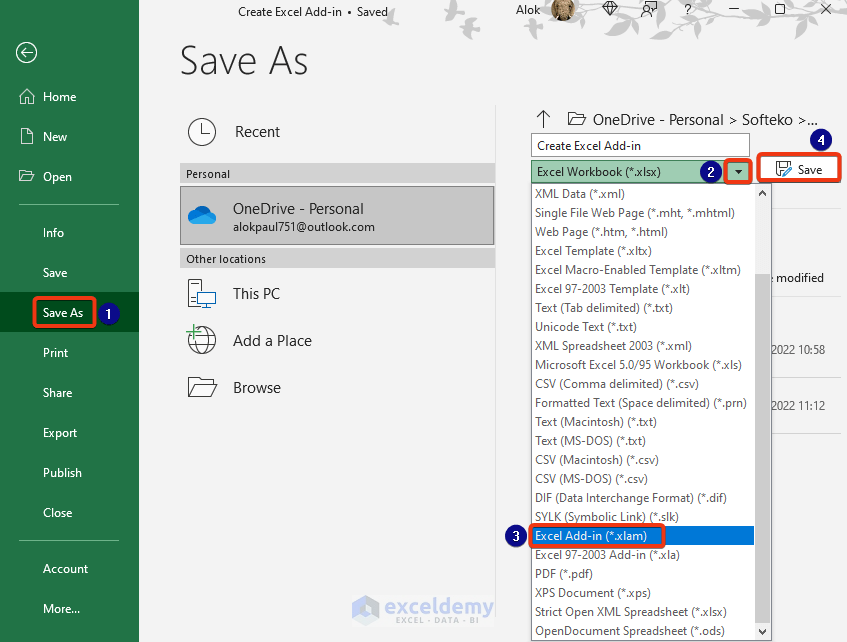
Step 2: Save the Add-In in XLAM Format
We already added a VBA code to the Excel file. Usually, we save a VBA code in .xlsm format. But here we will save this in .xlam format as it is an Add-in.
- Go to File >> Save As.
- Choose the Excel Add-in (*.xlam) format and then click on the Save options.
- Go to the File Explorer.

We can see the file is saved in Add-in format.
Step 3: Install the Add-In
Our Excel Add-in file is ready. Now, we will install the newly created Add-in file in another Excel file.
- First, we enter the working Excel file.
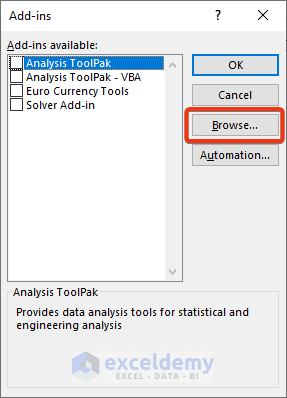
- Go to the Developer tab and click on the Excel Add-ins section.

- The Add-ins window appears. Click on the Browse option.
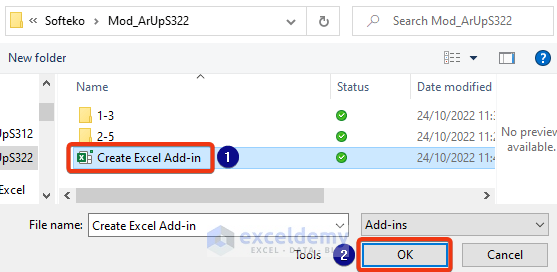
- Now, choose the Add-in file from File Explorer.
- Select the file and press the OK button.
- The Add-ins window again appears.

We can see the new add-in has been added here.
Step 4: Run the Add-In
Now, we will use the newly created add-in.
- This Add-in will be used to calculate the amount of interest.
- We collected all the data in the Excel workbook, where we added the Add-in.

- Now, go to Cell C8. Then, apply the following formula:
=bank_int(C5,C6,C7)

- After that, press the Enter button.

We get the result. Now, we will be able to use this add-in in any Excel file on that computer.
Read More: How to Remove Excel Add-In
Download Practice Workbook
Download this practice workbook to exercise while you are reading this article.
Add-In File:
Excel File:
Conclusion
In this article, we describe the steps for how to create an Excel add-in. We also showed how to install and use the newly created add-in. I hope this will satisfy your needs. And feel free to leave queries or suggestions in the comment section.
<< Go Back to Excel add-ins | Learn Excel
Get FREE Advanced Excel Exercises with Solutions!

How could you do this so that no one could see the code and I could sell it to others?