In Microsoft Excel, the TextBox control is a powerful feature that facilitates seamless text and numeric data entry, enhancing user interaction within spreadsheets. It offers a multitude of customization options and events that enable developers to create intuitive UserForms, streamlining data entry and management tasks.
The TextBox in Excel VBA is equipped with essential events that respond to user actions. The “Change” event captures modifications made to the TextBox content, allowing real-time updates. The “Enter” event activates when the TextBox gains focus, and the “Exit” event triggers when it loses focus. Developers can leverage these events to implement data validation, calculations, or conditional formatting, making the UserForm more dynamic and user-friendly.
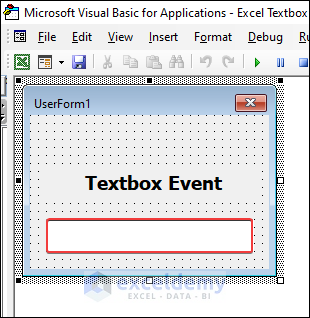
Below is a sample image of a user form with a label and a textbox in it.
How to Add a Text Box in Excel
- We need to first add a Textbox to the UserForm. To do this, a UserForm is necessary to be present in the VBA editor.
- Open the VBA editor in Excel.
- In the editor window, go to Insert > Userform.
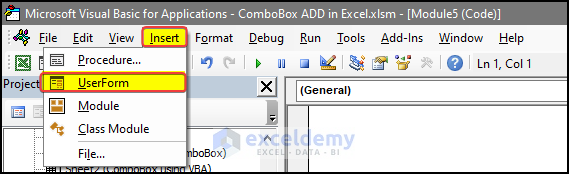
- After adding the user form, add the textbox to the UserForm.
Read More: How to Hide Textbox Using Excel VBA
What Are the Types of Textbox Events
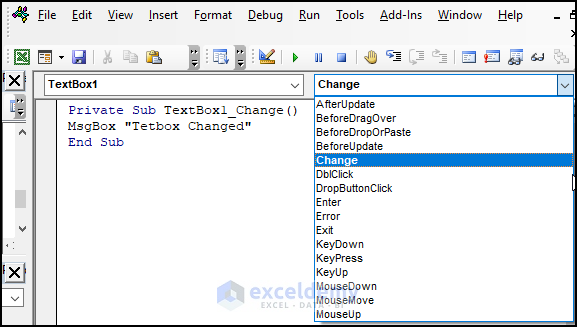
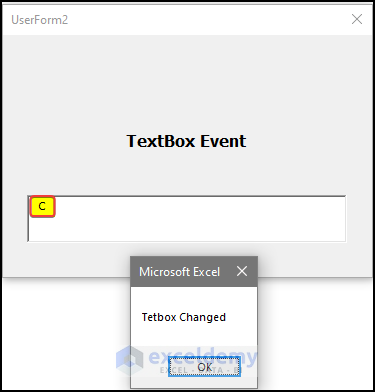
Type 1 – Change Event
This event triggers code-based tasks whenever something is entered inside the textbox.
- After entering this code and running it, we will see that the user form is now present in the worksheet.
- If we try to enter any demo value, like entering C in the textbox, it will show a message that the Textbox changed.
Type 2 – Enter Event
This event is executed whenever a user enters the textbox.
- In the below VBA code, we can see that whenever the user enters textbox 1 from other events in Excel, the message that the value entered in the Textbox will be shown”.
Private Sub TextBox1_Enter()
MsgBox "User Entered in TextBox"
End Sub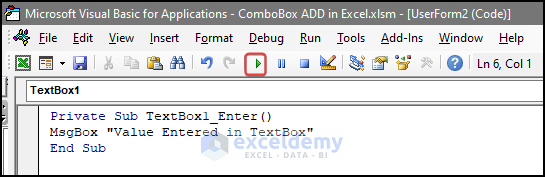
- In this video, we can see the whole process in detail.
Type 3 – Exit Event
This Exit event will execute code whenever the user exits the text box. Like exiting from the textbox to other textboxes or clicking on other UserForm elements, etc. Which can be a very useful feature for identifying various values and cross-checking tasks.
- Enter the following code inside the private sub method and then save it in the VBA editor.
Private Sub TextBox1_Exit(ByVal Cancel As MSForms.ReturnBoolean)
MsgBox "User left the TextBox"
End Sub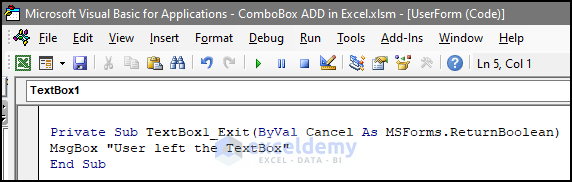
- After running the code, we will try to exit the textbox to the other textbox in the UserForm.
- This video show what happens if we try to exit the textbox.
Type 4 – KeyPress Event
This event is associated with keys pressed on the keyboard.
Private Sub TextBox1_KeyPress(ByVal KeyAscii As MSForms.ReturnInteger)
If KeyAscii >= 32 Then
Dim pressedKey As String
pressedKey = Chr(KeyAscii)
MsgBox "You pressed the key: " & pressedKey, vbInformation, "Key Pressed"
End If
End Sub
- The whole process is explained in the video below.
Type 5 – BeforeUpdate Event
This event triggers whenever a user tries to update the value in a textbox.
- With the code below, if the user tries to update the values in the textbox, the code will instantly check the value to see whether it is odd or even and then return a message accordingly.
- Open the editor and then enter the following code.
Private Sub TextBox1_BeforeUpdate(ByVal Cancel As MSForms.ReturnBoolean)
' Validate the input
Dim userInput As Variant
userInput = Val(TextBox1.Value) ' Convert input to a numeric value
If Not IsNumeric(userInput) Then
MsgBox "Please enter a valid integer.", vbExclamation, "Invalid Input"
Cancel = True ' Cancel the update
Exit Sub
End If
If userInput Mod 2 <> 0 Then
MsgBox "Please enter an even number.", vbExclamation, "Invalid Input"
Cancel = True ' Cancel the update
End If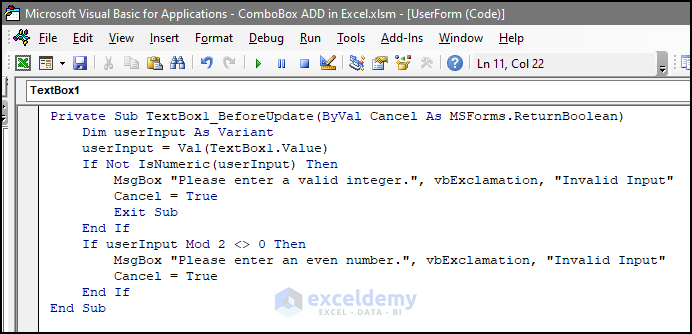
- The whole procedure is demonstrated below with an adequate explanation in a short video.
TextBox Properties in the UserForm
The UserForm Textbox has a unique range of properties that users can use to enhance appearance and function in VBA UserForm textbox events in Excel.
Here’s how to access the properties window:
-
- In the VBA editor, select the textbox you want to modify in your User Form.
- The properties window will automatically appear on the side of the editor, displaying all the options you can change for the selected textbox.
Below are the main properties and functions explained briefly:
- Name: The unique identifier for the Textbox that enables reference and manipulation through VBA code.
- Enabled: Specifies whether the Textbox is enabled or disabled for user interaction. When disabled, users cannot edit or select the text.
- EnterKeyBehavior: Determines whether pressing the “Enter” key inserts a line break in the Textbox when the property is set to “True.”
- EnterFieldBehavior: If set to “True,” this property enables users to use the “Tab” key to move to the next control when the Textbox has focus.
- Value: This property holds the text content within the Textbox. You can access and modify this property programmatically to read or update the text.
- TextAlign: Allows you to align the text within the Textbox. Options typically include left, right, or center alignment.
- PasswordChar: Use this property to display a specific character (e.g., asterisk) instead of the actual text, useful for creating password input fields.
- MultiLine: When set to “True,” this property allows the Textbox to display multiple lines of text, enabling users to enter or view lengthy content.
- ScrollBars: This property controls the appearance of scroll bars in the Textbox, which can be horizontal, vertical, both, or none.
- ScrollHeight: Specifies the size of the scrollable area within a MultiLine Textbox vertically.
- ScrollTop: Allows you to programmatically control the position of the vertical scrollbar in a MultiLine Textbox.
- ScrollLeft: Allows you to programmatically control the position of the horizontal scrollbar in a MultiLine Textbox.
- Visible: Controls whether the Textbox is visible or hidden on the UserForm. Dynamically changing this property can help manage the user interface layout.
- Accelerator: Allows you to set a keyboard shortcut (using the “&” symbol) to quickly focus on the Textbox from other controls.
- AutoTab: When set to “True,” this property automatically moves the focus to the next control once the maximum number of characters specified in the MaxLength property is reached.
- IMEMode: This property determines the Input Method Editor (IME) mode used for entering text, which is useful when dealing with multilingual inputs.
- MaxLength: Defines the maximum number of characters allowed in the Textbox. It can be useful for restricting input length, such as when expecting a specific format.
- BorderStyle: Determines the style of the Textbox’s border, offering options like fixed single-line, fixed 3D, and more.
- MouseIcon: This property sets a custom icon to be displayed when the mouse hovers over the Textbox.
- MousePointer: Controls the appearance of the mouse cursor when it hovers over the Textbox.
- Font: Allows you to set the font type, size, and style for the text displayed in the Textbox.
- ForeColor: Sets the foreground color of the Textbox’s text.
- BackColor: Sets the background color of the Textbox.
How to Integrate the TextBox with Other UserForm Elements
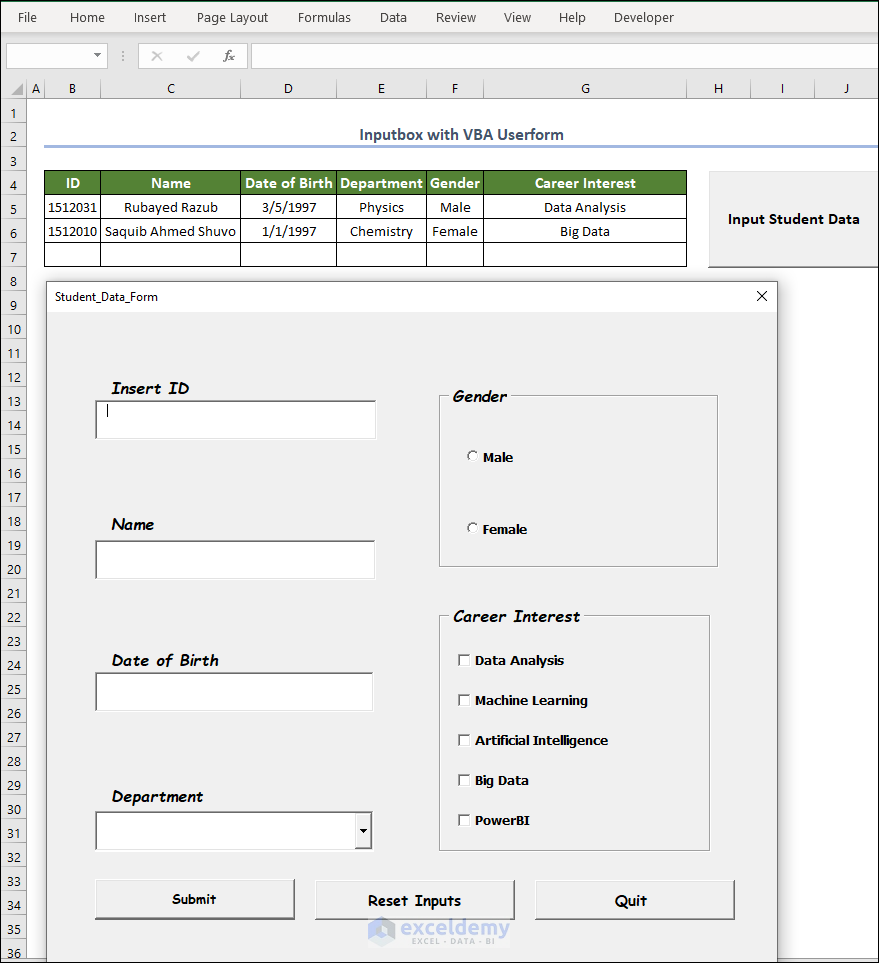
- The image below shows a UserForm containing a textbox and other elements.
- We have a textbox where we can enter the name, student ID, and date of birth. We can also select the department of the students in the combo box. After that, we can use the option button to choose the gender of the students. Finally, we can use the checkboxes to submit multiple subject choices. This way, we can combine the textboxes with the other elements of the UserForm. We also have buttons to quit the user form, reset the inputs, and submit the results.
- The video shows how the whole process works.
Things to Remember
Naming Convention: Use meaningful and descriptive names for your Textboxes to easily identify them within your VBA code. Avoid generic names like “Textbox1” and opt for more specific ones, such as “txtFirstName” or “txtAddress.”
Validation: Implement appropriate data validation for the Textbox to ensure that users enter valid and expected input. You can use events like “LostFocus” or a dedicated “Submit” button to trigger validation checks.
MaxLength: Consider setting the MaxLength property to limit the number of characters users can input. This is particularly useful for fields with fixed-length data, such as phone numbers or postal codes.
MultiLine Property: If you expect users to input or display longer texts, enable the MultiLine property, allowing the Textbox to accommodate multiple lines of text.
ScrollBars: Use the ScrollBars property to provide users with a convenient way to navigate through lengthy text in a MultiLine Textbox.
Clearing the Textbox: Decide whether to clear the Textbox automatically after each submission or leave the previous input intact. The choice depends on the specific use case and user expectations.
Focus: Manage the focus of the Textbox effectively. Set the focus on the appropriate Textbox when the UserForm loads or when specific events occur, so users can immediately start entering data.
Default Button: If you have multiple Textboxes in a UserForm, consider setting a default button (e.g., “OK”) to allow users to submit the form using the “Enter” key.
Password Input: For password fields, use the PasswordChar property to obscure the entered characters for security purposes.
Clear and Reset: Provide users with an option to clear or reset the content of the Textbox in case they wish to start over or correct their input.
Event Handling: Utilize appropriate events like “Change,” “KeyUp,” or “KeyDown” to respond to user interactions and update the application’s behavior accordingly.
Resize: Adjust the size of the Textbox to fit the expected input length adequately. A textbox that’s too small may frustrate users, while an overly large one can waste valuable space on the UserForm.
Testing: Test the UserForm with different scenarios, including edge cases and invalid input, to ensure it behaves as expected and gracefully handles various situations.
Localization: If your application needs to support multiple languages, consider using resource files or other localization techniques to handle translated text within the Textbox.
Frequently Asked Questions
1. What are the events for TextBox?
Change: This occurs when the text in the TextBox changes.
Enter: Occurs when the TextBox receives focus.
Exit: Occurs when the focus leaves the TextBox (loses focus).
KeyPress: Occurs when a key is pressed while the TextBox has focus.
KeyUp: Occurs when a key is released after being pressed while the TextBox has focus.
KeyDown: Occurs when a key is pressed down while the TextBox has focus.
BeforeUpdate: This occurs before the TextBox value is updated (when exiting the TextBox).
AfterUpdate: Occurs after the TextBox value has been updated (when exiting the TextBox).
2. How do I show a TextBox in Excel VBA?
To show a TextBox in Excel VBA, open the VBA editor with “ALT + F11.” Then, insert a new UserForm and add a TextBox control to it. Customize its properties if needed. Close the UserForm designer and return to Excel. Use the VBA code to show the UserForm with the TextBox, like UserForm1.Show.
3. What is the event when TextBox loses focus?
The event that occurs when a TextBox loses focus is the “LostFocus” event.
Download Practice Workbook
Related Articles
- How to Convert TextBox Value to Cell with VBA in Excel
- How to Make Textbox Datepicker with Excel VBA
- How to Use VBA to Change Textbox Text in Excel
- How to Add Text to Textbox Using Excel VBA
- How to Format TextBox for Phone Number in Excel VBA
- Excel VBA to Convert Textbox Value to Number
Get FREE Advanced Excel Exercises with Solutions!


Hi,
I love playing around with VBA in Excel and was wondering how to approach ActiveX Textbox events o=in a Worskheet object.
Hello Hans Hallebeek,
It’s great to hear that you love to play with VBA. VBA is interesting. Here’s a sample code to handle an ActiveX TextBox Change event in a worksheet:
1. Insert an ActiveX TextBox from the Developer tab.
2. Open the VBA editor (Alt + F11).
3. In the Project Explorer, find the worksheet with the TextBox.
4. Now, write the following code in the worksheet’s code window:
This triggers a message box whenever the TextBox content changes. You can replace TextBox1 with your TextBox’s name.
Regards
ExcelDemy