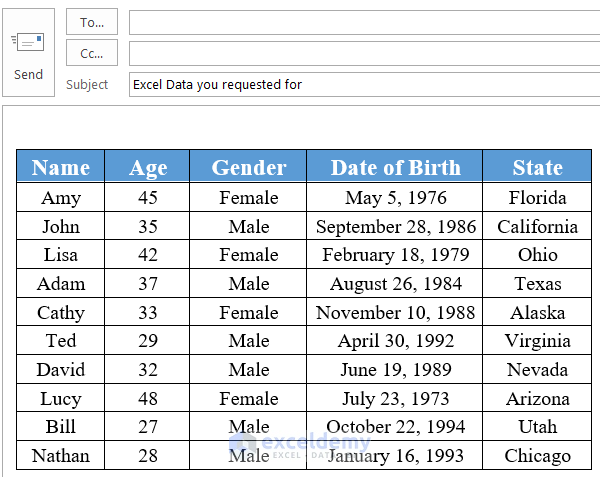
Let’s assume a scenario where we have an Excel file that contains information about the employees of a company, including the Name, Age, Gender, Date of Birth, and the State of origin. We will copy and then paste the range of this worksheet into the email body using VBA.
Method 1 – Paste a Range as an Image into an Email Body Using VBA in Excel
Steps:
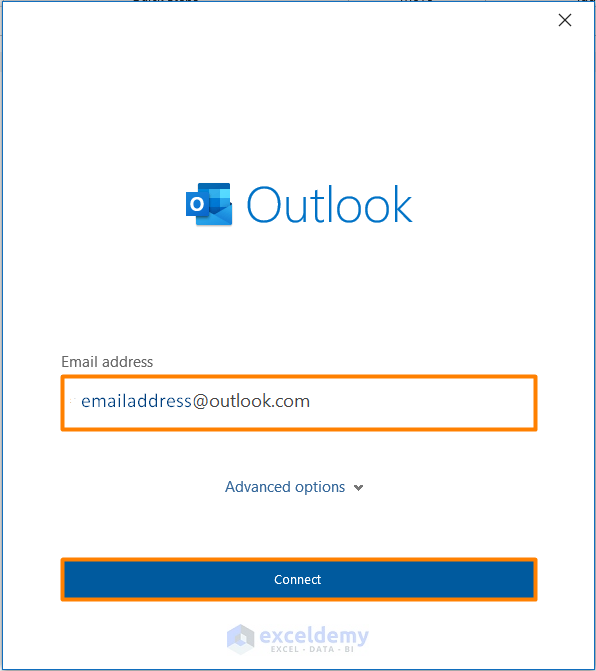
- Log in to the Outlook mail app using your account credentials.
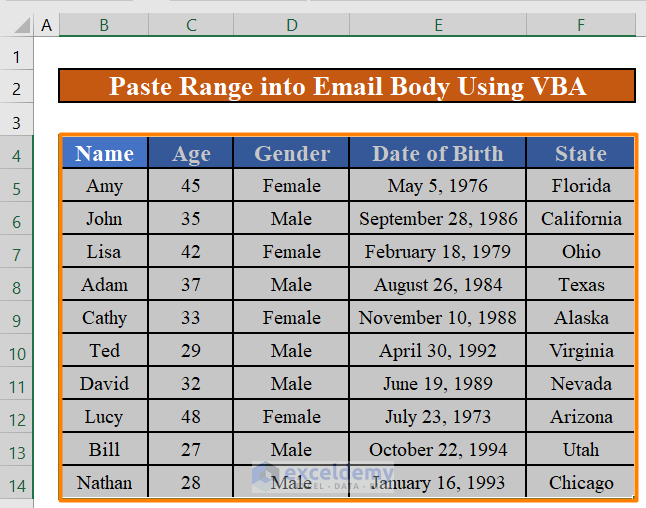
- Select the cell range you want to paste into the email body. We have selected the entire dataset, including the column headers.
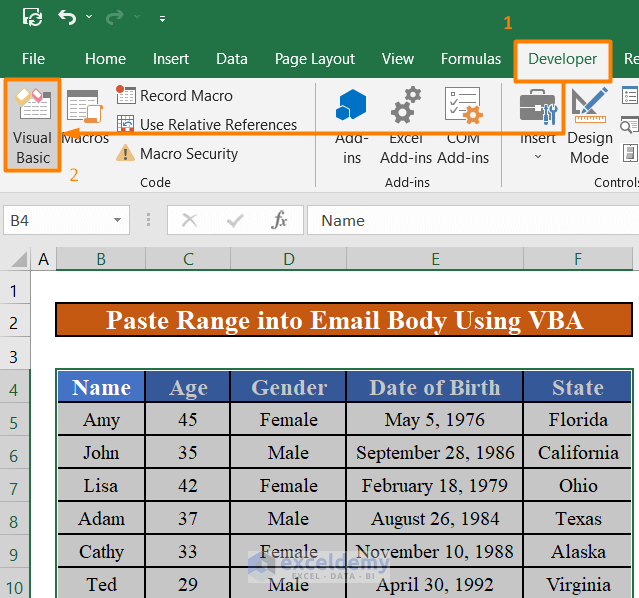
- Select Visual Basic from the Developer tab or press Alt + F11.
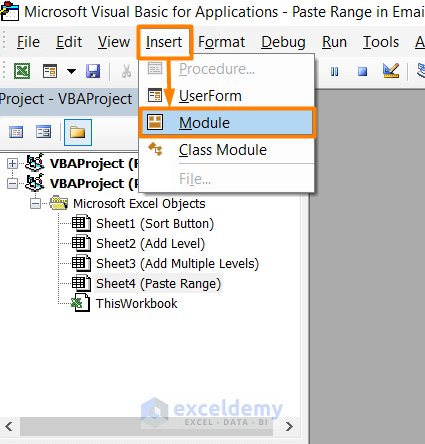
- Click on the Insert option and select Module.
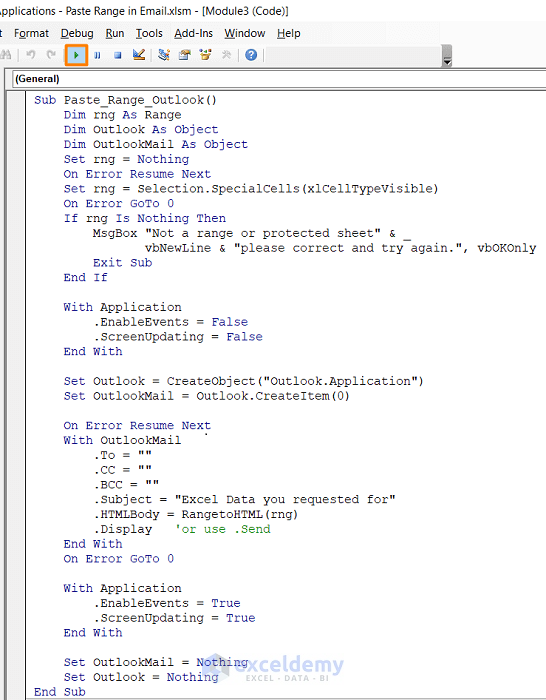
- Paste the following code in the window that appears.
Sub Paste_Range_Outlook()
    Dim rng As Range
    Dim Outlook As Object
    Dim OutlookMail As Object
    Set rng = Nothing
    On Error Resume Next
    Set rng = Selection.SpecialCells(xlCellTypeVisible)
    On Error GoTo 0
    If rng Is Nothing Then
        MsgBox "Not a range or protected sheet" & _
               vbNewLine & "please correct and try again.", vbOKOnly
        Exit Sub
    End If
    With Application
        .EnableEvents = False
        .ScreenUpdating = False
    End With
    Set Outlook = CreateObject("Outlook.Application")
    Set OutlookMail = Outlook.CreateItem(0)
    On Error Resume Next
    With OutlookMail
        .To = ""
        .CC = ""
        .BCC = ""
        .Subject = "Excel Data you requested for"
        .HTMLBody = RangetoHTML(rng)
        .Display   'or use .Send
    End With
    On Error GoTo 0
    With Application
        .EnableEvents = True
        .ScreenUpdating = True
    End With
    Set OutlookMail = Nothing
    Set Outlook = Nothing
End Sub
Function RangetoHTML(rng As Range)
    Dim obj As Object
    Dim txtstr As Object
    Dim File As String
    Dim WB As Workbook
    File = Environ$("temp") & "\" & Format(Now, "dd-mm-yy h-mm-ss") & ".htm"
    rng.Copy
    Set WB = Workbooks.Add(1)
    With WB.Sheets(1)
        .Cells(1).PasteSpecial Paste:=8
        .Cells(1).PasteSpecial xlPasteValues, , False, False
        .Cells(1).PasteSpecial xlPasteFormats, , False, False
        .Cells(1).Select
        Application.CutCopyMode = False
        On Error Resume Next
        .DrawingObjects.Visible = True
        .DrawingObjects.Delete
        On Error GoTo 0
    End With
    With WB.PublishObjects.Add( _
         SourceType:=xlSourceRange, _
         FileName:=File, _
         Sheet:=WB.Sheets(1).Name, _
         Source:=WB.Sheets(1).UsedRange.Address, _
         HtmlType:=xlHtmlStatic)
        .Publish (True)
    End With
    Set obj = CreateObject("Scripting.FileSystemObject")
    Set txtstr = obj.GetFile(File).OpenAsTextStream(1, -2)
    RangetoHTML = txtstr.readall
    txtstr.Close
    RangetoHTML = Replace(RangetoHTML, "align=center x:publishsource=", _
                          "align=left x:publishsource=")
    WB.Close savechanges:=False
    Kill File
    Set txtstr = Nothing
    Set obj = Nothing
    Set WB = Nothing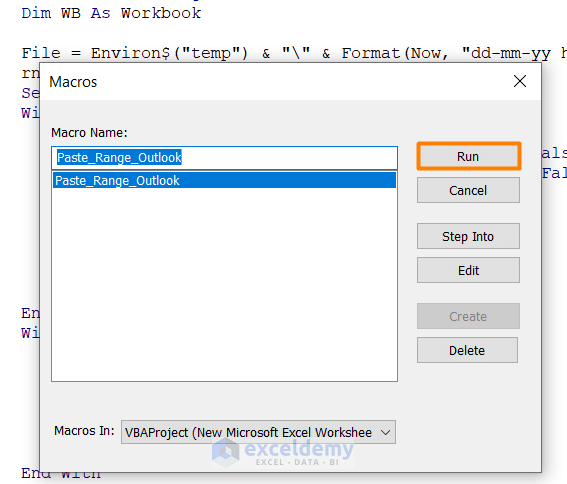
End Function- Click on Run (▶).
- If a window named Macro appears, click on Run from that window.
- A window of the Outlook mail app appears with a new mail that has the entire range copied from the worksheet in its body.
Read More: How to Send Email from Excel with Body Using a Macro
Method 2 – Use VBA to Copy and Paste a Range as an Image into Email
Alternatively, we can also copy and paste the range as an image format into the mail body. Let’s see how we can do that.
Steps:
- Insert a new Module.
- Copy the following code in the window that appears.
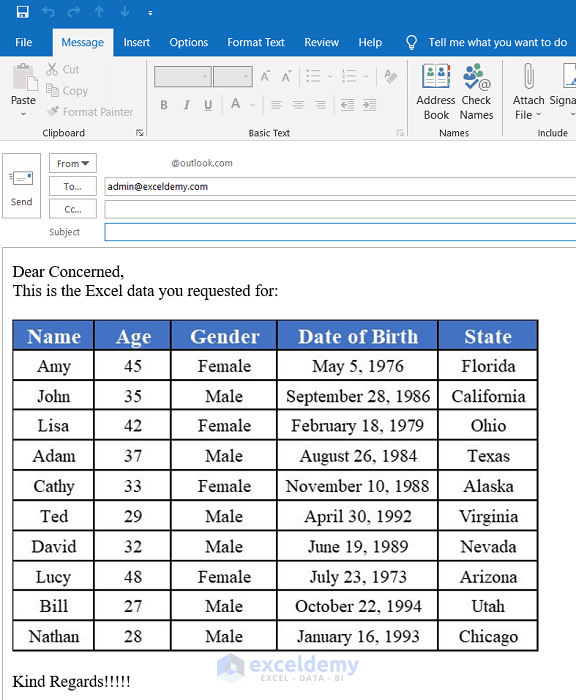
Sub PasteRangeinMail()
Dim FilePath As String
Dim Outlook As Object
Dim OutlookMail As Object
Dim HTMLBody As String
Dim rng As Range
On Error Resume Next
Set rng = Selection
If rng Is Nothing Then Exit Sub
With Application
.Calculation = xlManual
.ScreenUpdating = False
.EnableEvents = False
End With
Set Outlook = CreateObject("outlook.application")
Set OutlookMail = Outlook.CreateItem(olMailItem)
Call createImage(ActiveSheet.Name, rng.Address, "RangeImage")
FilePath = Environ$("temp") & "\"
HTMLBody = "<span LANG=EN>" _
& "<p class=style1><span LANG=EN><font FACE=Times New Roman SIZE=4>" _
& "Dear Concerned," _
& "<br>" _
& "This is the Excel data you requested for:<br> " _
& "<br>" _
& "<img src='cid:RangeImage.jpg'>" _
& "<br>" _
& "<br>Kind Regards!!!!!</font></span>"
With OutlookMail
.Subject = ""
.HTMLBody = HTMLBody
.Attachments.Add FilePath & "RangeImage.jpg", olByValue
.To = "[email protected]"
.CC = " "
.Display
End With
End Sub
Sub createImage(SheetName As String, rngAddrss As String, nameFile As String)
Dim rngJpg As Range
Dim Shape As Shape
ThisWorkbook.Activate
Worksheets(SheetName).Activate
Set rngJpg = ThisWorkbook.Worksheets(SheetName).Range(rngAddrss)
rngJpg.CopyPicture
With ThisWorkbook.Worksheets(SheetName).ChartObjects.Add(rngJpg.Left, rngJpg.Top, rngJpg.Width, rngJpg.Height)
.Activate
For Each Shape In ActiveSheet.Shapes
Shape.Line.Visible = msoFalse
Next
.Chart.Paste
.Chart.Export Environ$("temp") & "\" & nameFile & ".jpg", "JPG"
End With
Worksheets(SheetName).ChartObjects(Worksheets(SheetName).ChartObjects.Count).Delete
Set rngJpg = Nothing
End Sub- Click on Run (▶).
- If a window named Macro appears, click on Run from that window.
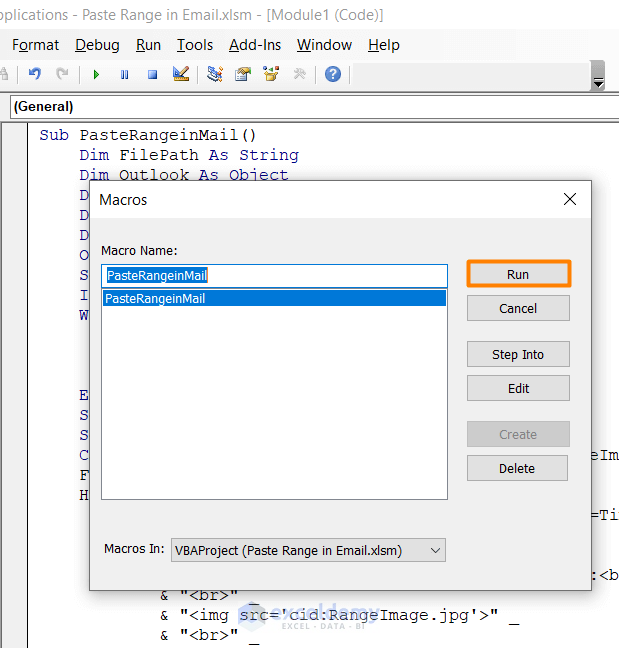
- A window of the Outlook mail app appears with a new mail that has the entire range copied from the worksheet as a jpg image in its body.
Read More: VBA to Generate Multiple Lines in Email Body in Excel
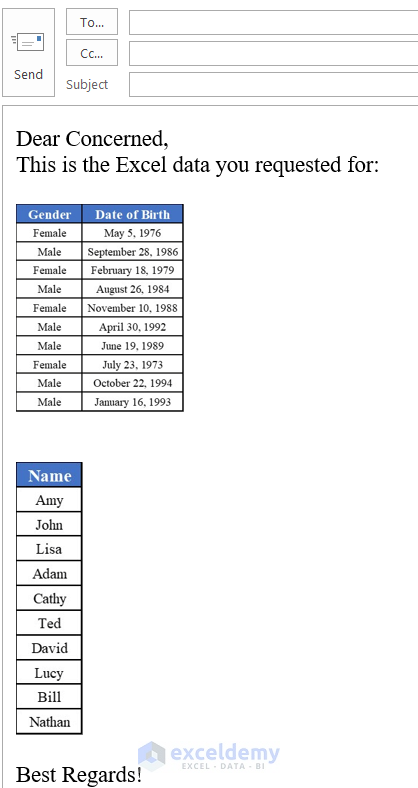
Method 3 – Copy Ranges from Multiple Worksheets and Paste as Images into an Email Using VBA
Steps:
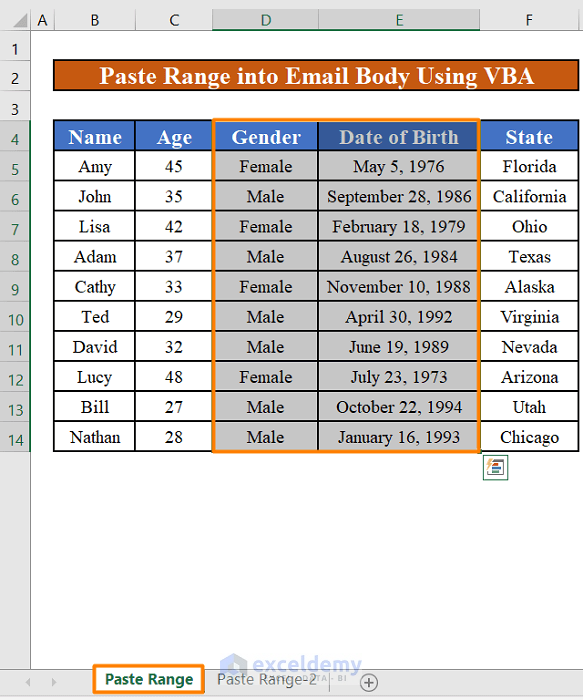
- First, we will select the ranges you want to paste into the body of an email. We have chosen the ranges under the Gender and Date of Birth columns from the first worksheet.
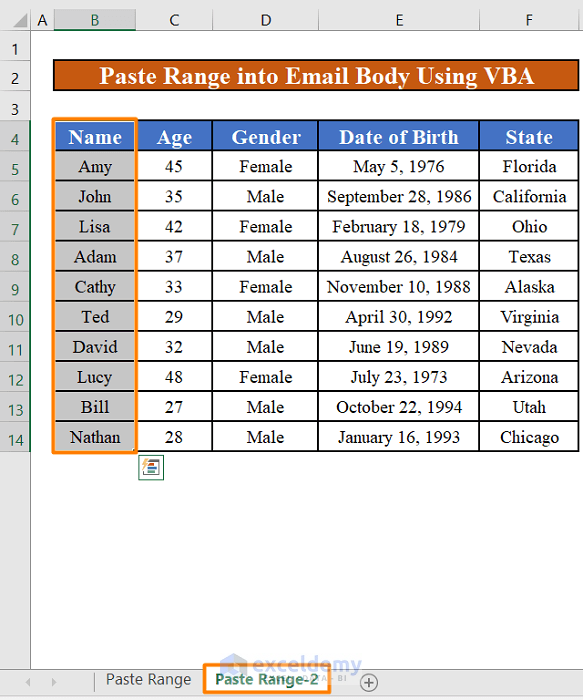
- Select the range under the Name column from the second worksheet.
- Copy the following code in the window that appears.
Sub PasteMultipleRangeinMail()
Dim FilePath As String
Dim Outlook As Object
Dim OutlookMail As Object
Dim HTMLBody As String
Dim rng As Range
Dim Sheet As Worksheet
Dim AcSheet As Worksheet
Dim FileName As String
Dim Src As String
On Error Resume Next
FilePath = Environ$("temp") & "\RangeImage\"
If Len(VBA.Dir(FilePath, vbDirectory)) = False Then
VBA.MkDir FilePath
End If
Set AcSheet = Application.ActiveSheet
For Each Sheet In Application.Worksheets
Sheet.Activate
Set rng = Sheet.Application.Selection
If rng.Cells.Count > 1 Then
Call createJpg(Sheet.Name, rng.Address, "DashboardFile" & VBA.Trim(VBA.Str(Sheet.Index)))
End If
Next
AcSheet.Activate
With Application
.Calculation = xlManual
.ScreenUpdating = False
.EnableEvents = False
End With
Set Outlook = CreateObject("outlook.application")
Set OutlookMail = Outlook.CreateItem(olMailItem)
Src = ""
FileName = Dir(FilePath & "*.*")
Do While FileName <> ""
Src = Src + VBA.vbCrLf + "<img src='cid:" + FileName + "'><br>"
FileName = Dir
If FileName = "" Then Exit Do
Loop
HTMLBody = "<span LANG=EN>" _
& "<p class=style1><span LANG=EN><font FACE=Times New Roman SIZE=4>" _
& "Dear Concerned," _
& "<br>" _
& "This is the Excel data you requested for:<br> " _
& "<br>" _
& Src _
& "<br>Best Regards!</font></span>"
With OutlookMail
.Subject = ""
.HTMLBody = HTMLBody
FileName = Dir(FilePath & "*.*")
Do While FileName <> ""
.Attachments.Add FilePath & FileName, olByValue
FileName = Dir
If FileName = "" Then Exit Do
Loop
.To = " "
.CC = " "
.Display
End With
If VBA.Dir(FilePath & "*.*") <> "" Then
VBA.Kill FilePath & "*.*"
End If
End Sub
Sub createJpg(SheetName As String, rngAddrss As String, nameFile As String)
Dim rngPic As Range
ThisWorkbook.Activate
Worksheets(SheetName).Activate
Set rngPic = ThisWorkbook.Worksheets(SheetName).Range(rngAddrss)
rngPic.CopyPicture
With ThisWorkbook.Worksheets(SheetName).ChartObjects.Add(rngPic.Left, rngPic.Top, rngPic.Width, rngPic.Height)
.Activate
.Chart.Paste
.Chart.Export Environ$("temp") & "\RangeImage\" & nameFile & ".jpg", "JPG"
End With
Worksheets(SheetName).ChartObjects(Worksheets(SheetName).ChartObjects.Count).Delete
Set rngPic = Nothing
End Sub- Click on Run (▶).
- If a window named Macro appears, click on Run from that window.
- A window of the Outlook mail app appears with a new mail that has the ranges copied from the worksheet as separate jpg images in its body.
Read More: Macro to Send Email from Excel
Quick Notes
- You should have the Outlook mail app to paste the range into the email body using VBA.
- If you do not have a Developer tab, you can make it visible in File > Options > Customize Ribbon.
- To open the VBA editor Press Alt + F11. You can press Alt + F8 to bring up the Macro window.
Download the Practice Workbook
Related Articles
- Send Reminder Email Automatically from an Excel Worksheet Using VBA
- Send Email from Excel VBA without Outlook
- How to Apply Macro to Send Email from Excel with Attachment
- Excel Macro to Send Email Automatically
- Excel Macro: Send Email to an Address in Cell
- Print to PDF and Email Using VBA in Excel


Hello
This is great!
I have a question please bear with me, I am a beginner when it comes to VBA
In my case I am looking to send a Pick up and delivery sheet (absolute range) daily.
My workbook consists of a worksheet for every day of the month.
Is there a way to have this module run by using a ActiveX button embedded in each days sheet to start instead of ALT F8 and run?
Thank you for your help
Hello SHAWN,
Thank you for letting us know your queries. Yes, there’s a way to attach a button to run your desired macro. Just insert any shape (Insert > Illustrations > Shapes) in the worksheet. Then, right-click on the shape to get the Context Menu. There, select the Assign Macro option. Hence, it’ll return a dialog box. Choose your desired macro and press OK. In this way, you don’t have to go to the VBA window to press the Run key.
Hope you can perform the task. Please reach out to me at: [email protected] for further queries.
Good luck.
Hi ! Great code, works like a charm. But nevertheless I do have a request.
I would very much like to have the number 3 method with a small adjustment.
I have a set range on sheet1 (“A1:I30”) and a set range on sheet2 (“A1:I20”), these are always the same ranges.
Can you adjust the method 3 code to send the two sheet ranges ??
It would be appreciated very much 🙂
Thanks for the help
Hello COEN,
Thanks for reaching out to us. Regarding your issue, select the range A1:I30 of Sheet1 first. Then, go to Sheet2. Press the Ctrl key, and select the range A1:I20 simultaneously. Thus, you’ll have selected your desired ranges from both sheets. Now, follow the steps in method 3. In this way, you’ll have your required email body.
Good luck.
Really great code that saved me lots of time.
Thanks alot.
Welcome SHAUL. It’s always a pleasure to hear that we were of any help to you.
Good luck.
Hi, can i ask why the picture/body colours are missing in the email
Hello DARRYL,
I’m not sure what you tried to mean by missing colors. The Headers are still blue in the email body. Please reach out to me at: [email protected] for any further queries. I’ll be happy to help.
Good luck.
Seems like method 2 missing createJpg() function from the screenshot above. Also, code for method 2 and 3 are still same as method 1 :p
Hello JKS,
Thank you so much for pointing out the mistake. We’ve uploaded the accurate VBA codes in methods 2 & 3.
And about your other issue regarding the screenshots, the codes are really long. That’s why we have demonstrated the upper portions only. But the entire code is there.
Lastly, we are grateful for your feedback. It helps us to grow.
Good luck.
Hi I am using the code to copy pivot table range. But i am facing an issue with the copied cells. There is a chart also appearing on top of the copied cells. Not sure why this is happening.
Did this get resolved? I get the same where the pivot table itself and then a chart of the pivot table are pasted on top of each other
Can delete various rows in the second Subs code and all I then get is the chart itself, but I need the other one!!
Hello Duncan,
The problem occurs because both the pivot table and its associated chart are copied and pasted into the email body simultaneously, overlapping each other. To resolve this, you should separate the chart from the pivot table when copying. You will need to adjust the code to specifically copy the range of cells containing the pivot table, ensuring that it does not include the chart.
We updated the VBA code where a Boolean parameter (includeChart) was added. When set to False, it will delete the chart shapes before exporting the image to ensure that only the pivot table is copied.
In the PasteRangeinMail subroutine, this parameter is set to False, so charts are excluded by default.
You can adjust the includeChart parameter as needed to ensure that only the pivot table is included in the email body.
Regards
ExcelDemy
Hello, JAMES!
Those codes work properly for pivot table range. Can you please send me your Excel file at [email protected]? So that, I can help you.
Thanks!
Hi,
I’m trying to send one range on one email and then copy the code to send another range on a second email and so on – my aim is to send 20+ emails in one go each with a unique range copied on to it.
What’s the best way to do this as when i try to duplicate the code multiple times, it only runs the first part.
Thanks,
Rowan
Hello, ROWAN!
Check this article. This may help you.
https://www.exceldemy.com/excel-automatically-send-email-when-condition-met/#2_Send_Email_Automatically_Based_on_a_Due_Date_Using_VBA_Code
Use this code to send 20+ emails in one go each with a unique range. Just change the condition and range as per your requirements.
Public Sub Send_Email_Automatically()
Dim rngD, rngS, rngT As Range
Dim ob1, ob2 As Object
Dim LRow, x As Long
Dim l, strbody, rSendValue, mSub As String
On Error Resume Next
Set rngD = Application.InputBox(“Deadline Range:”, “Exceldemy”, , , , , , 8)
If rngD Is Nothing Then Exit Sub
Set rngS = Application.InputBox(“Email Range:”, “Exceldemy”, , , , , , 8)
If rngS Is Nothing Then Exit Sub
Set rngT = Application.InputBox(“Email Topic Range:”, “Exceldemy”, , , , , , 8)
If rngT Is Nothing Then Exit Sub
LRow = rngD.Rows.Count
Set rngD = rngD(1)
Set rngS = rngS(1)
Set rngT = rngT(1)
Set ob1 = CreateObject(“Outlook.Application”)
For x = 1 To LRow
rngDValue = “”
rngDValue = rngD.Offset(x – 1).Value
If rngDValue <> “” Then
If CDate(rngDValue) – Date <= 7 And CDate(rngDValue) - Date > 0 Then
rngSValue = rngS.Offset(x – 1).Value
mSub = rngT.Offset(x – 1).Value & ” on ” & rngDValue
l = “
”
”strbody = “
strbody = strbody & “Hello! ” & rngSValue & l
strbody = strbody & rngT.Offset(x – 1).Value & l
strbody = strbody & “”
Set ob2 = ob1.CreateItem(0)
With ob2
.Subject = mSub
.To = rSendValue
.HTMLBody = strbody
.Send
End With
Set ob2 = Nothing
End If
End If
Next
Set ob1 = Nothing
End Sub
Hey, thank you very much for the code, it’s fantastic!
Just one question: is it possible to generate 2 screenshots (from 2 different ranges) from the same worksheet (methode 3) and if it’s possible what do I have to change within the code?
Thank you in advance!
Hannes
Hello, HANNES!
You can use the same code to generate 2 screenshots (from 2 different ranges) from the same worksheet. All you have to do is, while selecting any range press Ctrl. Then, just Run the code.
Or, you can use the code below, this will convert your excel file range to word document.
Private Sub EmailSS(rng As Range, rng2 As Range, strName As String)
‘To Open Email
Dim outlookApp As Outlook.Application
Set outlookApp = CreateObject(“Outlook.Application”)
Dim outMail As Outlook.MailItem
Set outMail = outlookApp.CreateItem(olMailItem)
With outMail
.To = strName
.Subject = “** Check this **”
.Importance = olImportanceHigh
.Display
End With
‘To Get Word Document
Dim wordDoc As Word.Document
Set wordDoc = outMail.GetInspector.WordEditor
‘To Take Screenshot
rng.Copy
wordDoc.Paragraphs(1).Range.PasteSpecial , , , , wdPasteBitmap
wordDoc.Content.InsertParagraphAfter
rng2.Copy
wordDoc.Paragraphs(2).Range.PasteSpecial , , , , wdPasteBitmap
outMail.HTMLBody = “Timesheets Submitted by ” & strName & “
” & _
Range(“Text”) & vbNewLine & outMail.HTMLBody
End Sub
Hope this will help you!
Thanks for sharing your problem with use.
Thank you, Sabrina! Unfortunately the method by pressing Crtl doesn’t work but the code below does its job 🙂 Thank you for that!
If anybody needs it hereinafter please find my adapted code (big thank to Sabrina once again) for creating up to 5 screenshots within the same worksheet (from variable selections) and pasting them into a single mail:
Private Sub EMailScreenshot()
Dim strName As String
Dim outlookApp As Outlook.Application
Set outlookApp = CreateObject(“Outlook.Application”)
Dim outMail As Outlook.MailItem
Dim rngFirst As Range
Dim rngSecond As Range
Dim rngThird As Range
Dim rngFourth As Range
Dim rngFifth As Range
On Error Resume Next
Set rngFirst = Selection.Areas(1)
Set rngSecond = Selection.Areas(2)
Set rngThird = Selection.Areas(3)
Set rngFourth = Selection.Areas(4)
Set rngFifth = Selection.Areas(5)
Set outMail = outlookApp.CreateItem(olMailItem)
With outMail
.To = ComboBox1.List(ComboBox1.ListIndex)
.Subject = “”
.Display
End With
Dim wordDoc As Word.Document
Set wordDoc = outMail.GetInspector.WordEditor
If Not rngFifth Is Nothing Then
rngFirst.copy
wordDoc.Paragraphs(1).Range.PasteSpecial , , , , wdPasteBitmap
wordDoc.Content.InsertParagraphAfter
rngSecond.copy
wordDoc.Paragraphs(2).Range.PasteSpecial , , , , wdPasteBitmap
wordDoc.Content.InsertParagraphAfter
rngThird.copy
wordDoc.Paragraphs(3).Range.PasteSpecial , , , , wdPasteBitmap
wordDoc.Content.InsertParagraphAfter
rngFourth.copy
wordDoc.Paragraphs(4).Range.PasteSpecial , , , , wdPasteBitmap
wordDoc.Content.InsertParagraphAfter
rngFifth.copy
wordDoc.Paragraphs(5).Range.PasteSpecial , , , , wdPasteBitmap
wordDoc.Content.InsertParagraphAfter
outMail.HTMLBody = outMail.HTMLBody
Exit Sub
End If
If Not rngFourth Is Nothing Then
rngFirst.copy
wordDoc.Paragraphs(1).Range.PasteSpecial , , , , wdPasteBitmap
wordDoc.Content.InsertParagraphAfter
rngSecond.copy
wordDoc.Paragraphs(2).Range.PasteSpecial , , , , wdPasteBitmap
wordDoc.Content.InsertParagraphAfter
rngThird.copy
wordDoc.Paragraphs(3).Range.PasteSpecial , , , , wdPasteBitmap
wordDoc.Content.InsertParagraphAfter
rngFourth.copy
wordDoc.Paragraphs(4).Range.PasteSpecial , , , , wdPasteBitmap
wordDoc.Content.InsertParagraphAfter
outMail.HTMLBody = outMail.HTMLBody
Exit Sub
End If
If Not rngThird Is Nothing Then
rngFirst.copy
wordDoc.Paragraphs(1).Range.PasteSpecial , , , , wdPasteBitmap
wordDoc.Content.InsertParagraphAfter
rngSecond.copy
wordDoc.Paragraphs(2).Range.PasteSpecial , , , , wdPasteBitmap
wordDoc.Content.InsertParagraphAfter
rngThird.copy
wordDoc.Paragraphs(3).Range.PasteSpecial , , , , wdPasteBitmap
wordDoc.Content.InsertParagraphAfter
outMail.HTMLBody = outMail.HTMLBody
Exit Sub
End If
If Not rngSecond Is Nothing Then
rngFirst.copy
wordDoc.Paragraphs(1).Range.PasteSpecial , , , , wdPasteBitmap
wordDoc.Content.InsertParagraphAfter
rngSecond.copy
wordDoc.Paragraphs(2).Range.PasteSpecial , , , , wdPasteBitmap
wordDoc.Content.InsertParagraphAfter
outMail.HTMLBody = outMail.HTMLBody
Exit Sub
End If
Hi,
I need a help.
I want to insert a (range) image in the center of the body mail.
For example:
I’ve inserted a image on Range”A1″,
I want to paste a Range”A1″ in the center of the body mail.
Hello Asmitha, Thanks for your query. I found it very fascinating. Yes, we can insert a image in the A1 cell and export it to the Outlook in the middle of the email body.
Put the following VBA code in the module and get the output like below image.
Thanks a ton and have a good day.
Regards,
MD Tanvir Rahman
Excel and VBA Content Developer
Exceldemy, Softeko
I have used the code and wanted to check if there is a code available to instead of sending it immediately, i would only need to copy a range of cells to copy as the email body input, then insert a file as attachment, and view it via Outlook mail app before hitting send button?
Dear Khristine,
Thank you for your comment. I have made some modifications to the code. Now, when you run it, a file picker dialog box will appear, allowing you to select a file. Once you’ve chosen the file, the Outlook app will open and a new email will be generated with the file attached. You can then manually send the email at your convenience. Here is the updated code:
I hope it will do the job for you.
Regards
Aniruddah Alam
ExcelDemy
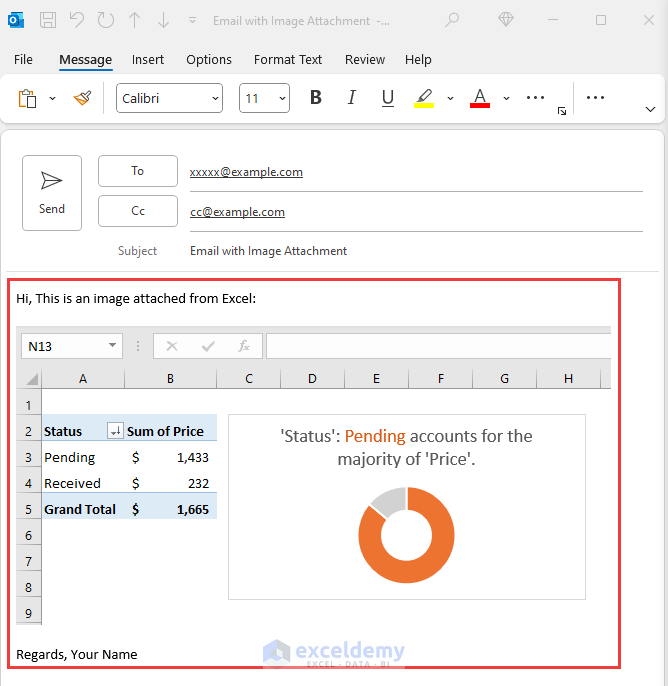
Rather than stacking the multiple images down the body of the email, how can this code be adapted to attach the images next to each other, across the body of the email?
Hello GRAHAM
Thanks for reading our blogs and sharing your requirements. You wanted to display the range-converted images horizontally in the email body. This can be achieved by slightly modifying the article’s Excel VBA code.
OUTPUT OVERVIEW:
Excel VBA Code:
I have another present for you. If you ever want to attach the images generated from the selected ranges, you can use the following code:
Hopefully, the codes will help in various situations. I have also attached the solution workbook; good luck.
DOWNLOAD SOLUTION WORKBOOK
Regards
Lutfor Rahman Shimanto
Excel & VBA Developer
ExcelDemy
Finally a solution that doesn’t lose font color and fill! Thank you!
Hello Nate,
You are most welcome. We are glad that our solution worked perfectly for you. Keep finding Excel solutions with ExcelDemy.
Regards
ExcelDemy
Thank you for your outstanding help. I had struggled to automate mail delivery of an Excel range using VBA. Your first example works very well.
Thanks again!
Hello Raif,
You are most welcome. We are glad to hear that our example worked for you. You can explore more article related to VBA. Keep learning Excel with ExcelDemy.
Regards
ExcelDemy
Good morning, when the first code listed was used in my first file, it worked flawlessly, but now it does not work in my second file. What am I missing? I cannot get the data to past to the body of the email on the second file.
Hello Zeke Cray,
Good morning! It sounds like the issue might be related to differences in the structure or layout of your second file.
Range Selection: Ensure the range is actively selected in the second file before running the macro.
Sheet Protection: If the sheet is protected, unprotect it to allow VBA access.
Range Differences: Check if the second file’s range differs from the first. Update Selection.SpecialCells(xlCellTypeVisible) accordingly.
Merged Cells: Remove any merged cells in the selection, as they can cause issues with PasteSpecial.
If you still face issues, let me know any specific error messages or changes between the two files.
Regards
ExcelDemy
Hello,
First of all thank you very much!
The VBA CODE is working perfectly to me. However when my users try to access the image by mobile the image does not pen (It shows a interrogation point).
Any thoughts that could help me on that?
thank you!
Hello Lucas de Oliveira Alves,
Thank you for your kind feedback! I’m glad to hear the VBA code is working well for you.
Regarding the issue with images not displaying on mobile devices, it could be due to how the image is embedded or attached in the email. Many mobile email clients do not support embedded images and might block them by default. Here are a few suggestions to address this:
Use an External Image Hosting Service: Instead of embedding the image directly in the email body, you can upload the image to a reliable hosting service and include its URL in the email body. This ensures the image is accessible regardless of the email client.
Check Email Client Compatibility: Ensure the image is embedded using standard practices that are supported by most email clients. Sometimes, tweaking the HTML format in the email body can resolve compatibility issues.
Use Base64 Encoding: If possible, encode the image in Base64 and include it in the email’s HTML body. While this increases email size, it often improves compatibility across devices.
Add the Image as an Attachment: If none of the above solutions work, consider attaching the image instead of embedding it. This ensures users can view the image by opening the attachment.
Regards
ExcelDemy