Complete the following steps before applying a macro to send email automatically.
STEPS:
- From your dataset, go to the Developer tab. Select the option Visual Basic.

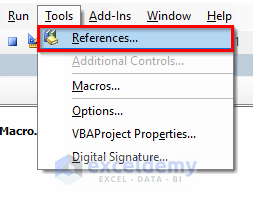
- Go to the Tool tab and select the option References.
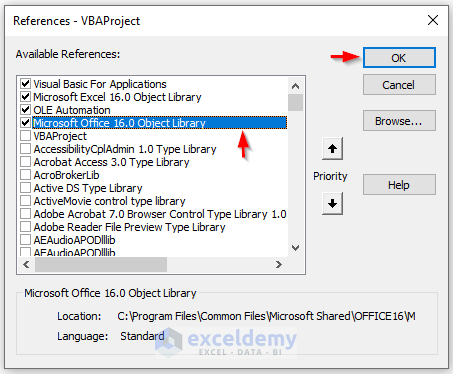
- A new dialogue box named ‘References – VBAProject’ will open.
- Check the option ‘Microsoft Office 16.0 Object Library’ and click OK.
Method 1 – Applying Excel VBA Macro to Send Email Automatically Based on Cell Value
STEPS:
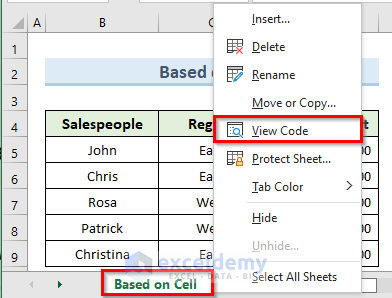
- Right–click on the sheet ‘Based on Cell’.
- Select the option ‘View Code’.
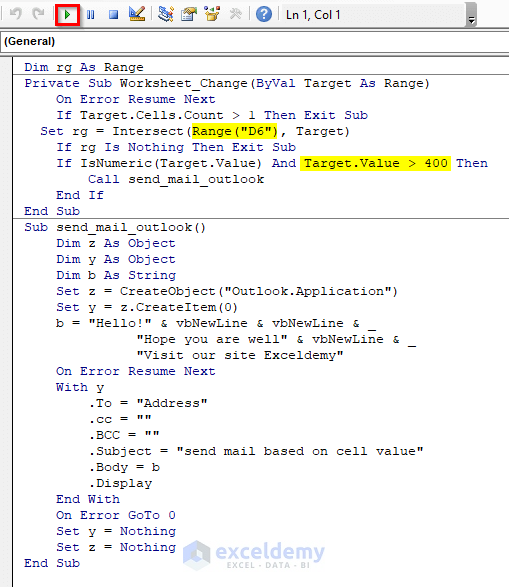
- A blank VBA code window will open. Another way to open that code window is to press Alt + F11.
- Enter the following code in that code window:
Dim rg As Range
Private Sub Worksheet_Change(ByVal Target As Range)
On Error Resume Next
If Target.Cells.Count > 1 Then Exit Sub
Set rg = Intersect(Range("D6"), Target)
If rg Is Nothing Then Exit Sub
If IsNumeric(Target.Value) And Target.Value > 400 Then
Call send_mail_outlook
End If
End Sub
Sub send_mail_outlook()
Dim z As Object
Dim y As Object
Dim b As String
Set z = CreateObject("Outlook.Application")
Set y = z.CreateItem(0)
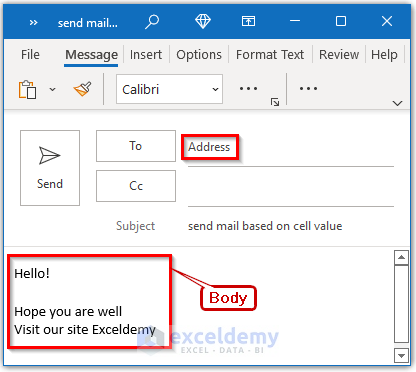
b = "Hello!" & vbNewLine & vbNewLine & _
"Hope you are well" & vbNewLine & _
"Visit our site Exceldemy"
On Error Resume Next
With y
.To = "Address"
.cc = ""
.BCC = ""
.Subject = "send mail based on cell value"
.Body = b
.Display
End With
On Error GoTo 0
Set y = Nothing
Set z = Nothing
End Sub- Click the Run button or press F5 to run the code.
- A new dialogue box named Macros will appear.
- In the Macro Name field, select the macro ‘send_mail_outlook’.
- Click on the Run button.
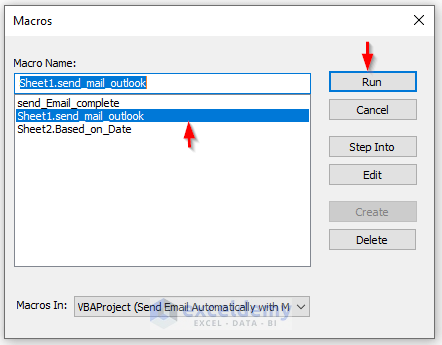
- When the cell value in cell D6 > 400 an email in Outlook will generate automatically with specific recipients. We have to just click on the Send button to send the email.
Read More: Excel Macro: Send Email to an Address in Cell
Method 2 – Sending Email Automatically Based on Due Date with VBA Macro
STEPS:
- Right-click on the sheet Date.
- Select the option ‘View Code’.
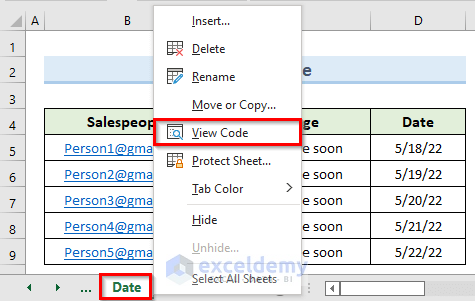
- A blank VBA code window opens. We can also press Alt + F11 to get that code window.
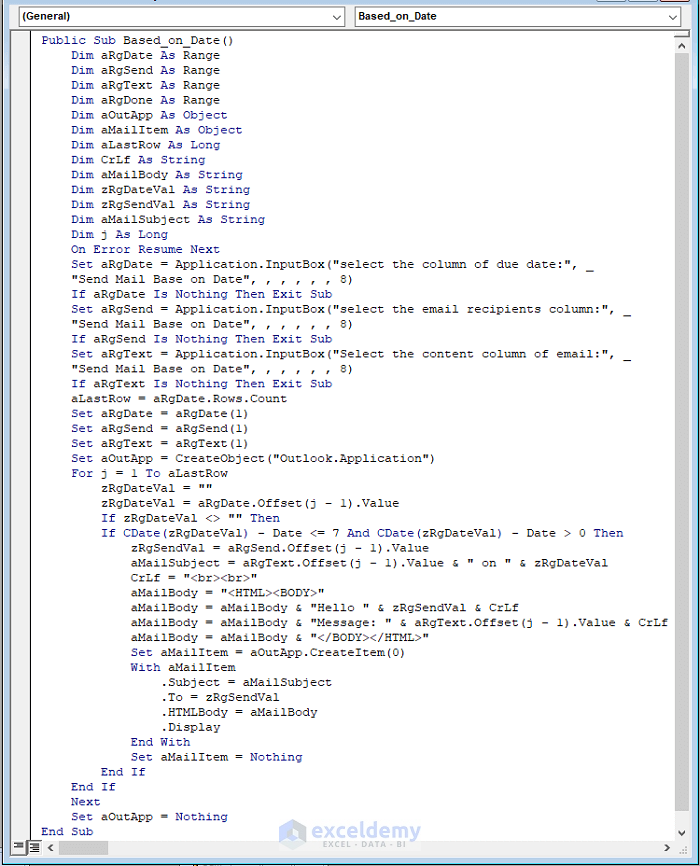
- Enter the following code in the code window:
Public Sub Based_on_Date()
Dim aRgDate As Range
Dim aRgSend As Range
Dim aRgText As Range
Dim aRgDone As Range
Dim aOutApp As Object
Dim aMailItem As Object
Dim aLastRow As Long
Dim CrLf As String
Dim aMailBody As String
Dim zRgDateVal As String
Dim zRgSendVal As String
Dim aMailSubject As String
Dim j As Long
On Error Resume Next
Set aRgDate = Application.InputBox("select the column of due date:", _
"Send Mail Base on Date", , , , , , 8)
If aRgDate Is Nothing Then Exit Sub
Set aRgSend = Application.InputBox("select the email recipients column:", _
"Send Mail Base on Date", , , , , , 8)
If aRgSend Is Nothing Then Exit Sub
Set aRgText = Application.InputBox("Select the content column of email:", _
"Send Mail Base on Date", , , , , , 8)
If aRgText Is Nothing Then Exit Sub
aLastRow = aRgDate.Rows.Count
Set aRgDate = aRgDate(1)
Set aRgSend = aRgSend(1)
Set aRgText = aRgText(1)
Set aOutApp = CreateObject("Outlook.Application")
For j = 1 To aLastRow
zRgDateVal = ""
zRgDateVal = aRgDate.Offset(j - 1).Value
If zRgDateVal <> "" Then
If CDate(zRgDateVal) - Date <= 7 And CDate(zRgDateVal) - Date > 0 Then
zRgSendVal = aRgSend.Offset(j - 1).Value
aMailSubject = aRgText.Offset(j - 1).Value & " on " & zRgDateVal
CrLf = "<br><br>"
aMailBody = "<HTML><BODY>"
aMailBody = aMailBody & "Hello " & zRgSendVal & CrLf
aMailBody = aMailBody & "Message: " & aRgText.Offset(j - 1).Value & CrLf
aMailBody = aMailBody & "</BODY></HTML>"
Set aMailItem = aOutApp.CreateItem(0)
With aMailItem
.Subject = aMailSubject
.To = zRgSendVal
.HTMLBody = aMailBody
.Display
End With
Set aMailItem = Nothing
End If
End If
Next
Set aOutApp = Nothing
End Sub- Use the Run button or the F5 key to run the code.
- A new dialogue box will pop up.
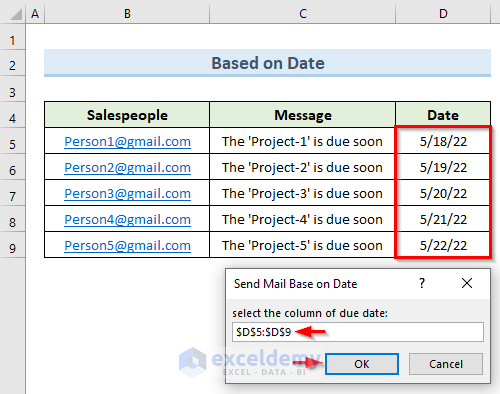
- In the input field of that dialogue box, select the due date column range D$5:$D$9.
- Click on OK.
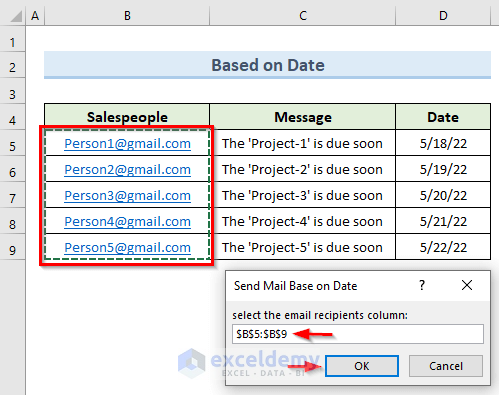
- A dialogue box will pop up.
- In the input field, select the column range B$5:$B$9 that contains the email addresses and click on OK.
- A window will pop up. Select the message range $C$5:$C$9 in the input field of the pop window.

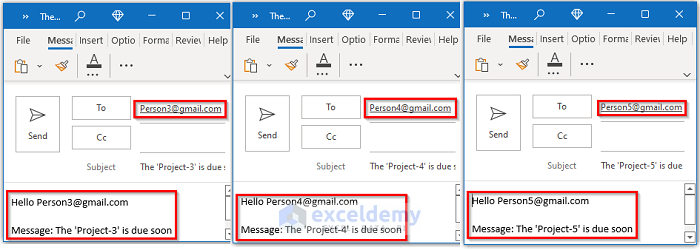
- The results are shown in the following image. We get three emails that are automatically created in three different windows of Outlook. This will not create mail for the first two email addresses because the due date of those two projects is over.
Read More: How to Apply Macro to Send Email from Excel with Attachment
Method 3 – Using Excel Macro to Send Email Automatically with Attachments
- Select the file ‘Attachment.xlsx’’.
- Click on the option ‘Copy Path’.
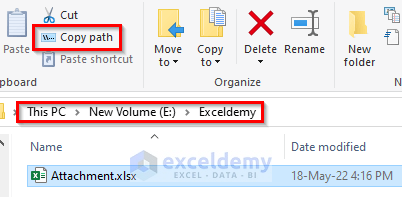
- The path of the file that we get:
E:\Exceldemy\Attachment.xlsx
Insert this path in our macro code to send this file by email.
STEPS:
- Go to the Developer tab and select the option Visual Basic.

- A new window named ‘Project – VBAProject will open.
- Right-click on the sheet name.
- Select Insert > Module.
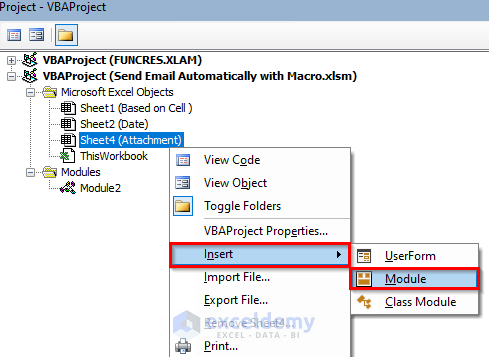
- A blank VBA will open.
- Enter the following code in that module:
Sub send_Email_complete()
Dim MyOutlook As Object
Set MyOutlook = CreateObject("Outlook.Application")
Dim MyMail As Object
Set MyMail = MyOutlook.CreateItem(olMailItem)
MyMail.To = "[email protected]"
MyMail.cc = "[email protected]"
MyMail.BCC = "[email protected]"
MyMail.Subject = "Sending Email with VBA."
MyMail.Body = "This is a Sample Mail."
Attached_File = "E:\Exceldemy\Attachment.xlsx"
MyMail.Attachments.Add Attached_File
MyMail.send
End Sub- Hit F5 or click the Run button to run the code.
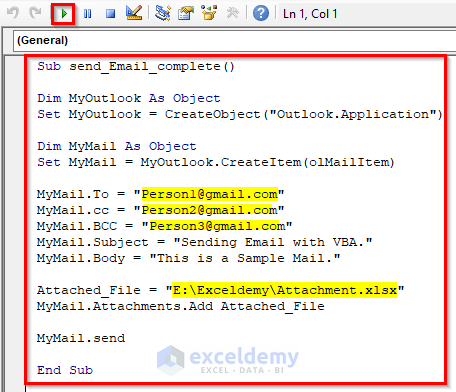
- The code will send the attachment to the provided emails in the code. The code sends emails by Outlook.
- Click the Allow button to let Outlook send the attachment to the given emails.

Read More: Send Email from Excel VBA without Outlook
Download the Practice Workbook
You can download the practice workbook from here.
Related Articles
- Send Reminder Email Automatically from an Excel Worksheet Using VBA
- VBA to Generate Multiple Lines in Email Body in Excel
- Macro to Send Email from Excel
- How to Send Email from Excel with Body Using a Macro
- Print to PDF and Email Using VBA in Excel
- How to Use Excel VBA to Paste Range into Email Body


Hello, is there a way to add multiple email addresses to the .to or .cc list through the macro/code vs an cell list/range?
Hello, JOSHUA KROGER!
Please Check the first and the third example. I drop the link here.
https://www.exceldemy.com/excel-macro-to-send-email-automatically/#1_Apply_Excel_VBA_Macro_to_Send_Email_Automatically_Based_on_Cell_Value
https://www.exceldemy.com/excel-macro-to-send-email-automatically/#3_Use_Excel_Macro_to_Send_Email_Automatically_with_Attachments
Hope you will get the solution.
Else you can try this! To use this code, first, you need to create a button.
Private Sub CommandButton1_Click()
On Error GoTo ErrHandler
Dim obj As Object
Set obj = CreateObject(“Outlook.Application”)
Dim objE As Object
Set objE = obj.CreateItem(olMailItem)
Dim rng As Range
Set rng = Range(“A4:A8” & Cells(Rows.Count, “A”).End(xlUp).Row)
Dim rng1 As Range
Dim int As Integer
Dim mailID, CCmailID As String
For Each cell In rng
If Trim(mailID) = “” Then
mailID = cell.Offset(1, 0).Value
Else
If Trim(CCmailID) = “” Then
CCmailID = cell.Offset(1, 0).Value
Else
CCmailID = CCmailID & vbCrLf & “;” & cell.Offset(1, 0).Value
End If
End If
Next cell
Set rng = Nothing
With objE
.To = mailID
.CC = CCmailID
.Subject = “Sending Email with VBA.”
.Body = “This is a Sample Mail.”
.Display
End With
Set objE = Nothing: Set obj = Nothing
ErrHandler:
‘
End Sub
I have a spreadsheet that I want to send email from depending upon the date. I have it doing everything I want except it’s not putting in who the email should go to. This is the code I have been using. My email addresses begin in Cell AK6. Can you tell me how to fix it? Thank you.
Sub Macro1()
Dim rngCell As Range
Dim rngMyDataSet As Range
Dim Rng As Range
Dim OutApp As Object
Dim OutMail As Object
Dim EmailSubject As String
Dim EmailSendTo As String
Dim MailBody As String
Dim EmailRecipient As String
Dim Signature As String
Application.ScreenUpdating = False
With ActiveSheet
If .FilterMode Then .ShowAllData
Set Rng = .Range(“AK6”, .Cells(.Rows.Count, 1).End(xlUp))
End With
For Each rngCell In Rng
If rngCell.Offset(0, 6) > 0 Then
ElseIf rngCell.Offset(0, 5) > Evaluate(“Today() +7”) And _
rngCell.Offset(0, 5).Value <= Evaluate("Today() +30") Then
rngCell.Offset(0, 6).Value = Date
Set OutApp = CreateObject("Outlook.Application")
Set OutMail = OutApp.CreateItem(0)
strbody = "According to my records, your contract " & Range("A1").Value & " is due for review on " & rngCell.Offset(0, 5).Value & vbNewLine & _
"Please review this contract prior to the pertinent date and email me with any changes you make to this contract. If it is renewed, please fill out the Contract Cover Sheet which can be found in the Everyone folder and send me the new original contract."
EmailSendTo = rngCell.Offset(0, 0).Value
EmailSubject = Sheets("sheet1").Range("A6").Value
EmailRecipient = rngCell.Offset(0, 1).Value
Signature = "C:Documents and Settings" & Environ("rmm") & _
"Application DataMicrosoftSignaturesrm.htm"
On Error Resume Next
With OutMail
.to = EmailSendTo
.CC = "[email protected]"
.BCC = ""
.Subject = EmailSubject
.Body = strbody
.Display
End With
On Error GoTo 0
Set OutMail = Nothing
Set OutApp = Nothing
End If
Next rngCell
Application.ScreenUpdating = True
End Sub
Hello, DIANA!
There is no problem with your code. What’s the problem actually?
Can you please email me the dataset here; [email protected]
Or you can visit the following article, this may help you to fix your problem.
https://www.exceldemy.com/automatically-send-email-from-excel-based-on-date/
If I keep a running spreadsheet, how can I send only to those not sent to before?
Thank you very much.
You have been so very helpful.
Hi, Frank!
You can create a helper column and input “Yes” for the sent mails. Then, you can run the VBA code to sent the values without the “Yes” values. That way, the mail will be sent only to those not sent to before.
You can also email us your Excel file with detailed instructions to [email protected], so that we can give you a proper code to solve the problem.