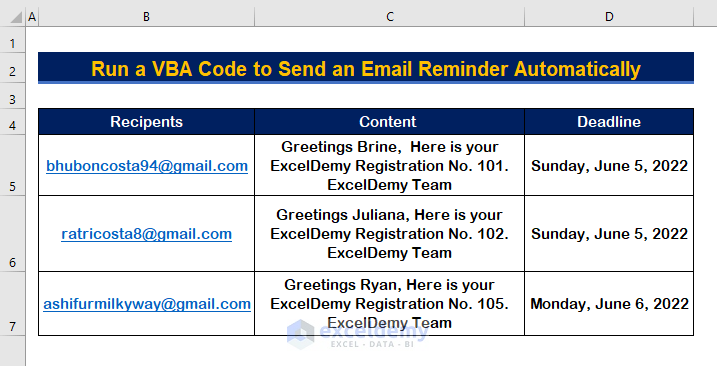
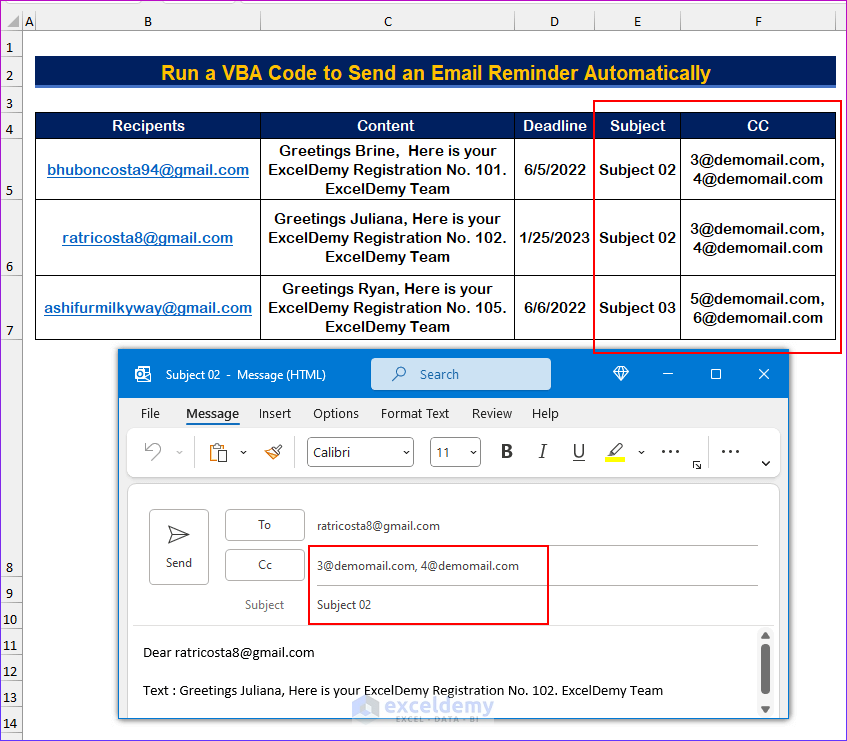
The sample dataset below includes the emails of various people, as well as the deadlines they must meet for various reasons. We’ll use a VBA macro to automatically send emails from Excel to remind them, or to send the emails manually if required.
Step 1 – Create a Module in Excel Worksheet
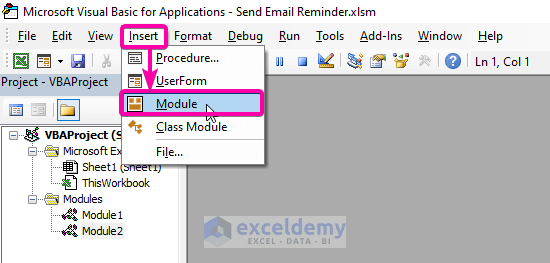
- To open the VBA Editor, press Alt + F11 .
- Click on the Insert tab.
- Select the Module option.
A module window opens.
Read More: Excel Macro to Send Email Automatically
Step 2 – Write VBA Codes to Send Reminder Email Automatically
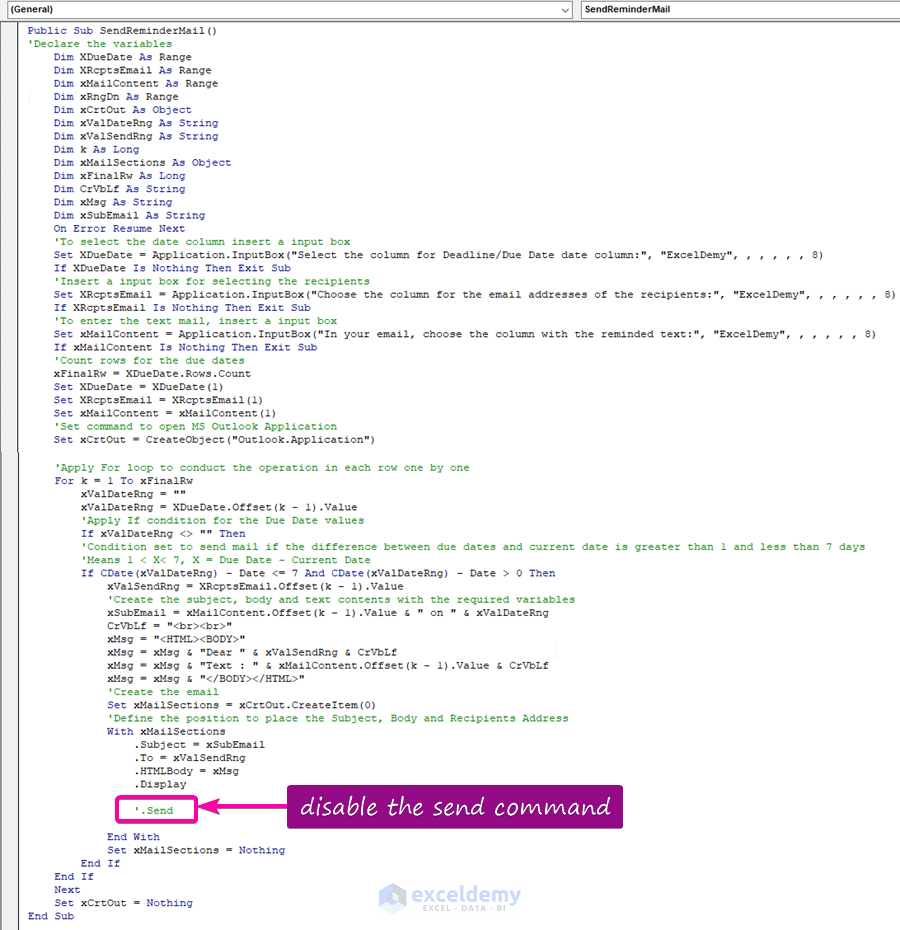
- Copy the following code and paste it into the module window:
Public Sub SendReminderMail()
'Declare the variables
    Dim XDueDate As Range
    Dim XRcptsEmail As Range
    Dim xMailContent As Range
    Dim xRngDn As Range
    Dim xCrtOut As Object
    Dim xValDateRng As String
    Dim xValSendRng As String
    Dim k As Long
    Dim xMailSections As Object
    Dim xFinalRw As Long
    Dim CrVbLf As String
    Dim xMsg As String
    Dim xSubEmail As String
    On Error Resume Next
    'To select the date column insert a input box
    Set XDueDate = Application.InputBox("Select the column for Deadline/Due Date date column:", "ExcelDemy", , , , , , 8)
    If XDueDate Is Nothing Then Exit Sub
    'Insert a input box for selecting the recipients
    Set XRcptsEmail = Application.InputBox("Choose the column for the email addresses of the recipients:", "ExcelDemy", , , , , , 8)
    If XRcptsEmail Is Nothing Then Exit Sub
    'To enter the text mail, insert a input box
    Set xMailContent = Application.InputBox("In your email, choose the column with the reminded text:", "ExcelDemy", , , , , , 8)
    If xMailContent Is Nothing Then Exit Sub
    'Count rows for the due dates
    xFinalRw = XDueDate.Rows.Count
    Set XDueDate = XDueDate(1)
    Set XRcptsEmail = XRcptsEmail(1)
    Set xMailContent = xMailContent(1)
    'Set command to open MS Outlook Application
    Set xCrtOut = CreateObject("Outlook.Application")

    'Apply For loop to conduct the operation in each row one by one
    For k = 1 To xFinalRw
        xValDateRng = ""
        xValDateRng = XDueDate.Offset(k - 1).Value
        'Apply If condition for the Due Date values
        If xValDateRng <> "" Then
        'Condition set to send mail if the difference between due dates and current date is greater than 1 and less than 7 days
        'Means 1 < X< 7, X = Due Date - Current Date
        If CDate(xValDateRng) - Date <= 7 And CDate(xValDateRng) - Date > 0 Then
            xValSendRng = XRcptsEmail.Offset(k - 1).Value
            'Create the subject, body and text contents with the required variables
            xSubEmail = xMailContent.Offset(k - 1).Value & " on " & xValDateRng
            CrVbLf = "<br><br>"
            xMsg = "<HTML><BODY>"
            xMsg = xMsg & "Dear " & xValSendRng & CrVbLf
            xMsg = xMsg & "Text : " & xMailContent.Offset(k - 1).Value & CrVbLf
            xMsg = xMsg & "</BODY></HTML>"
            'Create the email
            Set xMailSections = xCrtOut.CreateItem(0)
            'Define the position to place the Subject, Body and Recipients Address
            With xMailSections
                .Subject = xSubEmail
                .To = xValSendRng
                .HTMLBody = xMsg
                .Display

                .Send

            End With
            Set xMailSections = Nothing
        End If
    End If
    Next
    Set xCrtOut = Nothing
End Sub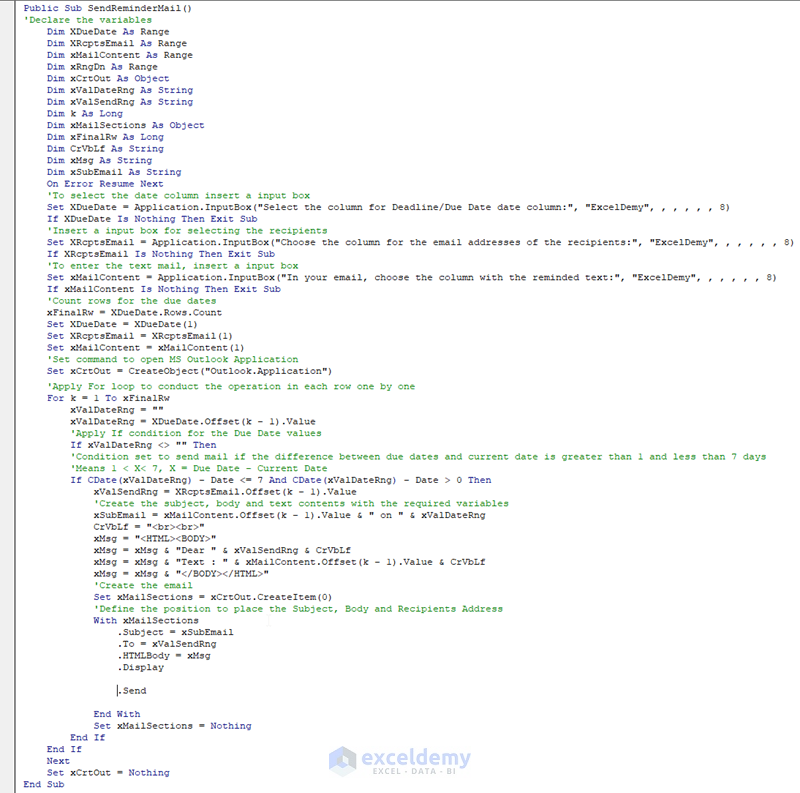
Read More: Excel Macro: Send Email to an Address in Cell
Step 3 – Run VBA Macro to Send Reminder Email Automatically from Excel Worksheet
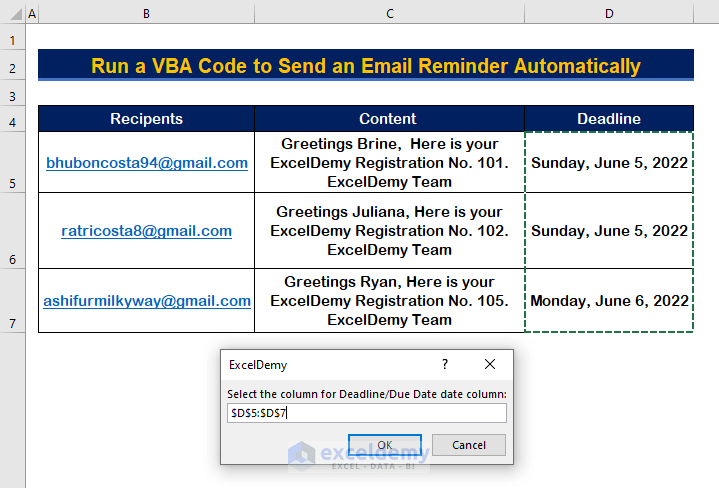
- After saving, press F5 to run the macro.
A macro dialog box opens.
- In the Date input box, select the Deadline column containing the due dates.
- Click OK.
Another input box opens.
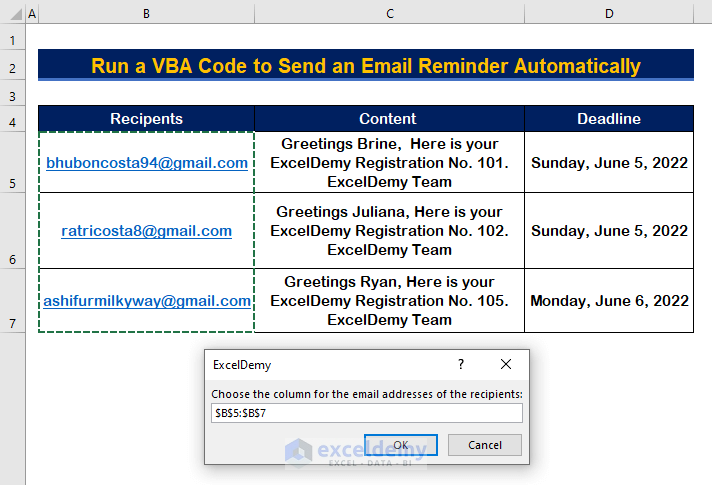
- Select the Recipients column in the range B5:B7.
- Click OK.
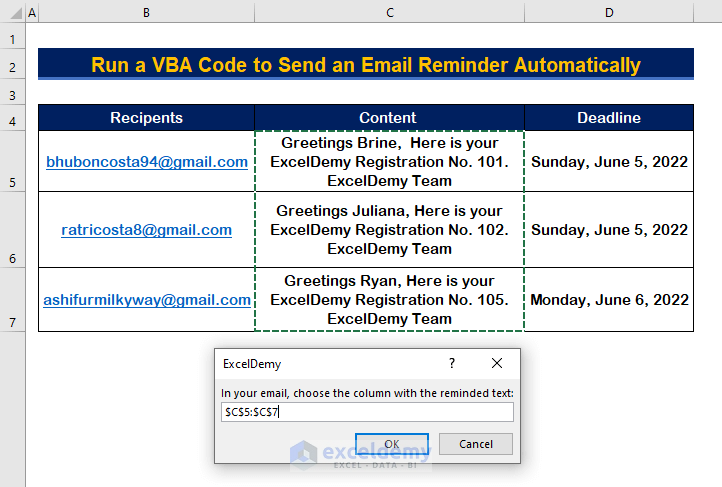
- Select the range C5:C7 in the final input box for the Content column.
- Click OK.
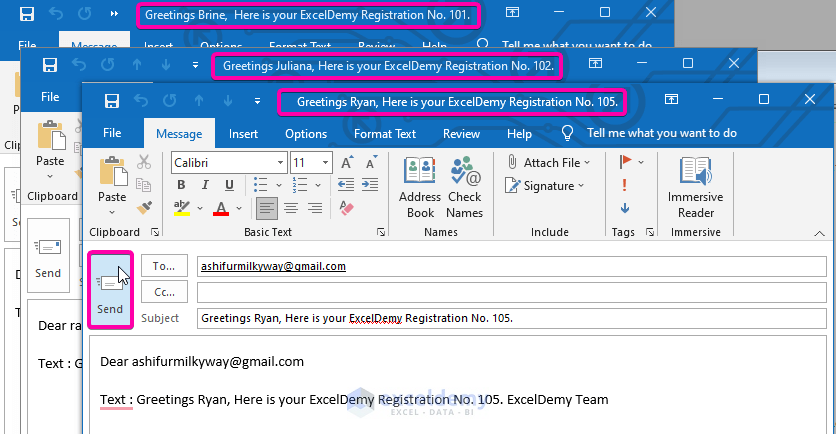
As a result, all of the reminder emails will be sent before the due dates.
Notes:
- We can also send the emails manually using the macro above. Simply place an apostrophe (‘) before the (.send) command to disable automatic sending, as shown in the image below.
- As a result, all completed drafts will be presented for review prior to sending them. After reviewing them, simply click the Send button on each individual email to be sent.
- Emails may not be sent immediately if there is insufficient storage to receive new data or if the per-day message sending limit has been reached.
- Microsoft Outlook must be used as the default email application.
Read More: How to Send Email from Excel with Body Using a Macro
Download Practice Workbook
Related Articles
- Send Email from Excel VBA without Outlook
- VBA to Generate Multiple Lines in Email Body in Excel
- How to Apply Macro to Send Email from Excel with Attachment
- Macro to Send Email from Excel
- Print to PDF and Email Using VBA in Excel
- How to Use Excel VBA to Paste Range into Email Body


Hi, after following this process, I received automated Email, but all email are getting delivered together which should be deliver one day before the date given in deadline column. means mail are not getting delivered as per dates.
please help with solution.
Greetings Nishant,
To get emails one day prior the deadline date, try the following codes below.
We just edited the code in the If condition by replacing 1 with 0.
Previous code:
Modified Code:
Please, give us feedback, if any further query needed. The ExcelDemy team is always in your assistance.
How to add on another column instead of only, due date, email address and text column. Please advise
Greeting AIN,
Let’s say you want to add another column containing the CC email addresses. You can just copy the codes from here. Moreover, if you want to get the Excel file containing the codes, just give your email address.
Hope this will work with your requirements.
Please, keep giving your feedbacks. The ExcelDemy team is always concerned about your queries.
Hello,
How long before the due date does the email get sent to the email address?
Hi Taylor,
# The macro contains conditions against the email sending within a Week prior to the Deadline/Due Date using the following line
# So, the email will get sent within- 1 day <= Deadline/Due Date <= 7 day or 1 week range prior to the Deadline/Due Date.
Hope, you find your answer, let us know if further explanation is needed. Our dedicated Softeko Team is always there to help.
Hi
If i want to add an attachment, can u please help?
Regards
Greetings Lalit,
You just have to add two lines in between the xMailSections portion:
Steps:
1. Add the file path of your attachment with the attachment name.
2. Apply add attachment command to add the attachment.
Please, see the image below for a detailed understanding.
After running the code, you will see results with the attachment available.
Moreover, we have a dedicated article based on your requirement. Please, go through the article to learn in detail.
https://www.exceldemy.com/macro-to-send-email-from-excel-with-attachment/
Hope, this will meet your requirement. Please, give us feedback if any furthur query needed. The ExcelDemy team is always in your assistance.
Hi Team,
How can I have a fixed email subject line?
Hello Sunit,
To set a fixed email subject line in your VBA code, you just need to assign your desired subject text to the .Subject property. For example:
.Subject = “Your Fixed Email Subject Here”
Place this line in the section of your VBA code where you create the email, and every email sent will have the same subject line.
Regards
ExcelDemy
Hai, I am getting “compile error” for control variable already in use. Highlighting “k=1 to xFinalRw” “apply for loop conduct the operation in each row one by one
Greetings Vinod,
The code provided above is actually working quite well for multiple members of our team. The Error you experienced is local and I advise you to review the code and check whether you made any altercation to the code. Try to paste the code as given here same to the editor. Just change the attachment address according to your need.
The specific error that you are experiencing might be the cause of using the same variable k in multiple places. Again, in our code, we did not use the variable in multiple places in the same code. Try to paste the same code that we provided or change the variable name to something else, like K1. Hope this helps.
Thanks and Regards
Rubayed Razib
Team Exceldemy
Hello, Lalit Kansal! You can send us your attachment to this email: [email protected]
Hello
Thanks for resolving the query.
Can u help in the code if we want to add the different subject rather than text and due date copied in the mail
Thanks and Regards
Greetings Lalit,
Pleased to hear that your previous query has been resolved.
We have created an Excel file for you to add different subjects. Just download the file and run the code of Module 1.
https://www.exceldemy.com/wp-content/uploads/2022/08/Send_Email_Reminder_Lalit.xlsm
1. You will get an input box to select the subject column as shown in the image below.
2. Therefore, you will see the emails on display before sending them, with the selected different subjects.
Please feel free to ask more queries. Our ExcelDemy Team will reach you as soon as possible.
Hello,
Do we need to run the module every time i update the input (For eg: deadline)?
How to autoupdate that?
Br,
Claudiu
Hello Claudiu, thank you for your question. The following steps will execute the VBA code whenever you change the dates.
Press ALT+F11 to bring up the VBA window. Then, right click on “Sheet1” and select View Code.
Then, type the following VBA code. This code will call the SendReminderMail Sub whenever, a value changes in the cell range D5:D7.
Then, when you change the date, it will automatically execute the macro.
However, if this doesn’t solve your problem, you can mail us your Excel file with detailed instructions to: [email protected], and we’ll try to solve it as soon as possible.
HOW TO AUTOMATICALLY SELECTDUE DATE COLUMN WITHOUT INPUTBOX AND RUN A CODE
Thank you Prachi Davade for your wonderful question. You can change the
to
This will do what you desire. If you have further queries, let us know.
Regards
Bishawajit, on behalf of ExcelDemy
Hi, how to add reminder time for the email? (e.g. want to send the email on January 13th, 2023 at 8.00 am)
Thank you, SALWA for your wonderful question.
First off, you cannot change the time for a scheduled email; however, you can add the remaining date in the email using the VBA code. When you apply the VBA code, the emails will pop up for sending. And on the Outlook email section, you can customize emails with scheduled time
Then, using your Outlook account, you can set it up for a scheduled email. I hope this may solve your issue.
Bishawajit, on behalf of ExcelDemy
Hi I’d like to find out if i can change the name of the person I am sending it to, so instead of it being the email address showing it’s there name that I would define ? How can I have this happen?
Thank you, CHAD for your wonderful question.
Firstly, you cannot change the recipient’s name after emailing. When you apply the VBA code, the emails will pop up for sending. And on the Outlook email section, you can customize emails. So, you have to put the email address first in the recipient’s column.
This will do what you desire. If you have further queries, let us know.
Regards
Bishawajit, on behalf of ExcelDemy
Hi, how to add CC and subject column. Please advice
You can use the following code to include the subject and CC columns.
The following image shows the output.
Hi, i wanna asked about this program. Is this program just running one time when we run this program or this program will always run and when it reach the due date then it will still automatically send reminder to email. Would like to have your confirmation
Thank you
Greeting Yuki,
Thank you for your queries,
This program will have to run just one time and when it will reach the due date it will send reminder emails automatically.
But you can also customize it to send it manually. Please go through the “Notes” section in Step 3 of the article.
You can stop sending emails automatically just by disabling the .Send command from the full code. It will pops up for a confirmation before sending. Moreover, you can customize the recipients names. That’s the elegance of our objective!
However, if this doesn’t solve your queries, you can mail us your Excel file with detailed instructions to: [email protected], and we’ll try to solve it as soon as possible.
Regards,
ExcelDemy Team
Hi bhunon
Hope you are great ,
How I can add more than one cell content ? I mean for the content how I can include more than cell in the mail contents function?
Also , how I can keep this reminder working although I closed the excel ?
Dear
I tried your previous solution for adding more the I content and it worked perfectly I added 18 variables.
More question please can I set more than one reminder ?
I mean to be reminded before the due date with 90 days and 50 days and 30 days for example?
Thank you a lot
Dear Nouran,
I am delighted to hear that your previous queries have been resolved. It seems like you have invested a lot of patience and effort, considering you had to work with 18 variables to accomplish your task!
Regarding your further queries, you want to send reminder emails multiple times with different time intervals. For instance, you want to send the first mail three days prior to the deadline, the second mail five days prior to the deadline, and the final mail seven days before the deadline. To accomplish this, we have utilized the following dataset, and as of today, it is the 8th of May, 2023.
Now, you have to modify the If section of the codes as in the image below.
Here, is the full updated code.
I hope that this response has resolved your current queries. If you would like to automate the program, please refer to our previous replies for detailed instructions. Additionally, please inform us if you have any further questions.
Regards,
ExcelDemy Team
Yes, you can still run the program when your Excel App is closed. You do not need to run the program every day manually. By doing so, whenever you open your PC your program will be executed automatically. Follow the steps below to do so.
Step 1:
1. From the Start Menu type Run to open the Windows Run dialog box and paste the following path:
%AppData%\Microsoft\Windows\Start Menu\Programs\Startup
2. Click OK.
Step 2: Place your Excel File in the Startup folder.
Step 3:
1. Open your Excel file Macro Window.
2. In the Project Explorer, double-click the ThisWorkbook object to open the code window for the workbook.
3. In the code window, select Workbook from the drop-down list at the top.
4. Then, select the Workbook_Open event from the drop-down list on the right.
Step 4:
1. Type or paste the VBA code that you want to run when the file is opened between the Private Sub Workbook_Open() and End Sub lines.
2. Save the Excel file.
Now, whenever you open your PC, the VBA code you wrote will be automatically executed. Hope this will resolve your issue. Please let us know your further feedback, our ExcelDemy Team is always relentless to welcome your issues.
Regards,
ExcelDemy Team
Answer 1: Let’s say you want to add one more column for the mail content portion. So, we have assigned VBA codes with one more variable xMailContent2
Copy the codes below and apply them to your Module.
See the output as images below:
Answer 2: Unfortunately, you cannot run the program without opening the Excel App. You may get this done by applying API. However, you can try the below process but it has some troubleshooting issues. Please let us know if you get solved your issue.
On the other hand, you can automatically run when you open the Excel file, you do not need to manually run the code. Simply, apply the VBA codes inside the Private Sub event.
Hai thank for the explanation. So basically for this program we need to run manually every day right.
But i would like to know whether there is a program that can always running automatically when the due date already reached.Thank you
You do not need to run the program every day manually. You can automatically run the program whenever you open your PC. Follow the steps below to do so.
Step 1:
1. From the Start Menu type Run to open the Windows Run dialog box and paste the following path:
%AppData%\Microsoft\Windows\Start Menu\Programs\Startup
2. Click OK.
Step 2: Place your Excel File in the Startup folder.
Step 3:
1. Open your Excel file Macro Window.
2. In the Project Explorer, double-click the ThisWorkbook object to open the code window for the workbook.
3. In the code window, select Workbook from the drop-down list at the top.
4. Then, select the Workbook_Open event from the drop-down list on the right.
Step 4:
1. Type or paste the VBA code that you want to run when the file is opened between the Private Sub Workbook_Open() and End Sub lines.
2. Save the Excel file.
Now, whenever you open your PC, the VBA code you wrote will be automatically executed. Hope this will resolve your issue. Please let us know your further feedback, our ExcelDemy Team is always relentless to welcome your issues.
Regards,
ExcelDemy Team
Yeah, YUKI, you are right. Your workbook need to be opened all the time to continue running this program. But, Problem arises when you turn off your pc the program will not run. So, you need to reopen the Excel file and run the program on daily basis.
However, you can just open the Excel App. from your PC. Then it will run automatically. To do so, please insert your whole code in between Private Sub as below:
So, whenever you open the Excel App. the program will continue to run.
On the other hand, if you want to run the program just after whenever you open PC. We need some time to make it for you. You may share your Excel file with us in [email protected]. Our dedicated ExcelDemy Team is trying to resolve your issue.
Regards,
ExcelDemy Team
I have two questions –
1. Is it possible to send recurring daily reminders? Say from 25th of the current month, until 10th of the next month?
2. If the excel is saved in OneDrive, and opened via Web browser, will the macros still run?
I will really, REALLY appreciate a quick response.
Hi PRATIBHU
I hope you are doing well.
This is your 2nd question and its answer.
If the excel is saved in OneDrive, and opened via Web browser, will the macros still run?
Answer: It depends on the type of macro and how it was created.
If the macro is a VBA macro, it will not run in the web browser version of Excel. VBA macros can only run in the desktop version of Excel on a Windows or Mac computer.
Coming to your first question, our team is working on the macro. We will reach you soon hopefully.
dears,
for content can we add more than one cell? say that cell with name of the task and cell contains the task itself ?
also if i saved the excel on Team channel do i have to open it every day so the macros work ?
Answer 1: To add one or more columns for the mail content section, you must add variables. Let’s say you want to add one more column so we will add VBA codes with one more variable xMailContent2. So, your data set may look like the following image, one column with the task name, and another with the task details.
 So, apply the following VBA codes to perform your requirements.
Answer 2: You cannot run a file automatically from a Team Chanel server. However, you can automatically run the program whenever you open your PC. Follow the steps below to do so.
Step 1:
1. From the Start Menu type Run to open the Windows Run dialog box and paste the following path:
%AppData%\Microsoft\Windows\Start Menu\Programs\Startup
2. Click OK.
Step 2: Place your Excel File in the Startup folder.
Step 3:
1. Open your Excel file Macro Window.
2. In the Project Explorer, double-click the ThisWorkbook object to open the code window for the workbook.
3. In the code window, select Workbook from the drop-down list at the top.
4. Then, select the Workbook_Open event from the drop-down list on the right.
Step 4:
1. Type or paste the VBA code that you want to run when the file is opened between the Private Sub Workbook_Open() and End Sub lines.
2. Save the Excel file.
Now, whenever you open your PC, the VBA code you wrote will be automatically executed. Hope this will resolve your issue. Please let us know your further feedback, our ExcelDemy Team is always relentless to welcome your issues.
Regards,
ExcelDemy Team
dears
Thanks a lot for your support my previous inquiries was resolved ,
i added 18 variables !!!
more Qs can we add multiple reminder for the same due date ? i mean 7 days before and 3 days before for example ?
BR
Nouran
Dear Nouran,
I am delighted to hear that your previous queries have been resolved. It seems like you have invested a lot of patience and effort, considering you had to work with 18 variables to accomplish your task!
Regarding your further queries, you want to send reminder emails multiple times with different time intervals. For instance, you want to send the first mail three days prior to the deadline, the second mail five days prior to the deadline, and the final mail seven days before the deadline. To accomplish this, we have utilized the following dataset, and as of today, it is the 8th of May, 2023.
Now, you have to modify the If section of the codes as in the image below.
Here, is the full updated code.
I hope that this response has resolved your current queries. If you would like to automate the program, please refer to our previous replies for detailed instructions. Additionally, please inform us if you have any further questions.
Regards,
ExcelDemy Team
is it possible to have the text insert a data range and not just 1 cell of information?
Dear Mike,
I understand you wish to insert a range to have the text as input. Here is the modified code to do so.
Also, you can insert a data range by adding variables. To know more about this, see this comment.
i was able to generate email earlier but now when i run macro it does not open outlook email with all information anymore. i checked references as well and i have checked outlook so it should be working so not sure why it is not opening outlook email. can someone help?
Hello ANA, Thank you for reaching out to us. We understand that you were previously able to generate emails successfully, but now when running the macro, Outlook does not open with all the information as before.
To identify the problem, it’s challenging to determine the exact cause from here. However, one possibility could be that your deadlines may not have been updated correctly, causing the following lines of code to not execute as expected:
As you can see, emails will only be sent when the deadline is 7 days or less from the current date. If your deadlines fall within this range and you’re still experiencing issues, we recommend sharing your file with us through the Exceldemy Forum. This will allow us to directly analyze the problem and provide appropriate solutions. Thank you for your cooperation.
Regards
Aniruddah
why when I try to run the code, the outlook application doesn’t pop out?
Hi AMY,
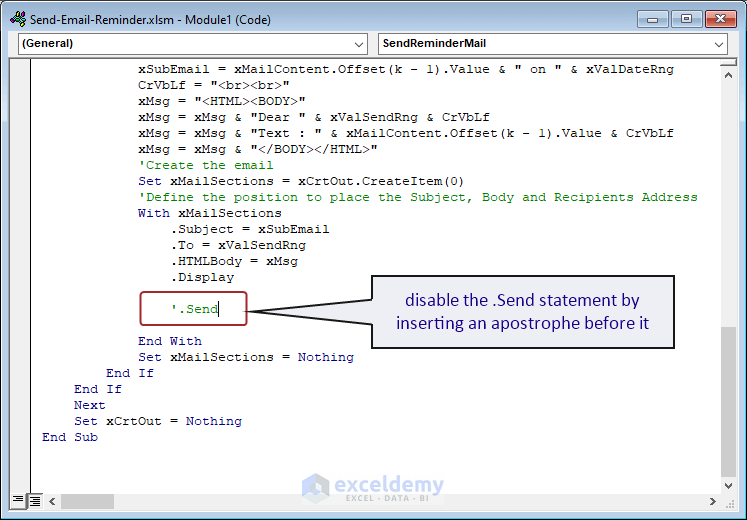
Most probably you haven’t disable the “.Send” statement in the VBA code. Disable the “.Send” statement by putting an apostrophe before it.
Regards
Rafiul Hasan
ExcelDemy
Hi, how do I make the code work for workbook with multiple worksheets? Thanks.
Hi,
You can use the following code. After sending mail for the first sheet, it will show message box for next sheet. Insert your ranges carefully for different sheets in the appeared input message box.
Regards
Rafiul Hasan
ExcelDemy
how do i make code
1) to send mail by just selecting a row (specifically email id column in that row) so that information from different columns in that row could be sent .
2) also how to enable multiple selection of rows.
Hello Vyshnav V S
Thanks for visiting our blog and sharing an exciting problem. I have developed an Excel VBA Sub-procedure that meets both requirements.
To send email using VBA, you can use the Send property. When sending an email, the Microsoft Outlook dialog box will appear. Lastly, you must click on Allow to send email.
SOLUTION Overview:
NOTE: Additionally, the sub-procedure will validate your selection. If you select another column instead of the ID column (assuming it is column B), the message will pop up saying to choose the intended column.
Excel VBA Sub-procedure:
Hopefully, the sub-procedure will meet your expectations. I have attached the solution workbook as well. Good luck.
DOWNLOAD SOLUTION WORKBOOK
Regards
Lutfor Rahman Shimanto
Excel & VBA Developer
ExcelDemy
How do i make a code for multi selection ( like by selecting one row , mail should be sent to recipient with data fetched from needed columns in that same row )
Hoping for a fast reply
Dear Vyshnav V S
Thanks for clarifying your requirements further. I have modified the previously given code to fulfil your goal. Now, you can select any column containing email IDs, and all the other required information will be retrieved from columns C and D.
SOLUTION Overview:
Excel VBA Sub-procedure:
Make changes to the code if necessary. I hope the code will fulfil your goal; good luck.
Regards
Lutfor Rahman Shimanto
Excel & VBA Developer
ExcelDemy
How do i make a remainder mail as above with different column(start date , planned due date , task id , mail content , recipient mail id , reviewer ,etc).Here i just need to run the code so that mail need to be sent to each recipients mail id who have passed the due date.(it should be automatically done without manual selection of each column for sending mail to one person itself)
Note : mail need to be sent to all recipient who have passed the due date in planned due date column.
Dear Vyshnav V S
As requested, I have improved the existing sub-procedure (previously provided) to fulfil your new requirements.
SOLUTION Overview:
NOTE: If the Microsoft Outlook dialog box appears, click Allow to send an email.
Improved Excel VBA Sub-procedure:
I hope the sub-procedure will reach your goal. I have attached the solution workbook as well; good luck.
DOWNLOAD SOLUTION WORKBOOK
Regards
Lutfor Rahman Shimanto
Excel & VBA Developer
ExcelDemy
i need a vba code such that hyperlink contain alm link plus task id . but in the hyperlink that is displayed , there should be only task id ( but this task id has same hyperlink address as of earlier).task id is taken from excel.alm link is assumed.this should be also included in the above code
hyperlink : almlink + task id
But in the hyperlink test to display : task id
Dear Vyshnav V S
It is good to see you again. Thanks for sharing further requirements. You want to improve the existing VBA code to add a hyperlink in the email content. The hyperlink should display only the task ID, but when clicked, it will direct to the ALM link along with the task ID.
I have improved the previously given code to fulfil your goal. When sending an email, ensure that you uncomment the line that contains the “.Send” property. Also, change the existing base AML link with the intended one.
SOLUTION Overview:
Improved Excel VBA Sub-procedure:
I hope the improved sub-procedure will reach your goal. I have attached the solution workbook; good luck.
DOWNLOAD SOLUTION WORKBOOK
Regards
Lutfor Rahman Shimanto
Excel & VBA Developer
ExcelDemy
How to add Request for Delivery Receipt and Read Receipt in Outlook into the above remainder mail.
Dear Vyshnav V S
It is great to see you again. Thanks for reaching out and sharing another exciting problem.
To add a Request for Delivery Receipt and a Read Receipt in the Outlook Application, we must use the ReadReceiptRequested and OriginatorDeliveryReportRequested properties. Do not worry! Based on your new requirements, I have enhanced the existing sub-procedure (I provided earlier).
SOLUTION Overview:
Excel VBA SUb-procedure:
I hope you have found the solution you were looking for. The solution workbook is attached; good luck.
DOWNLOAD SOLUTION WORKBOOK
Regards
Lutfor Rahman Shimanto
Excel & VBA Developer
ExcelDemy
How to add user interface instead of running the excel macro in this above remainder mail
Hello Vyshnav V S
It is good to see you again. When sending a reminder email, you want to add a user interface instead of running the Excel VBA Sub-procedure. To achieve this goal, you must use an Excel UserForm. I have designed a user interface in an Excel File.
SOLUTION Overview:
I hope the solution will help you reach your goal. I have also attached the solution workbook; good luck.
DOWNLOAD SOLUTION WORKBOOK
Regards
Lutfor Rahman Shimanto
Excel & VBA Developer
ExcelDemy
how to add a code to access ALM/work items/search work items / task id / task ticket from the task id details taken from the excel sheet and copy and paste the link details of that task ticket in mail.
hope for fast reply
Dear Vyshnav V S
It is good to see you again. You want to upgrade the previously given VBA code to include a feature that retrieves task details from an ALM system or a similar work item system.
To do so, connect to the ALM or work item system to fetch task details within the VBA. Later, you can develop a function to find the task details based on the task ID from the Excel sheet and generate a link to the task’s details. The implementation will depend on the system used and its access methods (like APIs).
Hopefully, the idea will help you; good luck.
Regards
Lutfor Rahman Shimanto
ExcelDemy
Hello Dears,
Thanks for your help, this guides me a lot.
I need your support as when i exited form the excel and opened it again i found that the code deleted, so How can save the code?
Additionaly, need to the reminder mail send automatically daily (once a day) till the deadline and without clicking send and without inserting the columes’ inputs.
Hello Mariam Mohsen,
Thank you for your kind words! I’m glad the guide was helpful to you. To ensure the VBA code isn’t deleted after closing Excel, you need to save the workbook as a Macro-Enabled Workbook (.xlsm). Here’s how:
1. Click File > Save As and select Excel Macro-Enabled Workbook (.xlsm) from the file type dropdown.
2. Save the file, and the code will remain intact when you reopen it.
For sending automatic daily reminders without manual intervention:
1. You can use the Workbook_Open event in VBA to trigger the reminder code automatically when the file is opened.
2. Alternatively, you can schedule the macro to run daily using Task Scheduler in Windows, linking it to the workbook.
Lastly, to avoid manual column inputs, you could enhance the VBA code to dynamically pick up data based on your predefined conditions. Let me know if you’d like a step-by-step explanation for any of these solutions!
Regards
ExcelDemy
Hi,
The automation is really helpful.
Need support in below points
1 – Do not want to select the Date input box, select the Deadline column containing the due dates or any other column options it should auto consider the details from the excel sheet. If required how to add multiple column and details so that the added column details should also be shared in email
2 – In the mail body only the person name should be there instead of email id. E.g. Dear Mahesh and not Dear [email protected] / [email protected] etc..
3 – Require the email alerts due from 30 days for the expiry and need it to be send on every alternate day e.g.(1st- less than 30 days,next 27 days, next 25 days, next 21 days, next1 18 days, next 15 days, next 10 days, next 7 days, next 6 days, next 5 days, next 4 days, next 3 days, next 2 days, next 1 day. and once due date is extended or row details has been deleted alerts should be stopped
4 – Alert should also go if the due date is crossed i.e its overdue, until its removed from the sheet
5 – Auto email should be sent to respective users at particular time as per the day set (mentioned in point no 3) (No need to open the excel file or outlook for sharing the email)
6 – The mail body text and the subject line are same, wherein it should be different
7. Can we remove the name “ExcelDemy” which is mentioned in the code or its mandate to keep
8 – Support with the excel sheet on above and guidance too.
Thanks you
Hello Ashish,
Thank you for your detailed feedback. I’m glad you found the automation helpful. Here’s an updated VBA version you can use as a replacement for the basic code. It covers your requested changes.
Assumed sheet structure
This code assumes your sheet looks like this:
A = Person Name
B = Email
C = Item / Document / Task Name
D = Deadline
E = Department
F = Remarks
You can change the column letters inside the code if needed.
VBA Code:
Regards,
ExcelDemy
Hi Shamima,
First of all thank you very much to share the code in such a short time.
Am planing to set an auto reminder email to all the people whose email Id has been mention in excel sheet.
Below are the column name and details for which alert should go.
Do not have an option to attach the excel template which could be shared with below column names / details. Please support with the excel sheet.
Do suggest if any details to be added for better..
1.Client Name : Peral / signet / Marigold etc
2. PO No: 7592046713 / IM288332 (Number can be more or less than 10 digit, same with Alpha numeric)
3. PO End Date: will be in DD-MM-YY format
4. Project Manager Name: Shamima Sultana / Ashish M / Lutfor Rahman Shimanto etc
5. Project Manager email Id and other required people (To and CC): [email protected] /[email protected] etc
6. Require the email alerts due from 30 days for the expiry and need it to be send on every alternate day e.g.(1st- less than 30 days,next 27 days, next 25 days, next 21 days, next1 18 days, next 15 days, next 10 days, next 7 days, next 6 days, next 5 days, next 4 days, next 3 days, next 2 days, next 1 day, even overdue, until or once due date is extended or row details has been deleted alerts should be stopped
7. Subject Line: Client Name along with PO Number and PO end Date
8. Email Body line: Greetings
Client Name along with PO Number renewal due date is 31-Mar-26.
Please share the PO renewal progress and PO details once released
Note:
a. Auto email should be sent to respective users at particular time as per the day, as per point number 6, no manual selection of PO enddate, Name, Message etc
b. There will be multiple clients with single project manager along with multiple PO’s hence they should received multiple email as per PO number and due date
c. Support with the excel sheet to add the details and run, tried with the details shared from your side, received error…
d: Email should go to project manger/ team members and project managers manger, ir whose ever email Id has been added in excel sheet should receive the email.
Hello Ashish
Yes, this can be done with a customized Excel template and updated VBA code. The previous sample was a basic version, but for your case the sheet should be structured row-wise so each PO is treated separately and emails can go automatically to all recipients mentioned in that row. Use the following VBA code with a sheet structured like this:
A = Client Name
B = PO No
C = PO End Date
D = Project Manager Name
E = To Email
F = CC Email
G = Additional Email(s)
H = Remarks / Status
I = Last Sent On
J = Last Sent Status
If you want it to run when the workbook opens, paste this into ThisWorkbook:
A few important notes:
This code sends one email per PO row
If the same manager has multiple POs, they will get multiple separate emails
If the date is extended, the next reminders will follow the new date
If the row is deleted, reminders stop automatically
Column I prevents sending the same reminder multiple times on the same day
For fully automatic sending at a fixed time, Excel must still be launched by Windows Task Scheduler.
Regards,
ExcelDemy
Hi Shamima,
Please if you can check my email shared on 25th Mar’20206 and share your inputs.
1 – Alert to start and end duration (e..g start from 4th of every month and ends on 20th of every month)
2 – Alert on every alertnative day
3 – Any pending invoice alert to go as overdue post 20th of every month till its raised
Thank you…
Hello Ashish,
Thank you for your detailed follow-up and for sharing both the automation logic and the updated field list. This is shaping up to be a very well-structured solution.
Regarding your alert logic, your approach is absolutely practical and can be implemented with VBA:
• Alert duration (4th to 20th): You can control this using a date condition so emails are triggered only within this window.
• Alternate day alerts: The best approach is to track a “Last Reminder Sent Date” and send the next alert only if 2 days have passed. This is more reliable than using even/odd logic.
• Overdue alerts after the 20th: You can automatically mark pending invoices as “Overdue” and continue reminders until the status is updated to Completed.
Coming to your updated fields, your list already looks very good and covers most requirements. You may enhance it further with:
• Invoice Due Date – helps identify delays clearly
• Invoice Number – useful for tracking/reference
• Invoice Amount – helpful for reporting
• Last Reminder Sent Date – for automation control
• Email Status (Sent/Not Sent)
• Overdue Flag (Yes/No)
To make the file more user-friendly, you can also consider:
• Using dropdown lists for Invoicing Status and Reason for Delay
• Applying conditional formatting (e.g., highlight overdue items)
• Creating a simple dashboard for tracking (Pending vs Completed vs Overdue)
• Adding a manual trigger button for flexibility
Overall, your design is already very well thought out. With these enhancements, your automation will be even more efficient and user-friendly.
Regards,
ExcelDemy
Hi Shamima,
I hope you are doing well.
Thank you for your support and for sharing the automation steps earlier.
I would like to request your suggestions on implementing a similar type of automation and how it can be made more effective and user-friendly.
I am planning to set up an automated process to send monthly emails to the Finance team and Project/Account Managers, indicating whether invoicing for the previous month has been completed or not. For example, invoices for Feb 2026 would be tracked in March 2026 for all clients and projects. This is intended to help streamline the process and ensure better tracking and closure.
I am considering including the following columns as part of the automation:
Sr. No
Client Name
Project Name
PO No / WO ID
PO Start Date
PO End Date
Reason for Delay in Invoice
Invoicing Status
Project Manager Name
I would really appreciate your inputs and suggestions on this approach, including any improvements or additional fields that should be considered.
Hi Shamima,
Thank you for your suggestions / inputs. You can modify the code as per your input too and more efficient and user-friendly
if you can value add your expertise on the inputs you shared, with details codes etc..
• Using dropdown lists for Invoicing Status and Reason for Delay
• Applying conditional formatting (e.g., highlight overdue items)
• Creating a simple dashboard for tracking (Pending vs Completed vs Overdue)
• Adding a manual trigger button for flexibility
Please check the below codes and suggest for modifications with below criteria
1 – Alert to start and end duration (e..g start from 4th of every month and ends on 20th of every month) – date period may vary.
2 – Alert on every alternative day
3 – Any pending invoice alert to go as overdue post 20th of every month till its raised
4 – If the Invoicing Status column or section is mentioned raised than Last Sent Status column or section should mention completed or raised.
if Invoicing Status column or section is mentioned pending than Last Sent Status column or section should mention pending or overdue
5 – If the Last Sent Status column is shown completed than the Last Sent On date column or section should be the date when its shared
6 – Email should capture the remarks column details only in case of Invoicing Status column or section is mentioned pending
7 – Invoice for month should change automatically once next month starts (e.g. When Apr’26 months starts Invoice for month should be Mar’26. (but when code is run/executed input is already shown as Mar’26)
8 – Is its over due there should be note containing: This invoice is OVERDUE. Immediate action required
9- If the invoice status is mentioned raised / completed it should email (last sent on date when email is sent and Last sent status should be completed), but it currently shown as blank there is no email sent on concern email and last sent & Last sent status is blank
Client Name
Project Name
PO No / Wo Id
PO Start Date
PO End Date
Invoice for month
Account Manager Name
Account Manager Email Id
Finance Team Email Id
Reason for Delay in Invoice
Invoicing Status
Remarks
Last Sent On
Last Sent Status
==================================================================================
In Module Tab/Section
Option Explicit
Public NextRunTime As Date
‘ =====================================
‘ MAIN MACRO: Send Invoice Alerts
‘ =====================================
Sub SendInvoiceAlerts()
Static lastRunDate As Date
‘ Prevent multiple runs on the same day
If lastRunDate = Date Then Exit Sub
lastRunDate = Date
Dim ws As Worksheet
Set ws = ThisWorkbook.Sheets(“Sheet1”)
Dim lastRow As Long
lastRow = ws.Cells(ws.Rows.Count, “A”).End(xlUp).Row
Dim i As Long
Dim todayDate As Date
todayDate = Date
Dim startDate As Date, endDate As Date
startDate = DateSerial(Year(todayDate), Month(todayDate), 4)
endDate = DateSerial(Year(todayDate), Month(todayDate), 20)
‘ Alternate day logic (even days only)
If Day(todayDate) Mod 2 0 Then Exit Sub
Dim OutApp As Object, OutMail As Object
Set OutApp = CreateObject(“Outlook.Application”)
For i = 2 To lastRow
Dim invoicingStatus As String
Dim lastSentStatus As String
invoicingStatus = LCase(ws.Cells(i, 11).Value)
lastSentStatus = LCase(ws.Cells(i, 14).Value)
‘ Update Invoice Month Automatically
ws.Cells(i, 6).Value = Format(Date, “mmmm yyyy”)
‘ Skip if completed
If lastSentStatus = “completed” Then GoTo NextRow
Dim sendMail As Boolean
sendMail = False
‘ Condition 1 & 2: Between 4th–20th & alternate days
If todayDate >= startDate And todayDate endDate And invoicingStatus “raised” Then
sendMail = True
isOverdue = True
End If
If sendMail = True Then
Dim emailBody As String
Dim remarksText As String
‘ Include remarks only if pending
If invoicingStatus = “pending” Then
remarksText = “Remarks: ” & ws.Cells(i, 12).Value
Else
remarksText = “”
End If
‘ Overdue message
Dim overdueMsg As String
overdueMsg = “”
If isOverdue = True Then
overdueMsg = “This invoice is OVERDUE. Immediate action required”
End If
‘ Email Body
emailBody = “Dear Team,” & _
“Please find invoice details below:” & _
“Client Name: ” & ws.Cells(i, 1).Value & “” & _
“Project Name: ” & ws.Cells(i, 2).Value & “” & _
“PO No: ” & ws.Cells(i, 3).Value & “” & _
“Invoice Month: ” & ws.Cells(i, 6).Value & “” & _
“Status: ” & ws.Cells(i, 11).Value & “” & _
remarksText & _
overdueMsg & _
“Regards,Automation System”
Set OutMail = OutApp.CreateItem(0)
With OutMail
.To = ws.Cells(i, 8).Value
.CC = ws.Cells(i, 9).Value
.Subject = “Invoice Alert – ” & ws.Cells(i, 6).Value
.HTMLBody = emailBody
.Send
End With
‘ Update Last Sent Status
If invoicingStatus = “raised” Then
ws.Cells(i, 14).Value = “Completed”
ElseIf isOverdue = True Then
ws.Cells(i, 14).Value = “Overdue”
Else
ws.Cells(i, 14).Value = “Pending”
End If
‘ Update Last Sent On
ws.Cells(i, 13).Value = Format(Date, “dd-mmm-yy”)
End If
NextRow:
Next i
End Sub
‘ =====================================
‘ SCHEDULER: Start Scheduler
‘ =====================================
Sub StartScheduler()
Dim scheduledTime As Date
scheduledTime = Date + TimeValue(“10:00:00”) ‘ Set your desired time
‘ If the scheduled time was missed, run immediately
If Now > scheduledTime Then
Call SendInvoiceAlerts
NextRunTime = Date + 1 + TimeValue(“10:00:00”) ‘ schedule for next day
Else
NextRunTime = scheduledTime
End If
Application.OnTime NextRunTime, “RunScheduledTask”
End Sub
‘ =====================================
‘ SCHEDULER: Run Task
‘ =====================================
Sub RunScheduledTask()
Call SendInvoiceAlerts
‘ Schedule next day same time
NextRunTime = NextRunTime + 1
Application.OnTime NextRunTime, “RunScheduledTask”
End Sub
‘ =====================================
‘ SCHEDULER: Stop Scheduler
‘ =====================================
Sub StopScheduler()
On Error Resume Next
Application.OnTime NextRunTime, “RunScheduledTask”, , False
End Sub
============================================================================
In Thisworkbook
Private Sub Workbook_Open()
    StartScheduler
End Sub

Private Sub Workbook_BeforeClose(Cancel As Boolean)
    StopScheduler
End Sub
Hello Ashish,
Thank you for sharing the detailed code and requirements—this is a very solid setup already. I’ve reviewed your logic and below are the key improvements and fixes to make it work exactly as expected.
Key Fixes & Enhancements
• 1. Fix alternate day condition (currently broken)
Replace this line:
If Day(todayDate) Mod 2 0 Then Exit Sub
With:
If Day(todayDate) Mod 2 0 Then Exit Sub
• 2. Fix date range condition (syntax issue)
Replace:
If todayDate >= startDate And todayDate endDate
With:
If todayDate >= startDate And todayDate <= endDate Then
• 3. Invoice Month logic (previous month required)
Replace:
ws.Cells(i, 6).Value = Format(Date, “mmmm yyyy”)
With:
ws.Cells(i, 6).Value = Format(DateAdd(“m”, -1, Date), “mmm yy”)
(This ensures April shows March, as required)
• 4. Define missing variable (important)
Add this before using it:
Dim isOverdue As Boolean
• 5. Correct overdue condition (after 20th)
Replace your overdue logic with:
If todayDate > endDate And invoicingStatus “raised” Then
sendMail = True
isOverdue = True
End If
• 6. Fix status update logic (Requirement 4 & 9)
Replace with:
If invoicingStatus = “raised” Then
ws.Cells(i, 14).Value = “Completed”
ElseIf isOverdue = True Then
ws.Cells(i, 14).Value = “Overdue”
Else
ws.Cells(i, 14).Value = “Pending”
End If
(This ensures email + status update happens correctly)
• 7. Ensure email still sends when status = raised (your issue)
Remove or adjust this line:
If lastSentStatus = “completed” Then GoTo NextRow
Replace with:
If lastSentStatus = “completed” And invoicingStatus = “raised” Then GoTo NextRow
(This allows first-time “raised” emails to send)
• 8. Add overdue message (Requirement 8)
Keep this (just improve formatting):
If isOverdue = True Then
overdueMsg = “This invoice is OVERDUE. Immediate action required”
End If
• 9. Improve email formatting (important)
Replace your email body with:
emailBody = “Dear Team,” & _
“Please find invoice details below:” & _
“Client Name: ” & ws.Cells(i, 1).Value & “” & _
“Project Name: ” & ws.Cells(i, 2).Value & “” & _
“PO No: ” & ws.Cells(i, 3).Value & “” & _
“Invoice Month: ” & ws.Cells(i, 6).Value & “” & _
“Status: ” & ws.Cells(i, 11).Value & “” & _
remarksText & “” & overdueMsg & _
“Regards,Automation System”
• 10. Remarks only for pending (already correct, just refine)
If invoicingStatus = “pending” Then
remarksText = “Remarks: ” & ws.Cells(i, 12).Value & “”
Else
remarksText = “”
End If
Regards,
ExcelDemy
Hi Shamima,,
Thank you for sharing the feedback and suggestions..
most of the points have fixed it.. Need your support to build in the code, as suggested on below points
if you can value add your expertise on the inputs you shared, along with details codes adding in existing code etc..
• Using dropdown lists for Invoicing Status and Reason for Delay
• Applying conditional formatting (e.g., highlight overdue items)
• Creating a simple dashboard for tracking (Pending vs Completed vs Overdue)
• Adding a manual trigger button for flexibility
Below is the updated code details for reference.. please add or modify the codes for efficient and user-friendly.
Option Explicit
Public NextRunTime As Date
‘ =====================================
‘ MAIN MACRO: Send Invoice Alerts
‘ =====================================
Sub SendInvoiceAlerts()
Static lastRunDate As Date
‘ Prevent multiple runs on the same day
If lastRunDate = Date Then Exit Sub
lastRunDate = Date
Dim ws As Worksheet
Set ws = ThisWorkbook.Sheets(“Sheet1”)
Dim lastRow As Long
lastRow = ws.Cells(ws.Rows.Count, “A”).End(xlUp).Row
Dim i As Long
Dim todayDate As Date
todayDate = Date
Dim startDate As Date, endDate As Date
startDate = DateSerial(Year(todayDate), Month(todayDate), 4)
endDate = DateSerial(Year(todayDate), Month(todayDate), 20)
‘ Alternate day logic (even days only)
If Day(todayDate) Mod 2 0 Then Exit Sub
Dim OutApp As Object, OutMail As Object
Set OutApp = CreateObject(“Outlook.Application”)
For i = 2 To lastRow
Dim invoicingStatus As String
Dim lastSentStatus As String
invoicingStatus = LCase(ws.Cells(i, 11).Value)
lastSentStatus = LCase(ws.Cells(i, 14).Value)
‘ Update Invoice Month Automatically
ws.Cells(i, 6).Value = Format(DateAdd(“m”, -1, Date), “mmm”yyyy”)
‘ Skip if completed
If lastSentStatus = “completed” And invoicingStatus = “raised” Then GoTo NextRow
Dim sendMail As Boolean
sendMail = False
‘ Condition 1 & 2: Between 4th–20th & alternate days
If todayDate >= startDate And todayDate endDate And invoicingStatus “raised” Then
sendMail = True
isOverdue = True
End If
If sendMail = True Then
Dim emailBody As String
Dim remarksText As String
‘ Include remarks only if pending
If invoicingStatus = “pending” Then
remarksText = “Remarks: ” & ws.Cells(i, 12).Value & “”
Else
remarksText = “”
End If
‘ Overdue message
Dim overdueMsg As String
overdueMsg = “”
If isOverdue = True Then
overdueMsg = “This invoice is OVERDUE. Immediate action required”
End If
‘ Email Body
emailBody = “Dear Team,” & _
“Please find invoice details below:” & _
“Client Name: ” & ws.Cells(i, 1).Value & “” & _
“Project Name: ” & ws.Cells(i, 2).Value & “” & _
“PO No: ” & ws.Cells(i, 3).Value & “” & _
“Invoice Month: ” & ws.Cells(i, 6).Value & “” & _
“Status: ” & ws.Cells(i, 11).Value & “” & _
remarksText & “” & overdueMsg & _
“Regards,Automation System”
Set OutMail = OutApp.CreateItem(0)
With OutMail
.To = ws.Cells(i, 8).Value
.CC = ws.Cells(i, 9).Value
.Subject = “Invoice Alert – ” & ws.Cells(i, 6).Value
.HTMLBody = emailBody
.Send
End With
‘ Update Last Sent Status
If invoicingStatus = “raised” Then
ws.Cells(i, 14).Value = “Completed”
ElseIf isOverdue = True Then
ws.Cells(i, 14).Value = “Overdue”
Else
ws.Cells(i, 14).Value = “Pending”
End If
‘ Update Last Sent On
ws.Cells(i, 13).Value = Format(Date, “dd-mmmm-yy”)
End If
NextRow:
Next i
End Sub
‘ =====================================
‘ SCHEDULER: Start Scheduler
‘ =====================================
Sub StartScheduler()
Dim scheduledTime As Date
scheduledTime = Date + TimeValue(“10:00:00”) ‘ Set your desired time
‘ If the scheduled time was missed, run immediately
If Now > scheduledTime Then
Call SendInvoiceAlerts
NextRunTime = Date + 1 + TimeValue(“10:00:00”) ‘ schedule for next day
Else
NextRunTime = scheduledTime
End If
Application.OnTime NextRunTime, “RunScheduledTask”
End Sub
‘ =====================================
‘ SCHEDULER: Run Task
‘ =====================================
Sub RunScheduledTask()
Call SendInvoiceAlerts
‘ Schedule next day same time
NextRunTime = NextRunTime + 1
Application.OnTime NextRunTime, “RunScheduledTask”
End Sub
‘ =====================================
‘ SCHEDULER: Stop Scheduler
‘ =====================================
Sub StopScheduler()
On Error Resume Next
Application.OnTime NextRunTime, “RunScheduledTask”, , False
End Sub
Hello Ashish,
As requested, below is a more consolidated VBA structure that includes the main alert process along with additional user-friendly enhancements such as dropdown support, conditional formatting, dashboard refresh, and manual setup helpers.
Please place the first part in a standard Module and the second part in ThisWorkbook.
A few important notes:
1. Please keep your main data in Sheet1 with the same column order.
2. Column N is treated as Last Sent Status.
3. Column M is treated as Last Sent On.
4. Run InitialSetup once to apply dropdowns, formatting, and create the dashboard.
5. You can assign ManualRunAlerts to a shape or button for manual execution.
Regards,
ExcelDemy
Hi Shamima,
In continuous to email shared some time before is the below fields good to add or previously shared fields. share your inputs for the same. Thanks..
Client Name
Project Name
PO No / Wo Id
PO Start Date
PO End Date
Invoice for month
Account Manager Name
Account Manager Email Id
Finance Team Email Id
Reason for Delay in Invoice
Invoicing Status
Hi Shamima,
Thanks a lot for sharing the updated macro codes with additional details.
Have deleted the previous code and pasted the latest code received from your side.
There is no error while running the macro. But once the code is run, there is no output received.
1-No email is sent to the concern person
2-Last Sent On and Last Sent Status column is blank (Wherein M column is Last Sent On and N column is Last Sent Status
3-Auto month option is also not working
4-There is no enhancement feature sheet created on the points as per code
• Using dropdown lists for Invoicing Status and Reason for Delay
• Applying conditional formatting (e.g., highlight overdue items)
• Creating a simple dashboard for tracking (Pending vs Completed vs Overdue)
• Adding a manual trigger button for flexibility
5-Column name and heading are in below sequence in excel sheet, do suggest any modification is sequence is required or not
A—Client Name
B—Project Name
C—PO No / Wo Id
D—PO Start Date
E—PO End Date
F—Invoice for month
G—Account Manager Name
H—Account Manager Email Id
I—Finance Team Email Id
J—Reason for Delay in Invoice
K—Invoicing Status
L—Remarks
M—Last Sent On
N—Last Sent Status
Please suggest where all changes need to be done. Planning to show case the automation to senior management with complete follow and successful out come.
Hi Shamima,
Thanks again for sharing the updated macro code.
I’ve implemented the new version, and while it runs without errors, I’m not seeing the expected outputs. I might be missing something in the setup, so I wanted to check with you on the following:
* Emails are not being triggered
* Columns M (Last Sent On) and N (Last Sent Status) are not updating
* Auto month feature isn’t reflecting
* Enhancement features (dropdowns, formatting, dashboard, button) are not appearing
Also, sharing the current column structure for your reference—please let me know if any changes are required to align with the code:
A—Client Name
B—Project Name
C—PO No / Wo Id
D—PO Start Date
E—PO End Date
F—Invoice for month
G—Account Manager Name
H—Account Manager Email Id
I—Finance Team Email Id
J—Reason for Delay in Invoice
K—Invoicing Status
L—Remarks
M—Last Sent On
N—Last Sent Status
Would you be able to guide me on what might be missing or needs adjustment?
I’m planning to present this automation to senior management, so your help in getting this fully functional would mean a lot.
Thanks in advance!
Hello Ashish,
Thanks for your feedback! Here’s how to resolve the issues you’re facing:
1. Emails Not Sent:
Ensure Outlook is open and macros are allowed.
Make sure the OutApp and OutMail objects are properly created.
. Last Sent On & Last Sent Status Blank:
These fields should be updated inside the If sendMail = True block:
ws.Cells(i, 13).Value = Format(Date, “dd-mmm-yyyy”)
ws.Cells(i, 14).Value = “Completed” ‘ or “Pending” / “Overdue”
3. Auto Month Feature Not Working: Update the “Invoice for Month” logic:
ws.Cells(i, 6).Value = Format(DateAdd(“m”, -1, Date), “mmm yyyy”)
4. Enhancement Features Not Appearing:
Run the SetupDropdowns, ApplyStatusFormatting, and CreateOrRefreshDashboard macros.
Ensure you’ve assigned the manual trigger button to the ManualRunAlerts macro.
5. Column Sequence: Your column sequence is correct. Just ensure Column M (Last Sent On) and Column N (Last Sent Status) are referenced correctly in the code.
Regards,
ExcelDemy