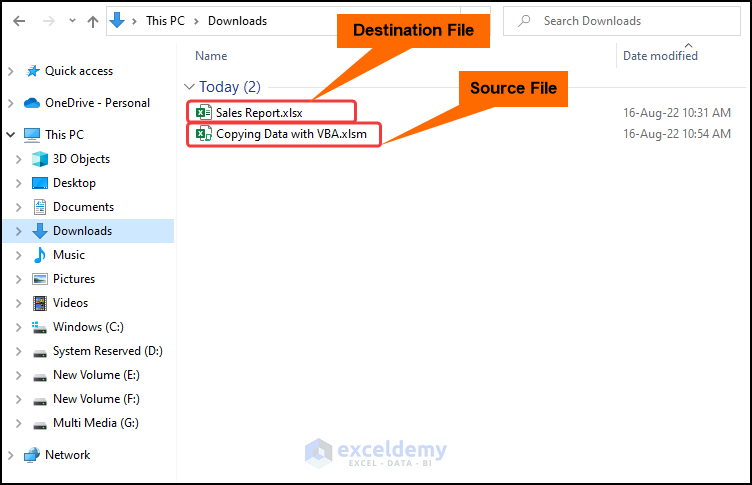
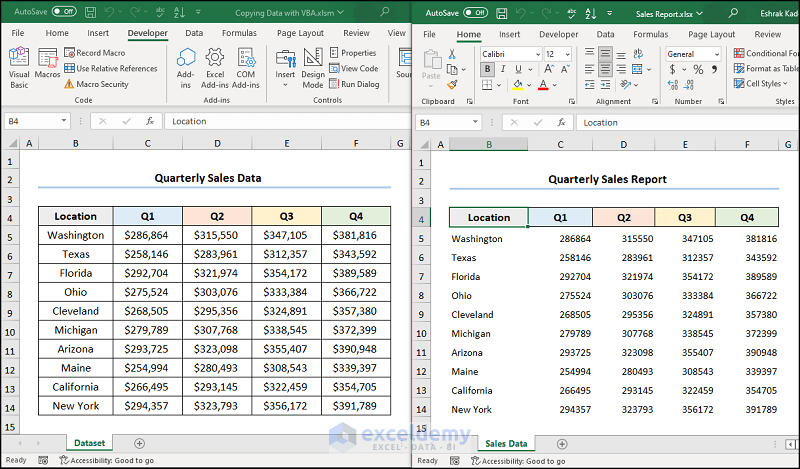
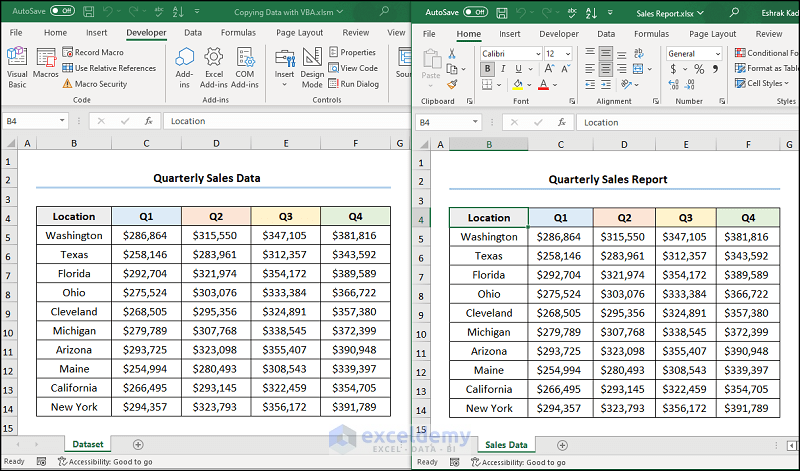
You have two Excel files, Copying Data with VBA.xlsm is the Source File containing the data you want to copy, and Sales Report.xlsx is the Destination File where data will be pasted.
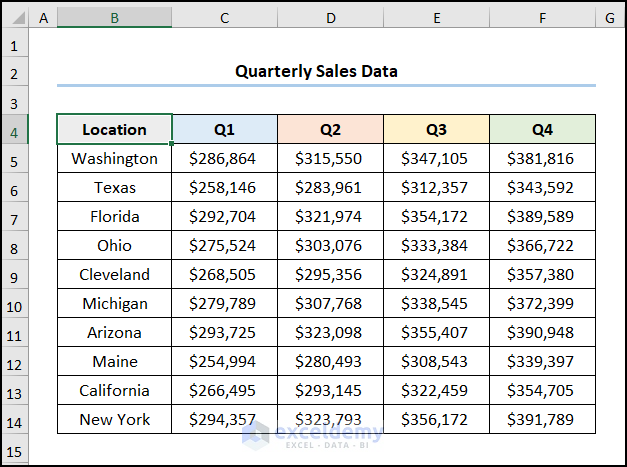
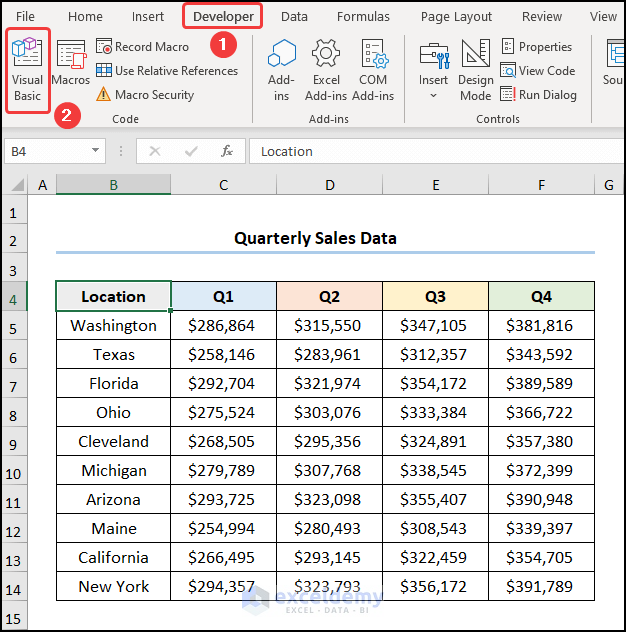
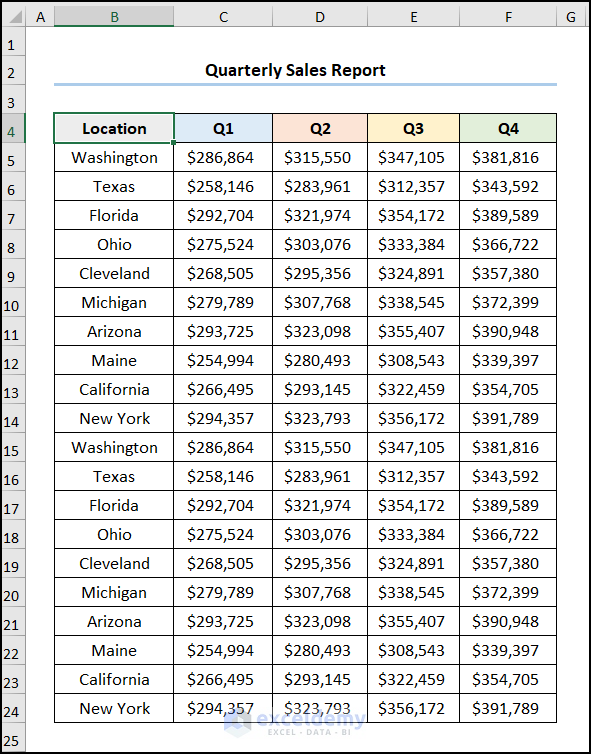
Consider the Quarterly Sales Data in the Source File as shown in B4:F14 . Here, the dataset shows the Location and Quarterly Sales for Q1, Q2, Q3, and Q4.
Example 1 – Opening Another Workbook and Copying Data with VBA
Step 1: Open the Visual Basic Editor
- Open both Excel files Copying Data with VBA.xlsm and Sales Report.xlsx.
- In the Source File (Copying Data with VBA.xlsm), go to the Developer tab >> click Visual Basic.

The Visual Basic Editor will open.
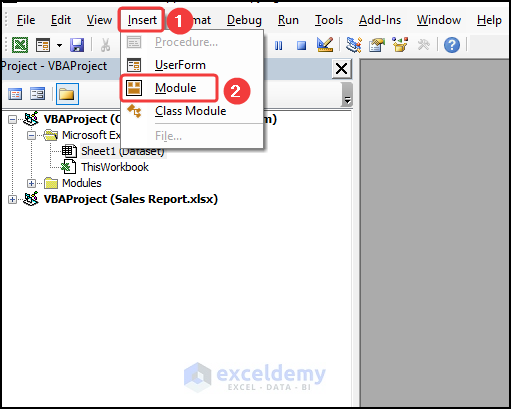
Step 2: Insert the VBA Code
- Go to the Insert tab >> select Module.

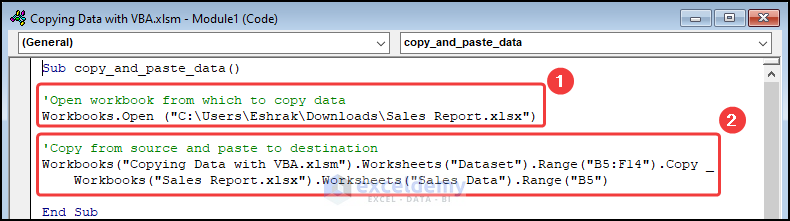
- Enter the code below.
Sub copy_and_paste_data()

'Open workbook from which to copy data
Workbooks.Open ("C:\Users\Eshrak\Downloads\Sales Report.xlsx")

'Copy from source and paste to destination
Workbooks("Copying Data with VBA.xlsm").Worksheets("Dataset").Range("B5:F14").Copy _
    Workbooks("Sales Report.xlsx").Worksheets("Sales Data").Range("B5")

End Sub
Code Breakdown:
- The full path and the proper file extension to open the workbook are provided. Here, “C:\Users\Eshrak\Downloads\Sales Report.xlsx“.
- B4:F14 is copied from the Source File (Copying Data with VBA.xlsm)
- It is pasted in the Destination File (Sales Report.xlsx).
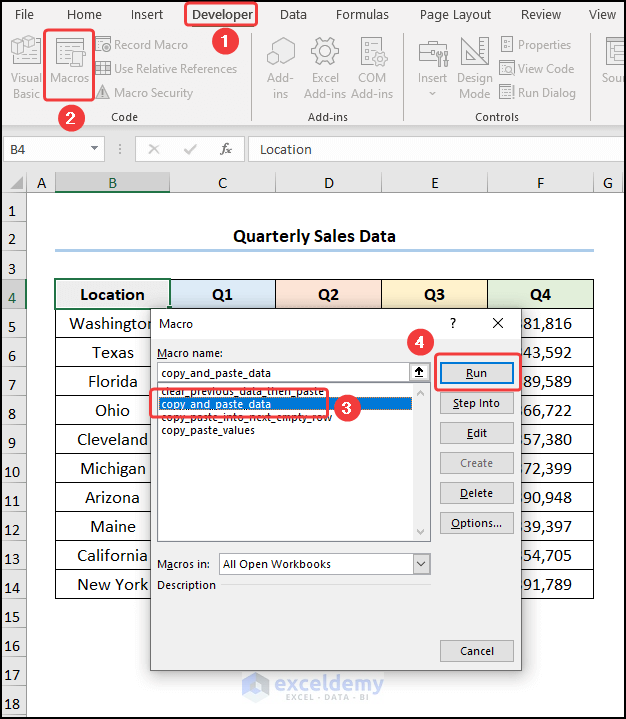
Step 3: Run the VBA Code
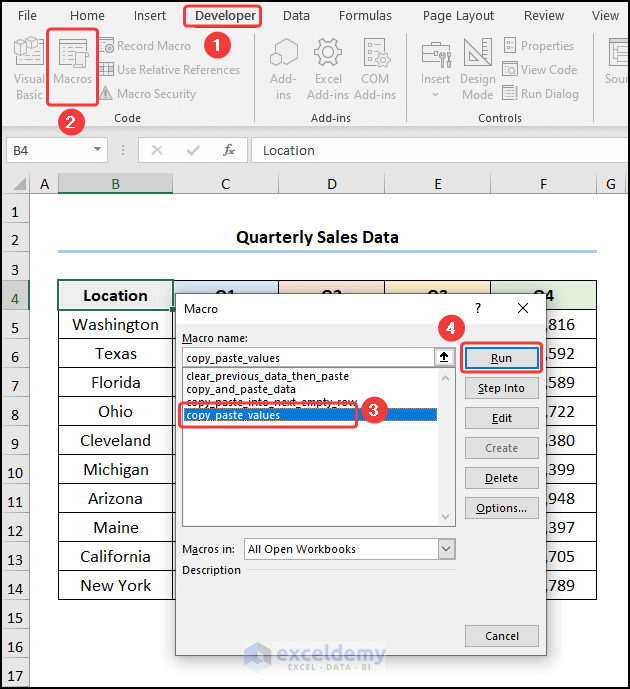
- Close the VBA window >> save as Macro-Enabled (.xlsm) >> click Macros.
In the Macros dialog box:
- Select copy_and_paste_data >> Click Run.
Note: You have to provide the full path name and the correct file extension.
This is the output.

The Source File has been copied into the Destination File.
Read More: How to Open All Excel Files in a Folder and Copy Data Using VBA
Example 2 – Using Excel VBA to Open Another Workbook to Copy Values Only
Step 1: Open the Visual Basic Editor
- Open both Excel workbooks: Copying Data with VBA.xlsm and Sales Report.xlsx.
- In the Source File (Copying Data with VBA.xlsm), go to the Developer tab >> choose Visual Basic.
The Visual Basic Editor window will open.
Step 2: Insert the VBA Code
- Go to the Insert tab >> select Module.
- Enter this code.
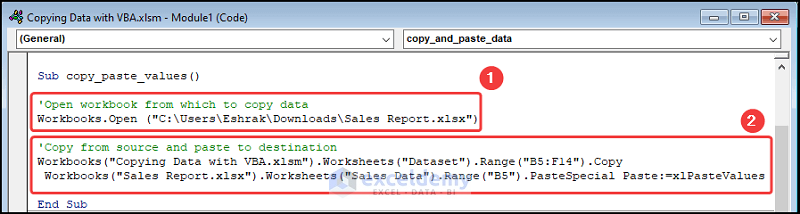
Sub copy_paste_values()

'Open workbook from which to copy data
Workbooks.Open ("C:\Users\Eshrak\Downloads\Sales Report.xlsx")

'Copy from source and paste to destination
Workbooks("Copying Data with VBA.xlsm").Worksheets("Dataset").Range("B5:F14").Copy
 Workbooks("Sales Report.xlsx").Worksheets("Sales Data").Range("B5").PasteSpecial Paste:=xlPasteValues

End Sub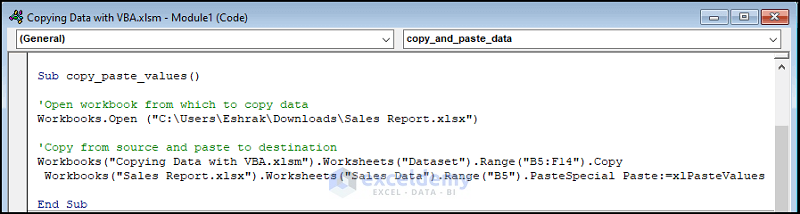
Code Breakdown:
- The full path and the proper file extension to open the workbook are provided. Here, “C:\Users\Eshrak\Downloads\Sales Report.xlsx”
- B4:F14 is copied in the Source File (Copying Data with VBA.xlsm)
- The Range.PasteSpecial function pastes values only into the Destination File (Sales Report.xlsx).
Step 3: Run the VBA Code
- Close the VBA window >> save as Macro-Enabled (.xlsm) >> click Macros.
In the Macros dialog box:
- Select copy_paste_values >> Click Run.
Note: Provide the full path name and the correct file extension.
This is the output.
Read More: Excel VBA to Loop Through Files in Folder and Copy Data
Example 3 – Applying VBA to Open Another Workbook and Copy Data into the Next Empty Row
Step 1: Open the Visual Basic Editor and Insert the Code
- Follow steps 1 and 2 in Example 2 to open the VBA window, insert a new Module, and enter the VBA code.
Sub copy_paste_into_next_empty_row()

Dim WS_Source As Worksheet
Dim WS_Destination As Worksheet
Dim Last_Row As Integer
Dim Last_Row_Position As Integer

    'Open the workbook from which to copy the data
    Workbooks.Open "C:\Users\Eshrak\Downloads\Copying Data with VBA.xlsm"

    'Naming each workbook
    Set WS_Source = Workbooks("Copying Data with VBA.xlsm").Sheets("Dataset")
    Set WS_Destination = Workbooks("Sales Report.xlsx").Sheets("Sales Data")

    'Get last empty row of source workbook
    Last_Row = WS_Source.Cells(WS_Source.Rows.Count, "B").End(xlUp).Row

    'Get last empty row of destination workbook
    Last_Row_Position = WS_Destination.Cells(WS_Destination.Rows.Count, "B").End(xlUp).Row + 1

    'Copy from source and paste onto destination
    WS_Source.Range("B5:F" & Last_Row).Copy WS_Destination.Range("B" & Last_Row_Position)


End Sub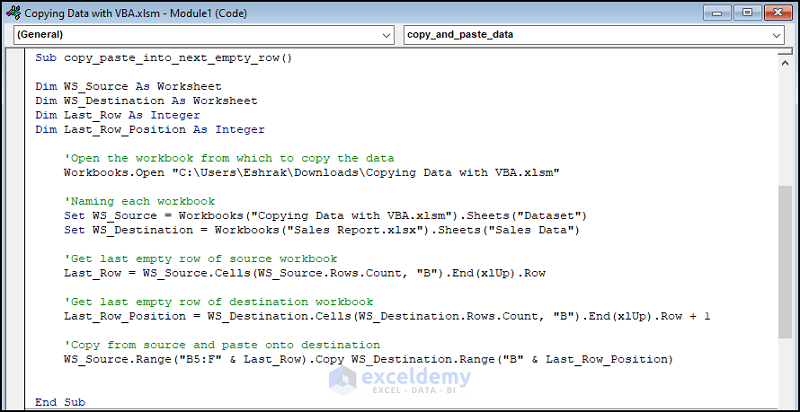
Code Breakdown:
- The full path and the proper file extension to open the workbook are provided. Here, “C:\Users\Eshrak\Downloads\Copying Data with VBA.xlsm”
- The two workbooks are named using the variables WS_Source and WS_Destination.
- The position of the last row in the Source File (Copying Data with VBA.xlsm) is obtained.
- The location of the last row in the Destination File (Sales Report.xlsx) is determined and 1 is added to move to the next row.
- The data range from the Source File is copied and pasted into the next empty row of the Destination File.

Step 2: Run the VBA Code
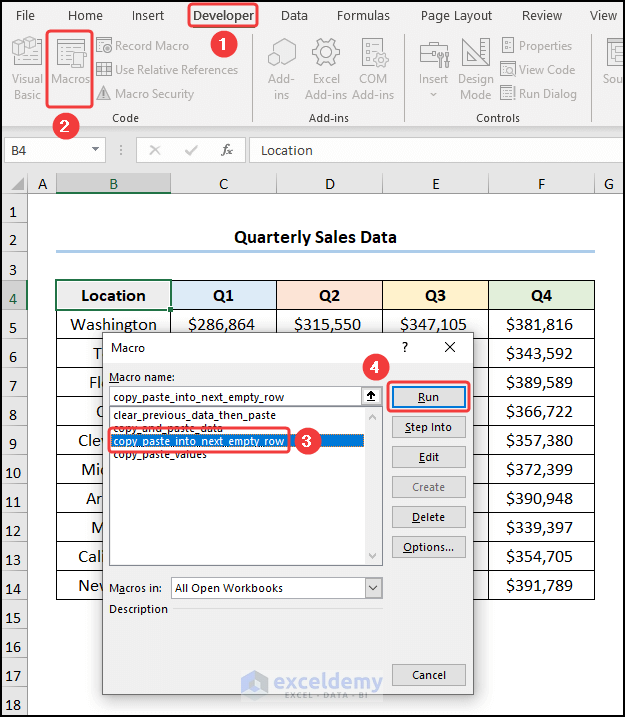
- Close the VBA window >> save the spreadsheet as Macro-Enabled (.xlsm) >> click Macros.
The Macros dialog box will open.
- Select copy_paste_into_next_empty_row >> Click Run.
This is the output.
Read More: Excel VBA to Copy Data from Another Workbook without Opening
Example 4 – Clearing Content and Copying Data into Another Workbook with VBA
Step 1: Open the Visual Basic Editor and Insert the Code
- Follow steps 1 and 2 in Example 3 to open the VBA window, insert a new Module, and enter the VBA code.
Sub clear_previous_data_then_paste()

Dim WS_Source As Worksheet
Dim WS_Destination As Worksheet
Dim LastRow_Source As Long
Dim LastRow_Destination As Long


  'Naming each worksheet
  Set WS_Source = Workbooks("Copying Data with VBA.xlsm").Worksheets("Dataset")
  Set WS_Destination = Workbooks("Sales Report.xlsx").Worksheets("Sales Data")

    'Get last empty row of source worksheet
    LastRow_Source = WS_Source.Cells(WS_Source.Rows.Count, "B").End(xlUp).Row

    'Get last empty row of destination worksheet
    LastRow_Destination = WS_Destination.Cells(WS_Destination.Rows.Count, "B").End(xlUp).Offset(1).Row

    'Remove previous data from destination worksheet
    WS_Destination.Range("B5:F" & LastRow_Destination).ClearContents

    'Copy from source and paste onto destination
    WS_Source.Range("B5:F" & LastRow_Source).Copy _
      WS_Destination.Range("B5")

End Sub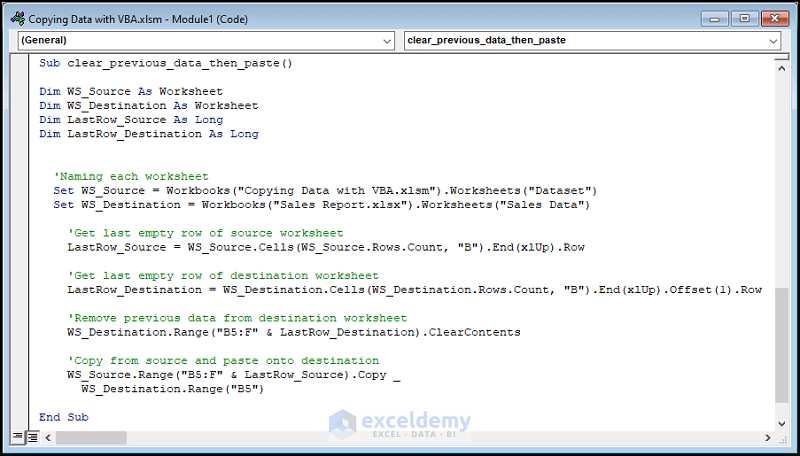
Code Breakdown:
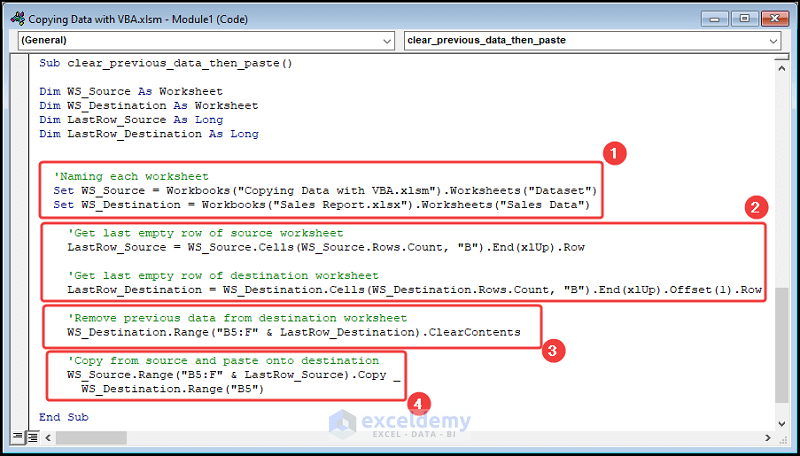
- The two workbooks are named using the variables WS_Source and WS_Destination.
- The location of the last row in the Source File is obtained.
- The position of the last row in the Destination File is determined and the OFFSET function is used to move to the next row.
- Any existing content is cleared from the Destination File using Range.ClearContents.
- The data range is copied from the Source File and pasted into the next empty row of the Destination File.
Step 2: Run the VBA Code
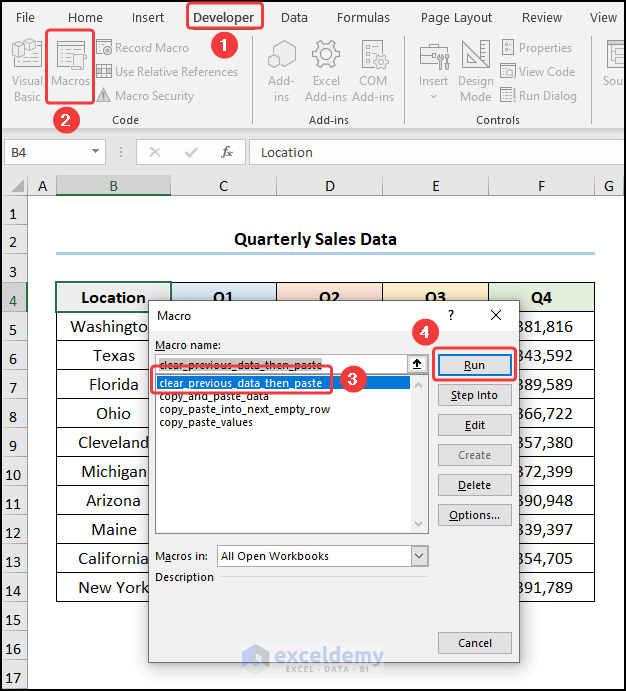
- Close the VBA window >> save the spreadsheet as Macro-Enabled (.xlsm) >> click Macros.
In the Macros dialog box:
- Select clear_previous_data_then_paste>> Click Run.
This is the output.
Read More: Macro to Copy Data from One Workbook to Another Based on Criteria
Things to Remember
- Make sure to provide the correct file name and the file extension.
- Ensure that both workbooks are open when you’re running the code.
- You don’t have to select any workbook or worksheet range since they are given in the VBA code.
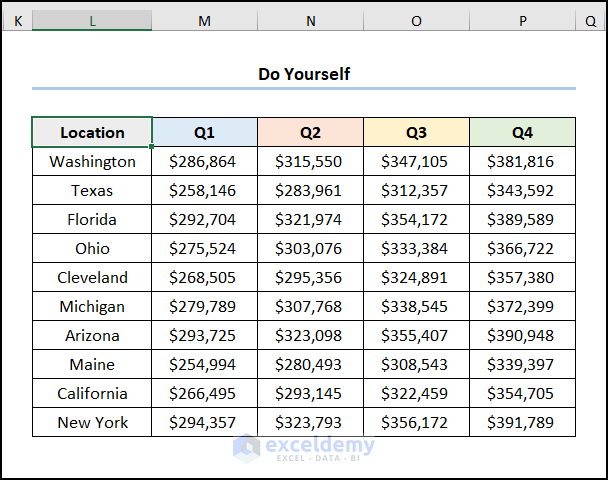
Practice Section
Practice here.
Download Practice Workbook
You can download the practice workbook from the link below.
Related Articles
- How to Use Excel VBA to Copy Range to Another Excel Sheet
- Macro to Copy and Paste from One Worksheet to Another
- Macro to Copy Specific Columns from One Worksheet to Another in Excel
- Excel VBA to Copy Rows to Another Worksheet Based on Criteria
- Excel VBA: Copy Range to Another Workbook


This is fine, but what I would like to know is should I reopen an already ‘open’ workbook.
Also, I may want to reference the other workbook again later (dependent on actions).
Currently I close it (if open) when I close the primary workbook.
I am getting some weird hangs (actually Excel whirring away according to Task Manager) and am not sure that this is due to trying to reopen the same ‘other’ workbook from a different Sub.
Hello Graham,
Great question! If the workbook is already open, it’s generally better to reference it directly instead of reopening it, as reopening can cause issues like hangs or multiple instances. You can check if it’s open using a loop through Workbooks, and then reference it accordingly.
Also, keeping it open while your primary workbook is active (especially if you’ll need it again) can reduce overhead and avoid unexpected behavior. Just make sure to manage memory and references properly to prevent Excel from hanging. The issue you’re seeing might be related to trying to reopen an already open workbook in a new Sub without checking its state first.
Regards
ExcelDemy