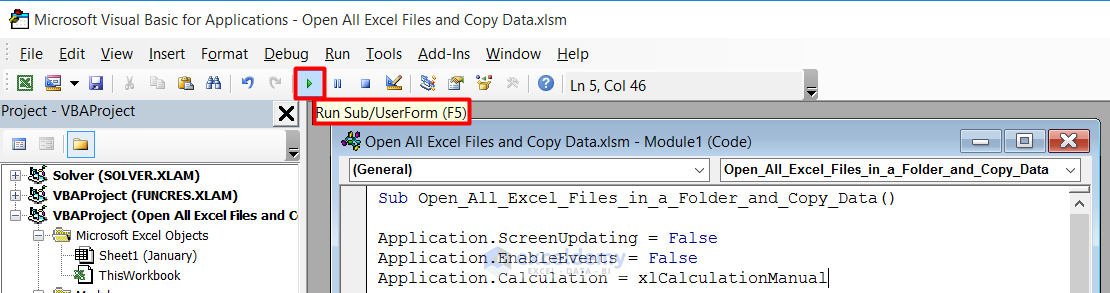
⧪ Method 1 – Setting Up the Environment
Set some necessary parameters to the required values to set up an environment for running the code smoothly.
Application.ScreenUpdating = False
Application.EnableEvents = False
Application.Calculation = xlCalculationManual
⧪ Method 2 – Inserting the Necessary Inputs
- The Worksheet Name to Copy Data from (“January” in this example)
- The Destination Worksheet (ThisWorkbook in this example. If you want to copy to another workbook, use the name of that workbook along with the full path directory).
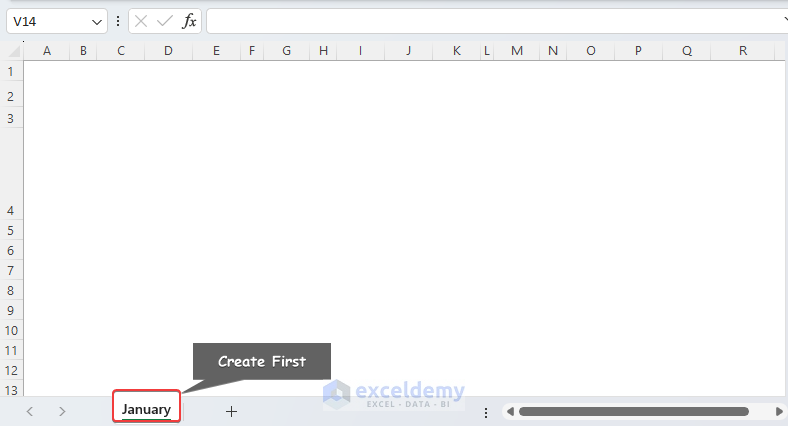
Sheet_Name = "January"
Set New_Workbook = ThisWorkbook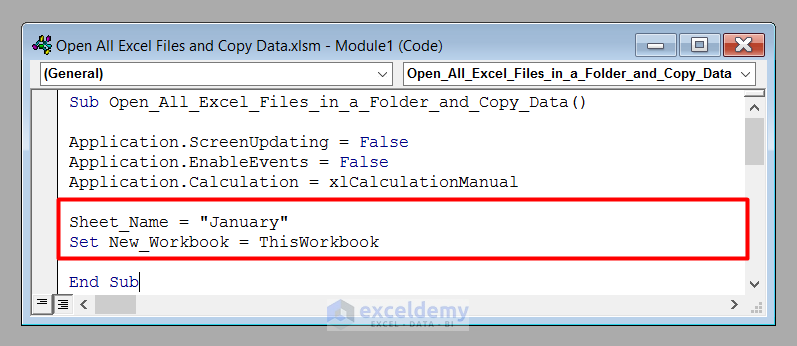
⧪ Method 3 – Selecting the Folder with the Excel Files
Set File_Dialog = Application.FileDialog(msoFileDialogFolderPicker)
File_Dialog.AllowMultiSelect = False
File_Dialog.Title = "Select the Excel Files"
If File_Dialog.Show <> -1 Then
    Exit Sub
End If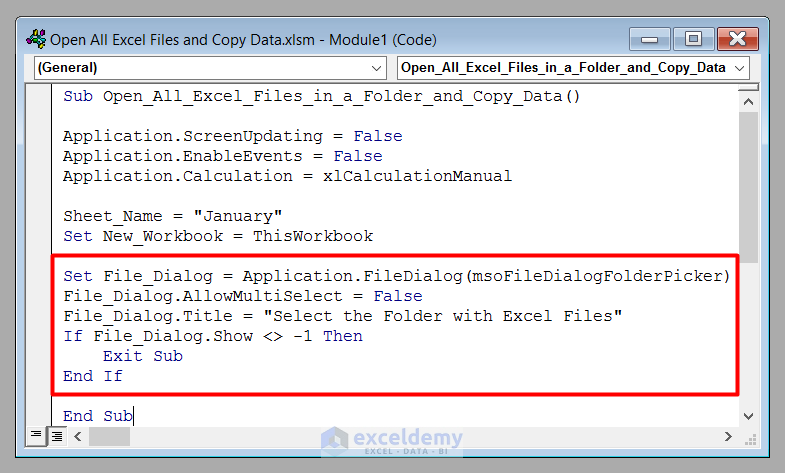
⧪ Method 4 – Setting the Names of the Selected Folder and the Excel Files in It
We’ll use the VBA Dir function for this purpose.
File_Path = File_Dialog.SelectedItems(1) & "\"
File_Name = Dir(File_Path & "*.xls*")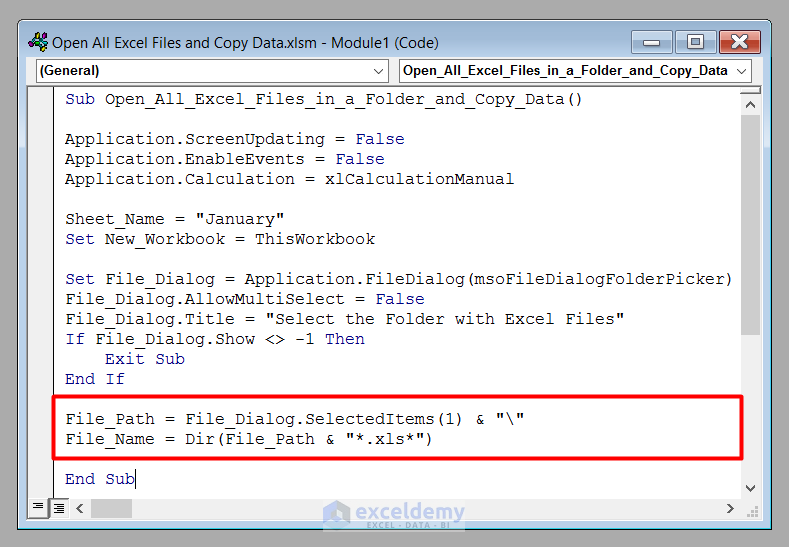
⧪ Method 5 – Iterating Through a Loop to Open All the Files and Copy Data from Them
Iterate through a while-loop to open all the files and copy data from them.
ActiveColumn = 0
Do While File_Name <> ""
    Set File = Workbooks.Open(Filename:=File_Path & File_Name)
    File.Worksheets(Sheet_Name).UsedRange.Copy
    ActiveColumn = ActiveColumn + 1
    New_Workbook.Worksheets(Sheet_Name).Cells(1, ActiveColumn).PasteSpecial Paste:=xlPasteAll
    ActiveColumn = ActiveColumn + File.Worksheets(1).UsedRange.Columns.Count
    File_Name = Dir()
Loop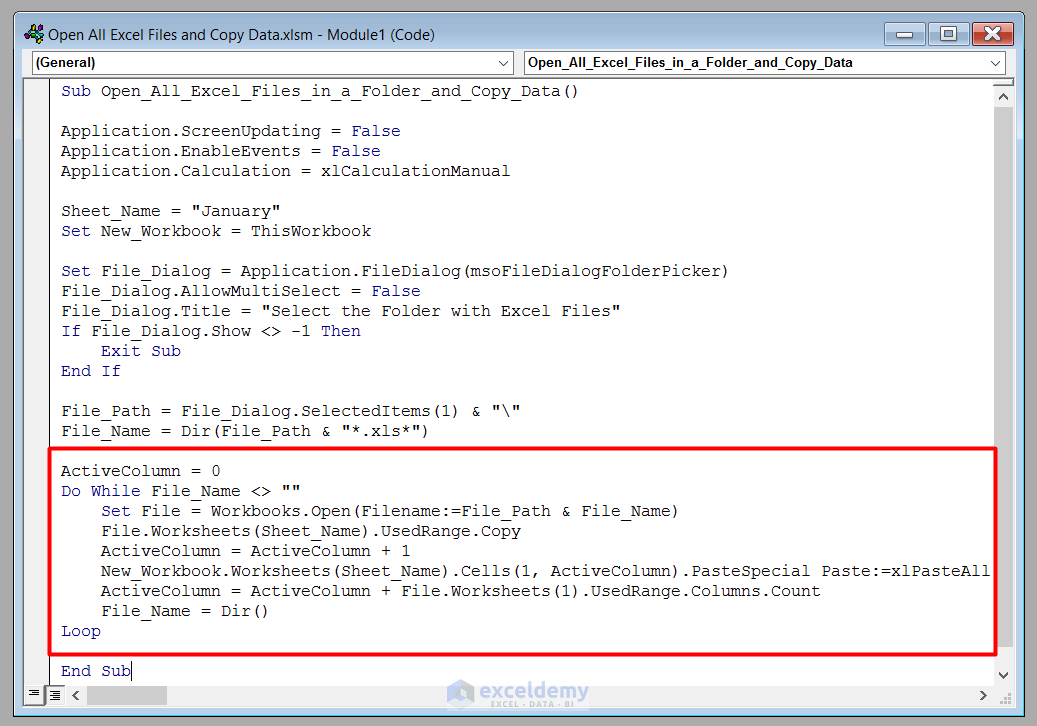
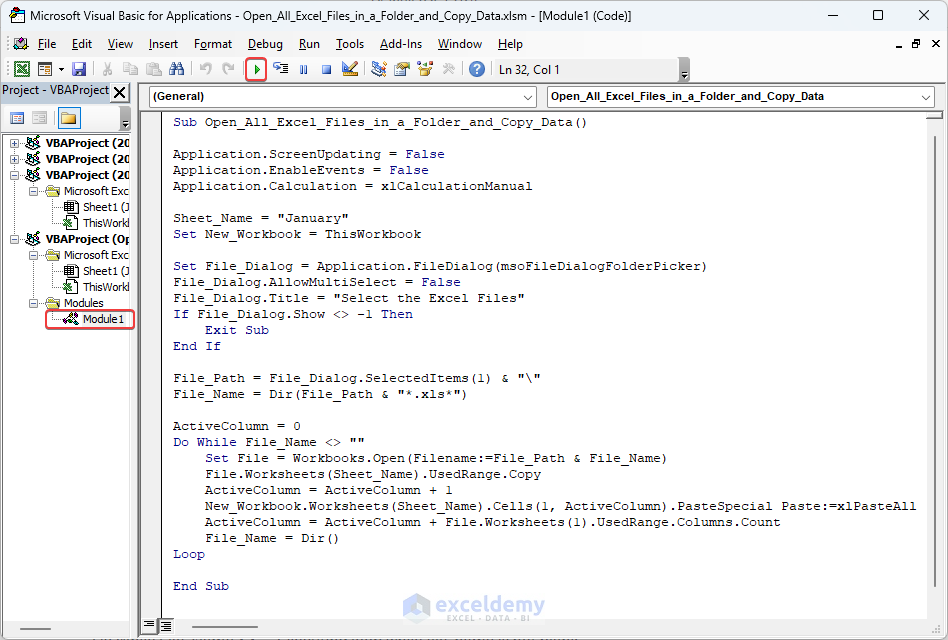
The complete VBA code will be:
⧭ VBA Code:
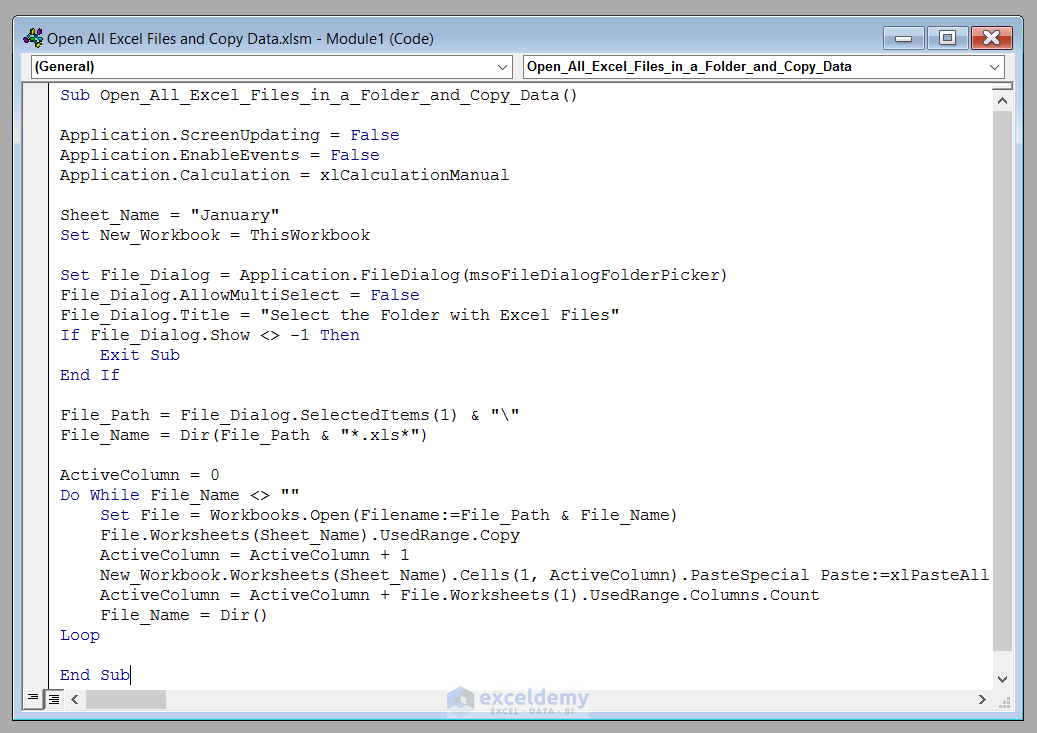
Sub Open_All_Excel_Files_in_a_Folder_and_Copy_Data()

Application.ScreenUpdating = False
Application.EnableEvents = False
Application.Calculation = xlCalculationManual

Sheet_Name = "January"
Set New_Workbook = ThisWorkbook

Set File_Dialog = Application.FileDialog(msoFileDialogFolderPicker)
File_Dialog.AllowMultiSelect = False
File_Dialog.Title = "Select the Excel Files"
If File_Dialog.Show <> -1 Then
    Exit Sub
End If

File_Path = File_Dialog.SelectedItems(1) & "\"
File_Name = Dir(File_Path & "*.xls*")

ActiveColumn = 0
Do While File_Name <> ""
    Set File = Workbooks.Open(Filename:=File_Path & File_Name)
    File.Worksheets(Sheet_Name).UsedRange.Copy
    ActiveColumn = ActiveColumn + 1
    New_Workbook.Worksheets(Sheet_Name).Cells(1, ActiveColumn).PasteSpecial Paste:=xlPasteAll
    ActiveColumn = ActiveColumn + File.Worksheets(1).UsedRange.Columns.Count
    File_Name = Dir()
Loop

End Sub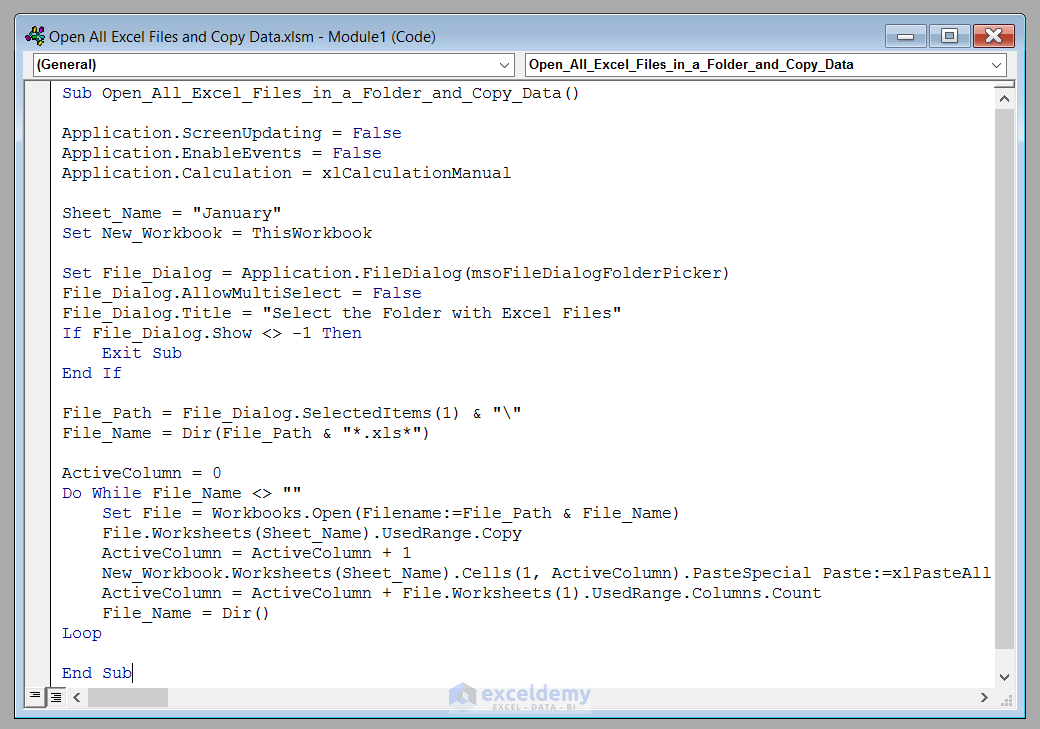
Developing a Macro to Copy All Excel Files in a Folder and Copy Data Using VBA
We’ve seen the step-by-step analysis of the code to open all Excel files in a folder and copy data from them. This is the step-by-step procedure to develop a Macro using the code.
⧪ Method 1 – Opening the Visual Basic Window
Press ALT + F8 on your keyboard to open the Visual Basic window.
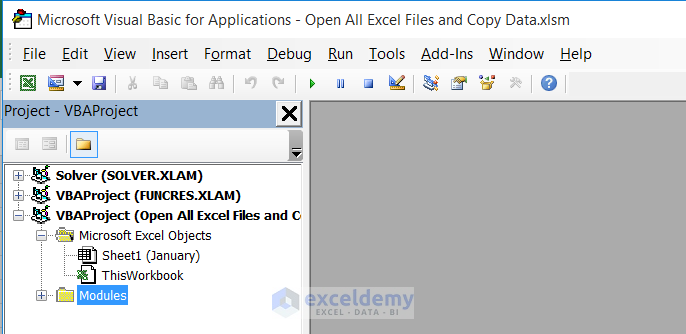
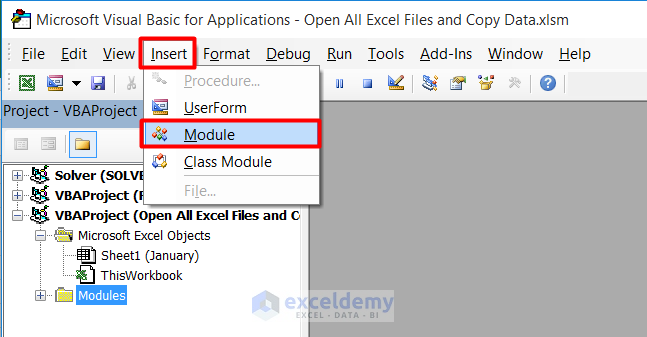
⧪ Method 2 – Inserting a New Module
Go to the Insert > Module tool in the toolbar to insert a new module (Module1).
⧪ Method 3 – Putting the VBA Code
Copy and paste the given VBA code into the new module.
⧪ Method 4 – Running the Code
Run the code from the Run Sub / UserForm option in the toolbar.
⧪ Method 5 – The Output
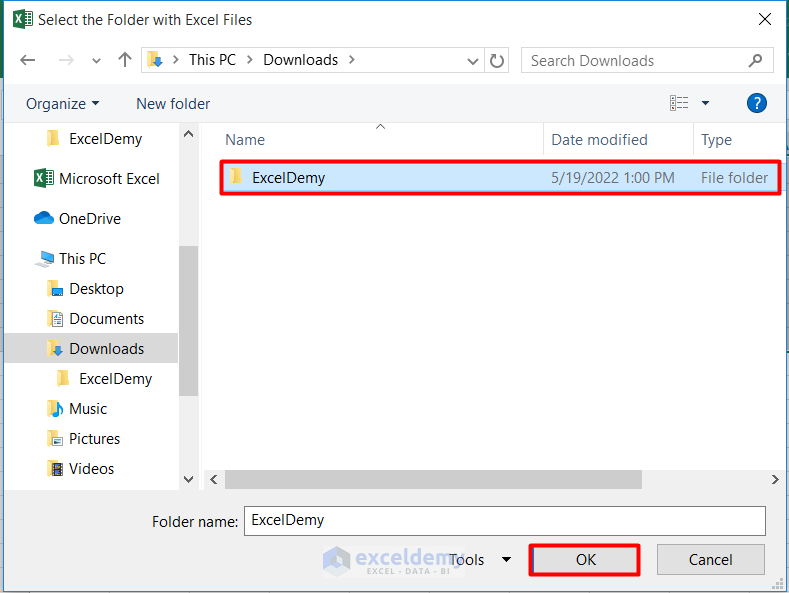
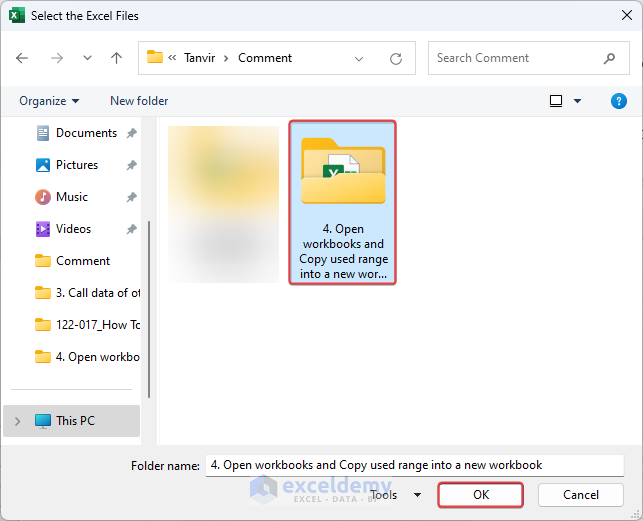
Run the code, a File Dialog will open asking you to select the folder with your Excel files. Select the folder (we selected ExcelDemy) and click Open.
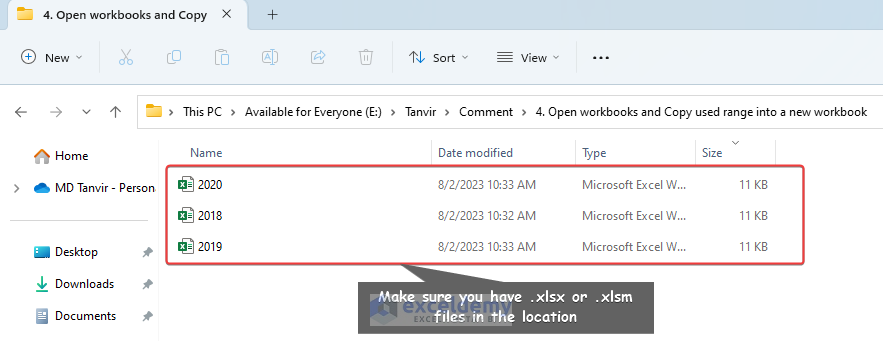
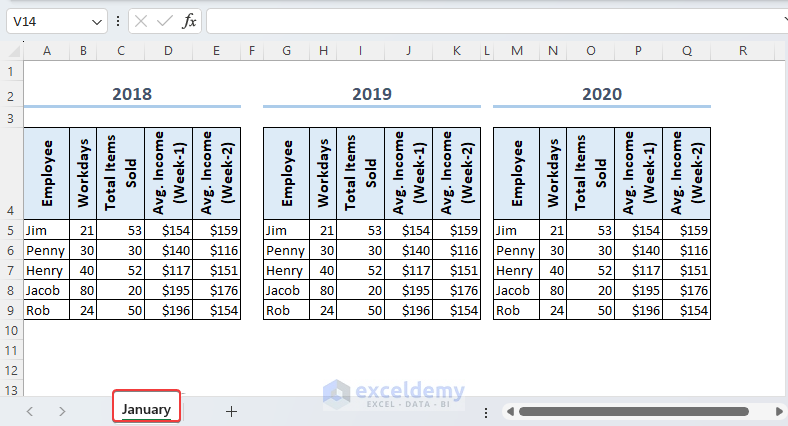
All the Excel files in the folder (2017, 2018, 2019, and 2020) opened and data copied from the input sheet (“January” here) of the files to the destination workbook (Active workbook here).

Things to Remember
- The code can copy not only all the .xlsx files but also all the files that have .xls in their extension (Like .xls, .xlsm, .xlsb,)
- Keep the destination workbook in a different folder from the folder with the Excel files. Otherwise, you’ll face issues while running the code.
- There must be a worksheet of the same name as the input worksheet (“January”) in the destination workbook before running the code. Otherwise, you’ll face errors.
Download Practice Workbook
Download this practice workbook to exercise while you are reading this article.
Related Articles
- How to Use Excel VBA to Copy Range to Another Excel Sheet
- Macro to Copy and Paste from One Worksheet to Another
- Macro to Copy Specific Columns from One Worksheet to Another in Excel
- Excel VBA to Copy Rows to Another Worksheet Based on Criteria
- Excel VBA: Copy Range to Another Workbook
- Excel VBA to Copy Data from Another Workbook without Opening
- Macro to Copy Data from One Workbook to Another Based on Criteria
Get FREE Advanced Excel Exercises with Solutions!


Hi
I copied your code but when I run it I get the runtime error 9 subscript out of range error at this point
New_Workbook.Worksheets(Sheet_Name).Cells(1, ActiveColumn).PasteSpecial Paste:=xlPasteAll
As I copied the code line for line, what am i missing?
Thanks
Dear STEVEN,
Thanks for your inquiry. Typically, the “runtime error 9 subscript out of range” occurs when we refer to something that doesn’t exist. In this particular situation, it seems that you haven’t created a worksheet called “January” in the workbook where you’re executing the code. To resolve this, kindly ensure that you create a worksheet with the exact name assigned to the Sheet_Name variable in the code. Once done, you can proceed with running the code, and hopefully, you won’t encounter any issues.
Best regards,
Aniruddah
hi,
thanks for the explanation.
what if don’t wont to copy all the data for January sheet, and
I wont to copy specifics cells from January sheet into specific cell In my summary file.
each row in my summary file need to contain the value from those specifics cell.
each row will contain the data from a different file.
for example.
i want to copy each file cells: B1, D11, C43
into the summary file – line 1 will be from 2017 – B1 into B4, D11 into C4, C43 into D4
line 2 will be from 2018 – with the same cells reffreance.
thanks in advance.
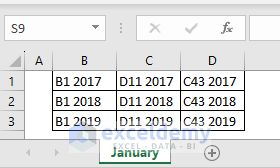
Thanks MORAN for your query. In order to copy only a number of selected cells(B1, D11, C43) instead of entire UsedRange, you need to modify the code in the following way.
By running the above code, you will be able to extract only selected cells from the source files and paste them on their corresponding columns in the summary file. On the summary file, each row will contain data from a specific file. In the example below, I have extracted B1, D11, C43 cells from 2017,2018 and 2019 files and paste them in column B, C and D respectively.
I hope, this addresses your problem.
Regards
Aniruddah
activecolumn = 0
Do While File_name “”
Set File = Workbooks.Open(Filename:=File_path & File_name)
File.Worksheets(sheet_name).UsedRange.Copy
activecolumn = activecolumn + 1
THE FOLLOWING IS GIVING AN ERROR
new_workbook.Worksheets(sheet_name).Cells(1, activecolumn).PasteSpecial Paste:=x1pasteall
Dear Lorenzo Pomini, Thank you so much for your queries. Probably Excel file location is not correct or you forgot to rename a sheet as “January“. However, please follow the mentioned steps. I hope it works.
Step 1: Make sure you created 2 or more worksheets in a preferred location.
Step 2: Create a worksheet named “January”
Step 3: Insert the following code in the module and hit the Run button.
Code Explanation:
Step 4: Select the folder to where Excel files are located.
Step 5: Obtain outcome containing data of 2017, 2018, 2019, 2020 in the January worksheet of the active workbook.
I hope these steps will be helpful to you. Please let me know if you face any further shortcomings. Thanks a ton. Have a good day.
Regards,
MD Tanvir Rahman
Excel and VBA Content Developer
Exceldemy, Softeko.