A File System Object (FSO) is an object in VBA that provides a way to work with files and folders on a computer’s file system. It allows VBA code to create, read, modify and delete files and folders, as well as perform other file system operations, such as copying, moving and renaming files and folders.
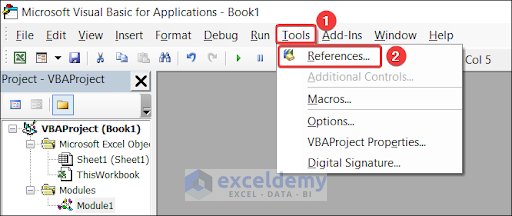
To move files using Excel VBA, we need to ensure that the Microsoft Scripting Runtime box is checked. To do this, go to Tools and click on References.
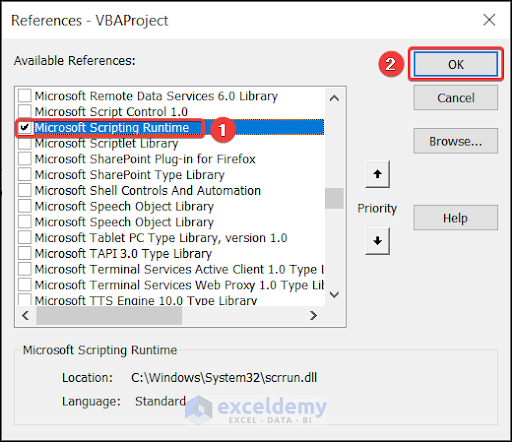
Search Microsoft Scripting Runtime and check the box beside it.
MoveFile Method Syntax
| Part | Required/Optional | Description |
|---|---|---|
| Object | Required | The name of a File System Object |
| Source | Required | The path of the files to be moved |
| Destination | Required | The path where the files are to be moved |
How to Launch VBA Editor in Excel
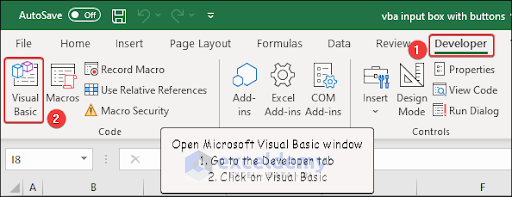
To access the Microsoft Visual Basic window, go to the Developer tab and click on Visual Basic. You can also open it by pressing Alt+F11 on your keyboard.
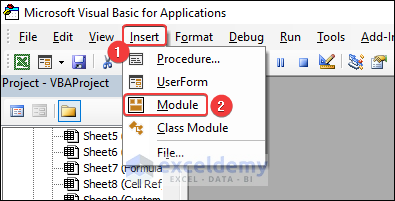
Go to the Insert tab and click on Module to open the code Module.
How to Move a Single File from One Folder to Another Using Excel VBA
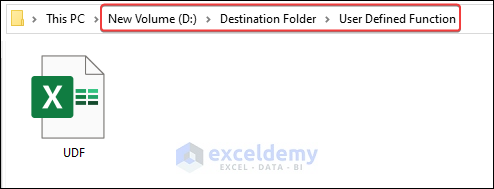
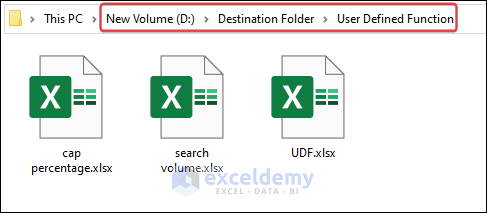
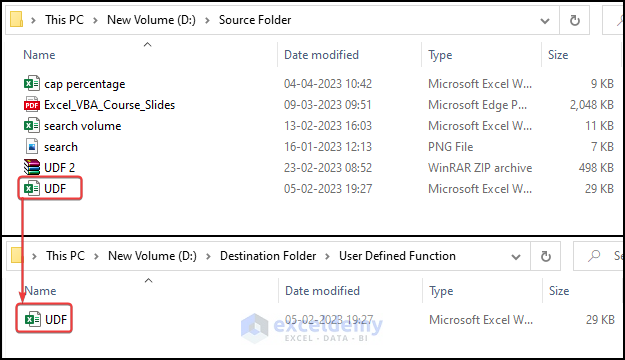
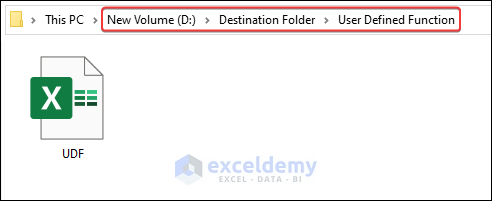
We will move a file named UDF.xlsx which is located in “D:\Source Folder\” path. We will move it to “D:\Destination Folder\User Defined Function\”.
- Open the Microsoft VBA code Module.
- Enter the following code in it.
Sub MoveSingleFile()
    Dim fso As Object
    Set fso = CreateObject("Scripting.FileSystemObject")
    fso.MoveFile "D:\Source Folder\UDF.xlsx", _
    "D:\Destination Folder\User Defined Function\UDF.xlsx"
End Sub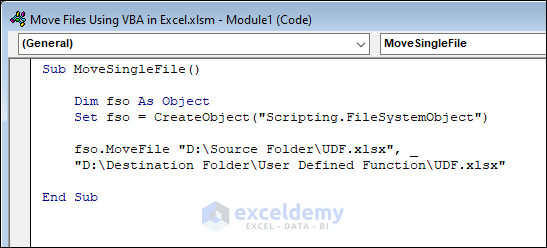
Code Breakdown
fso.MoveFile "D:\Source Folder\UDF.xlsx", _
"D:\Destination Folder\User Defined Function\UDF.xlsx"- This part moves a file named xlsx from the Source Folder directory located at “D:” to a subfolder named “User Defined Function” within the “Destination Folder” directory.
- Press F5 or the Run button to run the code.
- The file will be moved to the destination folder.
Excel VBA to Move Files: 5 Suitable Examples
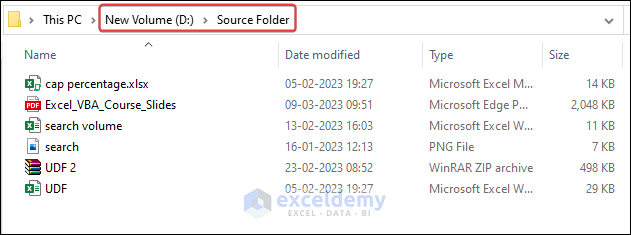
We will move files from the source folder (D:\Source Folder) that contains six files.
Example 1 – Move Multiple Files from One Folder to Another
We will move multiple files from one folder to another using FileSystemObject.
1.1 Move Multiple Files with Same Extensions
- Enter the following code in the VBA code Module.
Sub MoveFilewithSameExtensions()
    Dim fso As Object
    Set fso = CreateObject("Scripting.FileSystemObject")
    fso.MoveFile "D:\Source Folder\*.xlsx", _
    "D:\Destination Folder\User Defined Function\"
End Sub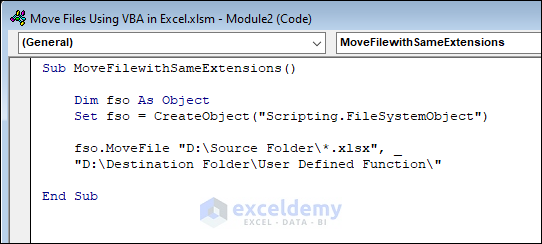
Code Breakdown
 fso.MoveFile "D:\Source Folder\*.xlsx", _
"D:\Destination Folder\User Defined Function\"- This part moves the files that contain “.xlsx” in their name from “D:\Source Folder” to “D:\Destination Folder\User Defined Function\” location.
- Run the code and you will find that all the files with the “.xlsx” extension are moved to the destination folder.
Read More: Excel VBA: Delete Files with Wildcards
1.2 Move All Files from a Folder
- Insert the VBA code given below in the Module.
Sub MoveAllFiles()
    Dim fso As Object
    Set fso = CreateObject("Scripting.FileSystemObject")
    fso.MoveFile "D:\Source Folder\*", _
    "D:\Destination Folder\All\"
End Sub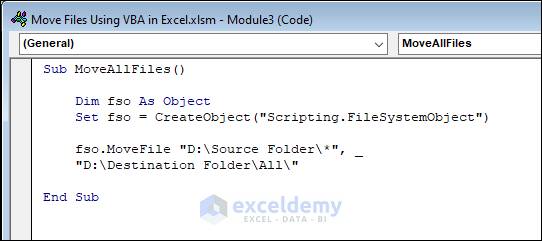
Code Breakdown
fso.MoveFile "D:\Source Folder\*", _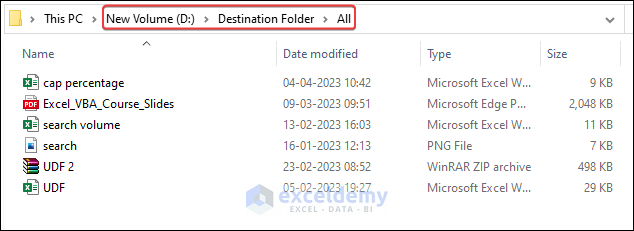
"D:\Destination Folder\All\"- This code moves all the files from “D:\Source Folder” to “D:\Destination Folder\All” location.
- Once you run the code, you will get your desired results.
1.3 Use For Loop to Move All Files from a Folder
We will move all files from one folder to another using For Loop. As we will use the For loop, there is no need to use the wildcard character. The VBA code is given below.
Sub MoveFilesForLoop()
    Dim fso As Object
    Set fso = CreateObject("Scripting.FileSystemObject")
    Dim srcPath As String
    srcPath = "C:\SourceFolder\" ' Change the source folder path here
    Dim dstnPath As String
    dstnPath = "C:\DestinationFolder\All\" ' Change the destination folder path here
    Dim fileItem As Object
    For Each fileItem In fso.GetFolder(srcPath).Files
        fileItem.Move dstnPath
    Next fileItem
End Sub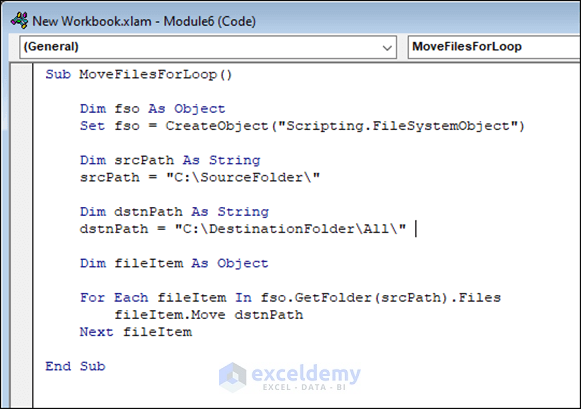
Code Breakdown
 For Each fileItem In fso.GetFolder(srcPath).Files
        fileItem.Move dstnPath
Next fileItem- The first line iterates through each file in the sourcePath folder.
- Then the code moves files represented by FileFromFolder to the destinationPath folder.
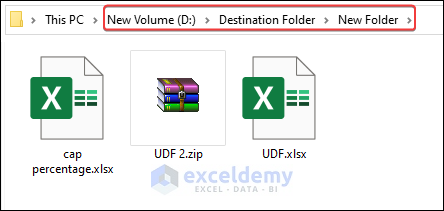
The output after running the code will look like the following image.

Example 2 – Move Files to a New Folder
While moving files to a new directory, you may not have an existing directory and you need to make a directory prior to moving the files. Using VBA, you can create a folder and move the files. In this example, we will move the files to a newly created folder, we will create a new folder and set it as the destination folder for the files to be moved.
Enter the following VBA code in the module.
Sub MoveFileToNewFolder()
    Dim fso As Object
    Dim sourcePath As String
    Dim destinationPath As String
    Dim newFolder As String
    Dim fileName As Variant
   Set fso = CreateObject("Scripting.FileSystemObject")
sourcePath = "D:\Source Folder\"
destinationPath = "D:\Destination Folder\"
newFolder = "New Folder"
'Create new folder in destination folder
fso.CreateFolder (destinationPath & newFolder)
'Array of file names to move
fileName = Array("UDF.xlsx", "cap percentage.xlsx", "UDF 2.zip")
'Loop through each file and move to new folder
For i = LBound(fileName) To UBound(fileName)
    fso.MoveFile sourcePath & fileName(i), destinationPath & newFolder _
    & "\" & fileName(i)
Next i
End Sub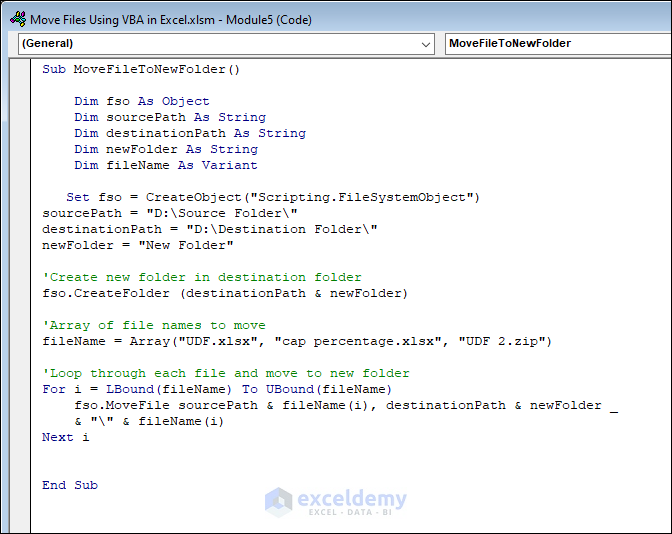
Code Breakdown
fso.CreateFolder (destinationPath & newFolder)- This line creates a new folder in the destinationPath
fileName = Array("UDF.xlsx", "cap percentage.xlsx", "UDF 2.zip")- This line creates an array that has three elements “xlsx“, “cap percentage.xlsx“, “UDF 2.zip“.
For i = LBound(fileName) To UBound(fileName)
            fso.MoveFile sourcePath & fileName(i), destinationPath & newFolder _
            & "\" & fileName(i)
Next i- This part of the code starts a loop that iterates through each element of the fileName The LBound and UBound functions return the lower and upper bound of the array.
- The code moves files from the sourcePath folder to the newFolder that is created at the destinationPath.
Run the code and get your desired output.
Read More: Excel VBA to Loop Through Files in Folder and Rename
Example 3 – Move Selected Files from One Folder to Another
For this example, we will need a dataset with file names, sources and destinations.
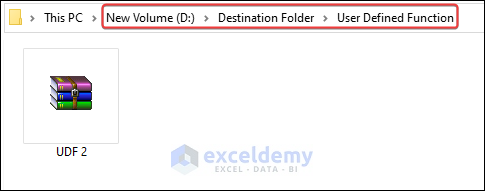
- From the dataset, select the file names you want to move. We have selected two files that will be moved to User Defined Function and Search Volume Folder.

- Go to the VBA code Module and enter the following code into it.
Sub MoveSelectedFiles()
    Dim fso As Object
    Dim sourceFileName As String, sourceFolderPath As String
    Dim destinFileName As String, destinFolderPath As String
    Dim fileName As String, destinFolderName As String
    Dim lastRow As Long, i As Long
    Dim selectedRange As Range, cell As Range
    Set fso = CreateObject("Scripting.FileSystemObject")
    sourceFolderPath = Range("C5").Value
    lastRow = Cells(Rows.Count, "B").End(xlUp).Row
    Set selectedRange = Application.Selection
    For Each cell In selectedRange
        If Not Intersect(cell, Range("B5:B" & lastRow)) Is Nothing Then
            fileName = cell.Value
            destinFolderName = Range("D" & cell.Row).Value
            sourceFileName = sourceFolderPath & "\" & fileName
            destinFolderPath = destinFolderName & "\" & fileName
            If Not fso.FolderExists(destinFolderName) Then
                MsgBox ("Destination folder " & destinFolderName & " does not exist.")
                GoTo NextFile
            End If
            If Not fso.FileExists(sourceFileName) Then
                MsgBox ("File Not Found in " & sourceFileName)
            Else
                If fso.FileExists(destinFolderPath) Then
                    MsgBox (destinFolderPath & " already exists. Skipping file " & fileName)
                Else
                    fso.MoveFile Source:=sourceFileName, Destination:=destinFolderPath
                    MsgBox (sourceFileName & " moved to " & destinFolderPath)
                End If
            End If
NextFile:
        End If
    Next cell
End Sub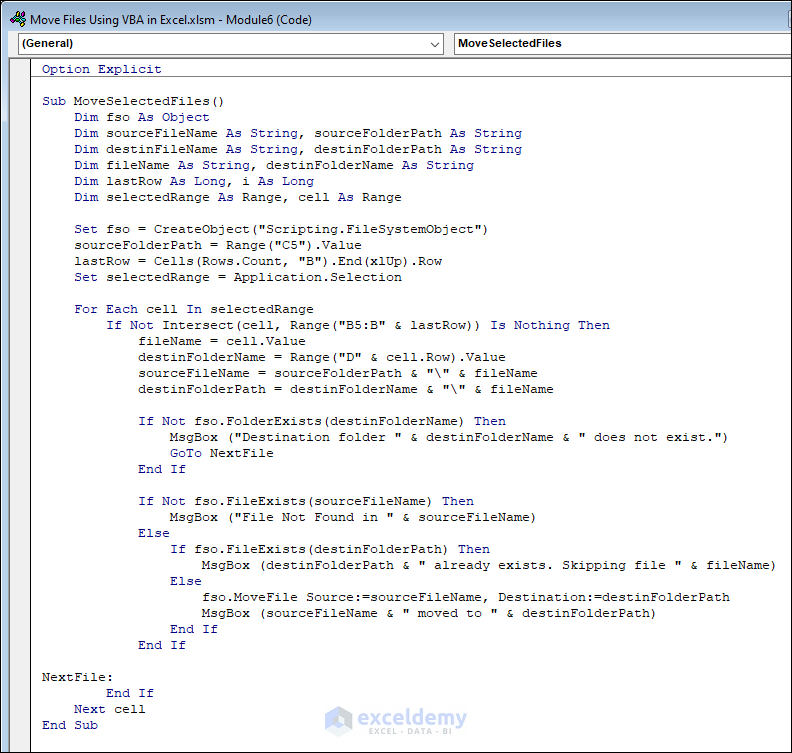
Code Breakdown
sourceFolderPath = Range("C5").Value
lastRow = Cells(Rows.Count, "B").End(xlUp).Row
Set selectedRange = Application.Selection- The first line assigns the value of cell C5 to sourceFolderPath.
- The next line calculates the last row within column B and assigns the value to lastRow
- Set selectedRange = Application.Selection sets a variable named selectedRange to the currently selected range of cells.
For Each cell In selectedRange
        If Not Intersect(cell, Range("B5:B" & lastRow)) Is Nothing Then
            fileName = cell.Value
            destinFolderName = Range("D" & cell.Row).Value
            sourceFileName = sourceFolderPath & "\" & fileName
destinFolderPath = destinFolderName & "\" & fileName- This part of the code iterates through selectedRange
- Then it checks if there is any overlap between the current cell and range “B5:B” using Intersect
- Press F5 on your keyboard.
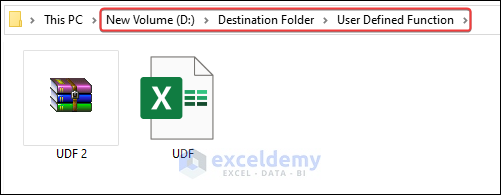
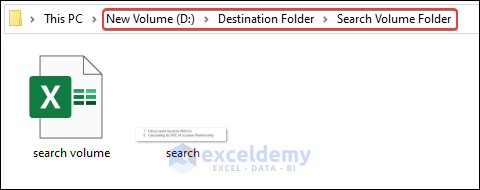
- As a result, the UDF 2 file will be moved to the User Defined Function
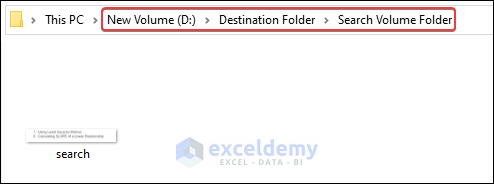
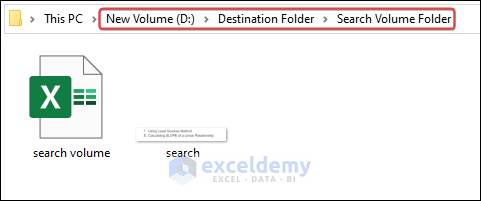
- The search file will be moved to the Search Volume Folder.
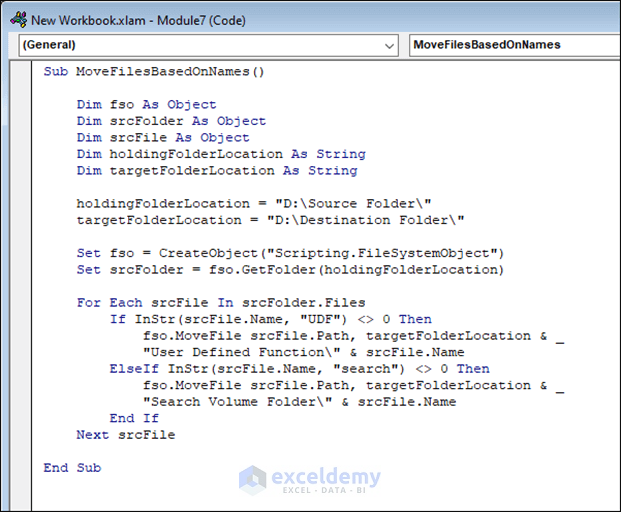
Example 4 – Move Files Based on File Names Using VBA in Excel
We will move files based on file names. We will use the following VBA code for this purpose. This code will move files if it finds the full match or partial match of a file name. The code will move the files that contain “UDF” or “search” in their names.
Code Breakdown
For Each srcFile In srcFolder.Files
        If InStr(srcFile.Name, "UDF") <> 0 Then
            fso.MoveFile srcFile.Path, targetFolderLocation & _
            "User Defined Function\" & srcFile.Name
        ElseIf InStr(srcFile.Name, "search") <> 0 Then
            fso.MoveFile srcFile.Path, targetFolderLocation & _
            "Search Volume Folder\" & srcFile.Name
        End If
Next srcFile- The code starts a For Each loop that iterates through each file in the srcFolder.
- Then it checks if the files in the srcFile contain the string “UDF”. If it does, then fso.MoveFile moves the file to the “User Defined Function” folder.
- Similarly, if the file name contains “search”, then the file is moved to “Search Volume Folder”.
Run the code and go to the destination folders to see the results.
Read More: How to Use Excel VBA to List Files in Folder
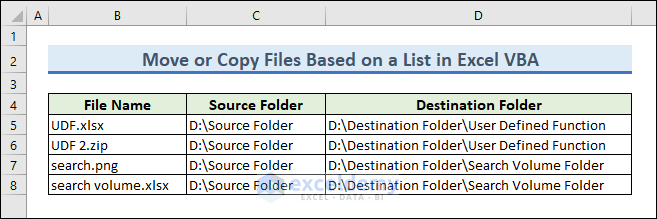
Example 5 – Move or Copy Files Based on a List
We can also move files based on a list or a cell value using VBA. In this example, we have a list of four files that we want to move to their corresponding destination folder.
Enter the following VBA code in the module.
Option Explicit
Sub MoveFilesBasedOnList()
    Dim fso As Object
    Dim sourceFileName As String, sourceFolderPath As String
    Dim destinFileName As String, destinFolderPath As String
    Dim fileName As String, destinFolderName As String
    Dim lastRow As Long, x As Long
    Set fso = CreateObject("Scripting.FileSystemObject")
    sourceFolderPath = Range("C5").Value
    lastRow = Cells(Rows.Count, "B").End(xlUp).Row
    For x = 5 To lastRow
        fileName = Range("B" & x).Value
        destinFolderName = Range("D" & x).Value
        sourceFileName = sourceFolderPath & "\" & fileName
        destinFolderPath = destinFolderName & "\" & fileName
        If Not fso.FolderExists(destinFolderName) Then
            MsgBox ("Destination folder " & destinFolderName & " does not exist.")
            GoTo NextFile
        End If
        If Not fso.FileExists(sourceFileName) Then
            MsgBox ("File Not Found in " & sourceFileName)
        Else
            If fso.FileExists(destinFolderPath) Then
                MsgBox (destinFolderPath & " already exists. Skipping file " & fileName)
            Else
                fso.MoveFile Source:=sourceFileName, Destination:=destinFolderPath
                MsgBox (sourceFileName & " moved to " & destinFolderPath)
            End If
        End If
NextFile:
    Next x
End Sub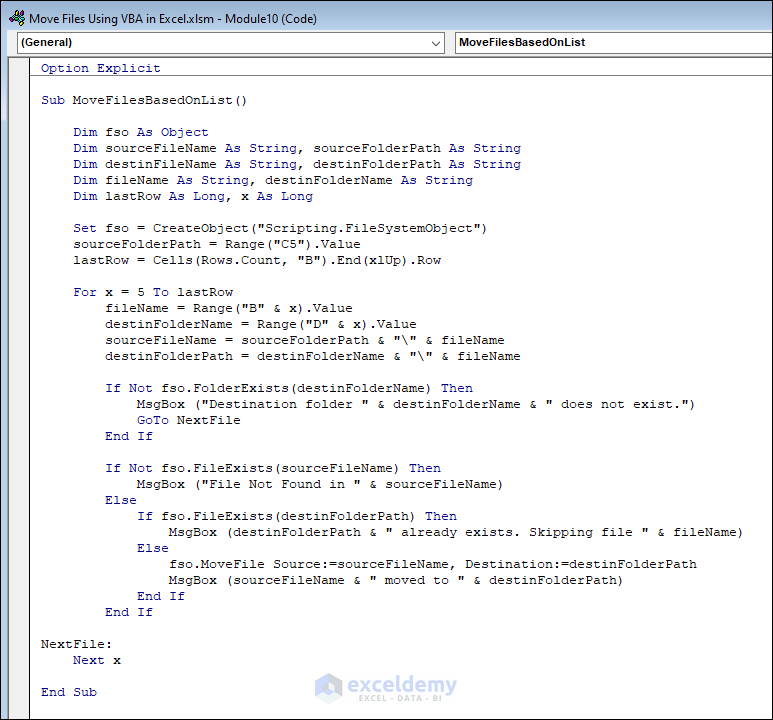
Code Breakdown
For x = 5 To lastRow
        fileName = Range("B" & x).Value
        destinFolderName = Range("D" & x).Value
        sourceFileName = sourceFolderPath & "\" & fileName
destinFolderPath = destinFolderName & "\" & fileName- The code uses a loop starting from the 5th row to the lastRow.
- Then it assigns the values of column B to fileName and values of column D to destinFolderName.
- The 4th line concatenates the “sourceFolderPath” variable with the “fileName” variable and a backslash to form the complete path. This complete path is assigned to the variable “sourceFileName“.
- Similarly, the other one is assigned to the variable “destinFolderPath”.
fso.MoveFile Source:=sourceFileName, Destination:=destinFolderPath- Then it moves the files from the path sourceFileName to destinFolderPath.
If you run this code, four MsgBox will appear with the message that a file from a folder is moved to another folder.
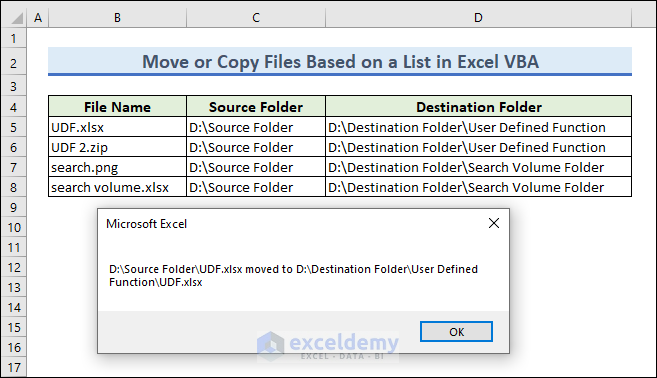
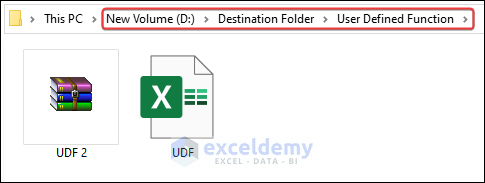
You can go to the destination folders to check the moved files.
How to Copy a File Using VBA in Excel
VBA can also be used to copy files in the same way as moving files.
Enter the following code into the module.
Sub CopySingleFile()
    Dim fso As Object
    Set fso = CreateObject("Scripting.FileSystemObject")
    fso.CopyFile "D:\Source Folder\UDF.xlsx", _
    "D:\Destination Folder\User Defined Function\UDF.xlsx"
End Sub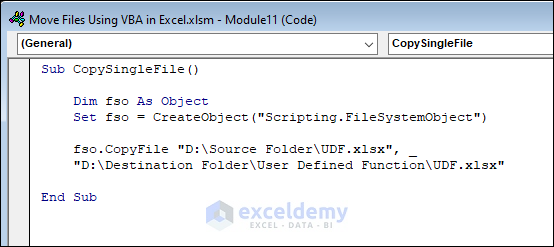
Code Breakdown
 fso.CopyFile "D:\Source Folder\UDF.xlsx", _
"D:\Destination Folder\User Defined Function\UDF.xlsx"- This code copies the file “xlsx” from “D:\Source Folder” and paste it to “D:\Destination Folder\User Defined Function” location.
Run the VBA code and the file will be copied to the destination folder.
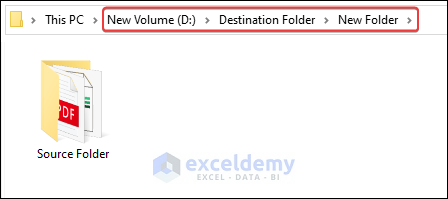
How to Move Folders Using Excel VBA
You can also move a whole folder using VBA code. We will move a Folder named Source Folder (D:\Source Folder) to a New Folder (D:\Destination Folder\New Folder). You can use the following VBA code to do this.
Sub MoveFolder()
    Dim fso As New FileSystemObject
    Set fso = CreateObject("Scripting.FileSystemObject")
    fso.MoveFolder "D:\Source Folder", "D:\Destination Folder\New Folder\"
End Sub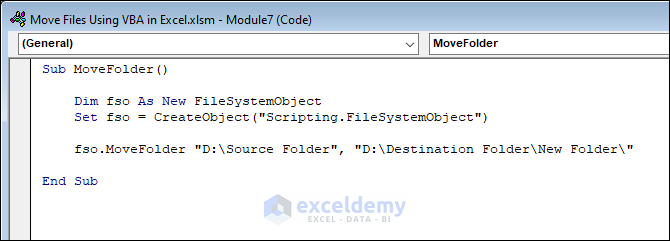
Code Breakdown
fso.MoveFolder "D:\Source Folder", "D:\Destination Folder\New Folder\"- The code moves the Source Folder located at “D:” to “D:\Destination Folder\New Folder”
When you run the code, the whole Source Folder will be moved to the New Folder.
How to Move File from One Folder to Another and Overwrite Using Excel VBA
While moving a file, another file with the same name can exist in the destination folder. In this situation, we can overwrite the existing file with the new one.
Enter the following VBA code into the module.
Sub MoveFileOverwrite()
    Dim fso As Object
    Set fso = CreateObject("Scripting.FileSystemObject")
    Dim sourcePath As String
    Dim destPath As String
    sourcePath = "D:\Source Folder\UDF.xlsx"
    destPath = "D:\Destination Folder\User Defined Function\UDF.xlsx"
    ' Check if the destination file already exists
    If fso.FileExists(destPath) Then
        ' Prompt a message box asking whether to overwrite the file or not
        Dim overwrite As VbMsgBoxResult
        overwrite = MsgBox("Do you want to overwrite the existing file?", _
        vbYesNo + vbQuestion, "File Exists")
        If overwrite = vbYes Then
            ' If user selects "Yes", delete the destination file
            fso.DeleteFile destPath
            fso.MoveFile sourcePath, destPath
            MsgBox "File moved successfully!", vbInformation, "Success"
        Else
            ' If user selects "No", then exit the sub
            Exit Sub
        End If
    Else
        ' If the destination file does not exist, simply move the source file
        fso.MoveFile sourcePath, destPath
        MsgBox "File moved successfully!", vbInformation, "Success"
    End If
End Sub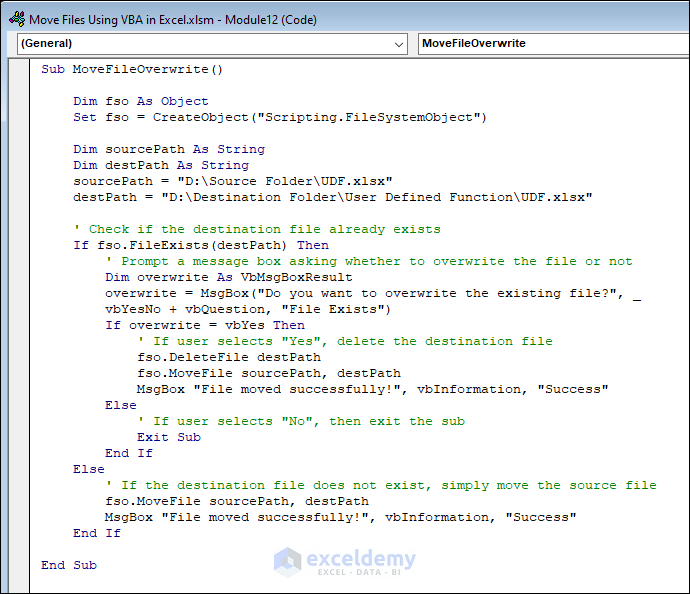
Code Breakdown
If fso.FileExists(destPath) Then
        ' Prompt a message box asking whether to overwrite the file or not
        Dim overwrite As VbMsgBoxResult
        overwrite = MsgBox("Do you want to overwrite the existing file?", _
        vbYesNo + vbQuestion, "File Exists")
        If overwrite = vbYes Then
            ' If user selects "Yes", delete the destination file
            fso.DeleteFile destPath
fso.MoveFile sourcePath, destPath- The code first checks if a file exists in the destination folder using the FileExists
- If a file exists, a MsgBox will appear that says “Do you want to overwrite the existing file?”
- If the user selects “Yes”, the code deletes the existing file using the “DeleteFile”
- Then it moves the file from the source folder to the destination folder using the “MoveFile”
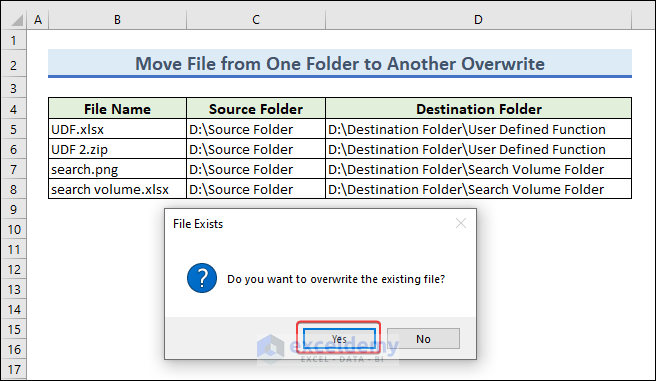
- Once you run the code, a MsgBox will appear. It will ask “Do you want to overwrite the existing file?”
- Click on Yes to overwrite the file.
- A MsgBox will pop up that says “File moved successfully!”
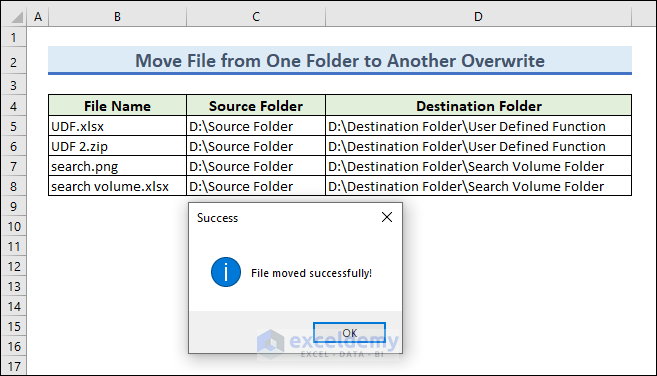
- Go to the destination folder to see the moved file.
Download Practice Workbook
Related Articles
- Excel VBA to Count Files in Folder and Subfolders
- Excel VBA to List Files in Folder with Specific Extension
- Excel VBA to List Files in Folder and Subfolders

