We like to have our data sorted. Sometimes, we might face the necessity to differentiate cells containing text from the entire dataset. In this article, I will explain step-by-step procedures to highlight cell if contains text in Excel. I hope it will be very helpful for you if you are looking for an efficient way to do so.
How to Highlight Cell If Contains Text in Excel: with Easy Steps
With the help of Conditional Formatting along with the ISTEXT function, we can highlight the cell if contains text in Excel. Let’s dive into detail.
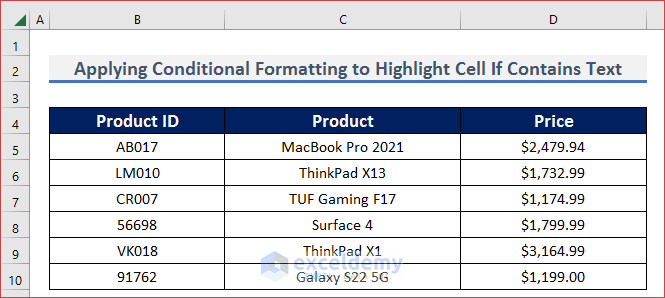
Step 1: Create an Organized Dataset to Highlight Cell If Contains Text
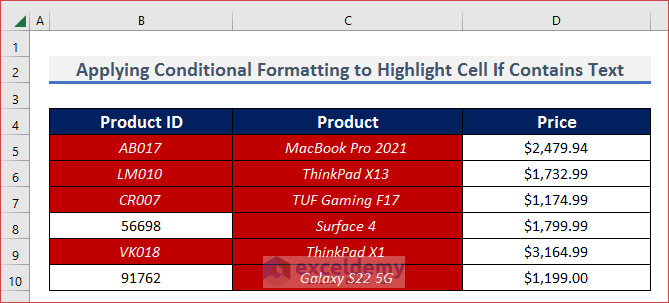
- In order to differentiate cells containing text from the dataset, it is the first and foremost criterion to have a proper dataset with both text and numbers. Here, I have organized a dataset with the Product ID, Product, and Price columns.
Step 2: Assign a Formula for Conditional Formatting
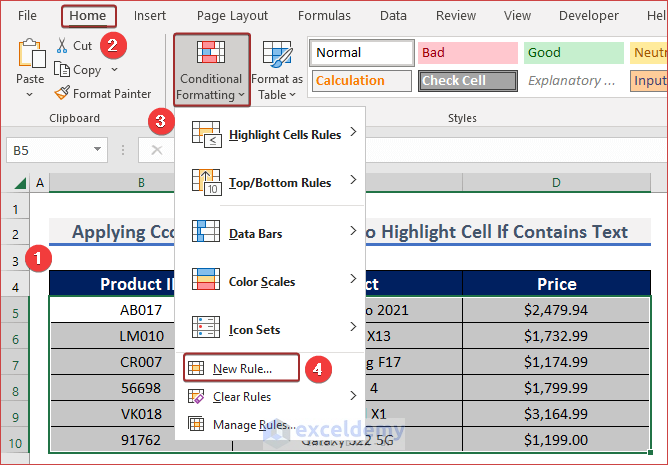
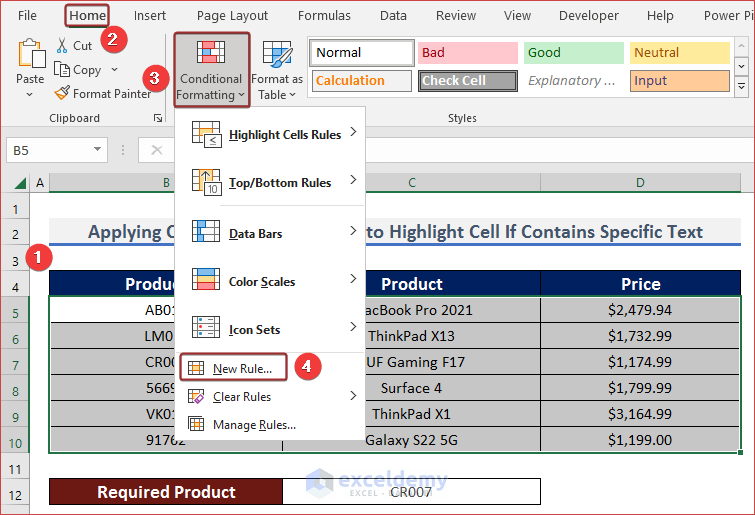
- In order to separate cells containing text with Conditional Formatting, we need to assign a formula. For this, select the entire dataset and go to the Home tab.
- Next, click on Conditional Formatting from the ribbon and choose New Rule…
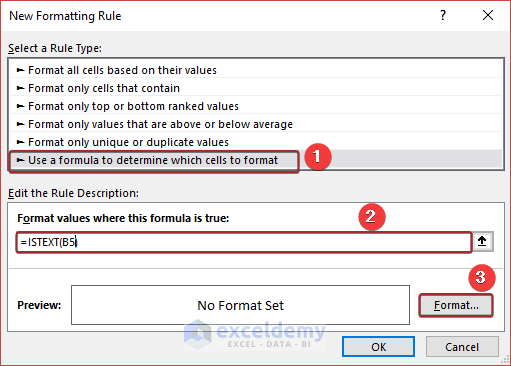
- A New Formatting Rule wizard will appear. Pick Use a formula to determine which cells to format from the Select a Rule Type section.
- Then, insert the following formula in the Format values where this formula is true section.
=ISTEXT(B5)- Next, click on Format to define the cell pattern containing text.
Step 3: Set Format for Cell to Highlight Cell If Contains Text
- After clicking on Format…, we will have the Format Cells wizard.
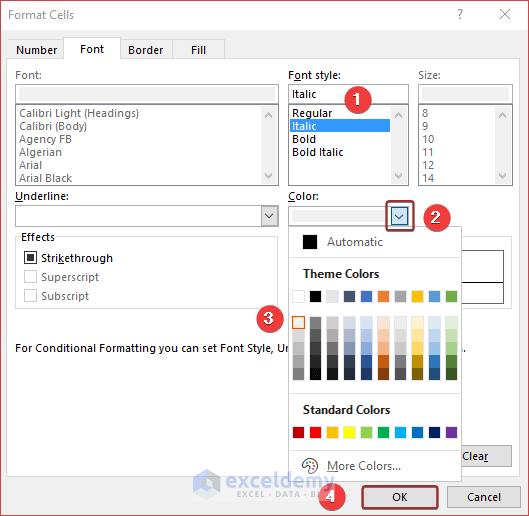
- Go to Fill.
- Pick a color according to your choice.

- Next, go to the Font tab.
- Make necessary adjustments from here. I have applied white color font with an Italic style.
- Afterward, click on OK.
- Click OK again to apply Conditional Formatting.

Step 4: Highlighted Cell If Contains Text
- After following the above steps, we will have the cells containing text sorted.
How to Highlight Cell If Contains Specific Text in Excel
There is a slight modification needed if we are going to highlight a cell that contains specific text. The details are described in the below section.
Steps:
- Select the entire dataset.
- Next, go to the Home tab.
- Choose New Rule… from the Conditional Formatting feature.
- A wizard named New Formatting Rule will appear.
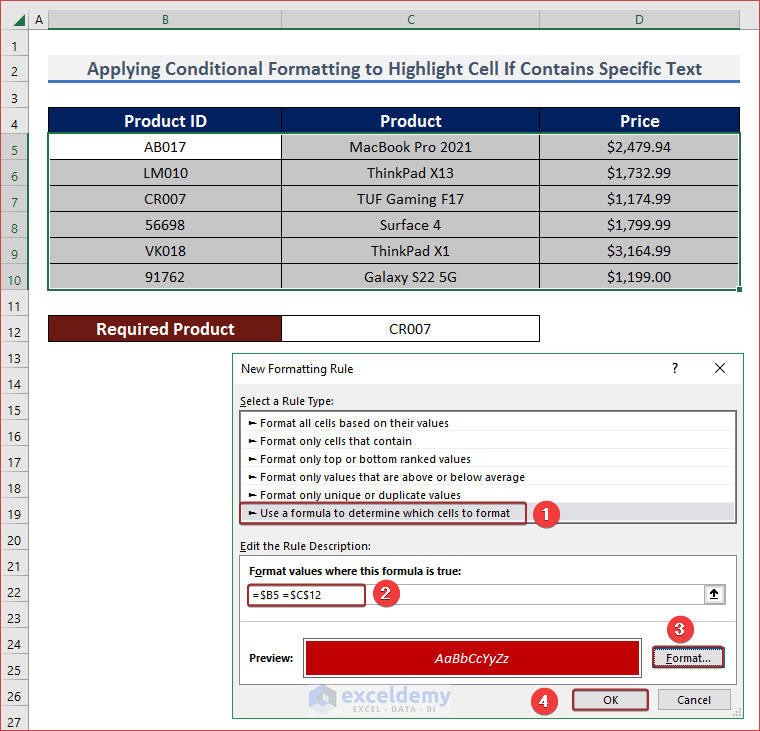
- Pick Use a formula to determine which cells to format from the Select a Rule Type section.
- Then, insert the following formula in the Format values where this formula is true section.
=$B5 =$C$12- Next, click on Format and make the necessary specifications to define the cell pattern containing specific text.
- Click on ENTER to finish the process.
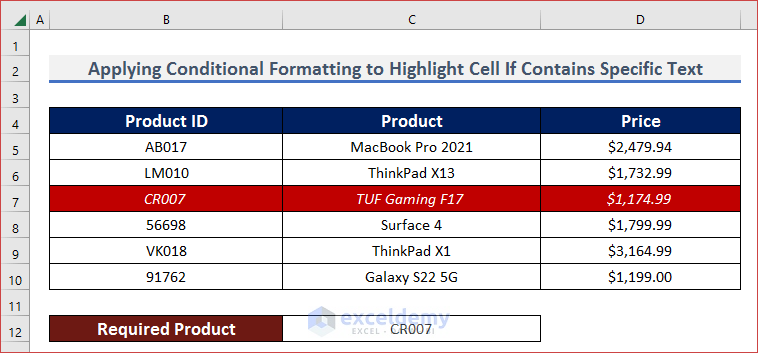
- Finally, we have highlighted cell that contains specific text.
Download Practice Workbook
Conclusion
At the end of this article, I like to add that I have tried to explain step-by-step procedures to highlight cells if contains text in Excel. It will be a great pleasure for me if this article helps any Excel user even a little. For any further queries, comment below.
<< Go Back to Text | If Cell Contains | Formula List | Learn Excel
Get FREE Advanced Excel Exercises with Solutions!
