How to Enable Share Workbook in Excel

Get FREE Advanced Excel Exercises with Solutions!
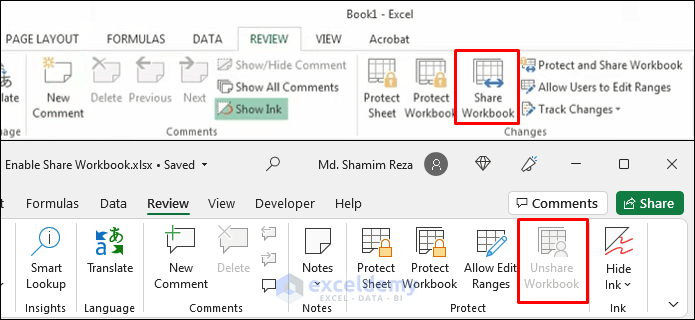
This article illustrates how to enable the Share Workbook button in Excel. You can easily access the Share Workbook button in Excel 2013 and earlier versions from the Review tab. But, you can not directly access it in Excel 2016 onward. The newer Excel versions will allow you to share your workbook using a new feature called Co-authoring. But, if you want to bring back the old Share Workbook button in a newer version of Excel, there is a way around doing that. The following picture highlights the problem. Have a quick look through the article to solve the issue.

Share Workbook button disabled in Excel


1. Enabling the Share Workbook Button in Excel

You enable the Share Workbook button to make it visible in the Review tab. Follow the steps below to be able to do that.

📌 Steps

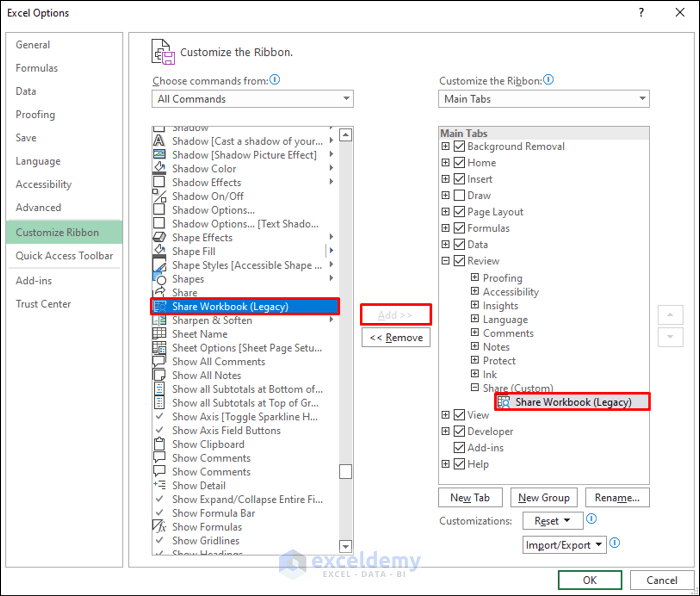
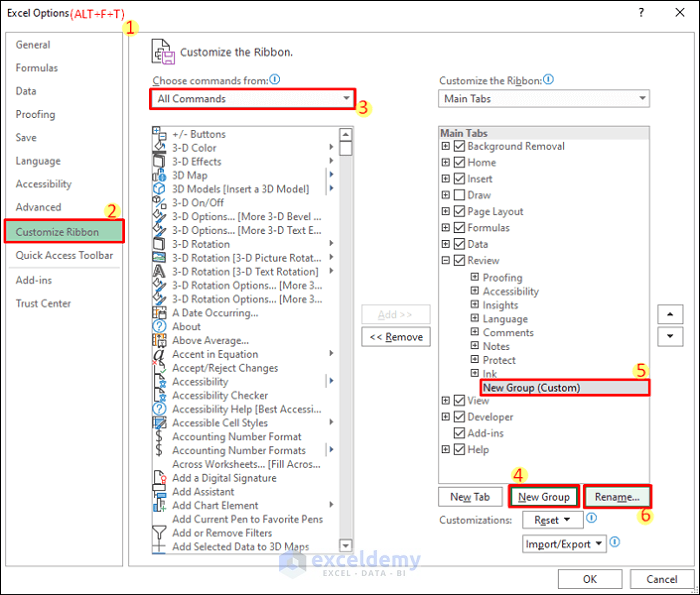
  • First, press ALT+F+T to open Excel Options. Then choose All Commands from the dropdown list. Next, expand the Review tab listed under Main Tabs. After that, select New Group to add a Custom Group. Then, select Rename.

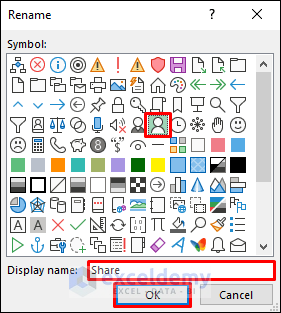
  • Now, change the Display Name and select a Symbol for the commands of the group. Press OK after that.

  • Next, scroll through the commands listed under All Commands and select Share Workbook (Legacy). Then, click on the Add button. Here, the button is grayed out because I’ve already added it to the group.

Enable Share Workbook in Excel

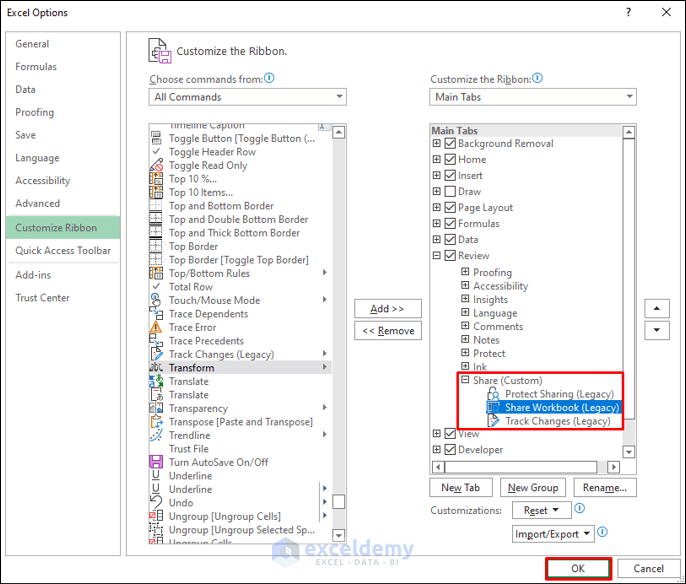
  • Now, you can scroll through the commands to add the Protect Sharing (Legacy) and the Track Changes (Legacy) commands too. These commands are also available in the earlier versions but not in the newer ones. Then, press OK.

  • After that, you will see that those commands are again visible in the Review tab as shown in the picture below.

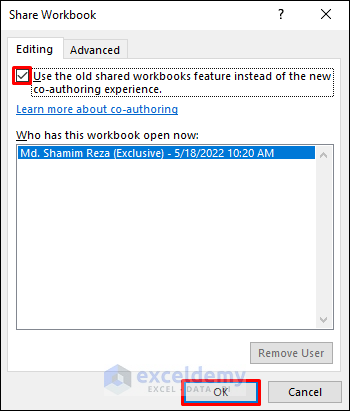
  • Now, select Share Workbook (Legacy) from there. Then, check the Use the old shared workbooks feature instead of the new co-authoring experience option. Next, click OK.

  • Then you will see a warning about saving the workbook. Click OK after that. Make sure that other users have access to the workbook. Save your workbook on a network location to do that.

  • You can also share your workbook by selecting the Protect and Share Workbook (Legacy) button that you just added to the new group. This will prevent anyone else from unsharing the workbook. But, you must use a password for that.

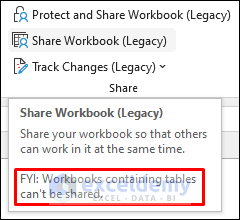
  • Now, if you are unable to use the newly added buttons, then you need to keep a few things in mind. First of all, keep the cursor on the Share Workbook (Legacy) button. Then, Excel will display a message saying that workbooks containing tables can’t be shared.

  • If the workbook contains tables then Excel will display the following error. It says that you need to convert the tables to ranges and remove any XML maps if remain.

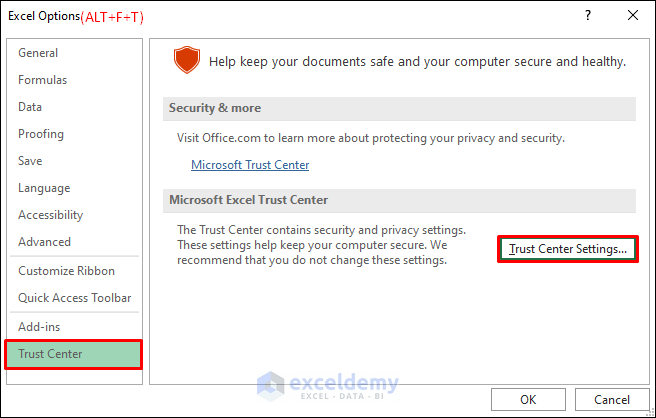
  • Moreover, you can’t share workbooks containing personal information either. To remove them, press ALT+F+T again to open Excel Options. Then select the Trust Center Settings from the Trust Center tab.

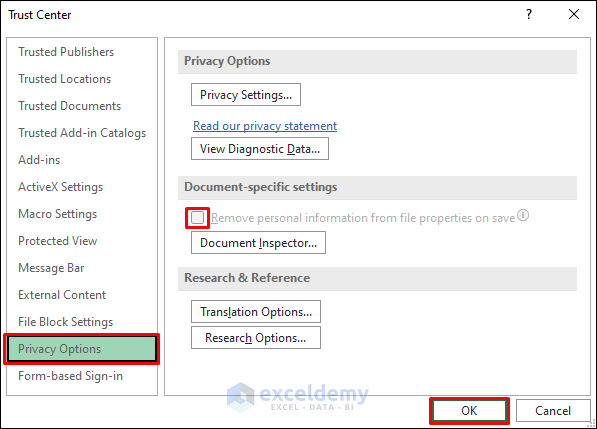
  • Next, check the Remove personal information from file properties on save setting from the Privacy Options. After that, click OK. Then click OK again. Now, you should be able the share the workbook.

Read More: Setting Permissions for a Shared File in Excel


2. Sharing a Workbook in Excel 2016 | 2019 | 365

Microsoft has introduced an amazing new Co-authoring feature in lieu of the old share workbook option. Follow the steps below to learn how to use this feature to share your workbooks.

📌 Steps

  • First, click on the Share button in the upper right corner of the Ribbon. Alternatively, you can select File >> Share.

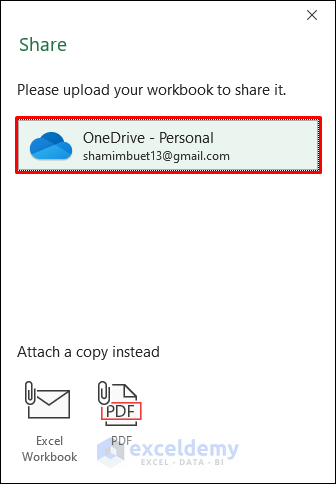
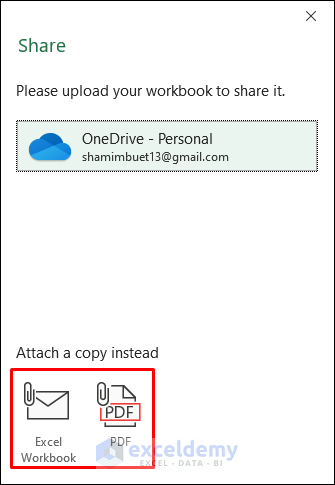
  • Then, upload your workbook on OneDrive so that others can have access to the file.

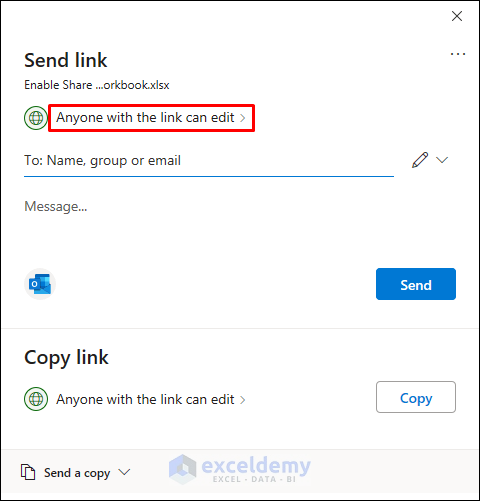
  • Next, click on the Anyone with the link can edit option.

Share a Workbook on Newr Versions of Excel

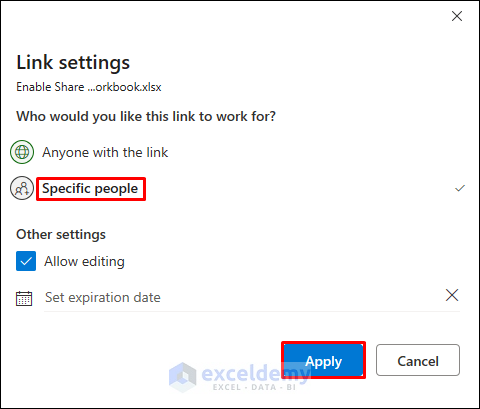
  • After that, choose Specific people if you want to share the workbook only with them. Otherwise, you can leave it as it is.

Share a Workbook in Excel 2016 | 2019 | 365

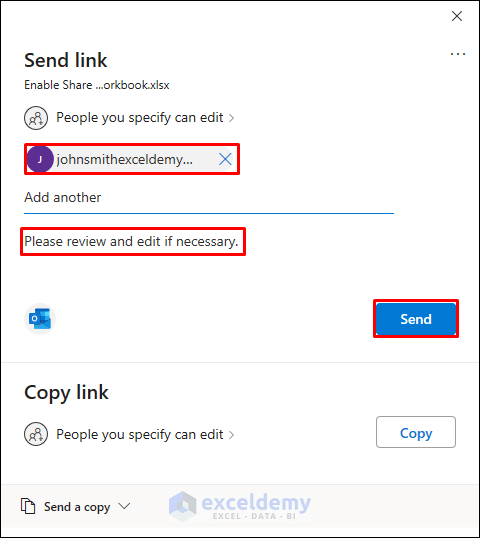
  • Now, enter the email addresses of the users with whom you want to share the workbook. The users will need to have their Microsoft accounts. Then, write a message if necessary. Click on the Send button after that.

Share a Workbook in Excel 2016, 2019 and 365

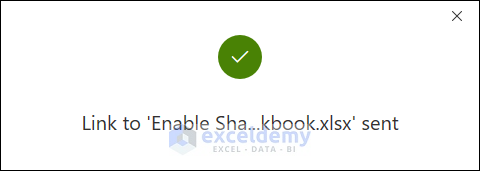
  • Then, you will get a confirmation message as follows.

  • Alternatively, you can just send the file as an Excel workbook or a PDF via email.

Share a Workbook in Excel 2016 | 2019 | 365

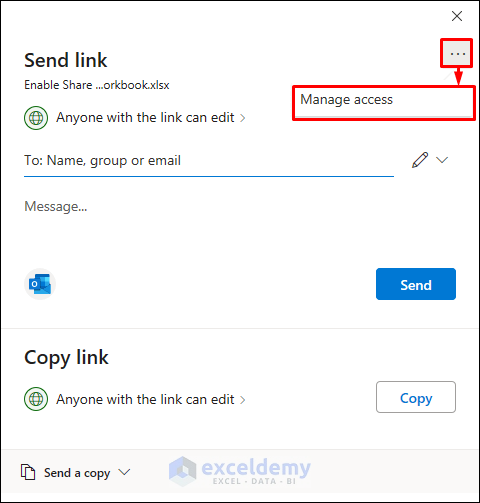
  • Now, to change the sharing permissions, you need to click on the Share button again. Then, click on the dotted menu in the upper right corner. Select Manage access after that.

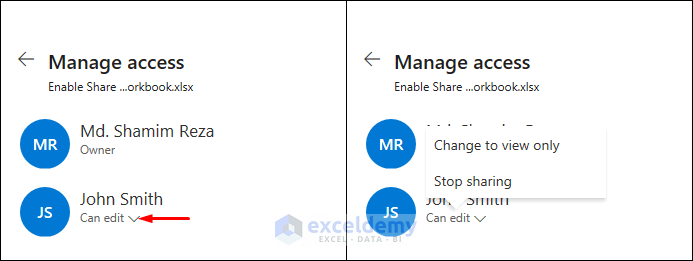
  • Now, click on the permission type below the names of any user. Then, you will be able to either stop sharing the workbook with the user or allow him/her to view it only.

Share a Workbook in Excel 2016 | 2019 | 365

  • You can see whoever is editing your workbook above the Ribbon. Click on their names to go to the cells that they are editing.

Share a Workbook in Excel 2016, 2019 and 365

Read More: How to Share Excel File for Multiple Users


3. Sharing a Workbook in Excel 2007 | 2013

Follow the steps below to know how to share a workbook in Excel 2007 and 2013.

📌 Steps

  • First, select Review >> Share Workbook.
  • Then, check the Allow changes by more than one user at the same time option on the Editing tab.
  • This also allows workbook merging. Now, click OK.
  • After that, you need to save the workbook on a network server so that other people can access it.

4. Sharing a Workbook in Excel 2003 and Earlier Versions

You can learn how to share a workbook in Excel 2003 and earlier versions by following the steps below.

📌 Steps

  • First, go to the Tools Then, click on Share Workbook.
  • Next, go to the Editing tab and check the Allow changes by more than one user at the same time option.
  • After that, hit the OK button. Then, select File >> Save As.
  • After that, save the workbook on any network server so that others can access it.

Things to Remember

  • You must save your workbook on a network location so that users can have access to it.
  • Workbooks that are saved as Excel 95 workbooks can not be shared. Only Excel 97 and later versions allow us to share workbooks.

Conclusion

Now you know how to enable the old Share Workbook feature in Excel. You also know how to share a workbook in different versions of Excel. So, have you tried to share your workbooks then? Please let us know in the comment section below. You can also reach us for further queries or suggestions.


Related Articles


<< Go Back to Share Workbook | Workbook in Excel | Learn Excel

What is ExcelDemy?

ExcelDemy - Learn Excel & Get Excel Solutions Center provides online Excel training , Excel consultancy services , free Excel tutorials, free support , and free Excel Templates for Excel professionals and businesses. Feel free to contact us with your Excel problems.
Md. Shamim Reza
Md. Shamim Reza

Md. Shamim Reza, a marine engineer with expertise in Excel and a fervent interest in VBA programming, sees programming as a time-saving tool for data manipulation, file handling, and internet interaction. His diverse skill set encompasses Rhino3D, Maxsurf C++, AutoCAD, Deep Neural Networks, and Machine Learning. He holds a B.Sc in Naval Architecture & Marine Engineering from BUET and has transitioned into a content developer role, generating technical content focused on Excel and VBA. Beyond his professional pursuits,... Read Full Bio

2 Comments
  1. Thank you so much for your detailed explanation. I followed the steps, and it worked perfectly!

    Regards

    Wendy

  2. Thank you so much for your detailed and intuitive instructions. I tried some of the changes, and they worked perfectly!

    Regards

    Wendy

Leave a reply

Advanced Excel Exercises with Solutions PDF


ExcelDemy
Logo