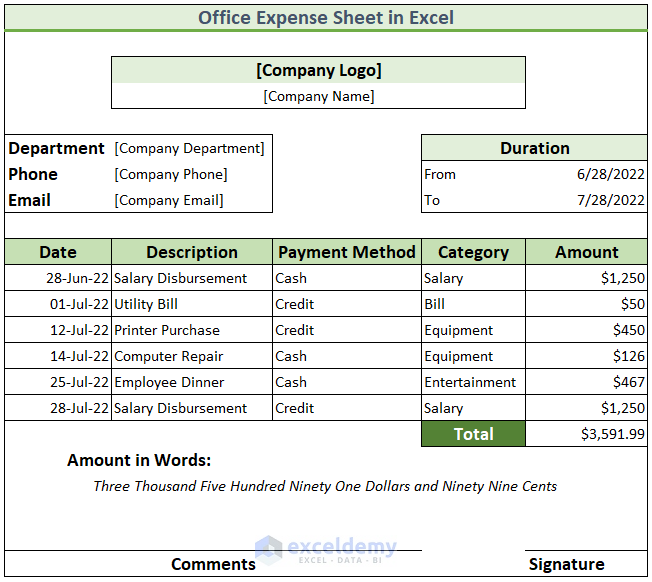
Here’s an overview of how a sample office expense sheet might look. You can customize this template later.
How to Make an Office Expense Sheet in Excel: 8 Easy Steps
Step 1 – Turn Off Gridlines
- From the View tab, deselect Gridlines.

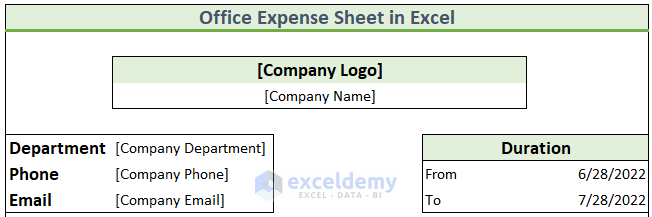
Step 2- Add the Basic Information
- Include this information about the company:
- Company Logo.
- Company Name.
- Company Department.
- Company Phone Number.
- Company Email Address.
- Add the duration of the expense sheet:
- From: 6-June-2022.
- To: 28-July-2022.
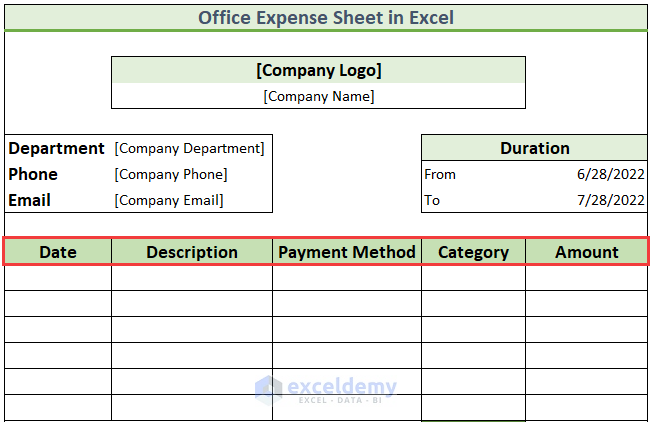
Step 3 – Add Column Headers
- Insert these columns:
- Date
- Description
- Payment Method
- Category
- Amount
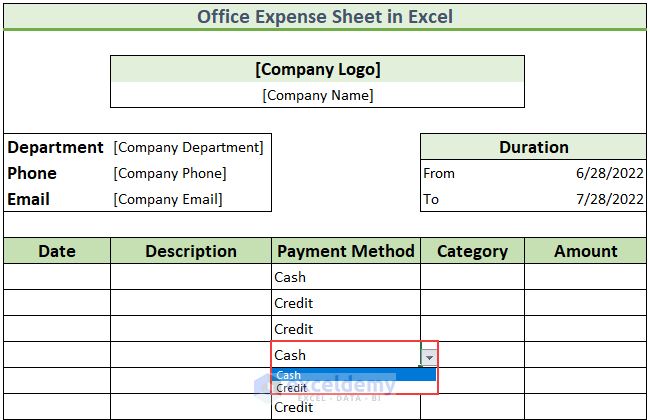
Step 4 – Insert a Dropdown List for the Payment Method
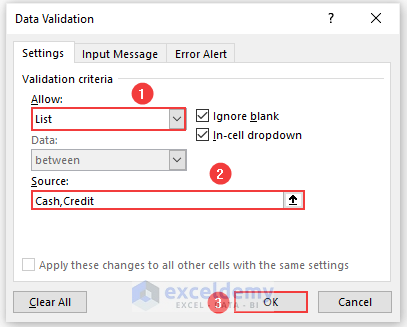
- Select the cell range D12:D17.
- From the Data tab, select Data Validation.
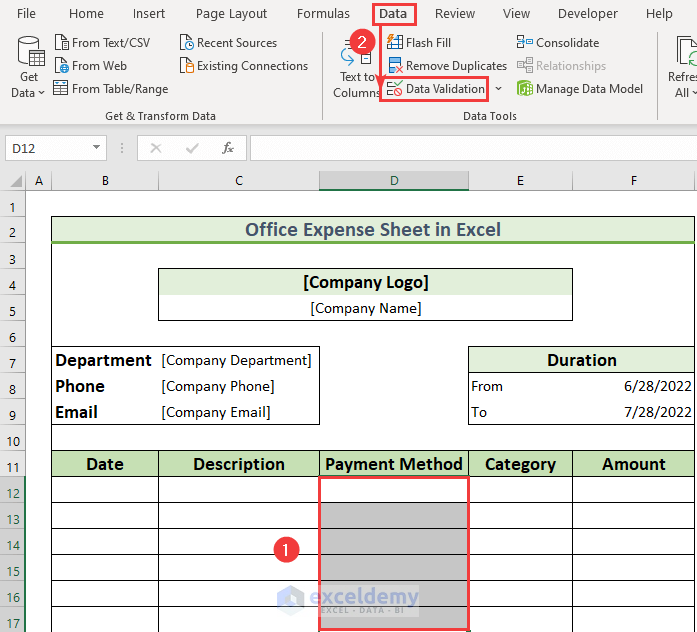
- The Data Validation dialog box will appear.
- Select List.
- Put “Cash, Credit” inside the Source box.
- Press OK.
- You can use the dropdown list to select the payment method in the Office Expense Sheet.
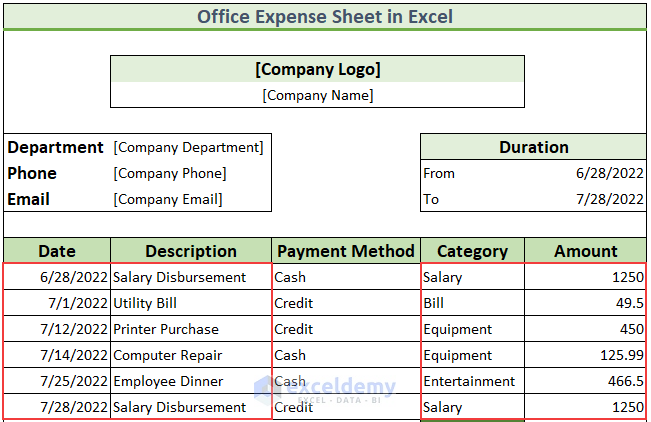
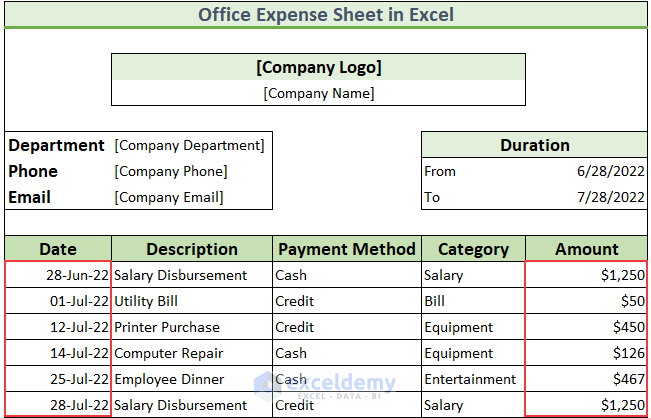
Step 5 – Data Entry and Proper Formatting
- Insert data in the Date, Description, Category, and Amount columns.
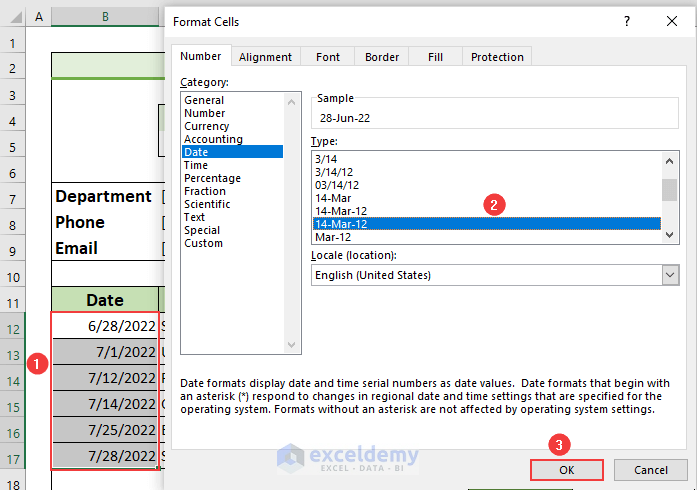
- Select the cell range B12:B17 and press Ctrl + 1.
- The Format Cells dialog box will pop up.
- Select the desired Type from the box and press OK.
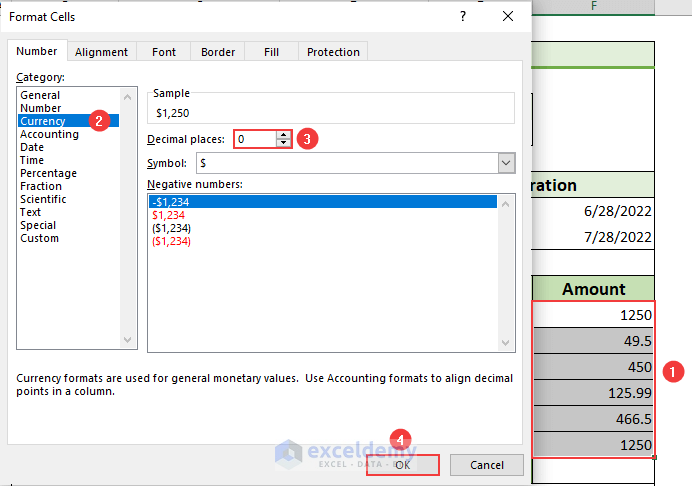
- Select the cell range F12:F17 and press Ctrl + 1.
- Select Currency from the Category.
- Set Decimal places to 0.
- Press OK.
- The Office Expense Sheet will look like this.
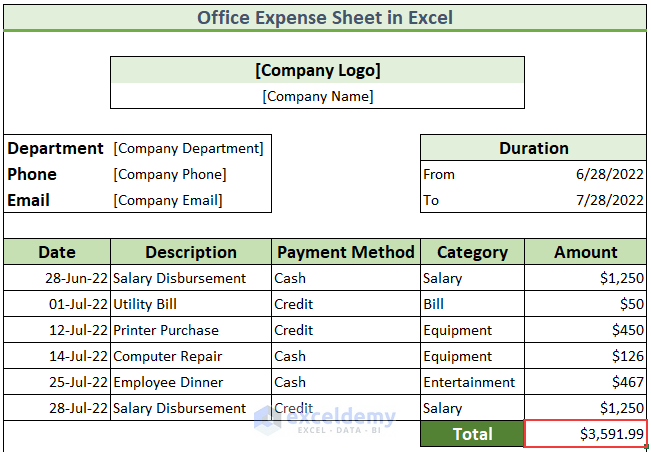
Step 6 – Apply the SUM Function to Get the Total
- Use the following formula in cell F18.
=SUM(F12:F17)

- Press Enter.
Step 7 – Automating the Conversion to Words Using VBA
- Press Alt + F11 to bring up the VBA window.

- From Insert, select Module.
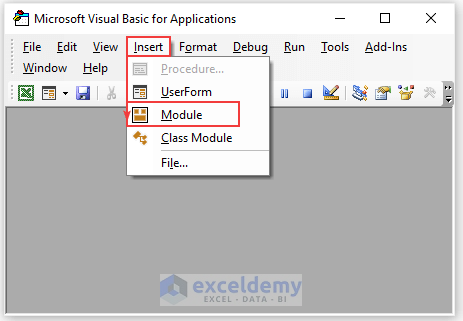
- Insert the following code in the module.
Option Explicit
Function Number_To_Words(ByVal xNumber)
        Dim xDollars, xCents, xT
        Dim xPlace, xCount
        ReDim Place(9) As String
        Place(2) = " Thousand "
        Place(3) = " Million "
        Place(4) = " Billion "
        Place(5) = " Trillion "
        xNumber = Trim(Str(xNumber))
        xPlace = InStr(xNumber, ".")
        If xPlace > 0 Then
                xCents = xTens(Left(Mid(xNumber, xPlace + 1) & "00", 2))
                xNumber = Trim(Left(xNumber, xPlace - 1))
        End If
        xCount = 1
        Do While xNumber <> ""
                xT = xHundreds(Right(xNumber, 3))
                If xT <> "" Then xDollars = xT & Place(xCount) & xDollars
                If Len(xNumber) > 3 Then
                        xNumber = Left(xNumber, Len(xNumber) - 3)
                Else
                        xNumber = ""
                End If
                xCount = xCount + 1
        Loop
        Select Case xDollars
                Case ""
                        xDollars = "No Dollars"
                Case "One"
                        xDollars = "One Dollar"
                 Case Else
                        xDollars = xDollars & " Dollars"
        End Select
        Select Case xCents
                Case ""
                        xCents = ""
                Case "One"
                        xCents = " and One Cent"
                            Case Else
                        xCents = " and " & xCents & " Cents"
        End Select
        Number_To_Words = xDollars & xCents
End Function
Function xHundreds(ByVal xNumber)
        Dim xResult As String
        If Val(xNumber) = 0 Then Exit Function
        xNumber = Right("000" & xNumber, 3)
        If Mid(xNumber, 1, 1) <> "0" Then
                xResult = xDigit(Mid(xNumber, 1, 1)) & " Hundred "
        End If
        If Mid(xNumber, 2, 1) <> "0" Then
                xResult = xResult & xTens(Mid(xNumber, 2))
        Else
                xResult = xResult & xDigit(Mid(xNumber, 3))
        End If
        xHundreds = xResult
End Function
Function xTens(tt)
        Dim xResult As String
        xResult = ""
        If Val(Left(tt, 1)) = 1 Then
                Select Case Val(tt)
                        Case 10: xResult = "Ten"
                        Case 11: xResult = "Eleven"
                        Case 12: xResult = "Twelve"
                        Case 13: xResult = "Thirteen"
                        Case 14: xResult = "Fourteen"
                        Case 15: xResult = "Fifteen"
                        Case 16: xResult = "Sixteen"
                        Case 17: xResult = "Seventeen"
                        Case 18: xResult = "Eighteen"
                        Case 19: xResult = "Nineteen"
                        Case Else
                End Select
        Else
                Select Case Val(Left(tt, 1))
                        Case 2: xResult = "Twenty "
                        Case 3: xResult = "Thirty "
                        Case 4: xResult = "Forty "
                        Case 5: xResult = "Fifty "
                        Case 6: xResult = "Sixty "
                        Case 7: xResult = "Seventy "
                        Case 8: xResult = "Eighty "
                        Case 9: xResult = "Ninety "
                        Case Else
                End Select
                xResult = xResult & xDigit(Right(tt, 1))
        End If
        xTens = xResult
End Function
Function xDigit(dd)
        Select Case Val(dd)
                Case 1: xDigit = "One"
                Case 2: xDigit = "Two"
                Case 3: xDigit = "Three"
                Case 4: xDigit = "Four"
                Case 5: xDigit = "Five"
                Case 6: xDigit = "Six"
                Case 7: xDigit = "Seven"
                Case 8: xDigit = "Eight"
                Case 9: xDigit = "Nine"
                Case Else: xDigit = ""
        End Select
End Function
VBA Code Breakdown
- We use the VBA Case statement to apply the word converter to our numbers.
- We use 3 more functions, xHundreds, xTens, and xDigit, to get the hundred, tens, and single-digit values, respectively.
- This code converts numbers to words.
- Hit Save and close the Module.
- Use the following formula in cell B20.
=Number_To_Words(F18)
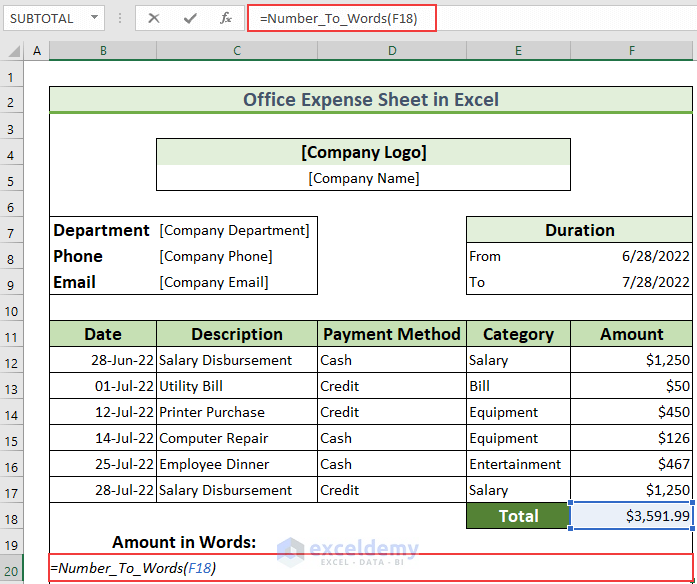
- Press Enter.
Step 8 – Insert a Space for Comments and the Signature
- Add blank spaces to insert comments and the signature of the concerned authority.

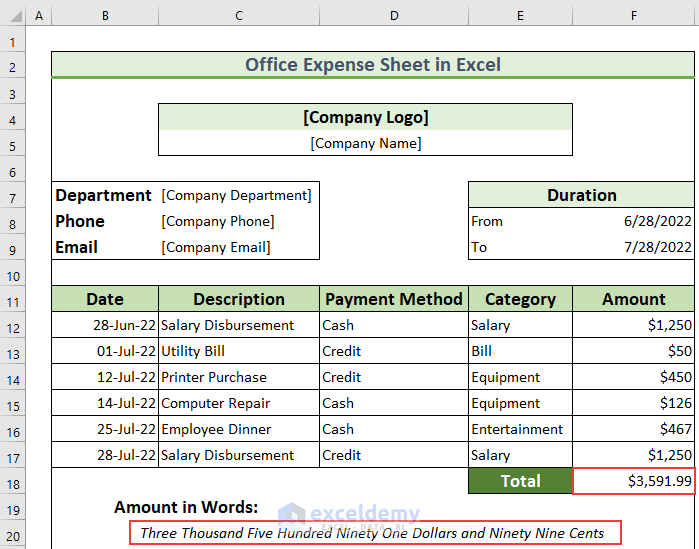
- The Office Expense Sheet is complete. Here’s an overview.
Download the Practice Workbook
You can download the file to use as a template and modify it as needed. Insert rows before the Total row to keep the functions working.
Related Articles
<< Go Back To Excel For Finance | Learn Excel
Get FREE Advanced Excel Exercises with Solutions!

Hello
I am currently working as Admin Officer.
Using Excel to prepare my reports is crucial.
I’m really enjoying your articles.
Hello, Michelet!
Thanks for your appreciation. Stay in touch with ExcelDemy.
Regards
ExcelDemy