What Is the VBA Event Handler in Excel?
We have placed a Command Button in my worksheet like the following figure. We will discuss the detailed process later in this article.
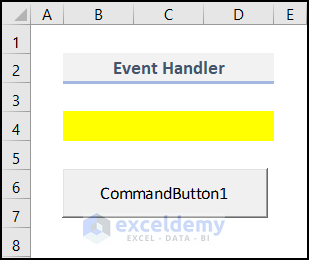
We want that Command Button will do something when it is clicked. Clicking on the CommandButton1 is an event. What this command button will do when it is clicked depends on the underlying subprocedure written by you. We want this when this command button will be clicked, cells in the range B4:D4 will be decorated with the yellow background color. We wrote a code like the following:
Private Sub CommandButton1_Click()
Range("B4:D4").Interior.Color = vbYellow
End Sub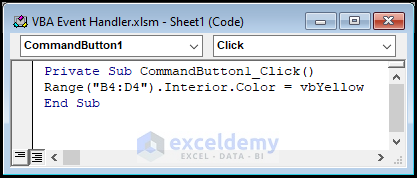
This sub-procedure is called event handler as it executes when someone clicks on the Command Button.
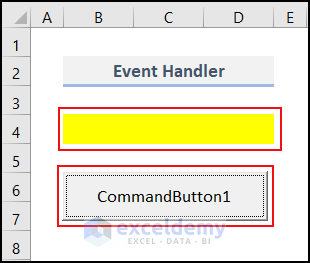
When we click the CommandButton1, cells in the range B4:D4 in my worksheet get yellow as their background color. An event happens and the event handler executes.
How to Get the Relevant Code Module to Put an Event Handler
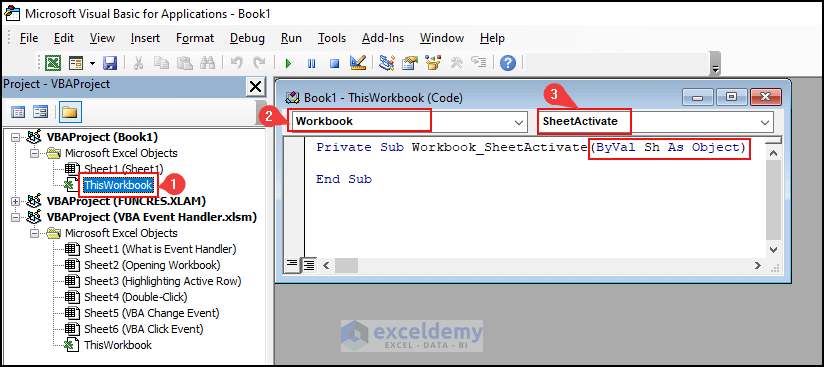
If you are working with workbook-related events, then you should place the VBA code you write in the ThisWorkbook code module.
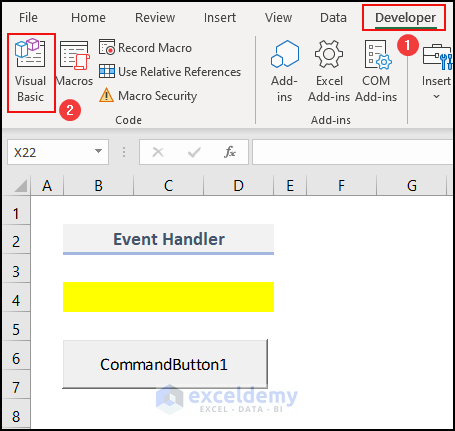
- Go to the Developer tab.
- Click on Visual Basic in the Code group.
- Alternatively, press Alt + F11.
- The Microsoft Visual Basic for Applications window appears.
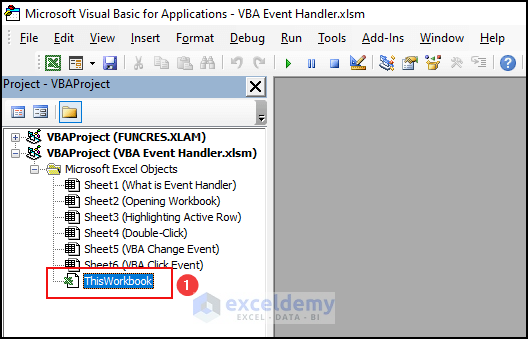
- In Project Explorer, double-click on ThisWorkbook.
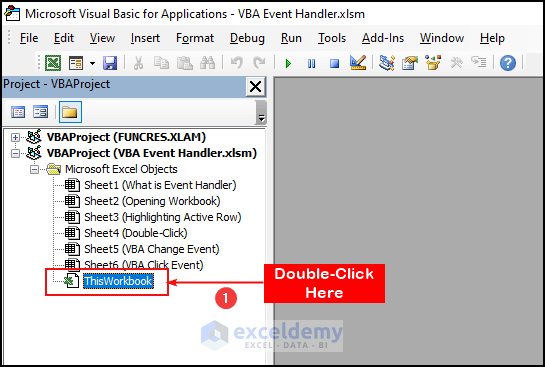
- The Code Module pops up.
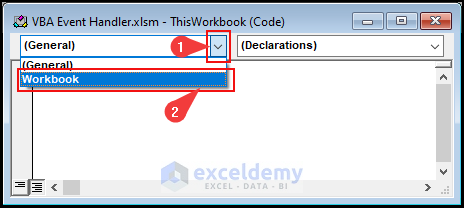
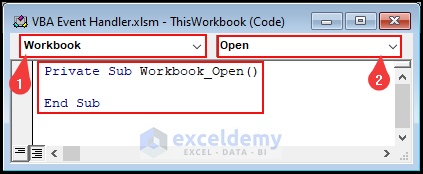
- From the left drop-down, select Workbook as the object.
- From the top-right drop-down, select the Open event.
- The sub-procedure name looks like the one below.
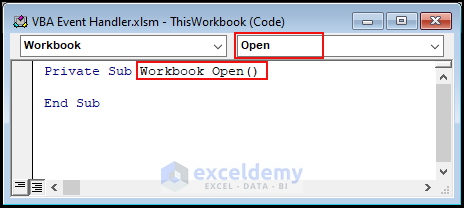
Between these two lines, you can enter your Workbook event handlers, i.e., the VBA code.
Alternatively, you can bring up a module for a sheet.
- Bring up the Microsoft Visual Basic for Applications window like before.
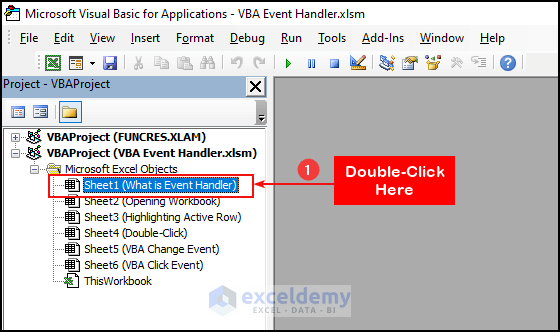
- Double-click on the Sheet Name in which you want to insert the VBA code. In this case, we clicked on Sheet1.
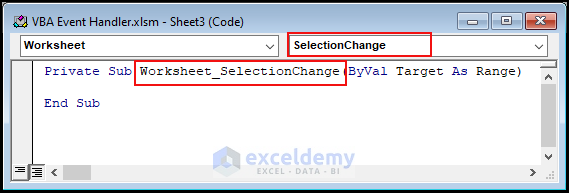
- From the left drop-down, select Worksheet.
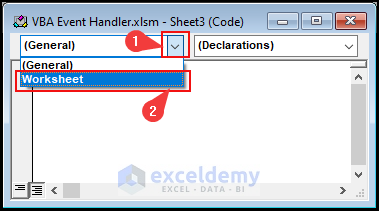
- After selecting Worksheet, the SelectionChange event gets selected automatically by default. Additionally, you can choose any other event from the right drop-down according to your preference.
Event Handler Procedures Have Predefined Names
Every event handler (the procedure or VBA code that controls the event) has a predefined name.
For example, the figure below shows the code module for the Sheet3 worksheet. To get this code module.
- Double-click on Sheet3 (Highlighting Active Row) in Project Explorer.
- Select Worksheet from the left drop-down list,
- Click on the Activate event.
We got a sub-procedure with two statements: the first statement is just the name of the sub-procedure, and the second statement is the End Sub statement, like the following figure.
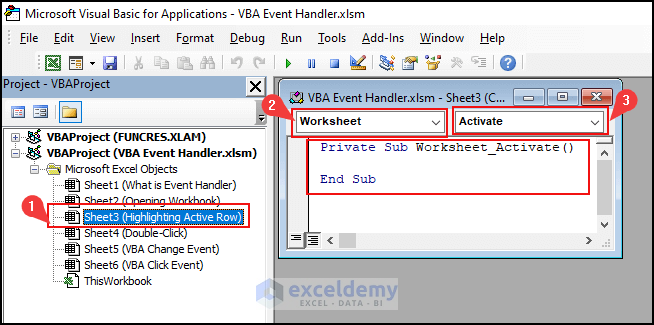
There is no other code inside these two statements. The sub-procedure name is predefined by Excel. We have to write the event handler VBA code between these two lines.
VBA Event Handler: 5 Examples
Example 1 – Opening the Workbook
We want to prompt the user to complete their time tracker each time they open a particular workbook.
Steps:
- Open the VBA window.
- In Project Explorer, double-click on ThisWorkbook.
The Workbook Code Module opens.
- Select Workbook on the left drop-down.
- Choose Open events from the right drop-down.
- The following code appears in the module box automatically.
- Paste the following code into your module.
Private Sub Workbook_Open()
wkd = Weekday(Date)
If wkd = 5 Then MsgBox "Make Sure to Fill the Time Tracker"
End Sub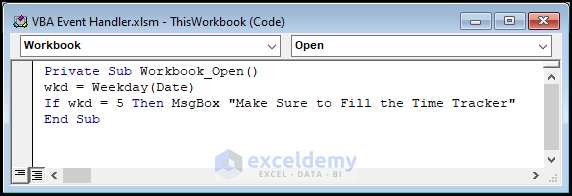
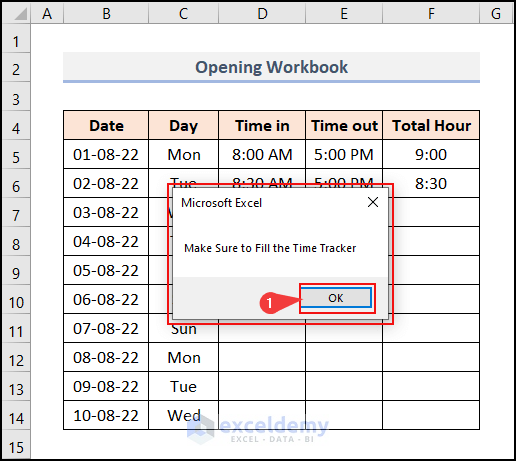
- Once you open the worksheet (on Thursday) that contains this script, a message box containing the desired message Make Sure to Fill the Time Tracker will appear.
- Click OK to remove it from the screen.
Read More: Excel VBA Open Workbook Event
Example 2 – VBA Event Handlers with Arguments
We’ll explain how to work with an event that will display a message when you activate any of the worksheets.
Steps:
- Bring up the ThisWorkbook code module like Example 1.
- Select Workbook from the left drop-down.
- Choose SheetActivate on the left drop-down.
The sub-procedure will automatically get the Sh argument.
- Paste the following code into the module.
Private Sub Workbook_SheetActivate(ByVal Sh As Object)
MsgBox Sh.Name & “ was activated. ”
End Sub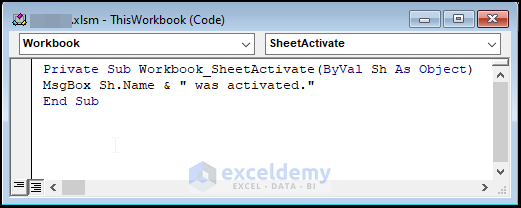
This procedure has one argument: Sh. The Sh represents the activated sheet; it means that if you activate Sheet2, the value of Sh will be Sheet2; if you activate Sheet5, the value of Sh will be Sheet5, and so on. The Sh is declared as an Object.
The above code makes use of information passed through the argument Sh. The code finds out the name of the worksheet by accessing the argument’s Name property.
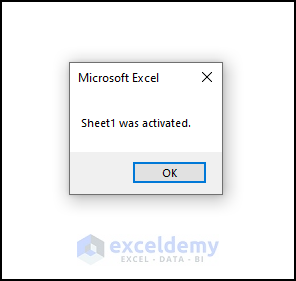
- Open the working file after downloading it.
- Move from one worksheet to another.
- Excel will display the name of the activated worksheet like the following image.
Example 3 – VBA Event Handler with Boolean Arguments
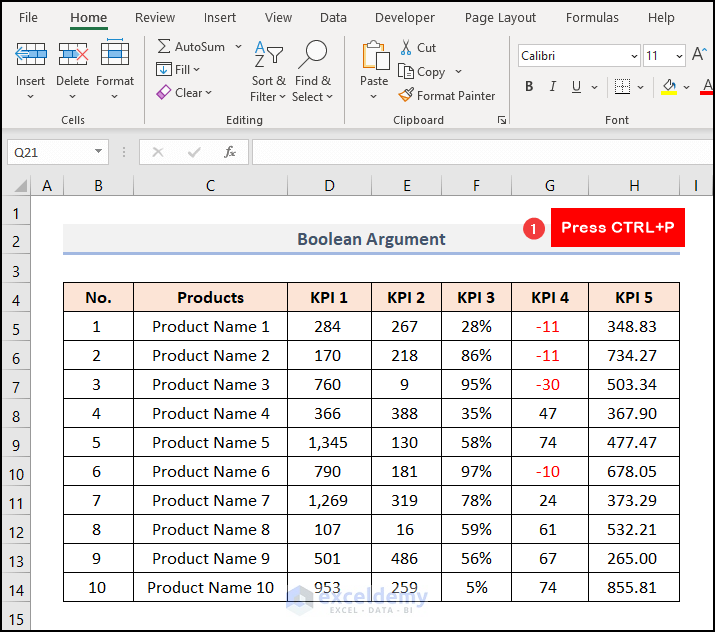
Some event-handler procedures have a Boolean argument called Cancel. For example, you can use a pop-up message that will display some information when you want to print something related to your workbook.
Steps:
- Open the ThisWorkbook code module.
- Insert the following code.
Private Sub Workbook_BeforePrint(Cancel As Boolean)
Msg = "Have you checked your printer connection?"
Ans = MsgBox(Msg, vbYesNo, "About to print...")
If Ans = vbNo Then Cancel = True
End Sub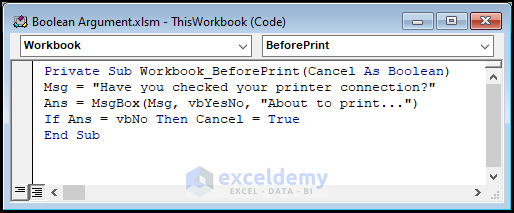
The default value of Cancel is FALSE. If you can make the value of Cancel to TRUE then the printing will be canceled.
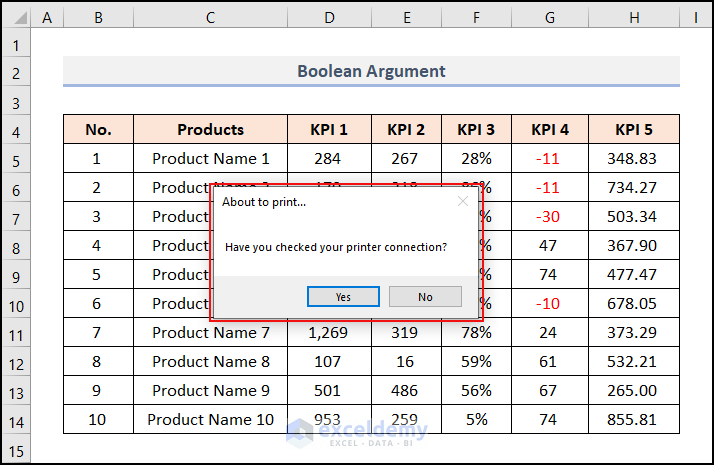
The Workbook_BeforePrint procedure executes just before the workbook prints. When you try to print something, this event handler procedure will display a message to let you know whether you have checked the printer connection. If you press Yes (Cancel is FALSE), printing will start; if you press No (Cancel is TRUE), nothing will be printed.
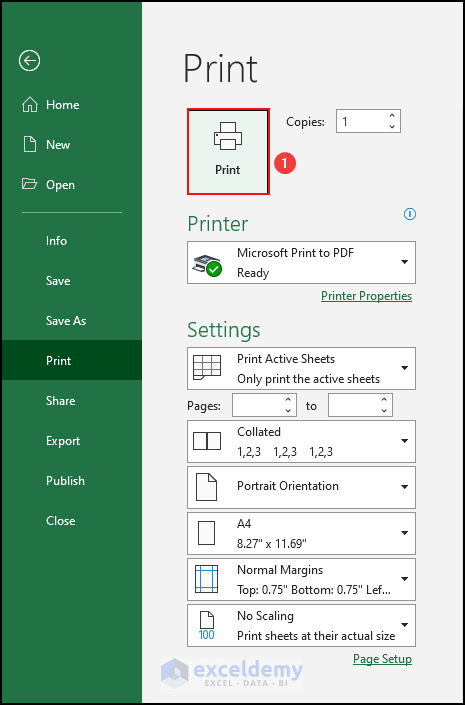
- Press Ctrl + P.
- Click on Print to print the document.
You will find a message box like the following image.
Example 4 – Highlighting the Active Row
Steps:
- Open the code module, like before.
- Put the following code into the module.
Sub Worksheet_SelectionChange(ByVal Target As Excel.Range)
Static xRow
If xRow <> "" Then
With Rows(xRow).Interior
.ColorIndex = xlNone
End With
End If
Active_Row = Selection.Row
xRow = Active_Row
With Rows(Active_Row).Interior
.ColorIndex = 6
.Pattern = xlSolid
End With
End Sub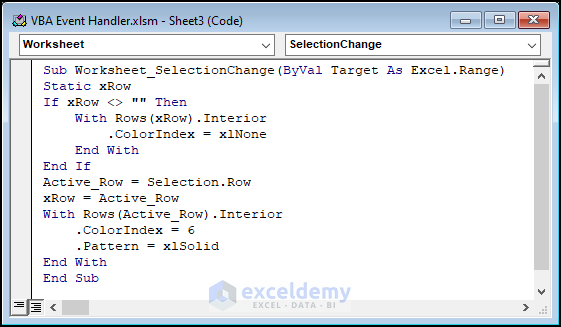
- Return to the worksheet.
- Select cell E7.
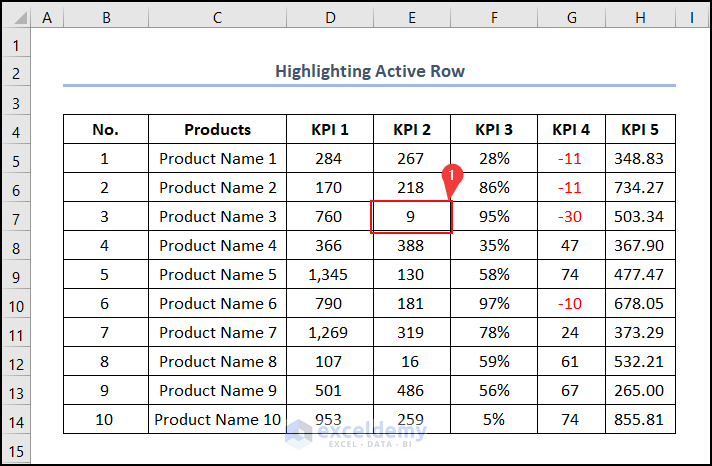
The whole Row 7 gets highlighted in one click.

Example 5 – Using Double-Click
Steps:
- Bring up the code module like before.
- Paste the following code into the module.
Private Sub Worksheet_BeforeDoubleClick(ByVal Target As Range, Cancel As Boolean)
Cancel = True
With Target
.Interior.Color = vbYellow
.Font.Color = vbBlack
.Font.Bold = True
End With
End Sub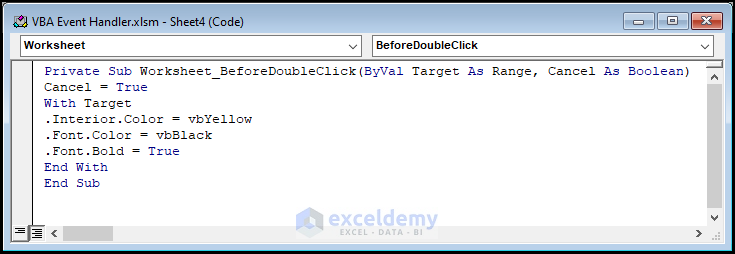
The above code does the following things:
When you double-click on a cell, it will apply a yellow background color to the cell. Also, it makes the font color black and makes the font Bold.
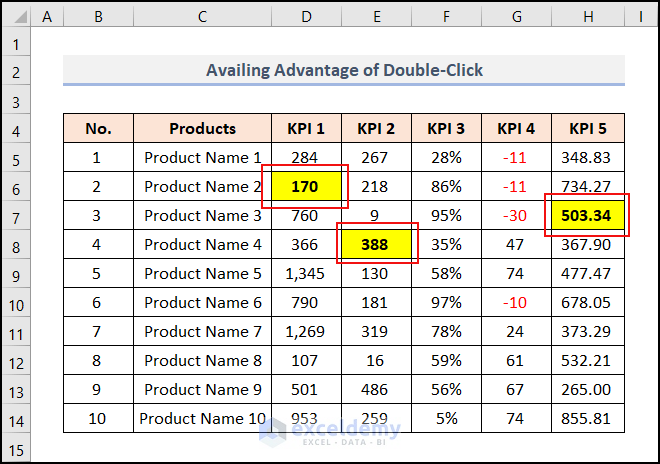
- Double-click on cells D6, E8, and H7, one after one.
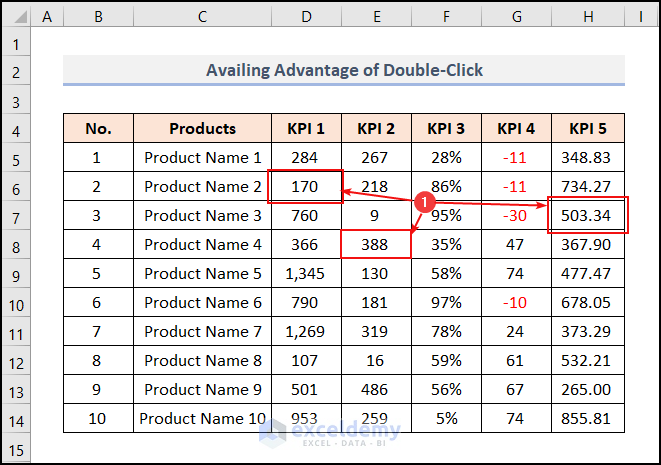
We can see these cells get changed just by clicking.
The Negative Impact of the Event Handler on the Undo Stack
Excel continuously tracks your actions while you work. You can always use Ctrl + Z to return to the earlier step if you make a mistake. You can go back two steps by pressing Ctrl + Z twice. The Undo stack contains a record of the actions you’ve taken.
If any event handler changes the worksheet, it can’t be undone by pressing Ctrl + Z. So, the undo stack gets disabled at this time.
Steps:
- Press Ctrl + Z to undo the highlighting of the cell and get Bold of the fonts.
Nothing happened this time. The cells remain unchanged.
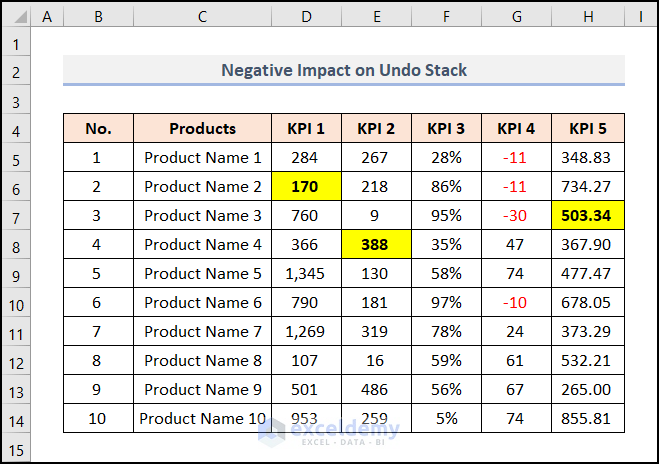
- Select cell D9.
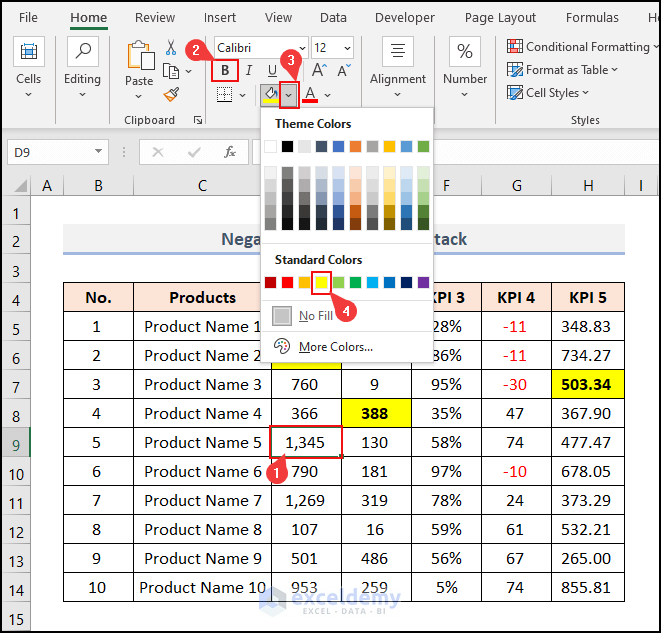
- Make the font Bold.
- Click on the Fill Color dropdown.
- Select Yellow as the background color.
We made these changes manually instead of using the VBA event.
The cell looks like the one below.
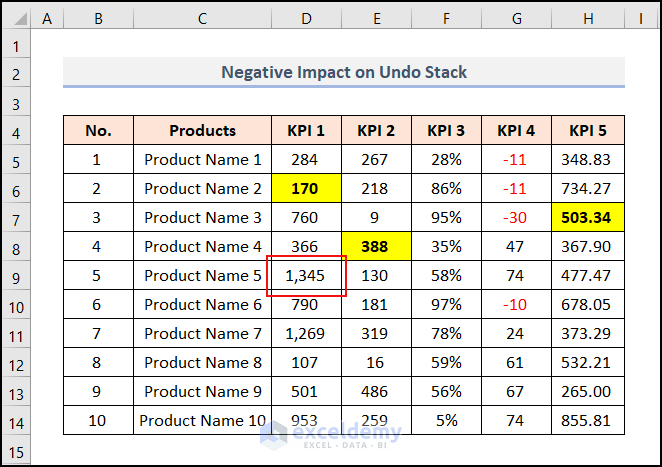
- Press Ctrl + Z on your keyboard.
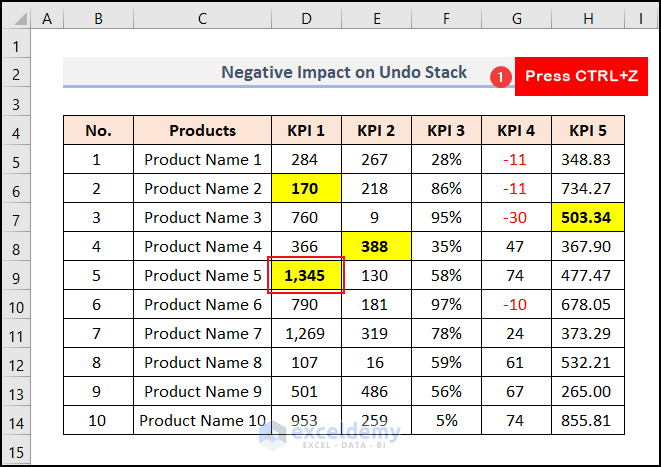
The actions get undone.
VBA Change Event
When some changes happen in a cell, the Change event gets triggered.
Steps:
- Open the code module like before.
- Paste the code into that module.
Private Sub Worksheet_Change(ByVal Target As Range)
MsgBox Target.Address
MsgBox Target.Value
End Sub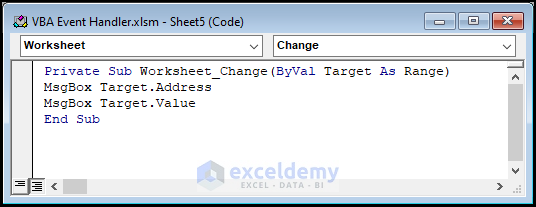
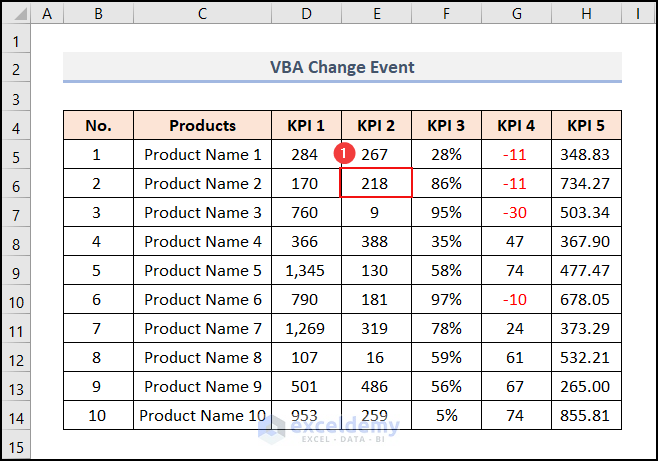
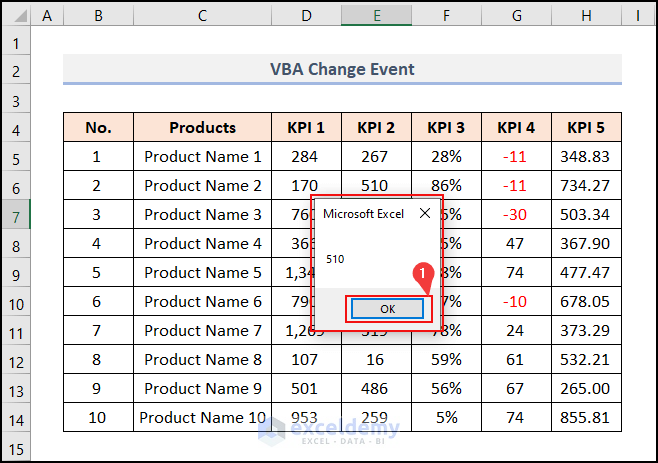
- Select cell E6. The cell value is 218.
- Change the cell value to 510.
- Press Enter.
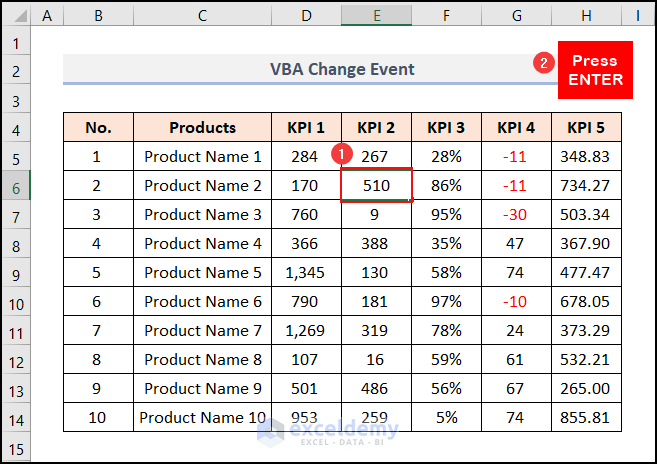
- As soon as the change gets placed, Excel shows a MsgBox with the cell address E6.
- Click OK.
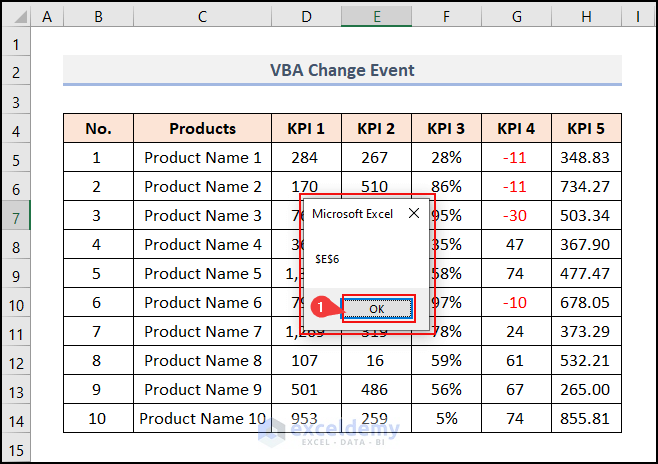
- Another MsgBox appears with a changed cell value of 510.
- Click OK to get rid of the box.
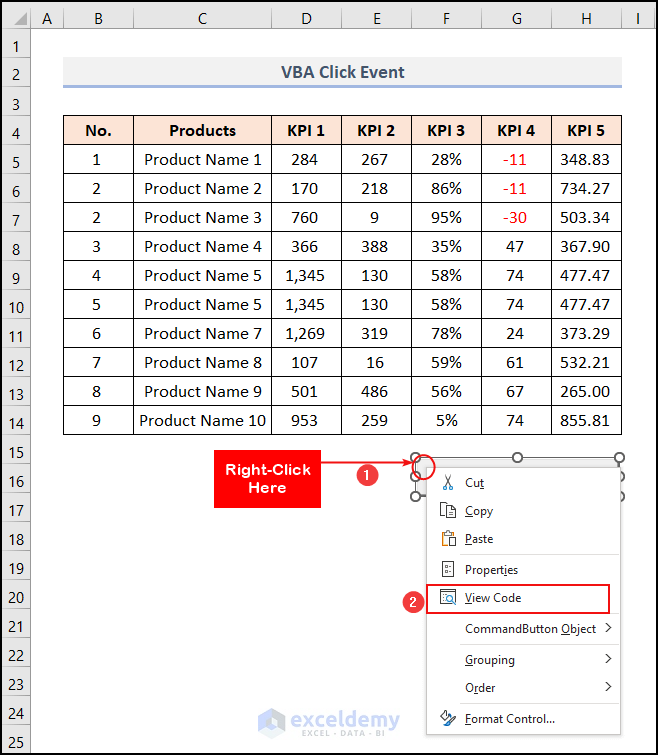
VBA Click Event
When you click on the Command Button, the event triggers.
Steps:
- Go to the Developer tab.
- Click the Insert drop-down on the Controls group.
- Select Command Button (ActiveX Control).
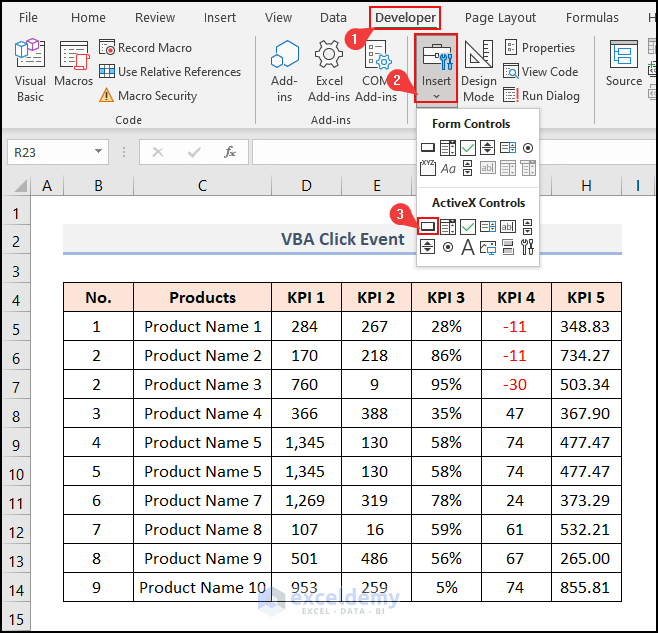
- Drag the cursor like in the image below to place the button into the sheet.
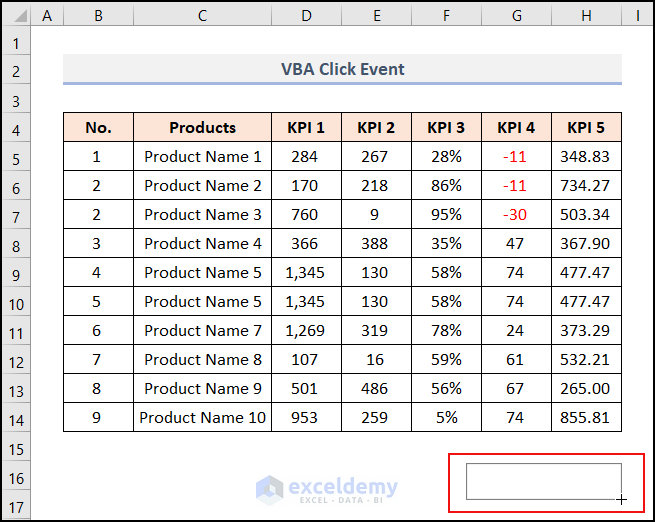
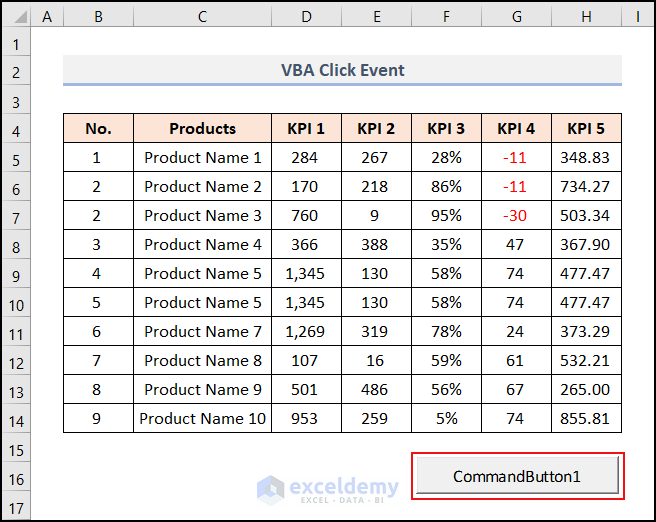
Here is our CommandButton1 on the worksheet.
- Right-click on the button to open the context menu.
- Select View Code from the options.
The code module window appears.
- Place the following code into the module.
Private Sub CommandButton1_Click()
Range("B10:H10").ClearContents
End Sub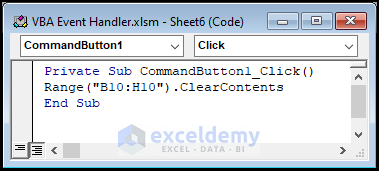
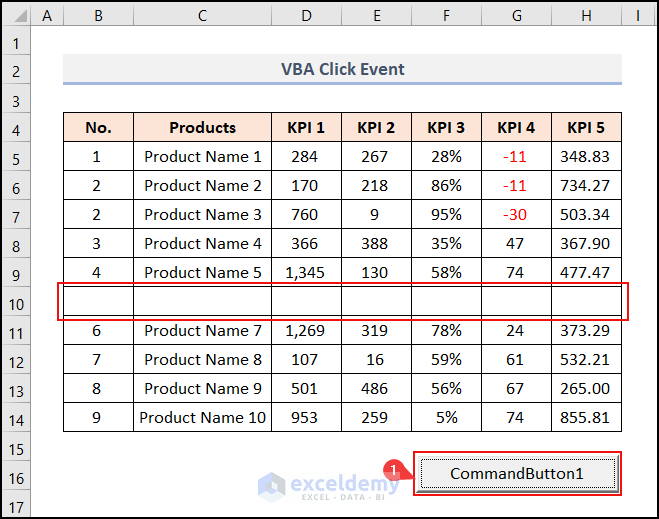
- When you click the CommandButton1, the contents in the B10:H10 range get cleared.
Download the Practice Workbooks
Related Articles
- Excel VBA: Workbook Level Events and Their Uses
- How to Create Calendar Using VBA in Excel
- How to Use VBA OnKey Event in Excel
- Excel VBA Events

