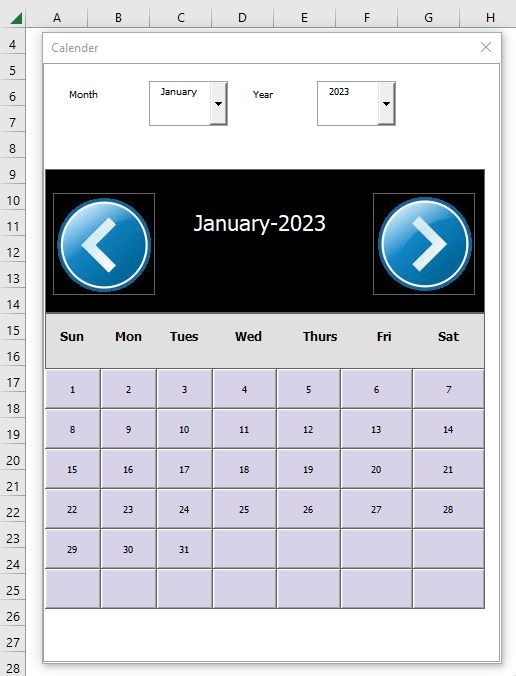
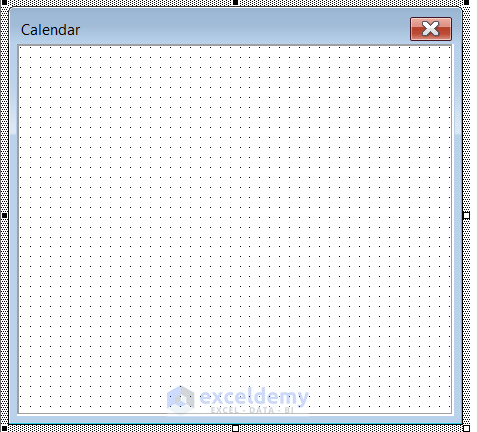
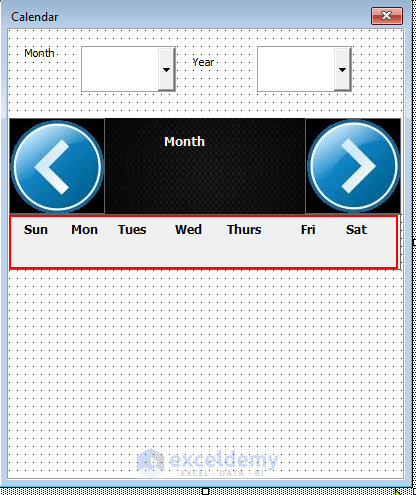
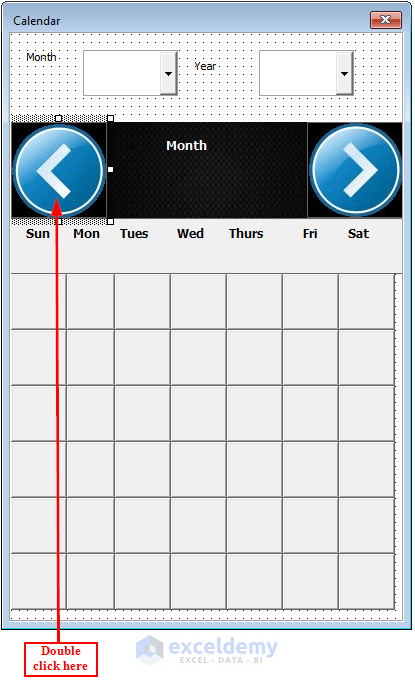
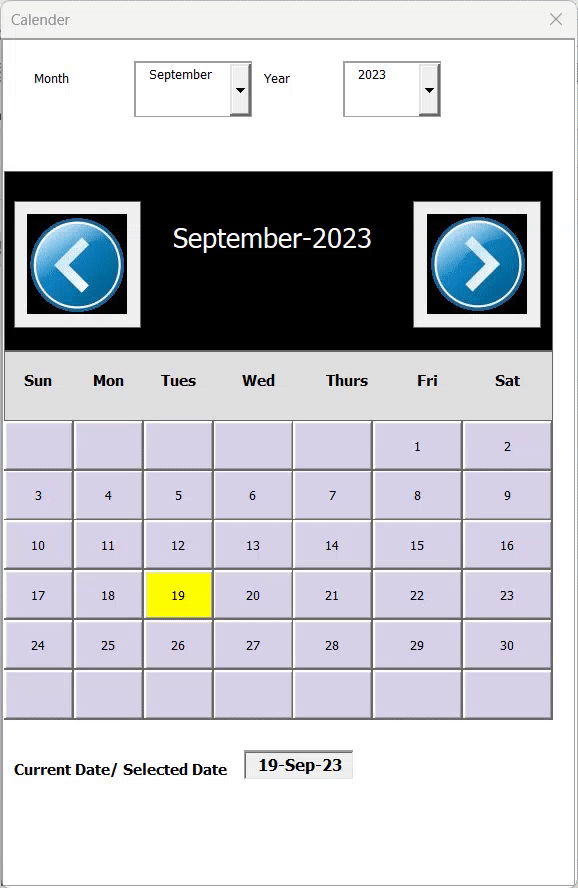
Here’s the overview of the calendar we’re going to create.
Step 1 – Preparing an Outline of the Calendar with a UserForm and VBA in Excel
- Go to the Developer tab and select Visual Basic.
- This will bring out the VBA Editor window.
- You can also press Alt + F11 keys to bring out the VBA Editor window.

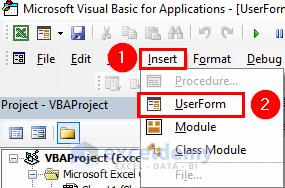
- From the Insert tab, select UserForm.
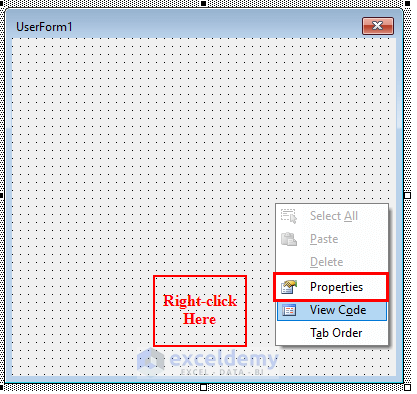
- You will see the UserForm.
- Right-click on the UserForm and select Properties.
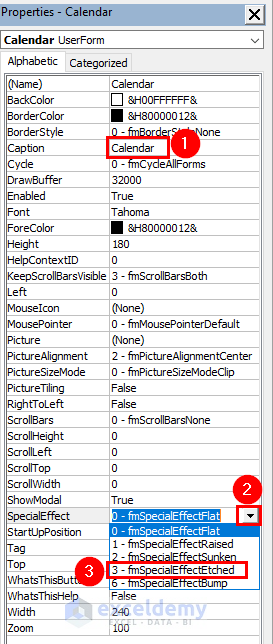
- A Properties window will appear on the right side of the UserForm.
- Set the Name. You can set any Name, but we put the name Calendar.
- Click on the drop-down arrow of the BackColor box.
- From Palette, select White.

- Set the Caption as Calendar.
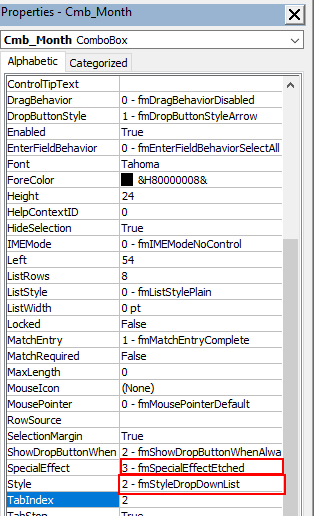
- Click on the drop-down arrow of the SpecialEffect box.
- Select 3-fmSpecialEffectEtched.
- The outer template of the Excel VBA Calendar is ready.
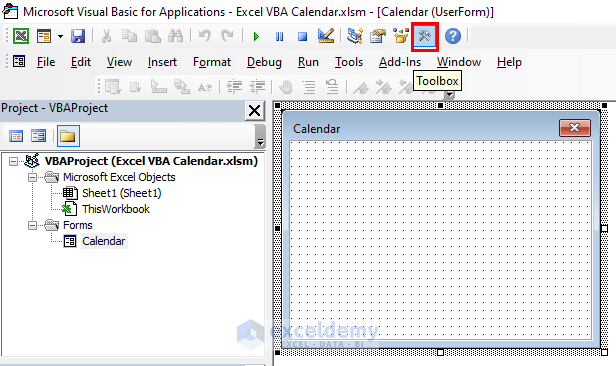
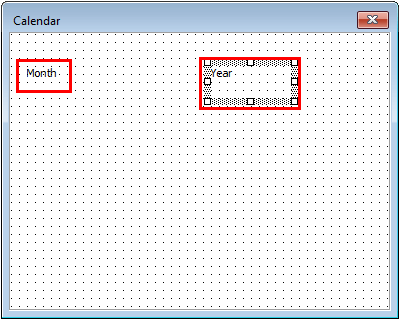
Step 2 – Inserting Labels into the Outline
- Click on the Toolbox.
- Select a Label from the Toolbox and draw the label in the Calendar.
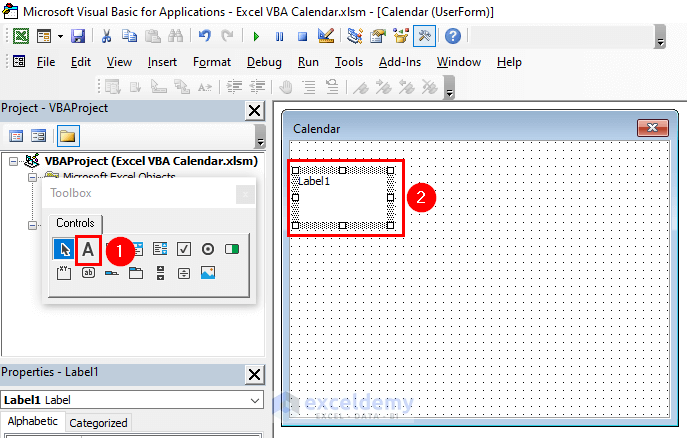
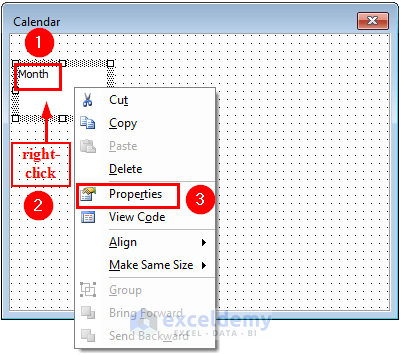
- We have named the label Month.
- Right-click on Month and select Properties.
- In the Properties window, click on the drop-down arrow of the BorderColor box.
- Select 0-fmBackstyleTransparent.
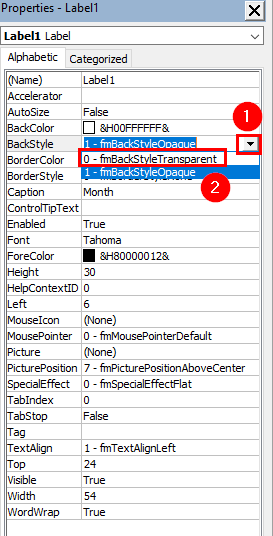
- We inserted the Year label in the same way.
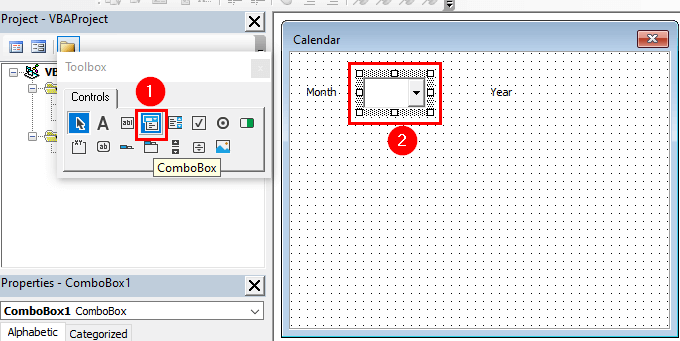
Step 3 – Adding ComboBoxes
- Select a ComboBox from the Toolbox.
- Draw the ComboBox next to Month.
- Right-click on the ComboBox and select Properties.

- In the Properties window, set the Name as Cmb_Month.
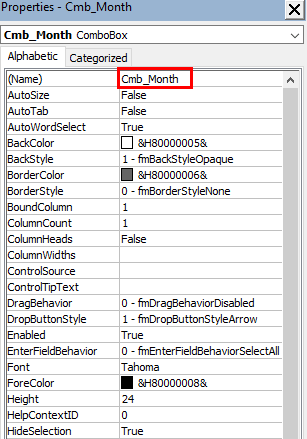
- Select 3-fmSpecialEfectEtched as the SpecialEffect.
- Select 2-fmStyleDropDownList as the Style.
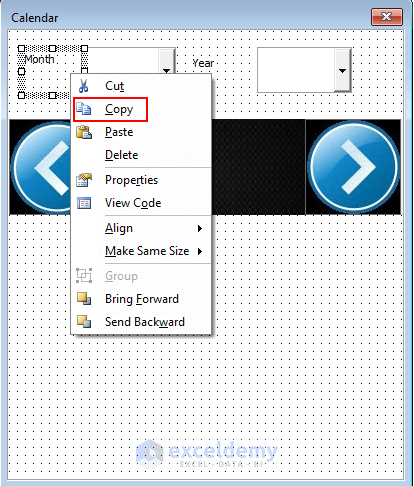
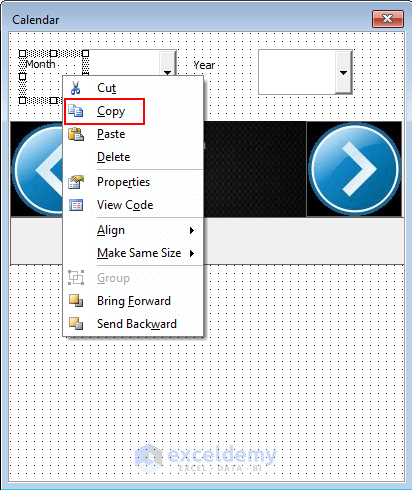
- Copy the ComboBox by right-clicking on it and selecting Copy.
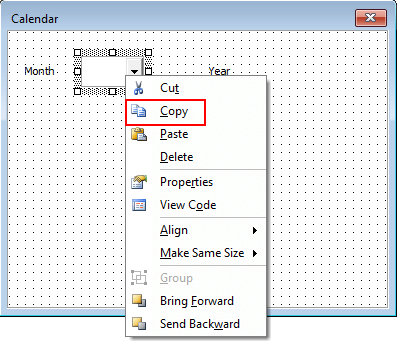
- Paste the copied ComboBox next to the Year label.
- Right-click on the ComboBox and select Properties.
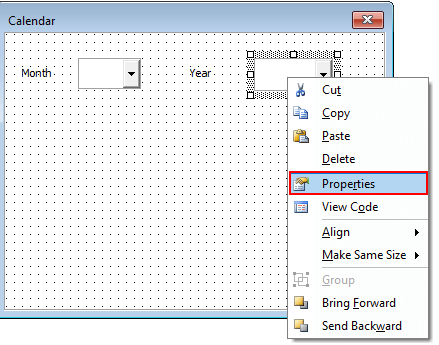
- A Properties window will appear.
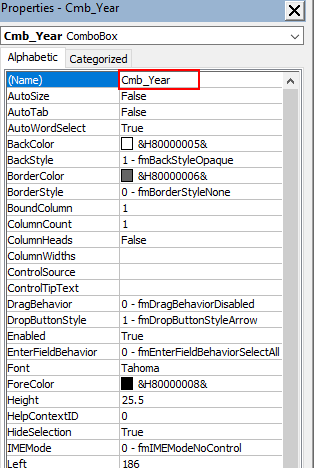
- Set the Name as Cmb_Year.
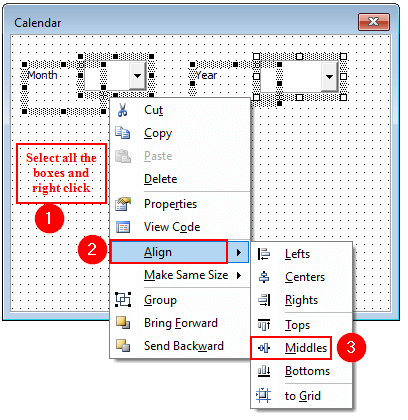
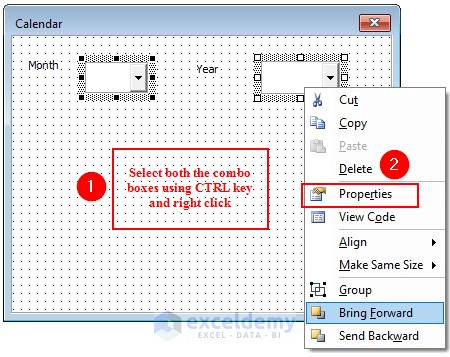
- Select all the labels and ComboBoxes by pressing the Ctrl key.
- Right-click on them.
- From the Align group, we will select Middles.
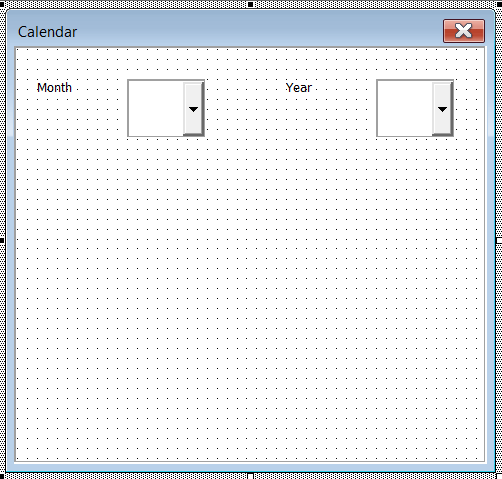
- Here’s the result.
Step 4 – Inserting Code for the ComboBoxes
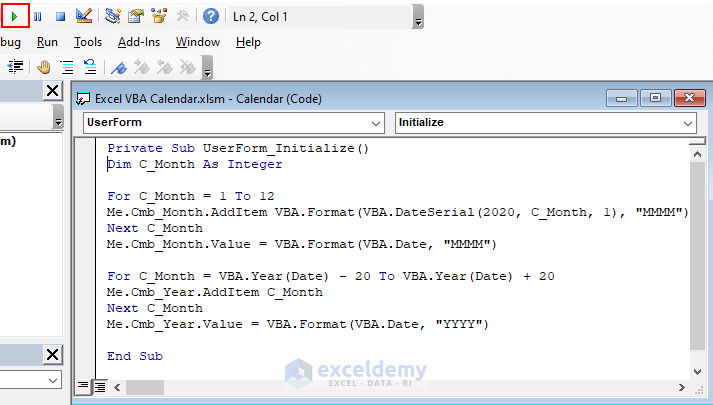
- Double-click anywhere on the Calendar.
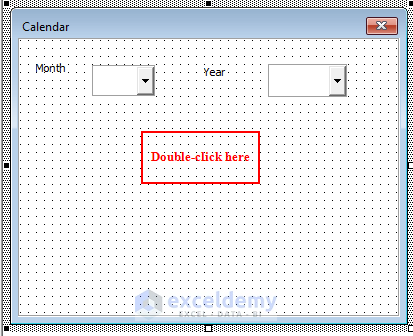
- A Module to write code will appear.
- Insert the following code.
Private Sub UserForm_Initialize()
Dim C_Month As Integer

For C_Month = 1 To 12
Me.Cmb_Month.AddItem VBA.Format(VBA.DateSerial(2020, C_Month, 1), "MMMM")
Next C_Month
Me.Cmb_Month.Value = VBA.Format(VBA.Date, "MMMM")

For C_Month = VBA.Year(Date) - 20 To VBA.Year(Date) + 20
Me.Cmb_Year.AddItem C_Month
Next C_Month
Me.Cmb_Year.Value = VBA.Format(VBA.Date, "YYYY")

End Sub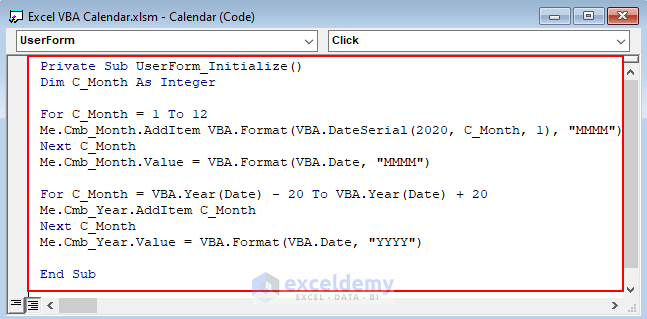
- Save the code.
- Return to the Calendar, and select the ComandBoxes while holding the Ctrl key.
- Right-click and select Properties.
 Select 20 for ListRows.
- This will display all the months at once and we do not need to scroll down to see all the months.

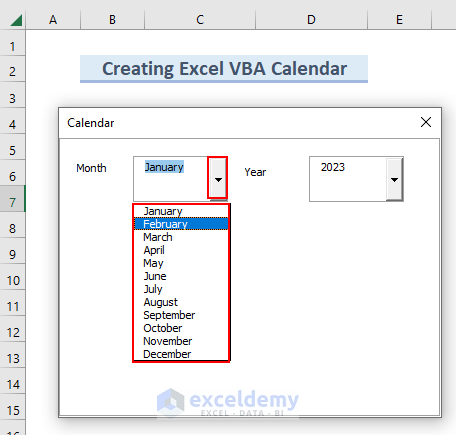
- Run the code.
- The current month will appear.
- You can click on the drop-down arrow and select any other month.
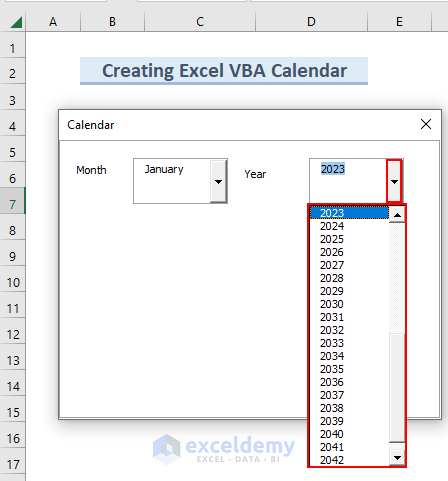
- You can click on the drop-down arrow for Year and select a value.
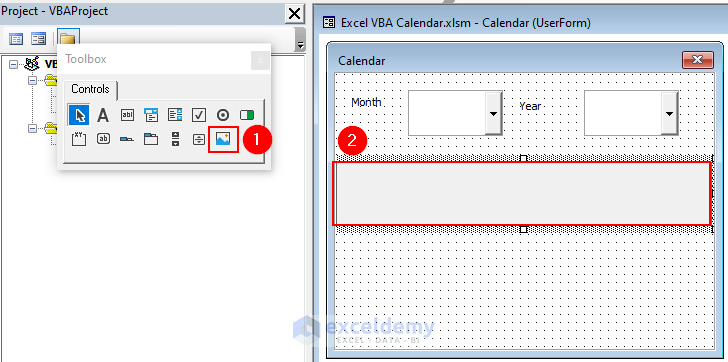
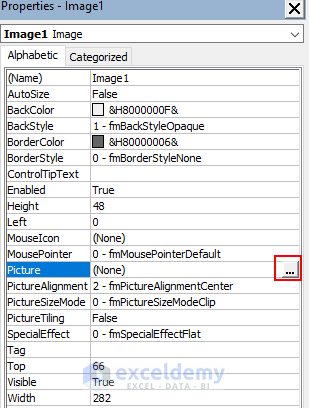
Step 5 – Inserting Images
- Select Image from the ToolBox.
- Draw the image box.
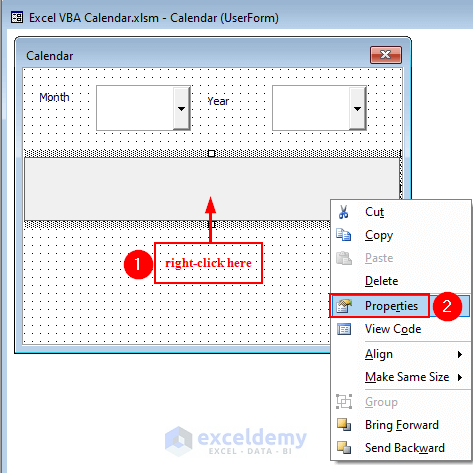
- Right-click on the image box and select Properties.
- Select 0-fmBorderStyleNone as the BorderStyle.
- Select a Picture.
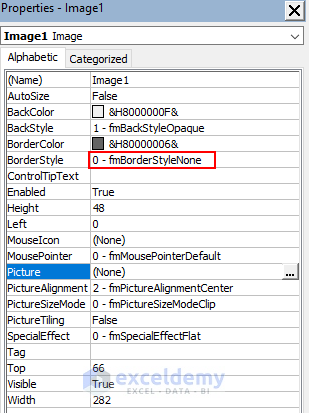
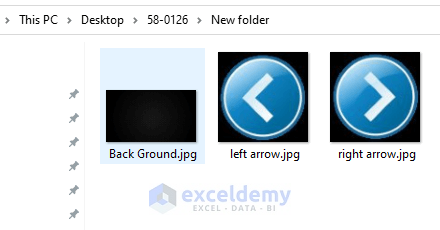
- We have three pictures in a specific folder. You can use any pictures you want.
Note: Your pictures must be in the .jpg format. Also, you must resize your pictures or they default to a big size which will be inconvenient.
- In the Picture box, click on the three dots to insert an image.
- We selected the Back Ground image and clicked Open.
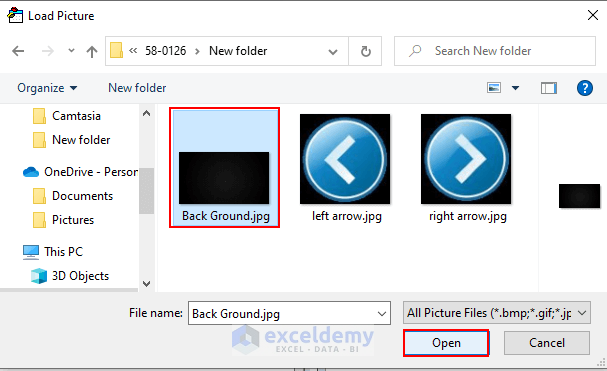
- You can see the Picture in the Image box.
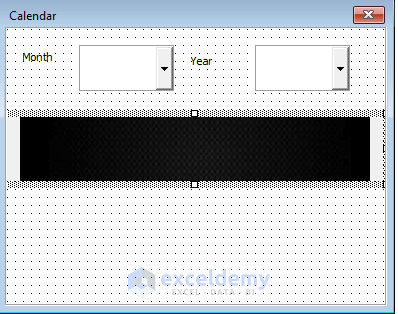
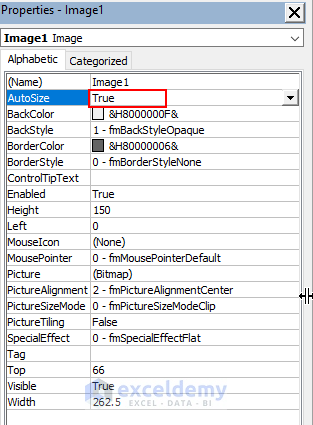
- In the Properties box, select True for AutoSize.
- Add the Right arrow and Left arrow pictures.
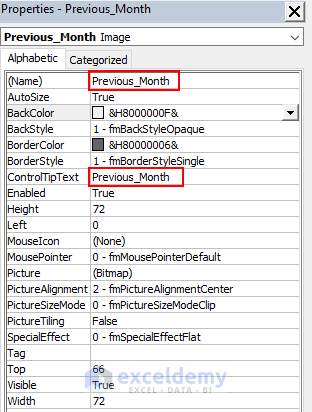
- Click on the Left arrow.
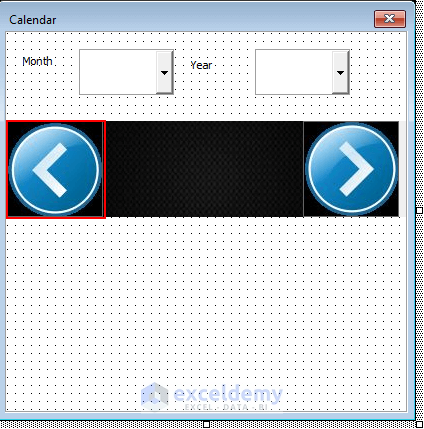
- This will open a Properties box.
- Set the Name as Previous_Month.
- Set the ControlTipText as Previous_Month.
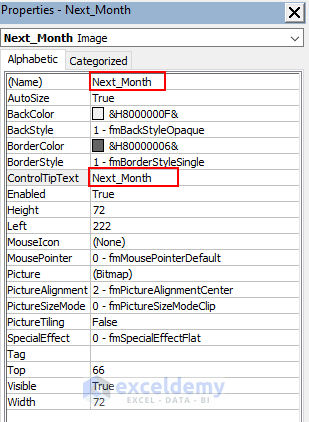
- Click on the Right arrow.

- This will open a Properties box.
- Set the Name as Next_Month.
- Set the ControlTipText as Next_Month.
Step 6 – Adding Month and Day Names
- Copy the Month label.
- Paste the Month into the calendar.
- Right-click on the Month and select Properties.

- Set the Name as Month_Name.
- Choose a White ForeColor.
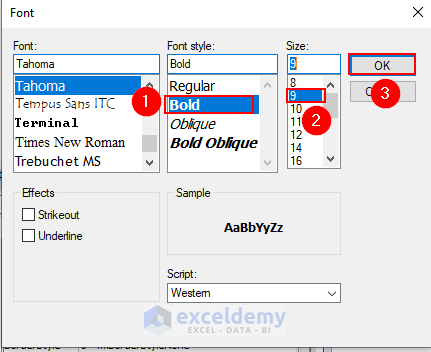
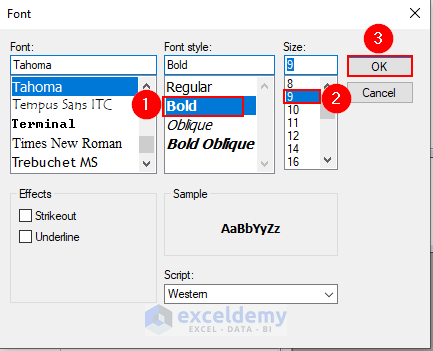
- Click on the Font box.
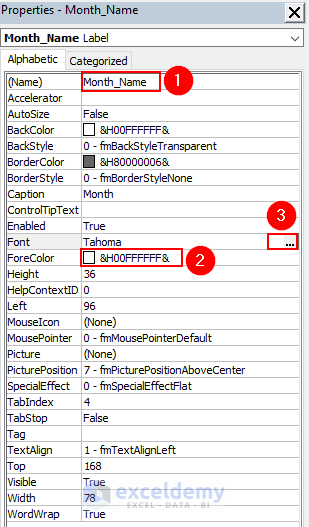
- Select Bold as the Font Style, choose Size 9, and click OK.
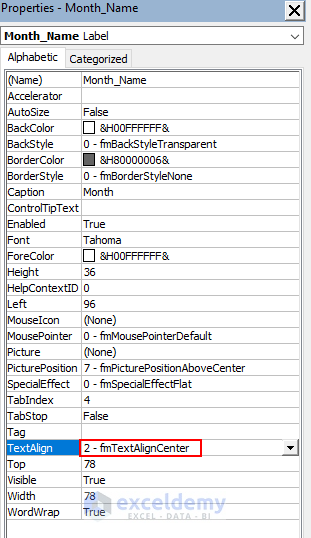
- Select Center for TextAlign.
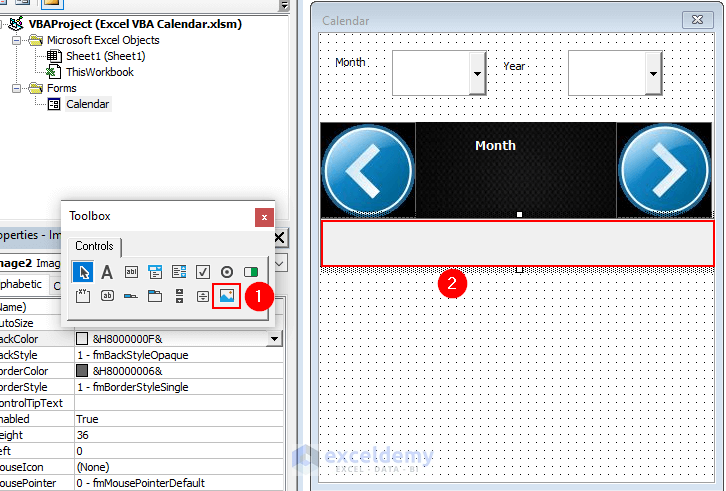
- Place the Month between the Left and Right arrow.
- From the Toolbox, select an Image. We placed the Image like the following picture.
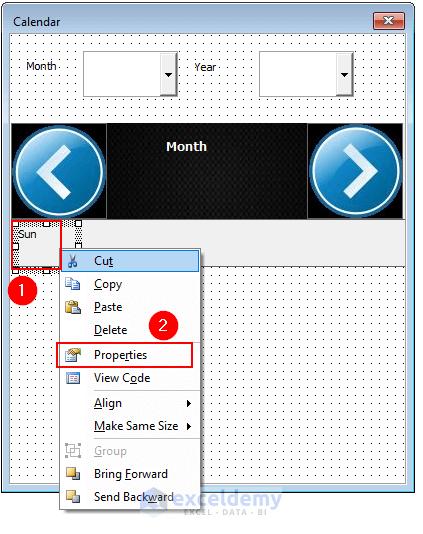
- Copy the Month label.
- Paste the Month in the image box and edit the name as Sun to indicate Sunday.
- Right-click on Sun and select Properties.
- Select Center for TextAlign.
- Click on the Font box.
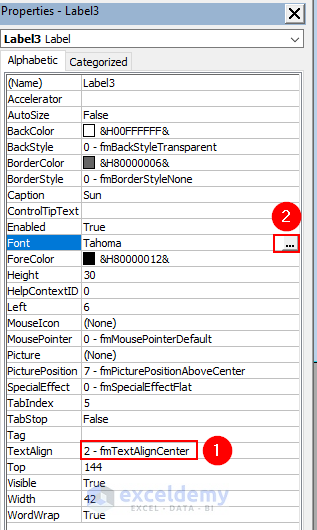
- Select Bold as the Font Style, choose Size 9, and click OK.
- We have added other days of the week by repeating the process.
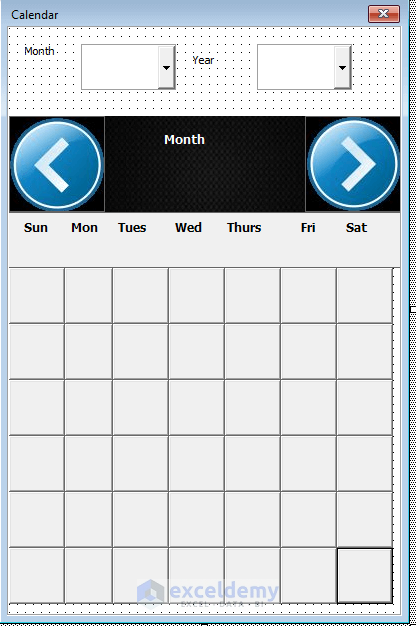
Step 7 – Adding CommandButtons
- From the Toolbox, select CommandButton.
- Draw the CommandButton under the days.
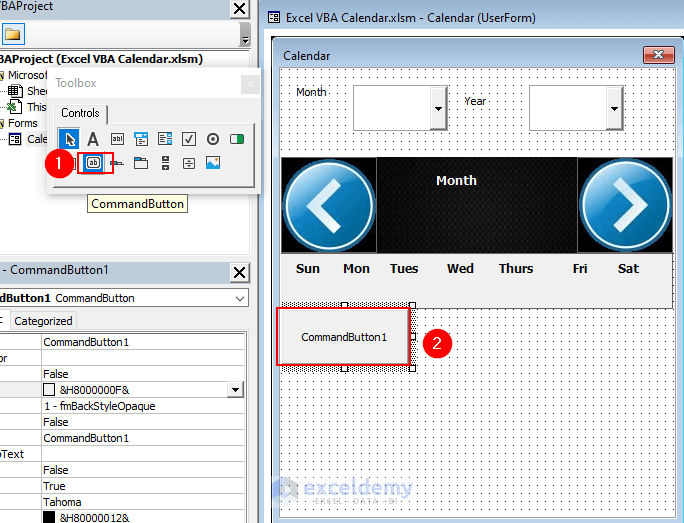
- Delete the name of the CommandButton.

- Draw 41 more Command Buttons.
- These commandbuttons will indicate the dates.
Note: You must insert the command button serially. Otherwise, the calendar will not run properly.
Step 8 – Inserting Codes for CommandButtons
- Double-click on the empty space in the Excel VBA Calendar.
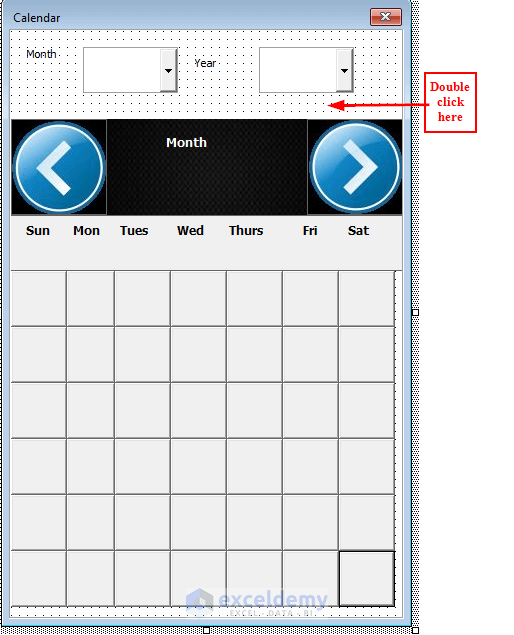
- Insert the following code.
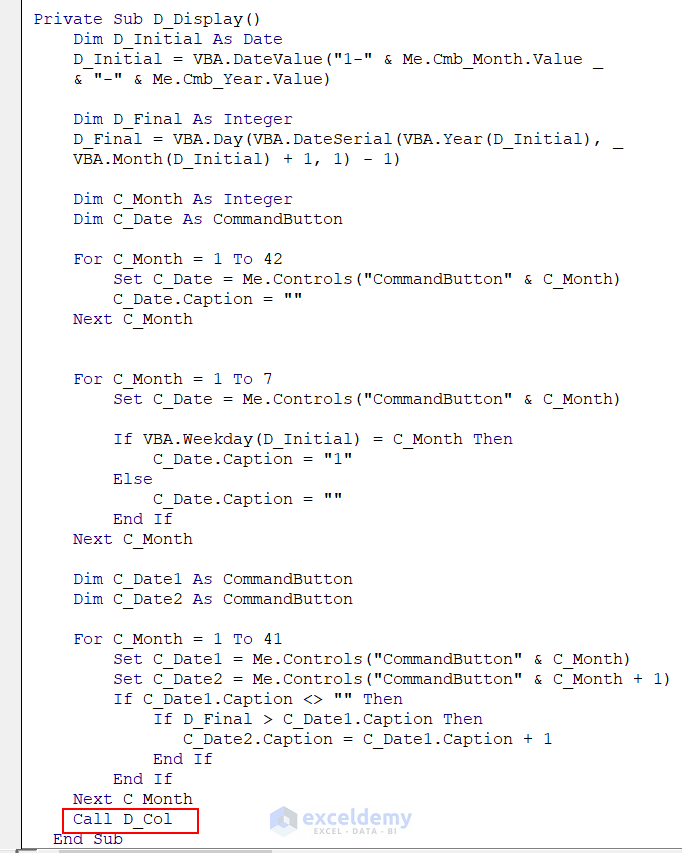
Private Sub D_Display()

 Dim D_Initial As Date
 D_Initial = VBA.DateValue("1-" & Me.Cmb_Month.Value _
 & "-" & Me.Cmb_Year.Value)

 Dim D_Final As Integer
 D_Final = VBA.Day(VBA.DateSerial(VBA.Year(D_Initial), _
 VBA.Month(D_Initial) + 1, 1) - 1)

 Dim C_Month As Integer
 Dim C_Date As CommandButton

 For C_Month = 1 To 42
  Set C_Date = Me.Controls("CommandButton" & C_Month)
  C_Date.Caption = ""
 Next C_Month

 For C_Month = 1 To 7
  Set C_Date = Me.Controls("CommandButton" & C_Month)
   If VBA.Weekday(D_Initial) = C_Month Then
 C_Date.Caption = "1"

  Else
    C_Date.Caption = ""
 End If

 Next C_Month

  Dim C_Date1 As CommandButton
  Dim C_Date2 As CommandButton

 For C_Month = 1 To 41
 Set C_Date1 = Me.Controls("CommandButton" & C_Month)
 Set C_Date2 = Me.Controls("CommandButton" & C_Month + 1)

 If C_Date1.Caption <> "" Then
 If D_Final > C_Date1.Caption Then
 C_Date2.Caption = C_Date1.Caption + 1

    End If
 End If
  Next C_Month
End Sub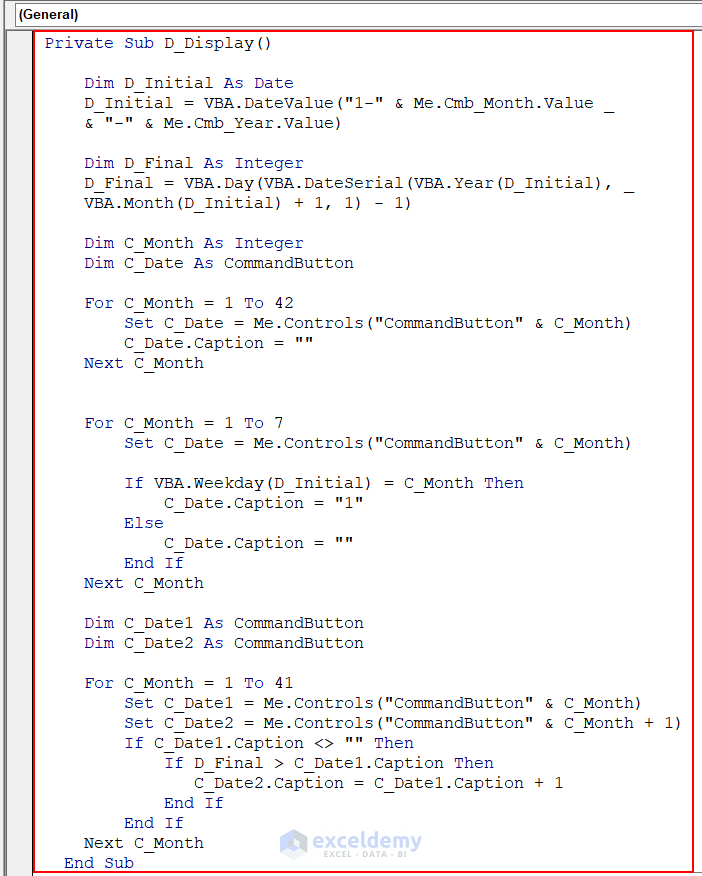
- Run the code.
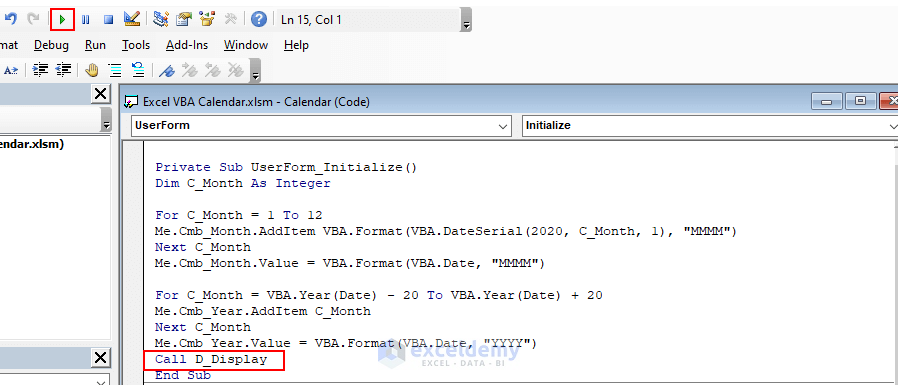
- The Calendar is looking better. You can also see the dates in the Command Buttons.
- The dates are fixed for the month of January and the year 2023.
- To make the calendar dynamic, insert the following code in the UserBox module.
Private Sub Cmb_Month_Change()
If Me.Cmb_Month.Value <> "" And Me.Cmb_Year.Value <> "" Then
  Call D_Display
  Me.Month_Name.Caption = Me.Cmb_Month & "-" & Me.Cmb_Year
 End If

End Sub

Private Sub Cmb_Year_Change()
If Me.Cmb_Month.Value <> "" And Me.Cmb_Year.Value <> "" Then
    Call D_Display
    Me.Month_Name.Caption = Me.Cmb_Month & "-" & Me.Cmb_Year
End If

End Sub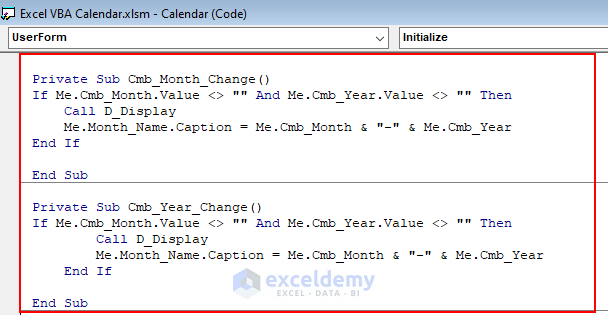
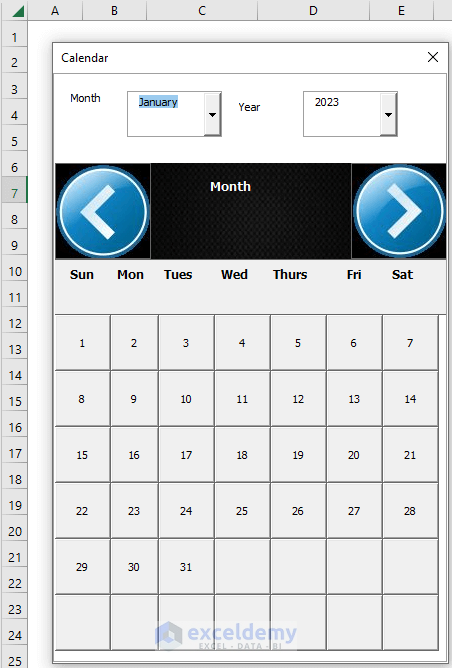
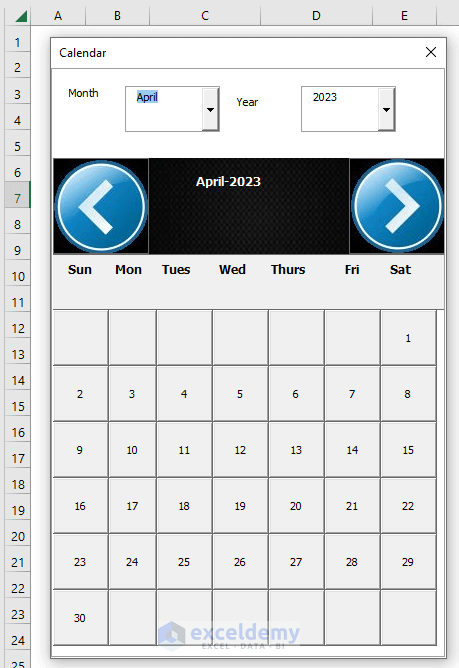
- Run the code.
- Change the month to April.
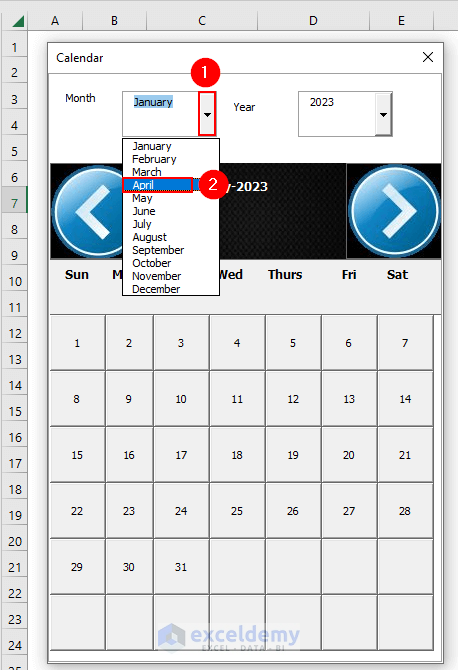
- You can see the calendar for April 2023. You can also change the Year.
Step 9 – Using Code for the Left and Right Arrows
- Double-click on the Right arrow.
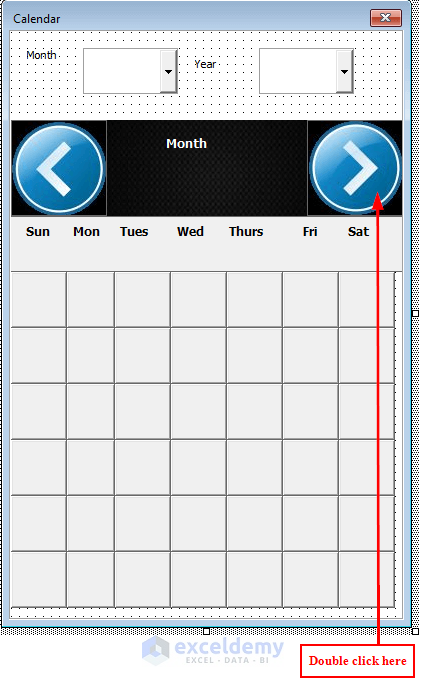
- Insert the following code.
Private Sub Next_Month_Click()
  On Error Resume Next
 If Me.Cmb_Month.ListIndex = 11 Then
    Me.Cmb_Month.ListIndex = 0
   Me.Cmb_Year.Value = Me.Cmb_Year.Value + 1
Else
   Me.Cmb_Month.ListIndex = Me.Cmb_Month.ListIndex + 1
 End If
End Sub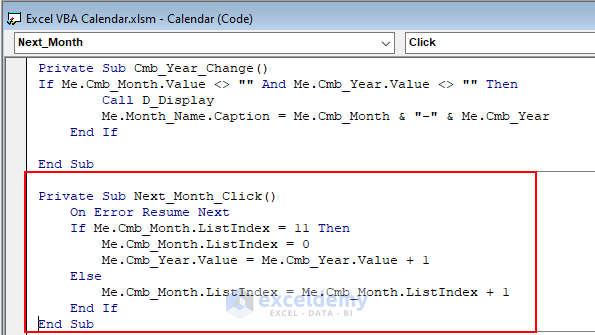
- Double-click on the Left arrow.
- Insert the following code.
Private Sub Previous_Month_Click()
  On Error Resume Next
  If Me.Cmb_Month.ListIndex = 0 Then
    Me.Cmb_Month.ListIndex = 11
  Me.Cmb_Year.Value = Me.Cmb_Year.Value - 1
 Else
  Me.Cmb_Month.ListIndex = Me.Cmb_Month.ListIndex - 1
  End If
End Sub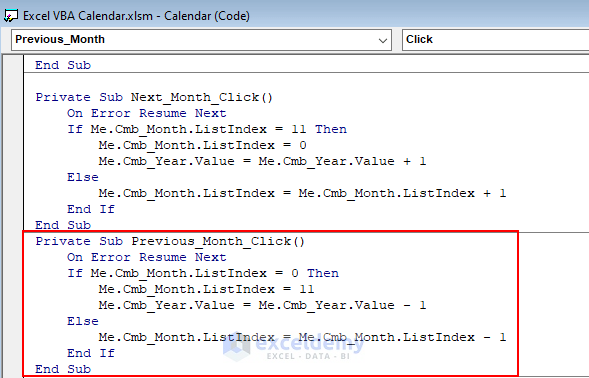
- Run the code.
- Click on the Left arrow.
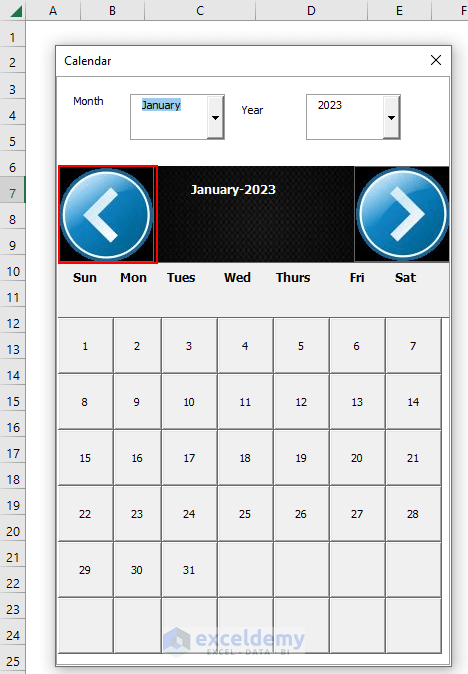
- The previous month will be shown.

- Click on the Right arrow.
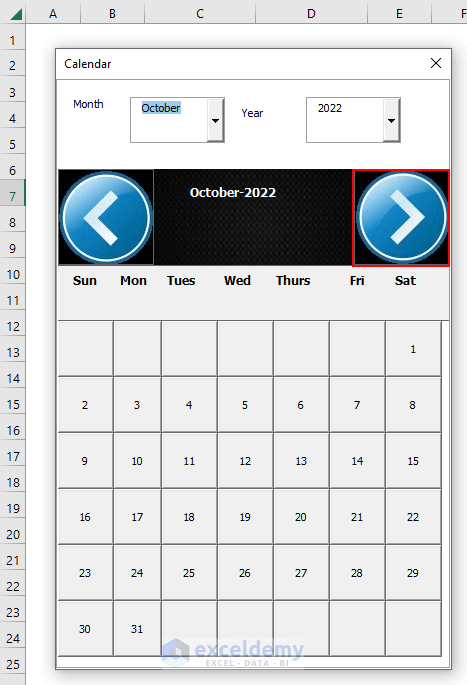
- The next month will be shown.

Step 10 – Adding Colors
- Add the following code at the end of the previous code.
Sub D_Col()

Dim C_Month As Integer
Dim C_Date As MSForms.CommandButton
For C_Month = 1 To 42
Set C_Date = Me.Controls("CommandButton" & C_Month)
C_Date.BackColor = VBA.RGB(217, 210, 233)
C_Date.Enabled = True
 Next C_Month
End Sub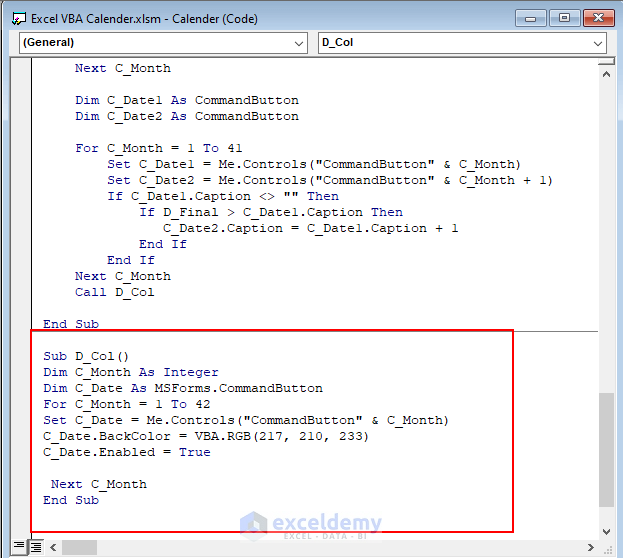
- Add Call D_Col to the code that is under the D_Display sub.
- Here’s the resulting code.
Private Sub Cmb_Month_Change()
If Me.Cmb_Month.Value <> "" And Me.Cmb_Year.Value <> "" Then
Call D_Display
Me.Month_Name.Caption = Me.Cmb_Month & "-" & Me.Cmb_Year
End If
End Sub
Private Sub Cmb_Year_Change()
If Me.Cmb_Month.Value <> "" And Me.Cmb_Year.Value <> "" Then
Call D_Display
Me.Month_Name.Caption = Me.Cmb_Month & "-" & Me.Cmb_Year
End If
End Sub

Private Sub Next_Month_Click()
On Error Resume Next
If Me.Cmb_Month.ListIndex = 11 Then
Me.Cmb_Month.ListIndex = 0
Me.Cmb_Year.Value = Me.Cmb_Year.Value + 1
Else
Me.Cmb_Month.ListIndex = Me.Cmb_Month.ListIndex + 1
End If
End Sub

Private Sub Previous_Month_Click()
On Error Resume Next
If Me.Cmb_Month.ListIndex = 0 Then
Me.Cmb_Month.ListIndex = 11
Me.Cmb_Year.Value = Me.Cmb_Year.Value - 1
Else
Me.Cmb_Month.ListIndex = Me.Cmb_Month.ListIndex - 1
End If
End Sub

Private Sub UserForm_Initialize()
Dim C_Month As Integer
For C_Month = 1 To 12
Me.Cmb_Month.AddItem VBA.Format(VBA.DateSerial(2020, C_Month, 1), "MMMM")
Next C_Month
Me.Cmb_Month.Value = VBA.Format(VBA.Date, "MMMM")
For C_Month = VBA.Year(Date) - 20 To VBA.Year(Date) + 20
Me.Cmb_Year.AddItem C_Month
Next C_Month
Me.Cmb_Year.Value = VBA.Format(VBA.Date, "YYYY")
Call D_Display
End Sub

Private Sub D_Display()
Dim D_Initial As Date
D_Initial = VBA.DateValue("1-" & Me.Cmb_Month.Value _
& "-" & Me.Cmb_Year.Value)
Dim D_Final As Integer
D_Final = VBA.Day(VBA.DateSerial(VBA.Year(D_Initial), _
VBA.Month(D_Initial) + 1, 1) - 1)
Dim C_Month As Integer
Dim C_Date As CommandButton
For C_Month = 1 To 42
Set C_Date = Me.Controls("CommandButton" & C_Month)
C_Date.Caption = ""
Next C_Month
For C_Month = 1 To 7
Set C_Date = Me.Controls("CommandButton" & C_Month)
If VBA.Weekday(D_Initial) = C_Month Then
C_Date.Caption = "1"
Else
C_Date.Caption = ""
End If
Next C_Month
Dim C_Date1 As CommandButton
Dim C_Date2 As CommandButton
For C_Month = 1 To 41
Set C_Date1 = Me.Controls("CommandButton" & C_Month)
Set C_Date2 = Me.Controls("CommandButton" & C_Month + 1)
If C_Date1.Caption <> "" Then
If D_Final > C_Date1.Caption Then
C_Date2.Caption = C_Date1.Caption + 1
End If
End If
Next C_Month
Call D_Col
End Sub

Sub D_Col()
Dim C_Month As Integer
Dim C_Date As MSForms.CommandButton
For C_Month = 1 To 42
Set C_Date = Me.Controls("CommandButton" & C_Month)
C_Date.BackColor = VBA.RGB(217, 210, 233)
C_Date.Enabled = True
Next C_Month
End Sub- Run the code.

Practice Section
You can download the above Excel file and use the template to test it out.
Download the Template
Related Articles
- Excel VBA Events
- How to Use VBA Event Handler
- How to Use VBA OnKey Event in Excel
- Excel VBA Open Workbook Event
- Excel VBA: Workbook Level Events and Their Uses


I got to the point where the dates are fixed in step 8
I added the two codes and when I selected run I got an error message
“Compile errpr:
Ambiguous name detected: Cmb_Month_Change”
Can you please advise?
Kind Regards
Derek Tierney
Dear DEREK TIERNEY,
Thank you for your comment.
After typing the code for the Command Button in Step 8, you have to call the private sub Call D_Display in the previous code. This will solve the problem. If you still face the issue, please attach the Excel file in the comment section.
Best,
Afia Aziz Kona
Very Nice! I used commandbuttons in lieu of inserting images, renamed them as “Previous_Month” and “Next_Month” respectfully. This works really nice! I love that I can mod all of the content to my liking. Now I have a question. I would like to add a few more items to this.
1. I would like to add a Text Box that will load with today’s date, I believe that should be simple enough through the initialize sub.
2. I would like to click on the commandbutton for a date and it will fill in that date into the text box mentioned above.
3. I would like for the commandbutton with the current date to be a different color than the rest. (I am changing the weekend colors so when the current date changes, these need to go back to the original color).
Thanks a lot, MATT, for your comment. If you want to insert a Text Box that will display the current date, and highlight the current date, follow the steps below:
First, draw a Textbox, rename it as “TextBox1”.
You can also insert a Label to show what the Textbox will contain.
Next, go to the D_Col subroutine and modify it in this way:
As whenever any change happens in the userform, this D_Col subroutine is called, so it will always highlight the current date and populate the TextBox1 with the current date.
If you want to populate the TextBox1 with the date of the clicked commandbutton, you need to write event driven subs CommandButton_Click for each of the CommandButtons from CommandButton1 to CommandButton42. Below, I am only giving the CommandButton1_Click sub.
You just need to replace the CommandButton1 with CommandButton2, CommandButton3 and so on for the rest of the CommandButtons.
Now, if you run the UserForm, you will get your desired features.
Here, I am attaching the Excel File with modified UserForm and VBA Codes :VBA UserForm Calender.xlsm
I happily followed this exercise. The initial User Form was successful (after making and correcting a few mistakes along the way).
Following your reply to Matt’s query, I tried modifying the D_Col subroutine. I typed it in manually first, then copy and pasted. Unfortunately, when I try to run it, I get the error message Compile Error: Variable not defined
(i in the line “For i = 1 to 41” was highlighted).
Can you please advise me what I have done wrong.
Thank you.
I’m actually replying to Shamima (sadly no reply link).
Thank you for your fast response. Of course you are absolutely correct. VBA 101. (I’m a slow learner;-))
Additionally, for anyone else like me who’s a little slow, the same applies to the CommandButton code. In this case…
Dim Textbox as Date for each CommandButton
Private Sub CommandButton1_Click()
Dim btn As CommandButton
Dim Date_text As Date
Set btn = Me.ActiveControl
Date_text = btn.Caption & “-” & Cmb_Month.Text & “-” & Cmb_Year.Text
Me.TextBox1.Text = Date_text
The magic works!
Hello Ian Lavell,
You are most welcome. Thank you so much for your feedback! I’m glad the explanation helped, and no worries at all about being a “slow learner”. We all have our own pace, and it’s great that you’re exploring VBA!
You’re absolutely right about applying the same logic to CommandButtons. The code you’ve shared looks great, and it’s fantastic that you’re combining the button caption with the ComboBox values to set the date.
Keep up the great work! Feel free to ask if you need any further clarifications.
Regards
ExcelDemy
Hello Ian Lavell
You are most welcome and thank you for following along! The “Compile Error: Variable not defined” on i likely occurs because the variable i hasn’t been declared.
Try adding Dim i As Integer at the beginning of your code, before the For i = 1 to 41 line. This declares i as an integer, ensuring it’s recognized in the loop. Also, ensure that the rest of the subroutine is correctly typed, and the range/variables are properly referenced.
Regards
ExcelDemy
Thank you so much! It is easy to use and connect to other forms and codes. It is easy to tailor to the specific needs for a calendar. I as the developer have total control over this calendar. I might have been able to develop one myself but it would have taken me a long time and it might not have been so user-friendly.
Hello DanJ,
You are most welcome.
Regards
ExcelDemy
This is fantastic.
Ive used the following to click a cell in my worksheet to open the calendar –
Private Sub Worksheet_SelectionChange(ByVal Target As Range)
If (Target.Count = 1) Then
If Not Intersect(Target, Range(“D75:D80”)) Is Nothing Then Calendar.Show
End If
End Sub
From Matt’s question above, how do I then add the SELECTED DATE into a cell I clicked to open the calendar in the excel sheet?
Thanks Rob.
Hello Rob Devine
Thanks a lot for your kind words. Your appreciation means a lot to us.
You wanted to display the UserForm Calender when you select a single cell from the D75:D80 range and insert the date into the selected cell. Thanks once again for sharing such a practical requirement.
SOLUTION Overview:
To do so, follow these steps:
I have attached the solution workbook for better understanding. I hope the solution will fulfil your needs; good luck.
DOWNLOAD SOLUTION WORKBOOK
Regards
Lutfor Rahman Shimanto
Excel & VBA Developer
ExcelDemy
How do I display the calendar in all cells?
Hello Jack,
To display the calendar in all cells, you need to use VBA to trigger the calendar whenever any cell is selected. Here’s how you can do it:
1. Open the VBA editor (press Alt + F11) and insert the calendar UserForm if you haven’t already.
2. In the sheet module (for example, Sheet1), use the Worksheet_SelectionChange event. This code makes the calendar pop up every time you select a cell on the sheet.
Replace CalendarForm with the actual name of your UserForm.
If you want the calendar to appear only for specific cells (e.g., only in column A), you can adjust the code like this:
Make sure the calendar form is set up to enter the selected date into the active cell, so when a user picks a date, it’s inserted into the cell they clicked.
Note: Showing the calendar for every cell might be intrusive, so you may want to limit it to certain columns or a range.
Explore this article: How to Insert Calendar in Excel Cell
Regards
ExcelDemy
hey, thank you for your tuto ! i inserted this code to the sheet1:
Private Sub Worksheet_SelectionChange(ByVal Target As Range)
If Not Intersect(Target, Range(“A:A”)) Is Nothing Then
CalendarForm.Show
End If
End Sub but i dont know how to set up to enter the selected date into the active cell.
Hello Ava,
You’re welcome! To enter the selected date from the CalendarForm into the active cell, you need to add some code to your CalendarForm. Here’s how you can do it:
In your CalendarForm code, after the user selects a date (for example, when they click on a date or an OK button), add this line:
Make sure that “Calendar1” matches the name of your calendar control on the form.
So, your event (for example, a button click) in the form might look like this:
This will insert the selected date into the active cell when you select a date from the CalendarForm.
Regards
ExcelDemy
Good morning, I have developed the calendar according to your instructions. I USE the US English version of Excel, but I would like the date in Italian format “dd/mm/yyyy”. I call the calendar with the following subroutine:
Private Sub Image25_Click()
On Error Resume Next
Call Calendario.SelectedDate(Me.txtinsdata)
End Sub
and in the calendar there is the following function:
Function SelectedDate(TargetControl As Object) As String
Dim str As String
If VBA.TypeName(TargetControl) = “Range” Or VBA.TypeName(TargetControl) = “TextBox” Then
str = TargetControl.Value
ElseIf VBA.TypeName(TargetControl) = “CommandButton” Or VBA.TypeName(TargetControl) = “Label” Then
str = TargetControl.Caption
End If
If VBA.IsDate(str) = True Then
Me.TextBox1.Value = VBA.Format(VBA.CDate(str), “dd/mm/yyyy”)
Else
Me.TextBox1 = “”
End If
Calendario.Show
If VBA.TypeName(TargetControl) = “Range” Or VBA.TypeName(TargetControl) = “TextBox” Then
TargetControl.Value = CDate(Me.TextBox1)
ElseIf VBA.TypeName(TargetControl) = “CommandButton” Or VBA.TypeName(TargetControl) = “Label” Then
TargetControl.Caption = Me.TextBox1.Value
Else
SelectedDate = Me.TextBox1.Value
End If
End Function
How can I force the date in the textbox and have the Italian format?
thanks soo much
Hello Sandro,
Good afternoon! You’re very close already, the main issue is how the date is written back to the TextBox/cell, not how it’s displayed inside the calendar.
Right now, this line is the key problem:
TargetControl.Value = CDate(Me.TextBox1)
CDate converts the text back to a date serial, and Excel then formats it using US regional settings, even if the string looks Italian.
Correct way to force Italian format (dd/mm/yyyy)
You should write the formatted text, not reconvert it with CDate.
Option 1: Force format for a TextBox (recommended)
Replace this part:
TargetControl.Value = CDate(Me.TextBox1)
with:
TargetControl.Value = Format(Me.TextBox1.Value, “dd/mm/yyyy”)
This guarantees the TextBox always shows Italian format, regardless of Excel language.
Option 2: If the target is a worksheet cell
If TargetControl is a Range, force the cell’s number format explicitly:
With TargetControl
.NumberFormat = “dd/mm/yyyy”
.Value = VBA.CDate(Me.TextBox1.Value)
End With
This keeps the value as a real date and displays it in Italian format.
Format(…, “dd/mm/yyyy”) controls display
NumberFormat = “dd/mm/yyyy” overrides Excel’s regional defaults
Avoiding CDate on TextBoxes prevents Excel from re-interpreting the date as US (mm/dd/yyyy)
Regards,
ExcelDemy