The Offset column property is very useful in copying cell entries from a column. In this article, we will discuss the use of the Offset function in cases of Column offset in Excel VBA, such as selecting a single column, single cell, multiple columns, assigning values to cells, and so on.

How to Launch VBA Editor in Excel
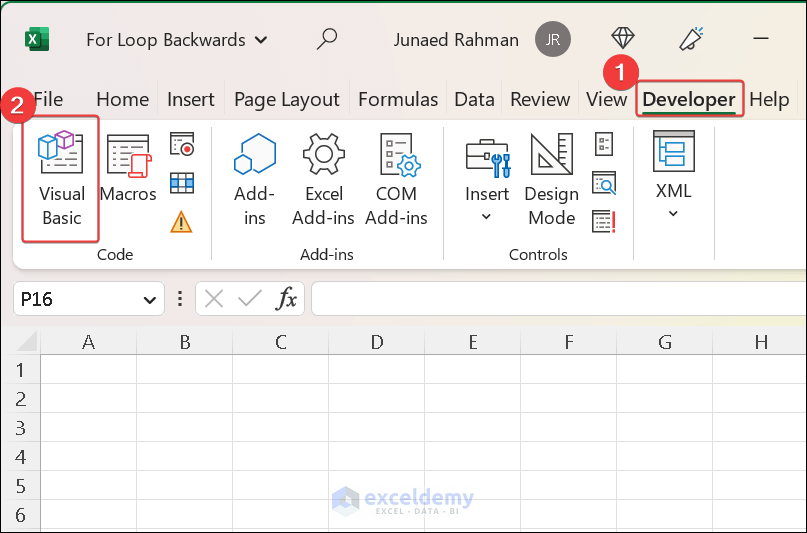
VBA code is written in a module created in the VBA Editor. To launch the VBA Editor & create a VBA module, you need the Developer tab to display on your ribbon. If you don’t have see it, enable it by following the instructions at this link: how to display the Developer tab on your ribbon.
Steps:
- Go to the Developer tab.
- Select Visual Basic.
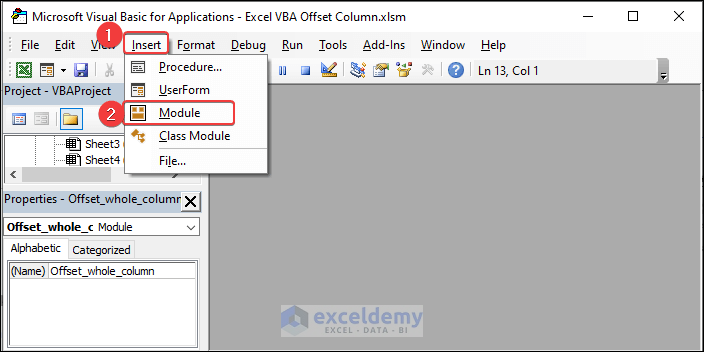
A new window will pop up.
- Select Insert.
- Select Module.
A new Module will be created.
Syntax of Offset in Excel VBA
The Offset function is a built-in function in Excel VBA that refers to a cell or range of cells that are a specified number of rows and columns away from a starting cell or range. The Syntax of the Offset function is:
=Offset (Reference, Rows, Columns, Height, Width)Argument Explanation
- Reference: Starting cell or range of cells to offset from.
- Rows: Number of rows to be offset from the starting cell or range. A positive value will move the reference down, while a negative value will move it up.
- Columns: Number of columns to be offset from the starting cell or range. A positive value will move the reference to the right, while a negative value will move it to the left.
- Height: The number of rows to include in the resulting range (Optional).
- Width: The number of columns to include in the resulting range (Optional).
Excel VBA to Offset Column: 5 Suitable Cases
Example 1 – Using Activecell.Offset Property to Offset Column and Select Cell
ActiveCell.Offset is a method in VBA that is used to refer to a cell that is a specified number of rows and/or columns away from the currently active cell. The ActiveCell object represents the currently active cell in the active worksheet. By using the Offset method with the ActiveCell object, we can easily refer to cells that are nearby without specifying their row and column numbers explicitly.
1.1 – Move Right of Column
To move right from the current cell, we will define the row offset as zero and provide the column offset value.
- Enter the following code in a new Module window:
Sub offset_active()
   ActiveCell.Offset(0, 1).Select
End Sub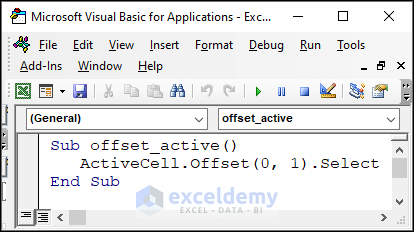
Code Explanation
ActiveCell.Offset(0, 1).SelectActiveCell : Refers to the currently active cell in the worksheet
Offset(0, 1) : Moves the currently active cell to the next column while the row remains unchanged.
.Select : Selects the specified range.
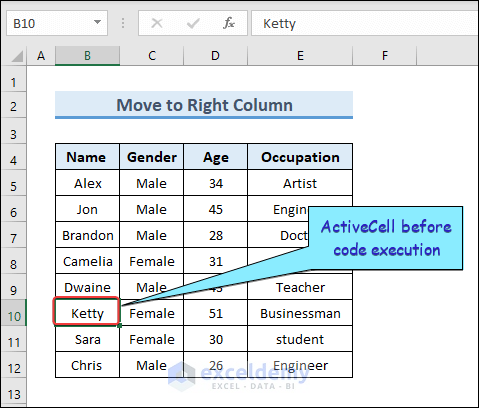
Execution of Code & Viewing Output
To view the output:
- Select a cell in the worksheet.
- Press F5 to run the code above in VBA.
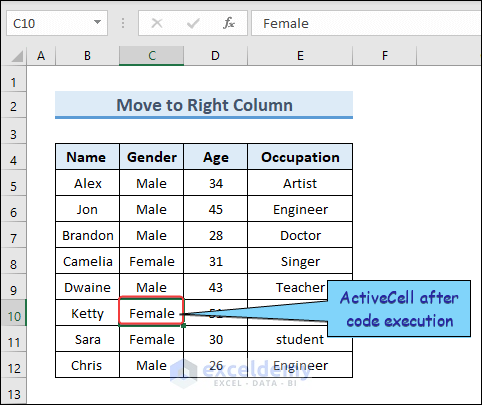
Here, before running the code, the active cell is B10.
Just after we run the code, C10 becomes the active cell.
1.2 – Move Specific Number of Cells from Column
In the above example, we moved the active cell one column to the right by hard-coding the number of columns to move in the code. Now, we’ll provide an InputBox where the user will provide the number. The code will move the current selection by that number of cells.
- Copy the following code and paste in a new module window:
Sub Offset_column_cell()
Dim offsetAmount As Integer
offsetAmount = InputBox("Enter the number of columns to offset:")
ActiveCell.Offset(0, offsetAmount).Select
End Sub
Code Explanation
offsetAmount = InputBox("Enter the number of columns to offset:")This InputBox takes the desired number of columns to be offset from the user and stores it in the offsetAmount variable.
ActiveCell.Offset(0, offsetAmount).SelectSets the active cell to the cell that is “offsetAmount” columns to the right.
Execution of Code & Viewing Output
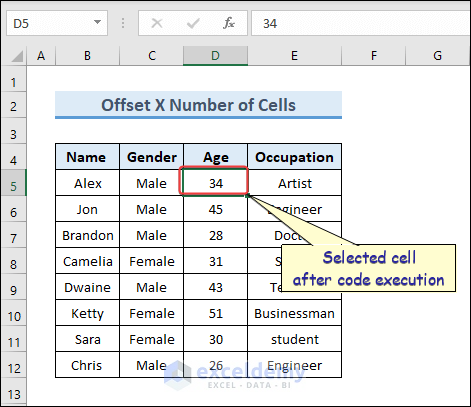
- Select a cell, and press F5 to run the code.
An InputBox appears like in the image below.

- Enter a number and click OK.
The active cell has moved to the right by the specified number of cells.
Example 2 – Using Range.Offset Property to Offset Column
Like the ActiveCell.Offset property, we can use the Range.Offset property in VBA to offset cells.
Here is the code:
Sub Offset_rangenext()
  Range("d9").Offset(, -2).Select
End Sub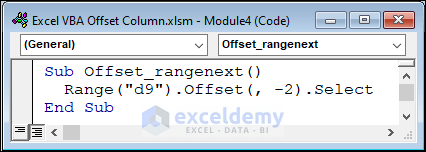
Code Explanation
Range("d9").Offset(, -2).SelectRange(“d9”) : Refers to cell D9 in the active worksheet.
Offset(, -2): The row offset value is missing here, which implies that the code will not offset in the vertical direction while “-2” specifies that the range should be moved two columns to the left.
Execution of Code & Viewing Output
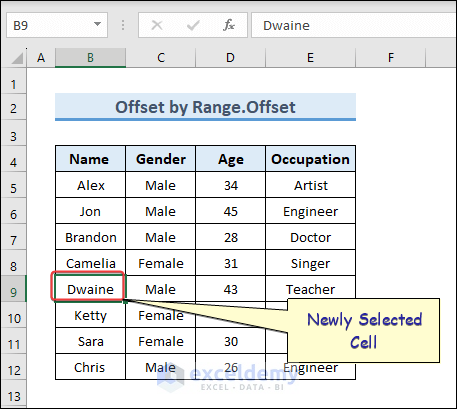
In the case of ActiveCell.Offset method, we have to select a cell first before running the code. With the Range.Offset method we can just run the code and get the output. In this case, cell B9 is selected in the output.
Example 3 – Offset Whole Column Selection
In addition to offsetting the active cell, we can also offset a whole column selection.
Here is the code:
Sub Offset_selectarea()
Dim selectedRange As Range
Dim offsetAmount As Integer
' Get the selected range of cells
Set selectedRange = Selection
' Get the amount of offset from the user
offsetAmount = InputBox("Enter the number of columns to offset", "Offset Columns")
' Offset the selected range
selectedRange.Offset(0, offsetAmount).Select ' Select the offset cells
End Sub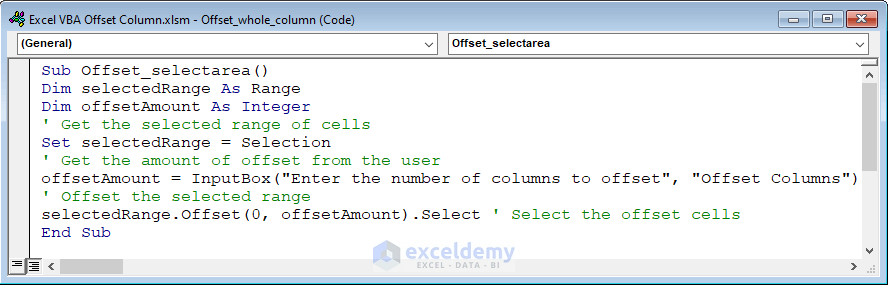
Code Explanation
Set selectedRange = SelectionAssigns the current selection to the variable “selectedRange”.
selectedRange.Offset(0, offsetAmount).SelectOffsets the selected range horizontally by the amount that the user specifies. The new column is then selected by the code.
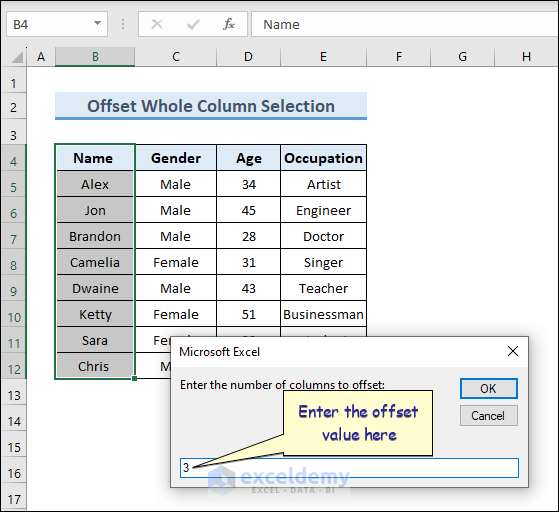
Execution of Code and Output Viewing
To view the output:
- Select a column.

- Select the Macro and run the code.
- Enter a value, for example “3”.
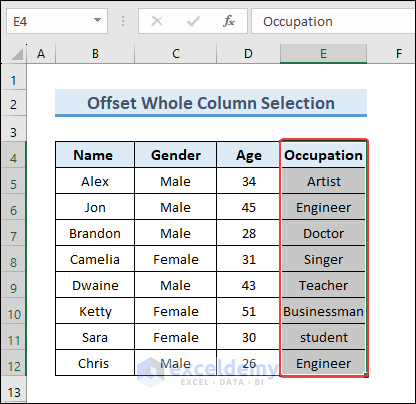
Our column selection is offset by the specified amount.
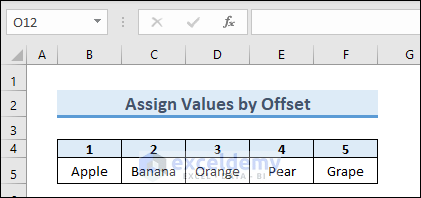
Example 4 – Assign Value to Several Columns
Beyond using the offset property to change a selection, we can use it to assign values to several columns too, by converting the values into an array. The following example will assign values to the 2nd, 3rd, 4th, 5th, and 6th columns. Modify the code to add more should you require.
Here’s the code:
Sub AssignValues()
Dim myValues As Variant
myValues = Array("Apple", "Banana", "Orange", "Pear", "Grape")
Range("B5").Select
'Loop through each value in the array
For i = 0 To UBound(myValues)
    'Assign the current value to the next cell in the active row
    ActiveCell.Offset(-1, i).Value = i + 1
    ActiveCell.Offset(0, i).Value = myValues(i)
    Next i
End Sub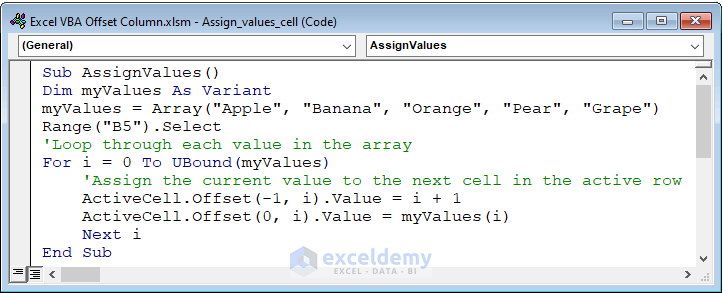
How Does the Code Work?
myValues = Array("Apple", "Banana", "Orange", "Pear", "Grape")Creates an array containing some values.
For i = 0 To UBound(myValues)The For loop iterates from 0 to the index of the last value of the “myValues” array.
ActiveCell.Offset(-1, i).Value = i + 1Sets the value of a cell that is one row above the active cell, and “i” columns away, to i+1.
ActiveCell.Offset(0, i).Value = myValues(i)Refers to a cell that is in the same row as the active cell (since the first argument is 0), and a certain “i” of columns away (since the second argument is i, the loop counter variable). Then it assigns the cell the “i” th value of the array “myValues”.
Execution & Output
After running the code, the output looks like the image below.
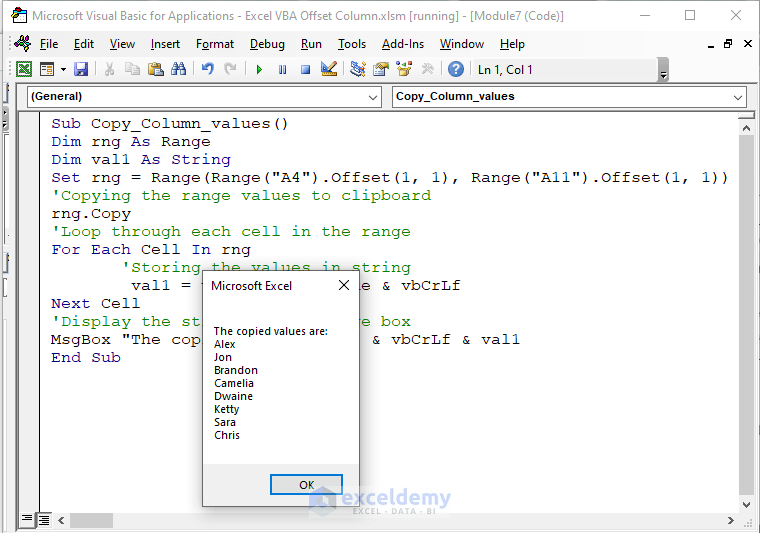
Example 5 – Copying Column Range Using Offset
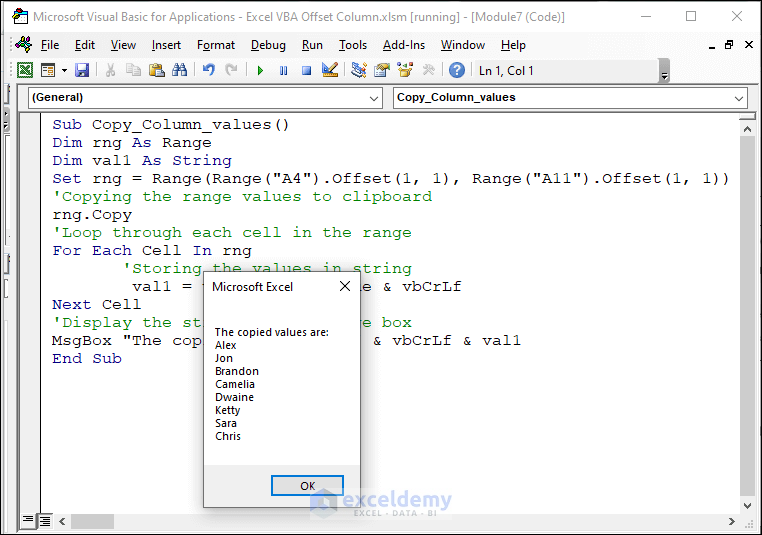
Using the Offset function is a great way to copy the values of a column and use them later.
Here is an example:
Sub Copy_Column_values()
Dim rng As Range
Dim val1 As String
Set rng = Range(Range("A4").Offset(1, 1), Range("A11").Offset(1, 1))
'Copying the range values to clipboard
rng.Copy
'Loop through each cell in the range
For Each Cell In rng
       'Storing the values in string
        val1 = val1 & Cell.Value & vbCrLf
Next Cell
'Display the string in a message box
MsgBox "The copied values are:" & vbCrLf & val1
End Sub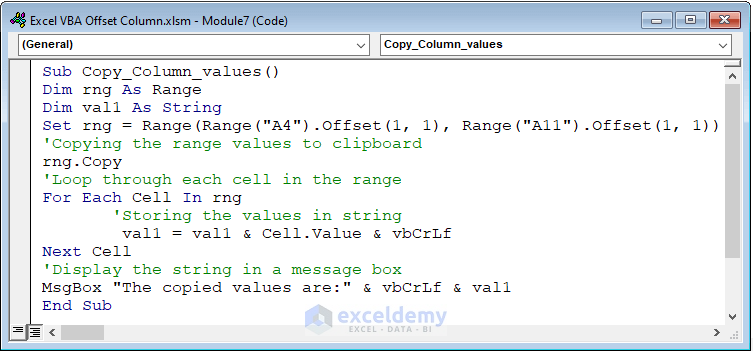
How Does the Code Function?
Set rng = Range(Range("A4").Offset(1, 1), Range("A11").Offset(1, 1))Range("A4").Offset(1, 1)Refers to cell A4 then moves the starting cell down one row and right one column, to cell B5, the start of the Range.
Range("A11").Offset(1, 1)Refers to cell A11 then moves the starting cell one row down and one column right, to cell B12, the Range end.
Set rngAssigns the range from B5 to B12 to the variable rng.
rng.CopyThe data within the “rng” range object is stored in the clipboard.
For Each Cell In rngA loop that iterates through each cell in the rng range object.
val1 = val1 & Cell.Value & vbCrLfMakes a string named val1 to store the value of rng, where all the values are kept in new lines.
Execution & Output
To view the output of the code, run it from the Developer tab.
After clicking on the Run button, we receive the following output:.
How to Use Range Offset in Excel VBA
Now let’s offset a selected range 2 rows down and 3 columns right (or any amounts). The code to do this is as follows:
Sub Range_offset()
Dim selectedRange As Range
Set selectedRange = Application.InputBox("Select a range:", Type:=8)
If selectedRange Is Nothing Then
    MsgBox "You did not select a range."
Else
    selectedRange.Offset(2, 3).Select
End If
End Sub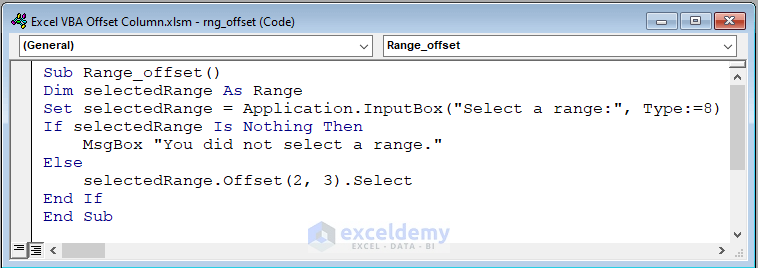
How Does the Code Function?
Set selectedRange = Application.InputBox("Select a range:", Type:=8)InputBox : Displays an InputBox with the message “Select a range”.
Type:=8 : Specifies that the user should select a range.
Set selectedRange: Assigns the range selected by the user to the variable “selectedRange”.
If selectedRange Is Nothing ThenChecks whether the variable “selectedRange” contains a valid range object.
selectedRange.Offset(2, 3).SelectOffsets the selection in the worksheet by 2 rows across and 3 columns down.
Execution and Output
When we run the code above in VBA, an InputBox appears.
- Select the range.
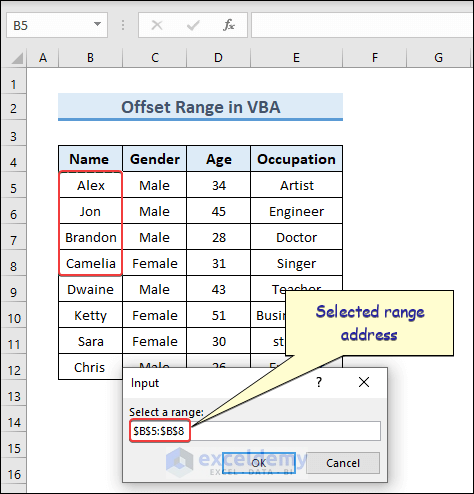
- Click “OK”.
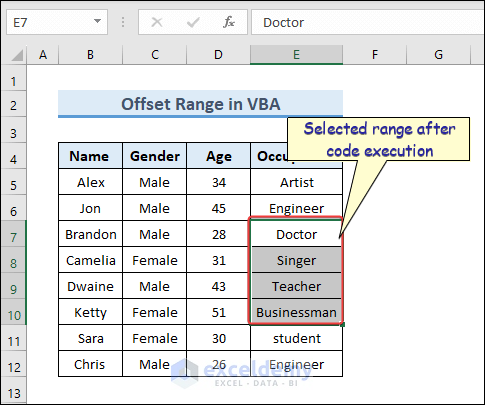
The specified range is selected.
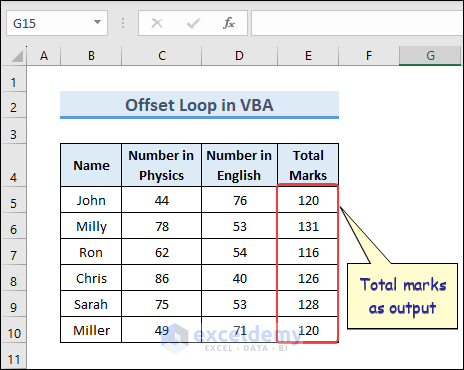
How to Use Offset Within a Loop in Excel VBA
In this example, we determine the Total Marks of the students in the dataset below by combining the Offset function with the For loop in VBA code.
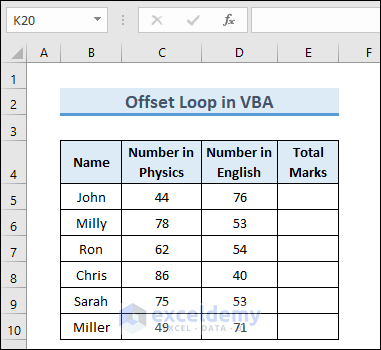
Use this code to determine the Total Marks and assign them to column E:
Sub Offset_loop()
Dim Row As Integer
Dim i As Integer
Dim num1 As Double
Dim num2 As Double
Row = Range("B" & Rows.Count).End(xlUp).Row ' Find the last row of the data
For i = 5 To Row ' Loop through each row of the data, starting at row 5
        num1 = Range("C" & i).Value
        num2 = Range("D" & i).Value
        Range("D" & i).Offset(0, 1).Value = num1 + num2
    Next i
End Sub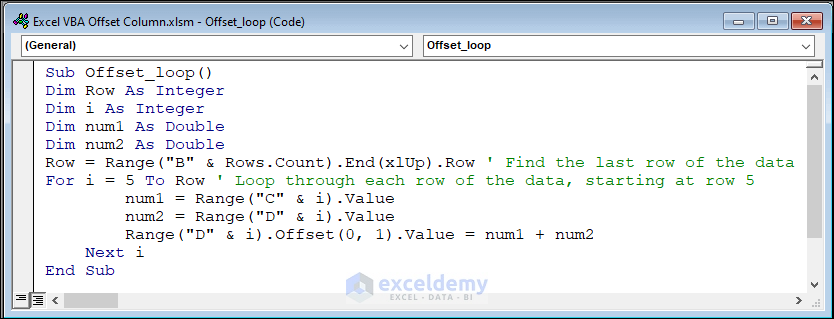
How Does the Code Function?
Row = Range("B" & Rows.Count).End(xlUp).Row “B” & Rows.Count: Creates a string that represents the last cell in column B.
num1 = Range(“C” & i).Value: C is the column name while i is the index of the column. So, C & i represents a cell in the sheet. The corresponding cell value is then assigned to the variable num1.
Range(“D” & i).Offset(0, 1).Value = num1 + num2: Adds the values of num1 and num2, and writes the result to a cell in column E.
Execution & Output
- Run the code to view the output.
The Total Marks for each student are correctly returned.
Read More: Excel VBA Offset Within Loop
Frequently Asked Questions (FAQs)
- What does the Offset function Do?
It allows you to move the active cell or a range of cells a certain number of rows and columns from its current location.
- How do you use the Offset function to move to a specific column?
Use the Offset function with a Rows argument of 0 and a Columns argument that corresponds to the number of columns you want to move. For example, if you want to move to the column 5 to the right of the active cell, use the following code:
ActiveCell.Offset(0, 5).Select- How do you use the Offset function to reference a range of cells in a specific column?
Use the Offset function in combination with the Range function.
Things to Remember
- The syntax for the Excel VBA Offset function is Offset(Reference, Rows, Columns, Height, Width).
- The Reference argument is the starting cell or range of cells.
- The Height and Width arguments are optional and specify the size of the range in the output.
- The Offset function can be a powerful tool for manipulating data in Excel VBA, but it should be used with care to avoid errors and unexpected results.
Download Practice Workbook
Get FREE Advanced Excel Exercises with Solutions!

