How to Launch VBA Editor in Excel
Here are the steps to launch the VBA Editor in Excel:
- Enable the Developer Tab:
- If you don’t see the Developer tab in your Excel ribbon, you’ll need to enable it. Follow these steps:
- Click on File.
- Choose Options.
- In the Excel Options window, select Customize Ribbon on the left.
- Check the box next to Developer under the Main Tabs section.
- Click OK.
- If you don’t see the Developer tab in your Excel ribbon, you’ll need to enable it. Follow these steps:
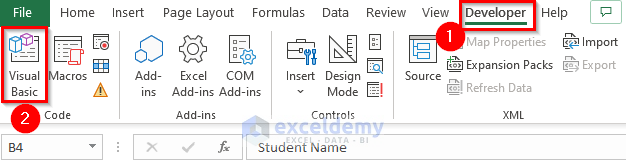
- Access the VBA Editor:
- Once you have the Developer tab visible, follow these steps:
- Click on the Developer tab.
- Select Visual Basic from the toolbar.
- Once you have the Developer tab visible, follow these steps:
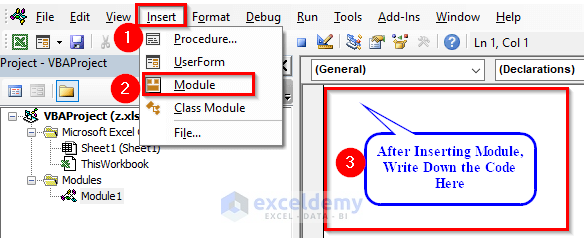
- Insert a Module:
- In the VBA Editor, go to the Insert tab.
- Choose Module.
- You can now write your VBA code within the module.
Note: Remember to save your Excel file as an Excel Macro-Enabled Workbook (.xlsm) to run the code successfully.
How to Add Borders Using VBA in Excel
- Objective
- You want to add a default border to the range B4:H14 in your Excel worksheet.
- Explanation
- The dataset contains students’ results, and you’re adding borders to enhance the visual appearance.
- Borders can be helpful when printing data, especially when presenting student results.
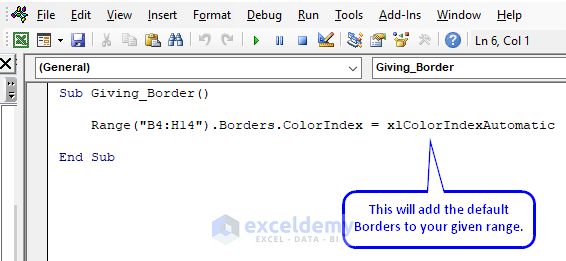
- VBA Code
Sub Giving_Border()
Range("B4:H14").Borders.ColorIndex = xlColorIndexAutomatic
End Sub- How to Run the Code
- Open the Excel workbook where you want to apply the borders.
- Go to the View tab.
- Click on Macros and select the View Macros option.
- Choose the Giving_Border subroutine and click Run.
The borders will now be inserted within the specified range.
Overview of Borders.Weight Property in Excel VBA
Let’s break down the information about the Borders.Weight property in Excel VBA:
- Overview
- The Borders.Weight property allows you to control the thickness of cell borders in Excel using VBA.
- There are four predefined expressions you can use with this property:
- xlThin: Denotes a thin border.
- xlMedium: Increases the border weight to a medium level.
- xlThick: Gives the highest thickness for borders.
- xlHairline: Returns the thinnest possible border.
- Notably, the Borders.Weight property not only adjusts the thickness of existing borders but also adds borders to cells that currently have none.
- Sample Code
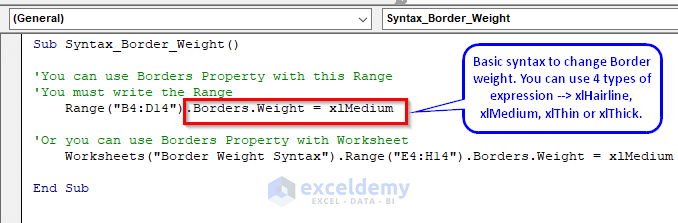
Sub Syntax_Border_Weight()
'You can use Borders Property with this Range
'You must write the Range
Range("B4:D14").Borders.Weight = xlMedium
'Or you can use Borders Property with Worksheet
Worksheets("Border Weight Syntax").Range("E4:H14").Borders.Weight = xlMedium
End Sub- Code Breakdown
- The provided code demonstrates how to use the Borders.Weight property with the Range object.
- The first line applies the medium border weight to the range “B4:D14.”
- The second line does the same for the range E4:H14 within the worksheet named Border Weight Syntax.
- Running the Code
- To execute the code:
- Go to the View tab in Excel.
- Click on Macros and select View Macros.
- Choose the Syntax_Border_Weight subroutine and click Run.
- To execute the code:
- Numeric Values
- Instead of using the predefined expressions, you can also use numeric values directly:
- 1: Hairline border.
- 2: Thin border.
- 3: Medium border.
- 4: Thick border.
- Instead of using the predefined expressions, you can also use numeric values directly:
Let’s break down the 8 methods for using Excel VBA to set the border weight.
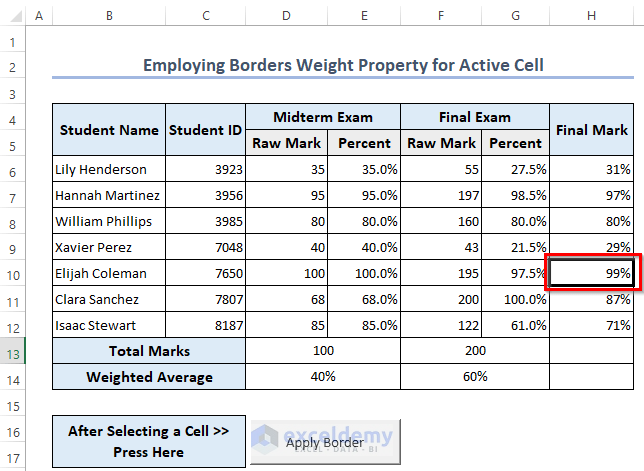
Method 1 – Applying Border Weight for Active Cell
- We’ll create a button that, when pressed, applies a thick border to the currently selected cell.
- Here’s the VBA code for this method:
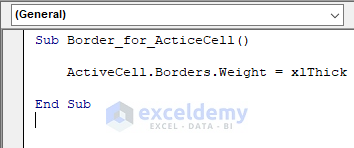
Sub Border_for_ActiceCell()
  ActiveCell.Borders.Weight = xlThick
End Sub- This code ensures that the active cell has a thick border.
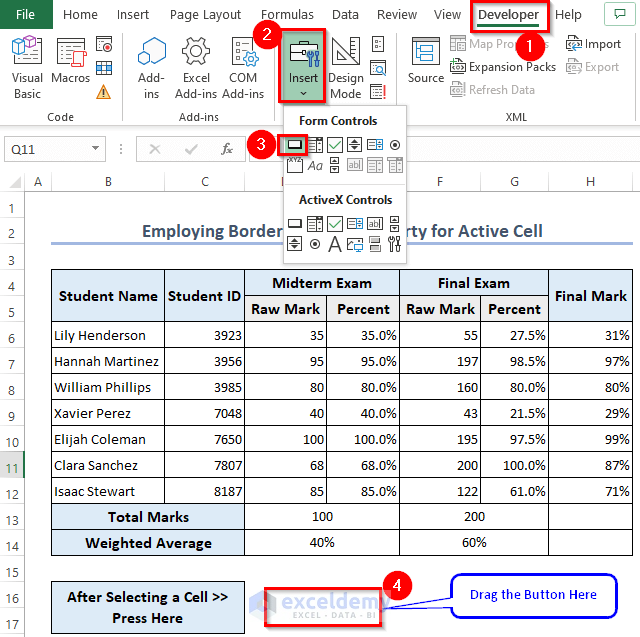
Inserting the Button:
- Open your Excel workbook.
- Go to the Developer tab (if not visible, enable it as mentioned earlier).
-
- Click on Insert and choose Button (Form Control).
- Drag the button to a suitable location on your worksheet.
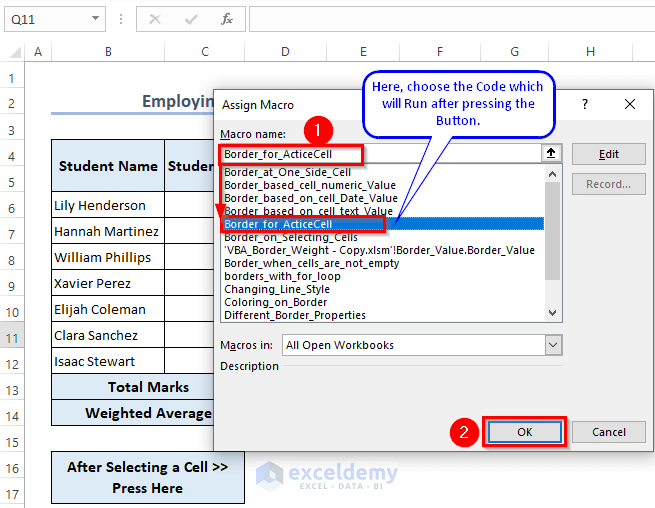
Assigning the Macro
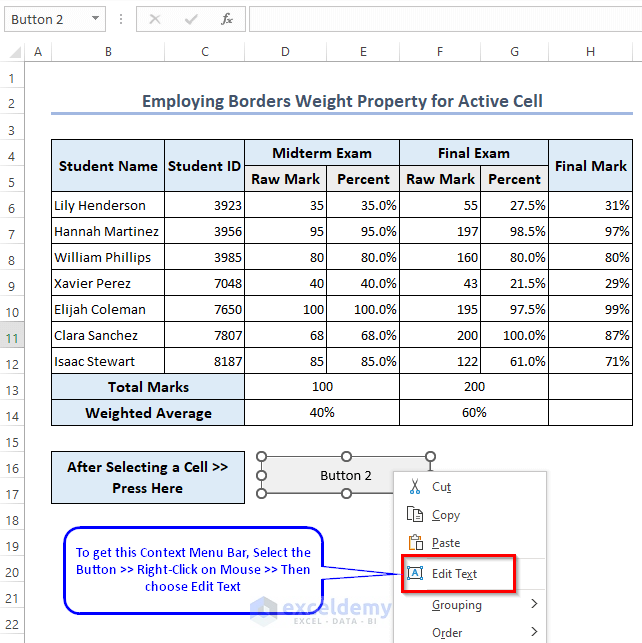
- Right-click the newly inserted button.
- Select Edit Text from the context menu.
- Rename the button (e.g., Apply Border).
- Right-click the button again and choose Assign Macro.
- Select the Border_for_ActiveCell subroutine (the one with the thick border code) and click OK.
Using the Button
- Click the button you’ve created.
- The selected cell will now have a thick border.
Optional – Renaming the Button
- If you have multiple buttons, consider renaming them for clarity.
- Right-click the button, choose Edit Text, and provide a descriptive name (e.g., Apply Border).

For instance, if you select cell H10 and press the Apply Border button, cell H10 will be bordered with a thick line. This approach allows you to customize border weights using Excel VBA.
Method 2 – Using a For Each Loop to Adjust Border Weight for a Specific Range
In this approach, we’ll utilize the BorderAround property to modify the border thickness. This provides an alternative way to apply or increase border thickness. When you need to apply specific conditions to borders, the For Each Next loop comes in handy. Let’s explore how to use this loop to adjust the border weight for a specified range.
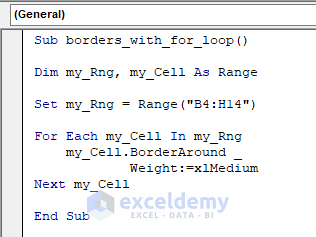
- Enter the following code to a module:
Sub borders_with_for_loop()
Dim my_Rng, my_Cell As Range
Set my_Rng = Range("B4:H14")
For Each my_Cell In my_Rng
my_Cell.BorderAround _
Weight:=xlMedium
Next my_Cell
End Sub
Code Breakdown
- Declare two variables: my_Rng and my_Cell as ranges.
- Set the applicable range for the active worksheet (in this case, B4:H14).
- Use the For Each Next loop to iterate through each cell in the specified range.
- Change the border weight of each cell to a medium thickness.
- Save the code and click the Run button to see the updated borders within the B4:H14 range.
Method 3 – Selecting a Range and Adjusting Border Weight
If you want to change the border weight for a selected range or need to do so repeatedly, follow this method. Simply select the desired range in your worksheet and run the following code:
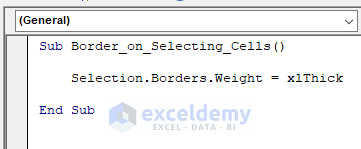
- Create a new module and add the code:
Sub Border_on_Selecting_Cells()
Selection.Borders.Weight = xlThick
End Sub
This code sets a thick border for the currently selected range.
- To execute the code, select the desired range in your worksheet and click the Run button.
Method 4 – Adding Borders Using the Borders.Weight Property Based on Numeric Conditions
If you need to specify a user-defined input range, this method is for you. In this approach, we’ll use a numeric condition to highlight specific cells that meet certain criteria. Specifically, we’ll identify students who scored less than 50% on their final marks.

- Create a new module and enter the following code:
Sub Border_based_cell_numeric_Value()
Dim my_Rng As Range
Dim my_Cell As Range
Set my_Rng = Application.InputBox(Title:="Exceldemy", _
Prompt:="Select the Range for Borders", Type:=8)
For Each my_Cell In my_Rng
If my_Cell < 0.5 Then
my_Cell.BorderAround _
Weight:=xlThick
End If
Next my_Cell
End Sub
Code Breakdown
- Declare two variables: my_Rng (for the selected range) and my_Cell (for individual cells).
- Use Application.InputBox to prompt the user to select a cell reference or range from the worksheet (Type:=8).
- Iterate through each cell in the selected range.
- If the cell value is less than 50%, apply a thick border.
- Save the code and click the Run button to see the updated borders.
As demonstrated, this method allows you to mark cells with scores below 50% using a prominent border.
Method 5 – Applying Border Weight When Cell Value Is Not Empty
If you have empty cells within your dataset and want to apply borders only to non-empty cells, follow this code:
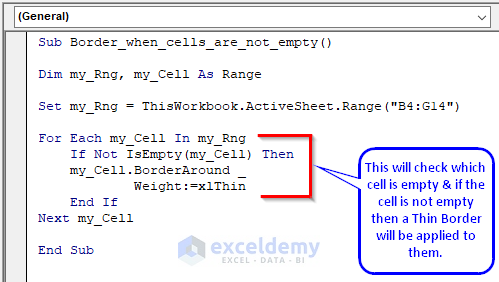
- Create a new module and enter the following code:
Sub Border_when_cells_are_not_empty()
Dim my_Rng, my_Cell As Range
Set my_Rng = ThisWorkbook.ActiveSheet.Range("B4:G14")
For Each my_Cell In my_Rng
If Not IsEmpty(my_Cell) Then
my_Cell.BorderAround _
Weight:=xlThin
End If
Next my_Cell
End Sub
Code Breakdown
- Declare two variables: my_Rng (for the specified range) and my_Cell (for individual cells).
- Use ThisWorkbook.ActiveSheet.Range to set the applicable range.
- Iterate through each cell in the range.
- If a cell is not empty, apply a thin border.
- To run the code, go to Macros, select the sub procedure named Border_when_cells_are_not_empty, and click Run.
When you run this code, any empty cells within the specified range will remain without a border.
Method 6 – Increasing Border Weight If the Cell Contains Text
In this method, we’ll focus on a different dataset containing employee information. Suppose you want to highlight the department named IT. This approach demonstrates how to adjust the border weight based on whether a cell contains a specified string.
- Create a new module and enter the following code:
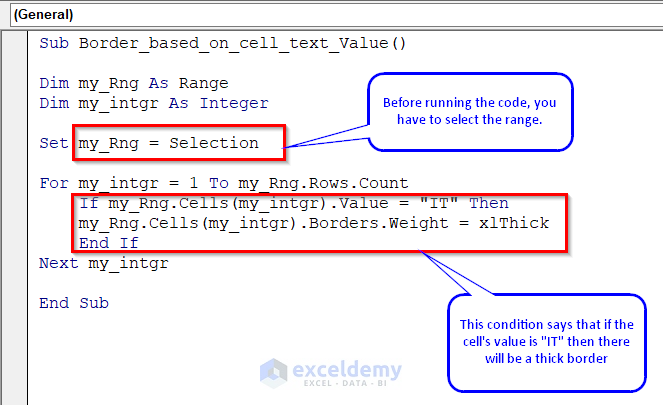
Sub Border_based_on_cell_text_Value()
Dim my_Rng As Range
Dim my_intgr As Integer
Set my_Rng = Selection
For my_intgr = 1 To my_Rng.Rows.Count
    If my_Rng.Cells(my_intgr).Value = "IT" Then
    my_Rng.Cells(my_intgr).Borders.Weight = xlThick
    End If
Next my_intgr
End Sub
Code Breakdown
- Declare two variables: my_Rng (for the selected range) and my_intgr (for iteration).
- Use the Selection property to set the applicable range (the user must select the range before running the code).
- Iterate through each cell in the range.
- If a cell contains the value IT, apply a thick border.
- To run the code, select the range (where the cells correspond to department names) and go to Macros. Choose the sub procedure named Border_based_on_cell_text_Value and click Run.
Remember to select the correct column before running the code to see the desired output.
Method 7 – Changing Border Weight If Cell Contains Date
Suppose you have a dataset with some dates, and you want to highlight specific dates. In that case, consider using this method. Here, I’ll explain how to highlight a date using the Borders.Weight property.

- Enter the following code to a Module:
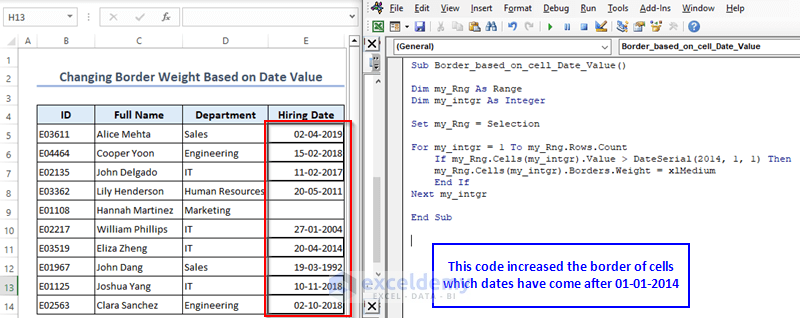
Sub Border_based_on_cell_Date_Value()
Dim my_Rng As Range
Dim my_intgr As Integer
Set my_Rng = Selection
For my_intgr = 1 To my_Rng.Rows.Count
If my_Rng.Cells(my_intgr).Value > DateSerial(2014, 1, 1) Then
my_Rng.Cells(my_intgr).Borders.Weight = xlMedium
End If
Next my_intgr
End Sub
Code Breakdown
- Declare two variables: my_Rng as a Range and my_intgr as an Integer.
- Set the range using the Selection property (the user must select the range before running this code).
- Use a For Next loop to process each cell in the specified range.
- DateSerial(2014, 1, 1) represents January 1, 2014. The condition checks if the cell value is greater than this date.
- If the condition is met, the border weight of the cell changes to a medium level.
- To apply this, select the range (where the cells contain dates), go to Macros, choose the sub procedure named Border_based_on_cell_Date_Value, and click Run.
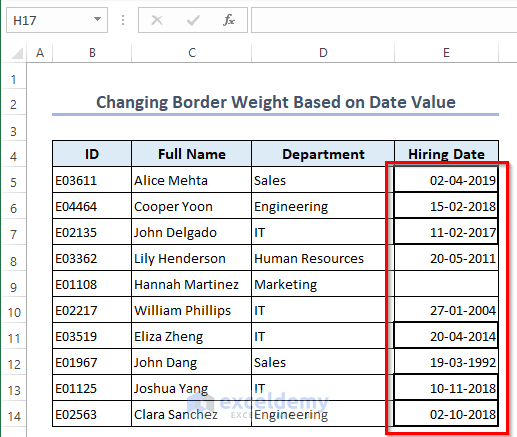
Now, the hiring dates after January 1, 2014, will be marked with a medium-weight border.
Method 8 – Changing Border Weight for One Side of Cell with Edge Property
In this method, we’ll focus on adjusting the border weight for specific sides of cells. If you need to mark a cell with varying border thicknesses, follow these steps:
- Write the following code in a Module:
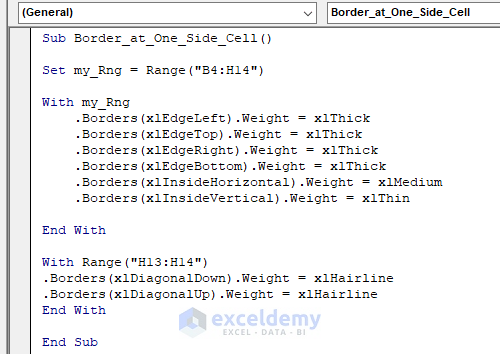
Sub Border_at_One_Side_Cell()
Set my_Rng = Range("B4:H14")
With my_Rng
.Borders(xlEdgeLeft).Weight = xlThick
.Borders(xlEdgeTop).Weight = xlThick
.Borders(xlEdgeRight).Weight = xlThick
.Borders(xlEdgeBottom).Weight = xlThick
.Borders(xlInsideHorizontal).Weight = xlMedium
.Borders(xlInsideVertical).Weight = xlThin
End With
With Range("H13:H14")
.Borders(xlDiagonalDown).Weight = xlHairline
.Borders(xlDiagonalUp).Weight = xlHairline
End With
End Sub
Code Breakdown
- Declare a variable named my_Rng as a Range.
- Set the range to B4:H14 of the active worksheet.
- The With-End With statement applies all properties within it to the specified range (my_Rng). You don’t need to repeatedly use the Range.property.
- The second With-End With statement works for the range H13:H14.
- To border a specific side of a cell, use the Borders(xlEdge…) property, specifying the desired side.
- To apply this, go to Macros, select the sub procedure named Border_at_One_Side_Cell, and click Run.
The output will reflect the adjusted borders.
How to Use Borders.Value Property in Excel VBA
Let’s break down how to use the Borders.Value property in Excel VBA:
- Overview
- The Borders.Value property allows you to modify the line style of cell borders.
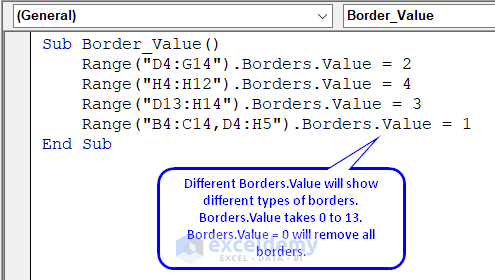
- You can specify numeric values from 0 to 13 to achieve different border styles.
- Numeric Values
- Borders.Value = 0: No border (no visible lines).
- Borders.Value = 1: Thin continuous border.
- You can use values up to Borders.Value = 13 for various styles.
- Example Code
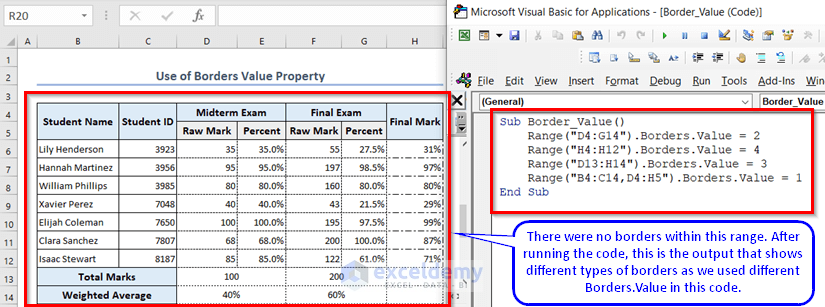
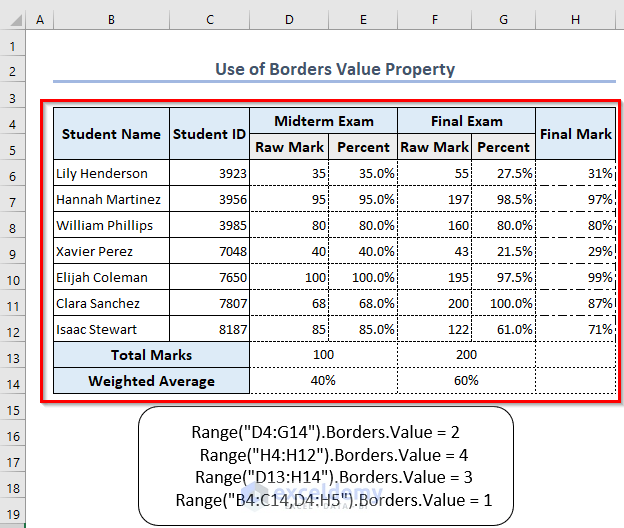
Sub Border_Value()
Range("D4:G14").Borders.Value = 2
Range("H4:H12").Borders.Value = 4
Range("D13:H14").Borders.Value = 3
Range("B4:C14,D4:H5").Borders.Value = 1
End Sub
Code breakdown
Range("D4:G14").Borders.Value = 2It will create a dashed border for D4 to G14 cells.
Range("H4:H12").Borders.Value = 4It will make the dash dot-dot type line style for H4 to H12 cells.
Range("D13:H14").Borders.Value = 3It will change the border to a dotted border for D13 to H14 cells.
Range("B4:C14,D4:H5").Borders.Value = 1This will make a thin continuous border for both the range B4 to C14 and D4 to H5.
- Application
- Save the code in a new Module.
- Go to Macros, choose the sub-procedure named Border_Value, and click Run.
- Observe the resulting border styles based on the specified ranges.
How to Color Borders in Excel VBA
- Introduction
- If you want to make your dataset visually appealing by using colorful borders or highlight specific cells with different border colors, this section is for you.
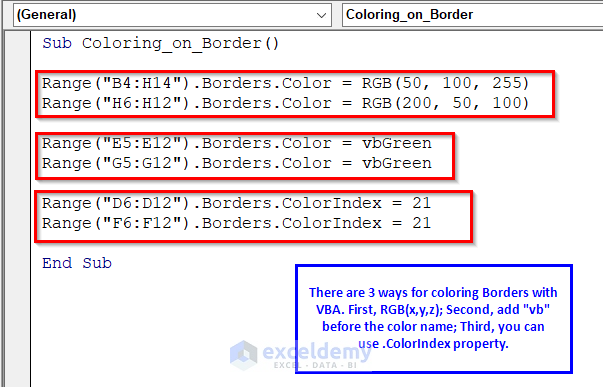
- The exciting part is that you can apply colors to your borders using VBA code. You have several options, including RGB color codes and predefined color names.
- Using RGB Color Codes
- RGB (Red, Green, Blue) color coding allows you to create custom colors.
- Each color component (red, green, blue) can range from 0 to 255.
- For example:
- RGB(0, 0, 0) represents black.
- RGB(255, 255, 255) represents white.
- RGB(0, 0, 255) represents blue.
- Adjust the values to create your desired shade (e.g., RGB(215, 50, 70) for a maroon-like shade).
- Applying Colors to Borders
- Use the Borders.Color property to set the border color.
- You can directly use color names (e.g., vbYellow) or RGB values (e.g., RGB(50, 100, 255)).
- To use color names, prefix them with “vb” (e.g., Borders.Color = vbYellow).
- Using ColorIndex
- The ColorIndex property allows you to choose from predefined colors.
- Values range from 1 to 56 (each representing a specific color).
- Example Code
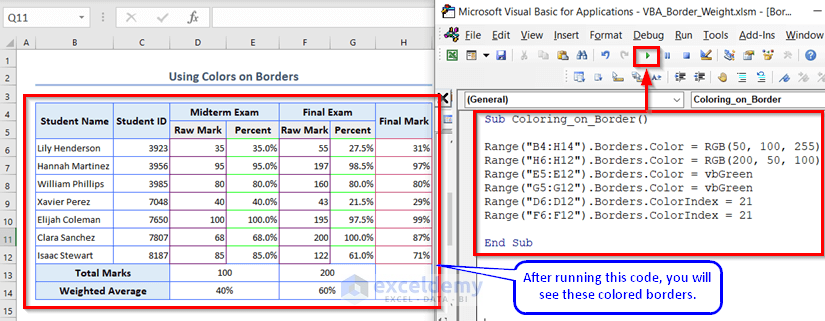
Sub Coloring_on_Border()
Range("B4:H14").Borders.Color = RGB(50, 100, 255)
Range("H6:H12").Borders.Color = RGB(200, 50, 100)
Range("E5:E12").Borders.Color = vbGreen
Range("G5:G12").Borders.Color = vbGreen
Range("D6:D12").Borders.ColorIndex = 21
Range("F6:F12").Borders.ColorIndex = 21
End Sub- Application
- Save the code in a new Module.
- Run the sub-procedure named Coloring_on_Border.
- Observe the output in your Excel sheet.
Read More: How to Use Excel VBA Border ColorIndex Property
How to Customize Border Styles Using VBA in Excel
If you’re working with Excel VBA and need to adjust border styles for different data sets within a single sheet, you can easily do so using the LineStyle property. Let’s walk through the steps:
- Access the Visual Basic Editor
- Go to the Developer tab in Excel.
- Click on Visual Basic to open the Visual Basic for Applications (VBA) editor.
- Insert a New Module
- In the VBA editor, insert a new module by clicking Insert > Module.
- Write the VBA Code
- Within the module, enter the following code:
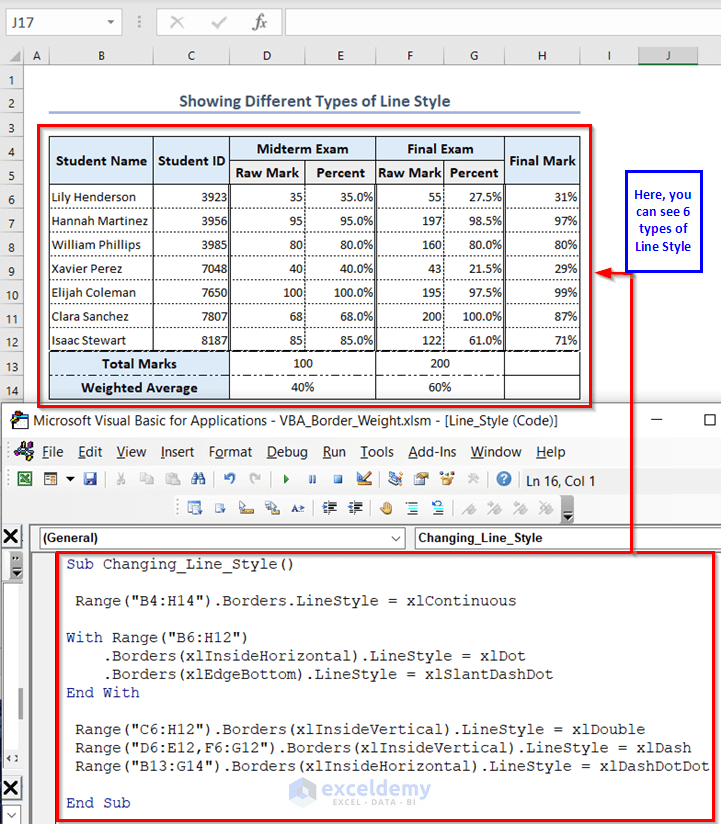
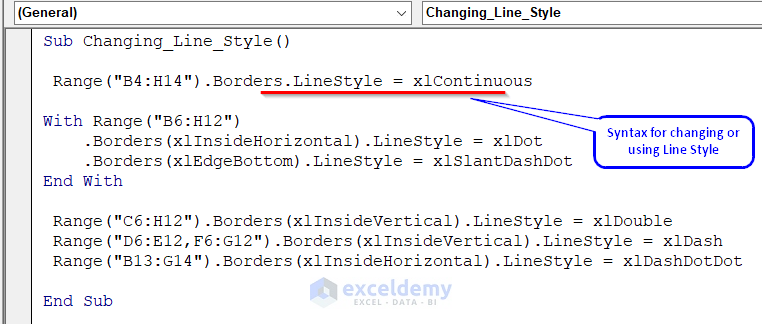
Sub Changing_Line_Style()
Range("B4:H14").Borders.LineStyle = xlContinuous
With Range("B6:H12")
.Borders(xlInsideHorizontal).LineStyle = xlDot
.Borders(xlEdgeBottom).LineStyle = xlSlantDashDot
End With
Range("C6:H12").Borders(xlInsideVertical).LineStyle = xlDouble
Range("D6:E12,F6:G12").Borders(xlInsideVertical).LineStyle = xlDash
Range("B13:G14").Borders(xlInsideHorizontal).LineStyle = xlDashDotDot
End Sub
Code Breakdown
- The code sets different line styles for various cell borders.
- It uses xlInsideHorizontal and xlInsideVertical to target specific lines within the specified ranges.
- The xlContinuous, xlDot, xlSlantDashDot, and xlDashDotDot styles are applied as needed.
- Applying the Changes
- To see the effect, run the macro:
- Go to Macros in the Developer tab.
- Select the Changing_Line_Style sub-procedure.
- Click Run.
- To see the effect, run the macro:
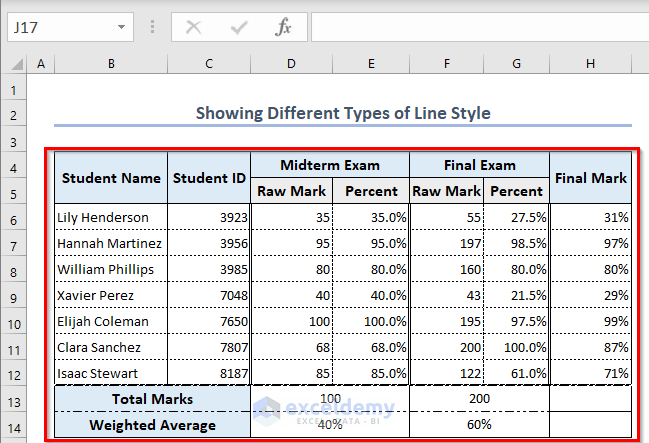
You’ll now have customized border styles for different data segments in your Excel sheet.
How to Customize Borders Using VBA in Excel

When you need to apply different border styles to decorate your dataset using a single code, follow these steps:
- Create a New Module
- Open the Visual Basic for Applications (VBA) editor.
- Insert a new module by clicking Insert > Module.
- Write the VBA Code
- Within the module, enter the following code:
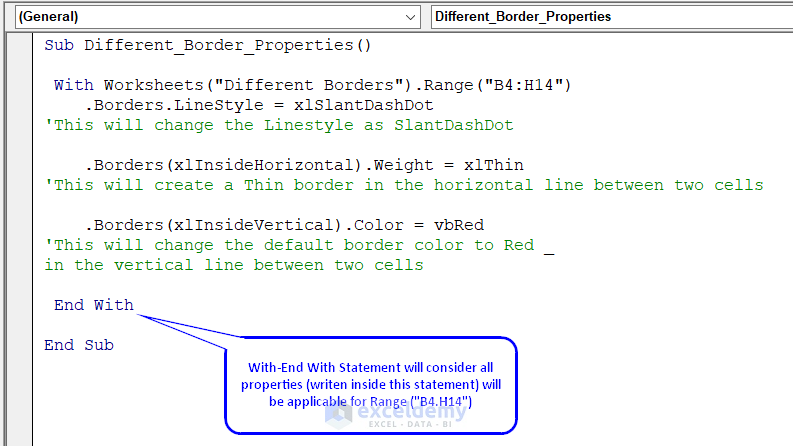
Sub Different_Border_Properties()
With Worksheets("Different Borders").Range("B4:H14")
.Borders.LineStyle = xlSlantDashDot
.Borders(xlInsideHorizontal).Weight = xlThin
.Borders(xlInsideVertical).Color = vbRed
End With
End Sub
Code Breakdown
- The code targets the range B4:H14 within the worksheet named Different Borders.
- It sets the border style to slant-dash-dot.
- The horizontal segment of cells is adjusted to thin borders.
- The vertical segment color is changed to red.
- Apply the Changes
- Press F5 to run the code and see the updated borders.
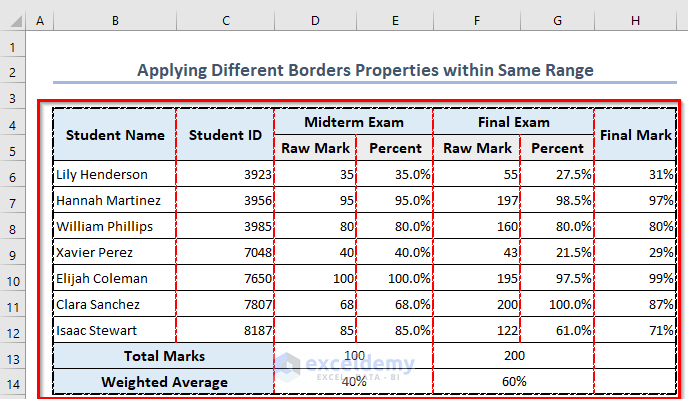
Now your dataset will have customized borders based on your specifications.
How to Remove All Borders in Excel with VBA
If you need to remove borders from a specific range, follow these steps. I’ll describe the code that accomplishes this task.
- Using Borders.Value Property
- You can set Borders.Value = 0 to delete all borders.
- Alternatively, use either of the following methods:
- Borders.ColorIndex = xlColorIndexNone
- Borders.LineStyle = xlNone
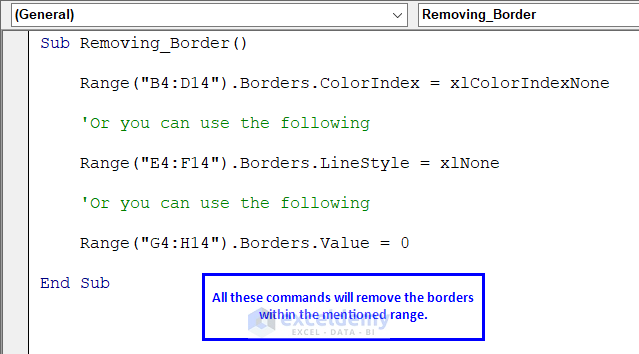
- Write the VBA Code
- Insert the following code into a module:
Sub Border_based_on_cell_Date_Value()
Dim my_Rng As Range
Dim my_intgr As Integer
Set my_Rng = Selection
For my_intgr = 1 To my_Rng.Rows.Count
    If my_Rng.Cells(my_intgr).Value > DateSerial(2014, 1, 1) Then
    my_Rng.Cells(my_intgr).Borders.Weight = xlMedium
    End If
Next my_intgr
End Sub- Understanding the Code
- The code targets the selected range.
- If a cell’s value is greater than January 1, 2014, it sets the border weight to medium.
- Apply the Changes
- Go to Macros, choose Remove_All_Borders, and press Run.
Keep in mind that naming sub-procedures differently from existing properties is essential to avoid conflicts.
Frequently Asked Questions
- Where Can I Find the Developer Tab in Excel?
The Developer tab is a powerful addition to the Excel Ribbon, providing access to features that are otherwise hidden. By default, it’s not visible in the Ribbon, but you can easily add it:
-
- Right-click on any existing tab in the Ribbon.
- Choose Customize the Ribbon.
- In the options pane, check the box next to Developer and click OK.
- The Developer tab will now appear at the end of the Ribbon.
- How Can I Change Line Thickness in Excel?
To adjust the thickness of cell borders or lines in Excel, follow these steps:
-
-
- Select the cell(s) with the border you want to modify.
- Right-click and choose Format Cells.
- Go to the Border tab.
- Under Line, select a thicker style from the presets or create a custom style.
- Click OK to apply the changes
-
Things to Remember
Remember, thoughtful naming of sub-procedures is essential to avoid conflicts in your code.
Practice Section
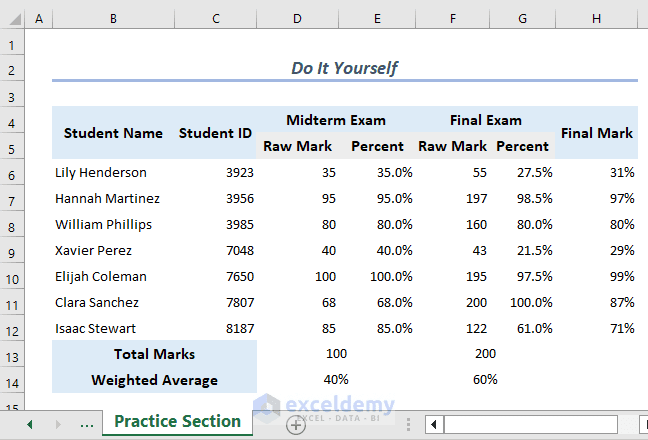
Now you can practice by yourself and learn how to use the Excel VBA border weight property.
Download Practice Workbook
You can download the practice workbook from here:
Get FREE Advanced Excel Exercises with Solutions!
