In this article, we will explain how to use Excel VBA Borders LineStyle, like in the video below.
Cell borders are a formatting feature in Excel that can be used to visually divide data and make it simpler to read. One of the formatting options that may be accessed and changed using Excel VBA is Borders Linestyle, which is used to customize the borderline’s appearance in a cell or range of cells.
Getting Started with VBA in Excel
A macro is a sequence of instructions that automates some aspects of Excel that you do regularly. For example, you may create a macro to format and print your month-end sales report. After the macro is developed, you can then execute it at will to perform the assigned task.
You don’t have to be a power user to build and use easy VBA macros. Beginner users can simply turn on Excel’s macro recorder: Excel will document your activities and convert them into a VBA macro. When you execute this macro, Excel will perform the actions again.
Enabling the Developer Tab in Excel
To work with VBA macros, the Developer tab must be present on the Excel Ribbon. It’s disabled by default. If you don’t see it, please follow this link to enable it: Developer tab in Excel Ribbon.
Launching the VBA Editor
Once you have the Developer tab, you will have access to the VBA editor window that will enable you to add, edit, or remove VBA code. Individual VBA codes are generally stored in a window called a module. It is usually a good practice to store different codes in different modules.
To create a module in the VBA window:
- Press Alt + F11 to open the Microsoft Visual Basic Applications window.
- Click the Insert tab and select Module from the menu.
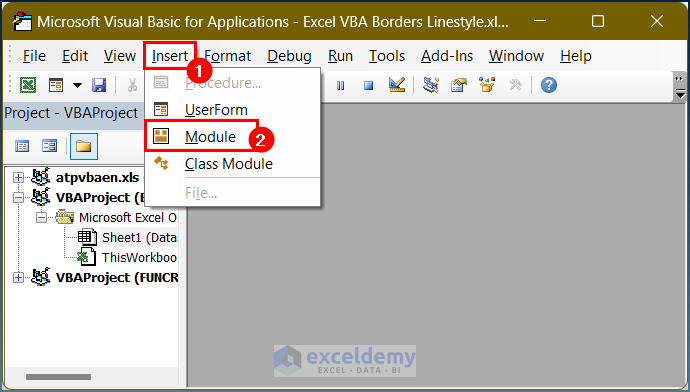
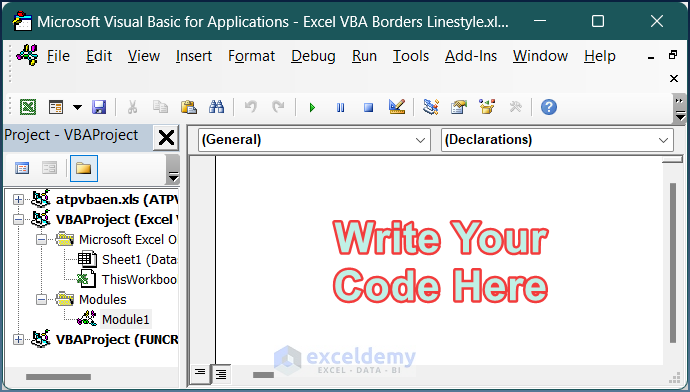
A module like the one below will be created.
What Is a Cell Border in Excel?
Usually, a cell border is a line that surrounds a cell or a group of cells. To make your border more attractive and to highlight it, you can thicken or thin it using several types of linestyle, which can be added manually or by using VBA.
Overview of the Borders.LineStyle Property in Excel VBA
The Borders.Linestyle property offers multiple different options, including solid lines, dotted lines, dashed lines, and many more. To set the Borders.Linestyle property with VBA, first select the range of cells to format using the Range object, a VBA object that represents a range of cells in Excel. After the range of cells is selected, use the Borders property to access the cell borders.
To set the Borders Linestyle property for all cells in a range in VBA, use the following syntax:
Range("A1:A5").Borders.LineStyle = xlContinuousDifferent Types of Cell Borders
Excel offers several different border styles that can be applied to individual cells or ranges of cells. These styles include solid lines, dotted lines, dashed lines, combinations of dashed and dotted lines, double lines, and more. However, the syntax remains almost the same for these variations.
Here are some examples of the VBA syntax for various cell border types, using a range of A1:A5 for demonstration:
Range("A1:A5").Borders.LineStyle = xlDash
Range("A1:A5").Borders.LineStyle = xlDashDot
Range("A1:A5").Borders.LineStyle = xlDashDotDot
Range("A1:A5").Borders.LineStyle = xlDot
Range("A1:A5").Borders.LineStyle = xlDouble
Range("A1:A5").Borders.LineStyle = xlSlantDashDot
List of Border Weights
The Borders property is a collection of border objects, which represent the horizontal, vertical, top, bottom, left, and right borders of the selected range. Moreover, it includes diagonal borders inside a particular cell range. Each border object has a Linestyle property, which can be set to one of the available options.
Additionally, the border linestyle includes the border weight property. We can set 4 different types of border thicknesses: Hair line, Thin, Medium, and Thick. A combination of these properties can be used simultaneously, with syntax like these examples:
Range("A1:A5").Borders(xlEdgeLeft).Weight = xlHairline
Range("A1:A5").Borders(xlEdgeRight).Weight = xlHairline
Range("A1:A5").Borders(xlEdgeTop).Weight = xlThin
Range("A1:A5").Borders(xlEdgeBottom).Weight = xlThin
Range("A1:A5").Borders(xlDiagonalUp).Weight = xlMedium
Range("A1:A5").Borders(xlDiagonalDown).Weight = xlMedium
Range("A1:A5").Borders(xlInsideHorizontal).Weight = xlThick
Range("A1:A5").Borders(xlInsideVertical).Weight = xlThick
Using the VBA Borders LineStyle Property (3 Easy Ways)
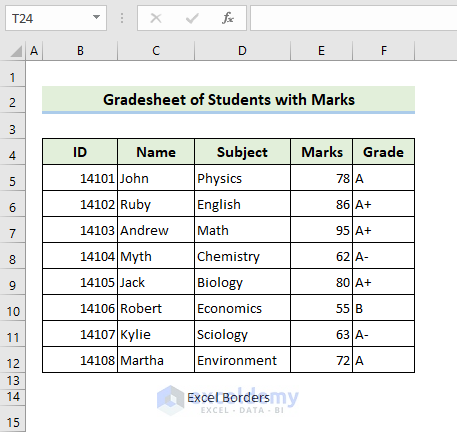
Now let’s use the linestyle property of Borders in Excel VBA,. For the purpose of demonstration, we’ll use the following sample dataset.
Method 1 – Applying Borders to All Text Cells
Here, we’ll apply borders to all cells containing text.
- Create a new module in the VBA window.
- Insert the following code in the module:
'Add Border to All Cells
'Declaring Sub-Procedure
Sub Add_Border_to_All_Cells()
'Declaring variables
Dim BrRange As Range
Dim BrCells As Range
'Provide the Range where you want borders
Set BrRange = Range("B4:F12")
For Each BrCells In BrRange
If Not IsEmpty(BrCells) Then
BrCells.BorderAround _
LineStyle:=xlContinuous, _
Weight:=xlThin
End If
Next BrCells
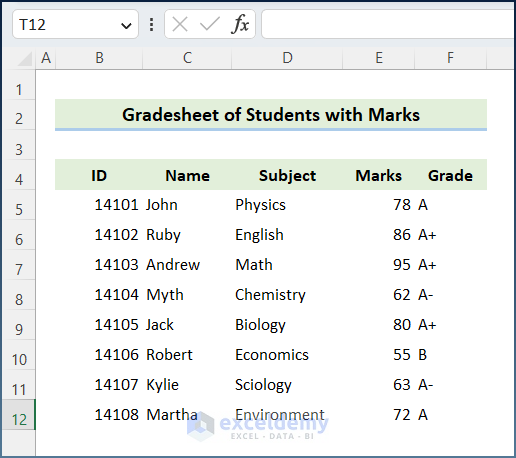
End SubIn this code, we use the If loop to check whether the cells are empty or not. If the cells are not empty, the code will assign a thin (Weight:=xlThin) border around each cell. Then the For loop checks each cell matching the condition and assigns borders within the given Range.
- Press the F5 key or the Run button to run the code.
Method 2 – Adding Borders in a Selected Range of Cells
Now let’s add borders to each cell in a particular range.
- Create a new module in the VBA window.
- Insert the following code in the module:
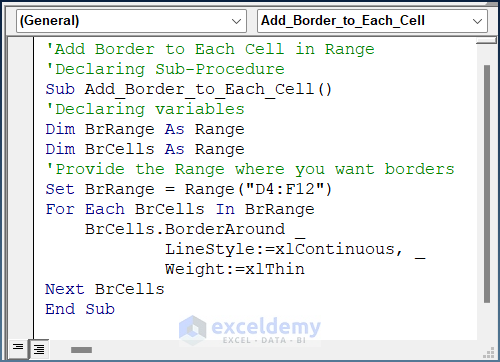
'Add Border to Each Cell in Range
'Declaring Sub-Procedure
Sub Add_Border_to_Each_Cell()
'Declaring variables
Dim BrRange As Range
Dim BrCells As Range
'Provide the Range where you want borders
Set BrRange = Range("D4:F12")
For Each BrCells In BrRange
    BrCells.BorderAround _
            LineStyle:=xlContinuous, _
            Weight:=xlThin
Next BrCells
End Sub
In this code, we use a For loop to apply the BorderAround method to each cell within the provided Range.
- Press the F5 key or the Run button to run the code, and the output will appear as below.
Method 3 – Using VBA BorderAround LineStyle Property to Add a Thick Border
The BorderAround method is a VBA method that can be used to add a border to a cell or range of cells in Excel. With this method, you can only add borders around your specified range. However, it will not insert borders on individual cells. This method allows you to specify the style, weight, and color of the border that you want to apply.
- Create a new module in the VBA window.
- Insert the following code in the module:
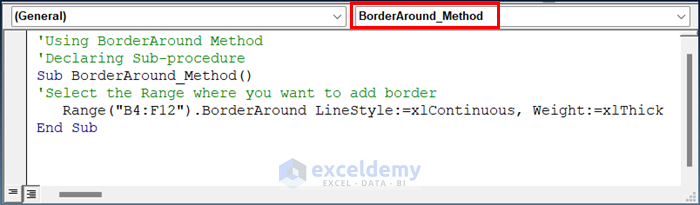
'Using BorderAround Method
'Declaring Sub-procedure
Sub BorderAround_Method()
'Select the Range where you want to add border
   Range("B4:F12").BorderAround LineStyle:=xlContinuous, Weight:=xlThick
End Sub
In this code, we use the BorderAround linestyle property and set the weight of the line as Thick (xlThick). We selected the range as B4:F12.
- Press the F5 key or the Run button to run the code.
How to Use Excel VBA Borders Linestyle Property: 4 Suitable Examples
Here are some examples of using different LineStyle properties in different circumstances.
Example 1 – Changing Colors in Borders
First, let’s look at some code to change the border color.
- Create a new module in the VBA window.
- Insert the following code in the module:
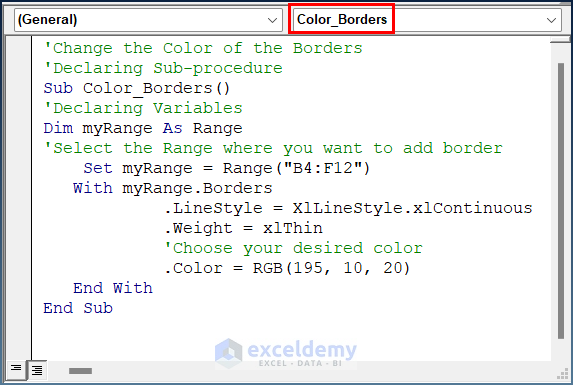
'Change the Color of the Borders
'Declaring Sub-procedure
Sub Color_Borders()
'Declaring Variables
Dim myRange As Range
'Select the Range where you want to add border
    Set myRange = Range("B4:F12")
   With myRange.Border
            .LineStyle = XlLineStyle.xlContinuous
            .Weight = xlThin
            'Choose your desired color
            .Color = RGB(195, 10, 20)
   End With
End Sub
In this code, we set the weight of the border as Thin and insert the border color in RGB. Input any color code according to your need.
- Press the F5 key or the Run button to run the code, and the output will appear as below.
Example 2 – Adding Borders Inside Cells
In this example, we’ll add borders inside cells within a specific range provided by the user. We’ll add borders to the cells using the code from Example 2. We’ve selected the Grade column to add inside borders in the cells.

- Create a new module in the VBA window.
- Insert the following code in the module:
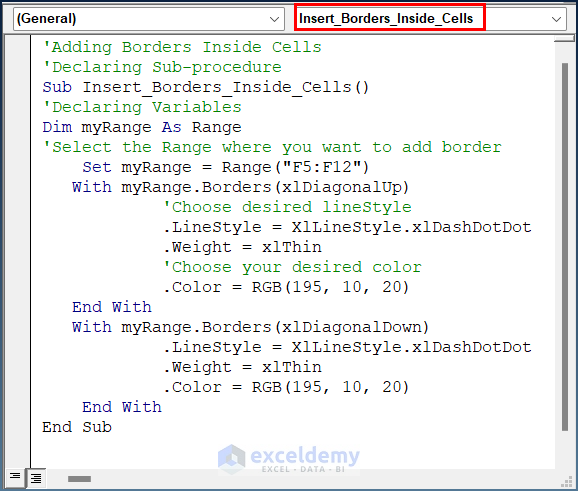
'Adding Borders Inside Cells
'Declaring Sub-procedure
Sub Insert_Border_Inside_Cells()
'Declaring Variables
Dim myRange As Range
'Select the Range where you want to add border
    Set myRange = Range("F5:F12")
   With myRange.Borders(xlDiagonalUp)
            'Choose desired lineStyle
            .LineStyle = XlLineStyle.xlDashDotDot
            .Weight = xlThin
            'Choose your desired color
            .Color = RGB(195, 10, 20)
   End With
   With myRange.Borders(xlDiagonalDown)
            .LineStyle = XlLineStyle.xlDashDotDot
            .Weight = xlThin
            .Color = RGB(195, 10, 20)
    End With
End Sub
In this code, we set DashDotDot as the border linestyle and add borders inside the cells of the provided Range. We select DiagonalUp and DiagonalDown as borders, which will add borders diagonally up and down inside a cell. Additionally, we added color with the help of RGB. If this property is not specified, the color will default to Black.
- Press the F5 key or the Run button to run the code and return the desired output.
Example 3 – Adding Double Line Top Borders
Let’s now apply a double line on the top border of each row in our dataset.
- Create a new module in the VBA window.
- Insert the following code in the module:
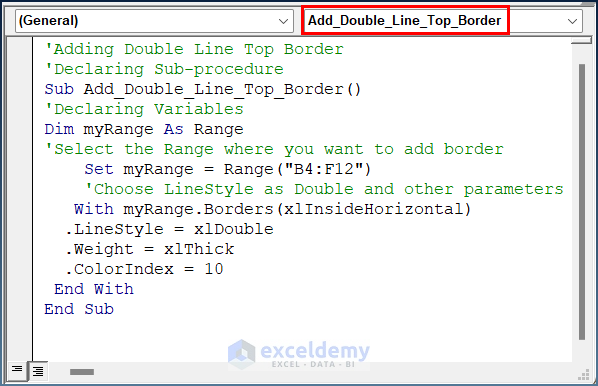
'Adding Double Line Top Border
'Declaring Sub-procedure
Sub Add_Double_Line_Top_Border()
'Declaring Variables
Dim myRange As Range
'Select the Range where you want to add border
    Set myRange = Range("B4:F12")
    'Choose LineStyle as Double and other parameters
   With myRange.Borders(xlInsideHorizontal)
  .LineStyle = xlDouble
  .Weight = xlThick
  .ColorIndex = 10
 End With
End Sub
In this code, we add a Double line top border in each row for the specified Range. We select InsideHorizontal and Double as the linestyle. Moreover, we add a Thick border with a ColorIndex of 10.
- Press the F5 key or the Run button to run the code and receive the desired result.
Read More: How to Use Excel VBA Border ColorIndex Property
Example 4 – Changing the Border Line Thickness
We can also make the borderline thick.
- Create a new module in the VBA window.
- Insert the following code in the module:
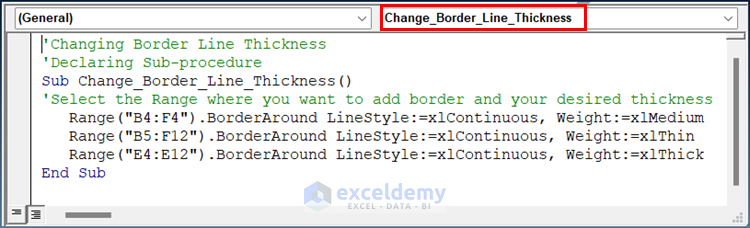
'Changing Border Line Thickness
'Declaring Sub-procedure
Sub Change_Border_Line_Thickness()
'Select the Range where you want to add border and your desired thickness
   Range("B4:F4").BorderAround LineStyle:=xlContinuous, Weight:=xlMedium
   Range("B5:F12").BorderAround LineStyle:=xlContinuous, Weight:=xlThin
   Range("E4:E12").BorderAround LineStyle:=xlContinuous, Weight:=xlThick
End Sub
In this code, we select 3 different types of border weights for different parts of the dataset. Change the Range according to your dataset.
- Press the F5 key or the Run button to run the code and receive the desired result.
Read More: How to Use Excel VBA Border Weight Property
How to Remove Borders with Excel VBA
Suppose we have added borders to the existing data previously using a method described above. Let’s remove these existing borders.
- Create a new module in the VBA window.
- Insert the following code in the module:
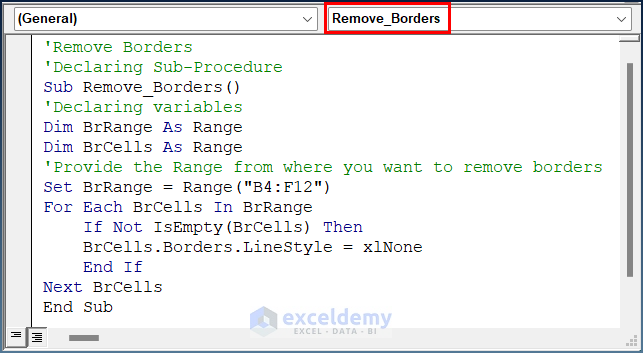
'Remove Borders
'Declaring Sub-Procedure
Sub Remove_Borders()
'Declaring variables
Dim BrRange As Range
Dim BrCells As Range
'Provide the Range from where you want to remove borders
Set BrRange = Range("B4:F12")
For Each BrCells In BrRange
    If Not IsEmpty(BrCells) Then
    BrCells.Borders.LineStyle = xlNone
    End If
Next BrCells
End Sub
In this code, we use a For loop to remove the borders from cells. The loop checks if the cells are empty or not. If they’re not empty then the borders will be removed. We use None as the Border LineStyle property, which will remove borders.
- Click the Run button to run the code, and your borders will be removed.
How to Create Variation in Border Colors with VBA
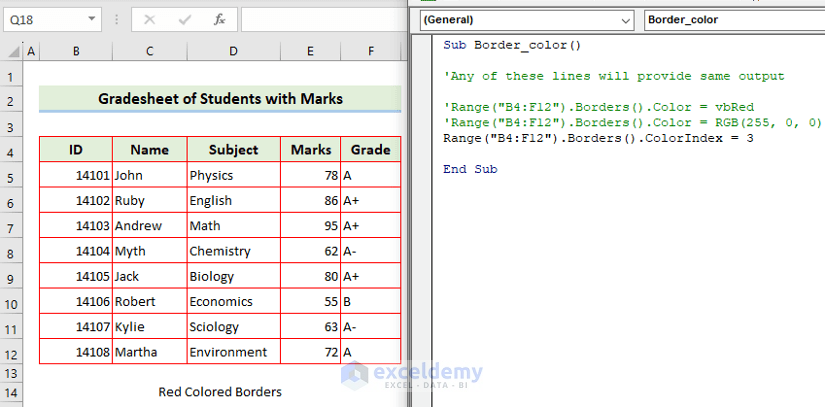
You can change the default color of your border with the help of Excel VBA. There are several properties of border color by which you can add colors to your borders, including RGB color value, ColorIndex number, and some direct color constants such as vbRed, vbBlue, vbBlack, vbWhite, vbMagenta, vbYellow, vbCyan, and vbGreen.
Here are some examples of the syntax to declare different border colors in VBA code, using an example range of B4:F12.
Range("B4:F12").Borders().Color = vbRed
Range("B4:F12").Borders().Color = RGB(255, 0, 0)
Range("B4:F12").Borders().ColorIndex = 3
These 3 lines of code return the same output, namely changing the border color to Red.
Things to Remember
- You can change the Range in each code to change the location to add borders linestyles.
- You can combine several linestyle properties at once with the help of Excel VBA.
- You can remove all borders by using the Borders command from the Fonts group.
- Unlike gridlines, All Borders are always visible in printing.
- If you use the BorderAround method, it will only add borders around your given Range.
- Adapt any of the code above to your needs.
Download Practice Workbook
Get FREE Advanced Excel Exercises with Solutions!

