Method 1 – Disabling a Recent Document List
Steps:
- Select the File tab on your Excel ribbon.
- Select Options from the left side of the backstage view.
![]()
-
- The Excel Options box will open up.
- Select the Advanced tab from the left side of this box first.
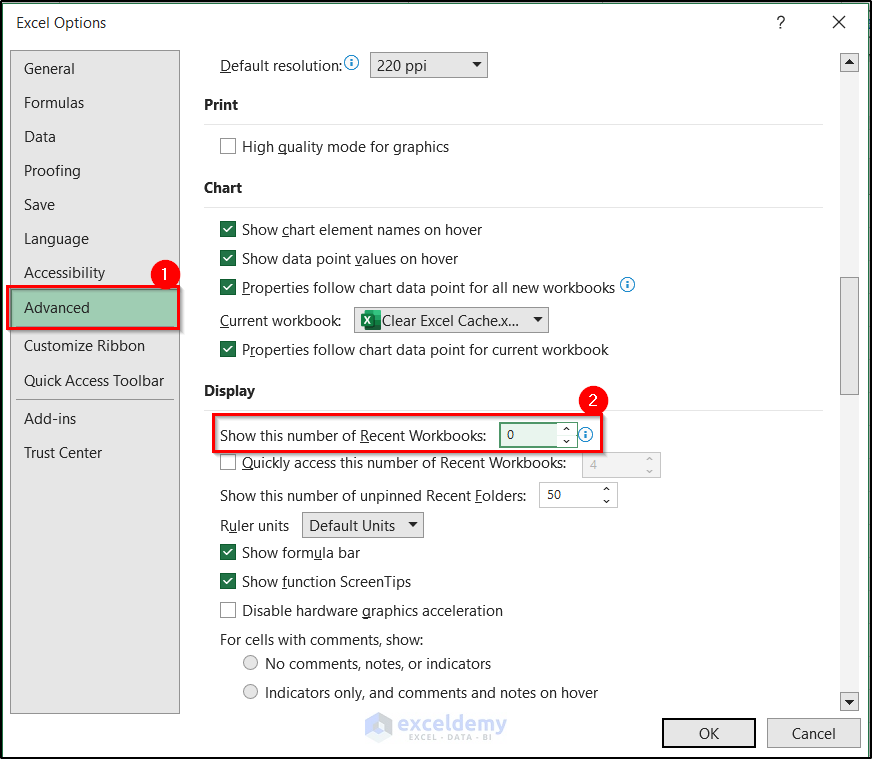
- Scroll down on the right until you find the Display sections.
- Set zero in the box beside the Show this number of Recent Workbooks option.
- Click OK.
This will disable the recent document list in Excel and clear a lot of the cache.
Method 2 – Using the Office Upload Center
Steps:
- Open the Upload Center by searching it in the Windows search bar.
- Go to Settings.
- In the box, check the Delete files from the Office Document Cache when they are closed option under the Cache Settings.
- Click on Delete cached files.
- A pop-up will appear to confirm the action.
- Confirm it by clicking on the Delete Cached information in the confirmation box.
Method 3 – Using Disk Cleanup
Steps:
- Open Disk Cleanup by searching it through the Windows search bar.
- Select the file where your Office files are located.
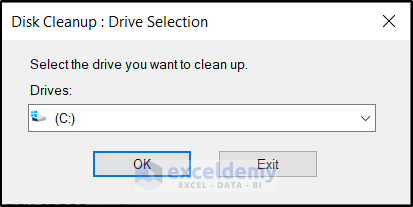
- Click on OK.
- Another box will pop up for that particular disk’s cleaning.
- Check the Temporary files option under the Files to delete section in the box.
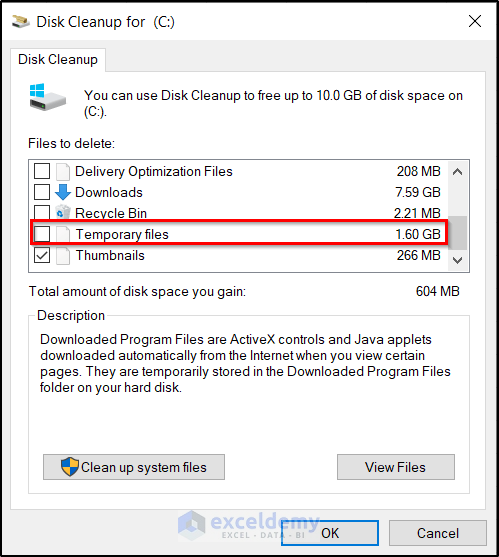
- Click OK.
The Disk Cleanup will clear all the cache of Microsoft Office including Excel.
Method 4 – Remove Cache Automatically
Steps:
- Select the File tab on your ribbon.
- Select Options from the left side of the backstage view.
![]()
- Select the Trust Center tab from the right of the Excel Options
- Select Trust Center Settings, as shown in the figure below.
![]()
- The Trust Center box will open up this time.
- Select the Trusted Add-in Catalogs tab.
- Check the Next time Office starts, clear all previously-started web add-ins cache option on the right.
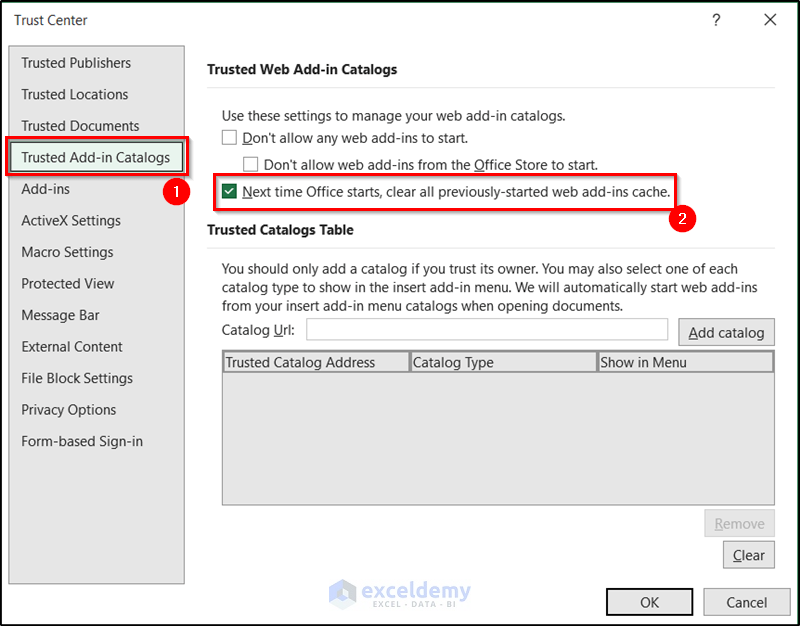
- Click OK.
Excel will automatically clear out the cache every time you restart the application.
Method 5 – Manually Deleting Local Files
Steps:
- Open the Run dialog box by pressing Win+R.
- Insert the following formula in the box:
%LOCALAPPDATA%\Microsoft\Office\16.0\Wef\
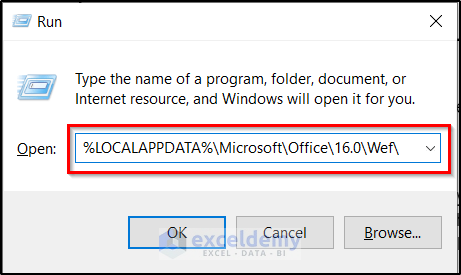
- Click OK.
- As a result, the file explorer will open up with the local cache files.
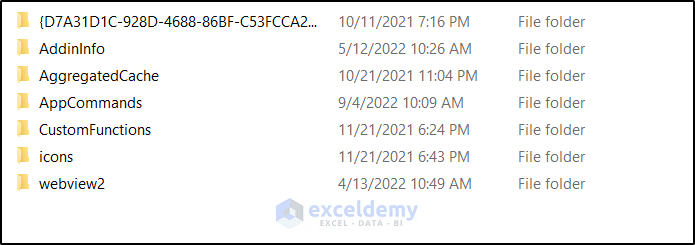
- Delete them all and restart Excel.
You can clear the Excel cache by manually deleting local files.
Method 6 – Clear PivotTable Cache
Steps:
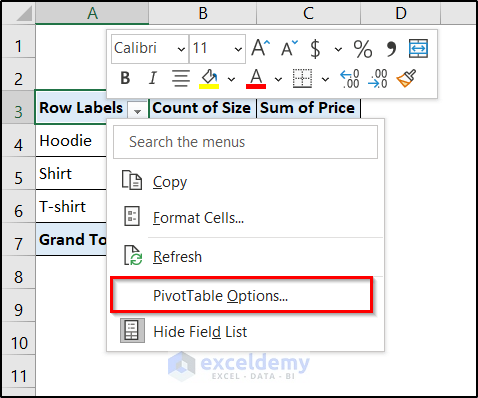
- Right-click on any cell of the Pivot Table.
- Select PivotTable Options from the context menu.
- The PivotTable Options box will open up.
- Select the Data tab in it first.
- Select the Number of items to retain per field to None.
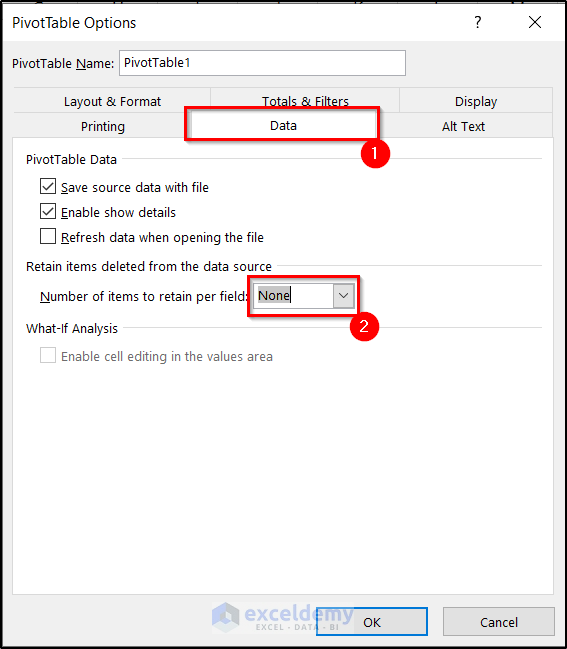
- Click OK.
- The action should be set into motion at this point. However, to see its effect immediately, right-click on any cell of the pivot table and select Refresh from the context menu.
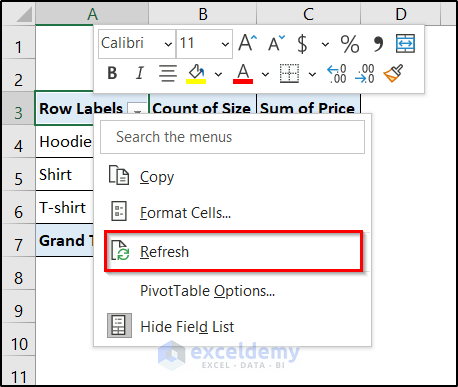
This will remove the pivot table caches and won’t store them. As a consequence, you will reduce the Excel cache.
Method 7 – Embedding VBA Code
Steps:
- Go to the Developer tab on your ribbon.
- Select Visual Basic from the Code.
![]()
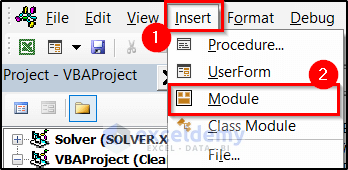
- As a result, the VBA window will open up.
- Click on Insert and select Module from the drop-down menu.
- Select the module if it hasn’t been selected, and insert the following code: (you can also find the code in the workbook.)
Sub Workbook_Open()
Dim xPtble As PivotTable
Dim xWkst As Worksheet
Dim xPcch As PivotCache
Application.ScreenUpdating = False
For Each xWkst In ActiveWorkbook.Worksheets
For Each xPtble In xWkst.PivotTables
xPtble.PivotCache.MissingItemsLimit = xlMissingItemsNone
Next xPtble
Next xWkst
For Each xPcch In ActiveWorkbook.PivotCaches
On Error Resume Next
xPcch.Refresh
Next xPcch
Application.ScreenUpdating = True
End Sub- Press F5 to run the code.
Download the Practice Workbook
You can download the workbook containing all the illustration sheets from the link below.
Clear Cache in Excel: Knowledge Hub
<< Go Back to Excel Files | Learn Excel
Get FREE Advanced Excel Exercises with Solutions!

you can just delete this file: C:\Users\(username)\AppData\Local\Microsoft\Office\16.0\OfficeFileCache
Thank you for pointing this out. There are some cache files in the location and the article has been updated for later uses.