Sorting means organizing data in ascending or descending order. So, you can easily visualize sorted extensive data. Also, you can find any information at a glance from that sorted data. Furthermore, you can sort any dataset as you want. With the help of custom sorting, you can sort the data beyond the traditional way. Now, let’s see the details of how to custom-sort using Excel VBA.
In the video, you can see my dataset becomes sorted according to a custom list. So, you can create your own list and can sort the data based on that list.
How to Launch VBA Editor in Excel
To write a VBA code in Excel, you have to launch the VBA editor. For launching this VBA editor, you must need the Developer tab, now if you don’t see the Developer tab then you have to enable the Developer tab.
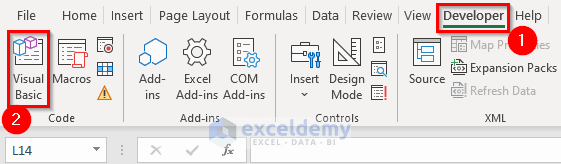
- To launch VBA Editor, choose the Developer tab >> then select Visual Basic.
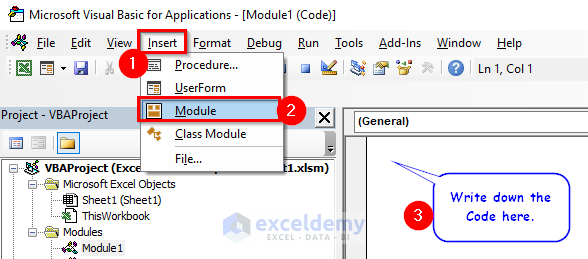
- Now, from the Insert tab >> you have to select Module. After inserting the Module, you need to write the preferable code as your dataset.
What Is Custom Sort in Excel?
There are some built-in lists in Excel, based on which you can sort your data. You can sort the dataset either alphabetically (from A to Z) or based on numbers (from highest to lowest) or based on date (from oldest to earlier or vice versa). Also, you can create a list and based on that list you can sort your data, which is called custom sorting. As an example, say you have customers’ information and from them, some are your regular customer. Now, you can sort the database based on these regular customers.
Excel VBA to Custom Sort: 5 Suitable Examples
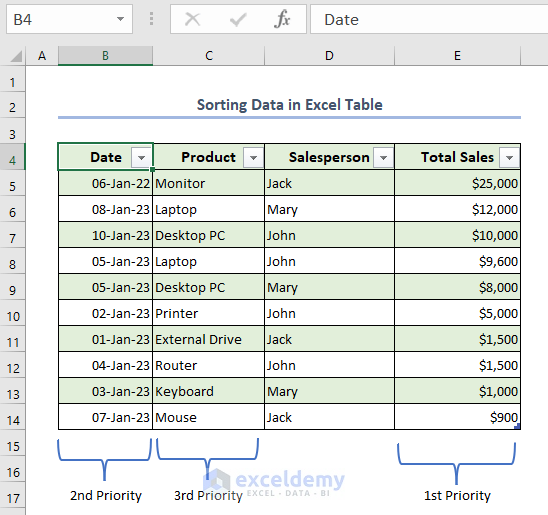
Here, I will explain some examples of how to custom sort with VBA code in Excel. For your better understanding, I’m going to use a sample dataset that has some information about sales.
1. Creating Custom List to Sort Dataset Based on Single Column in Excel
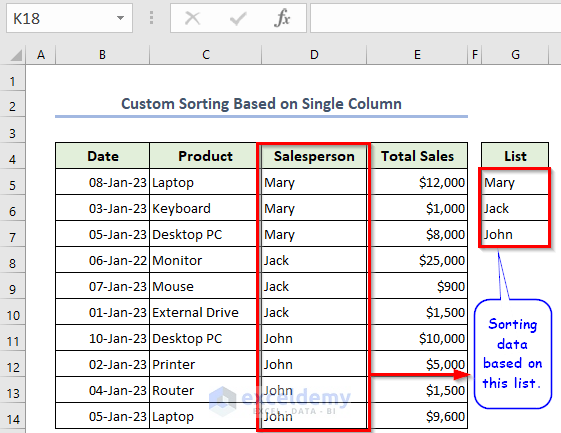
Here, I have created a list within G5:G8 cells. The list has three names, they are Mary, Jack, and John. So, the sort was based on this list.
Now, if you want to sort your data based on a new custom list then you can see this example. Here, I use a simple code so the sort is only according to the created custom list. No other column is considerable for this sorting.
- From Developer tab >> select Visual Basic >> then from the Insert tab >> you have to select Module >> write down the following code in the Module.
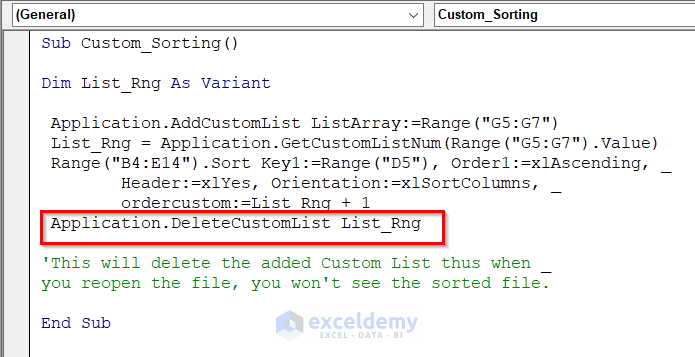
Sub Custom_Sorting()
Dim List_Rng As Variant
 Application.AddCustomList ListArray:=Range("G5:G7")
 List_Rng = Application.GetCustomListNum(Range("G5:G7").Value)
 Range("B4:E14").Sort Key1:=Range("D5"), Order1:=xlAscending, _
        Header:=xlYes, Orientation:=xlSortColumns, _
        OrderCustom:=List_Rng + 1
 Application.DeleteCustomList List_Rng
End Sub
🔎 Code Breakdown:
- Here, I create a sub-procedure named Custom_Sorting.
- Then I declare a variable List_Rng as Variant. Where I will keep the list as the base of sorting.
- In the Sort property, Key denotes the column based on which the sorting will be done. Then, you must mention the Order and Header (generally it assume the Order is in ascending way and there is no Header).
- “Application.DeleteCustomList List_Rng” —> this will remove the custom list after sorting. So, when you re-open the Excel file then you will get the original one. If you want to keep the sorted data then remove this line or you can copy-paste the sorted data into a different sheet.
- Also, if you don’t delete the custom list, then you can’t add this same custom list twice. You must use a different custom list every time.
- Now, from the Macros >> select Custom_Sorting >> press Run to see the output.
- So, you will see the following sorted data. If you have any data which doesn’t match the list that data will go to the bottom part of the dataset.
Read More: Excel VBA to Sort a ComboBox List Alphabetically
2. Creating Custom List for Sorting Dataset Based on Multiple Columns
Here, you can change the order. Also, the prime sorting is based on the created list. Then another sorting happens which is based on Total Sales. Furthermore, you can get your sorted data by clicking on the Sorting button.
So, this is an important example. You can sort properly with the help of two columns and you can also change the sorting order.
Now, let’s see the steps.
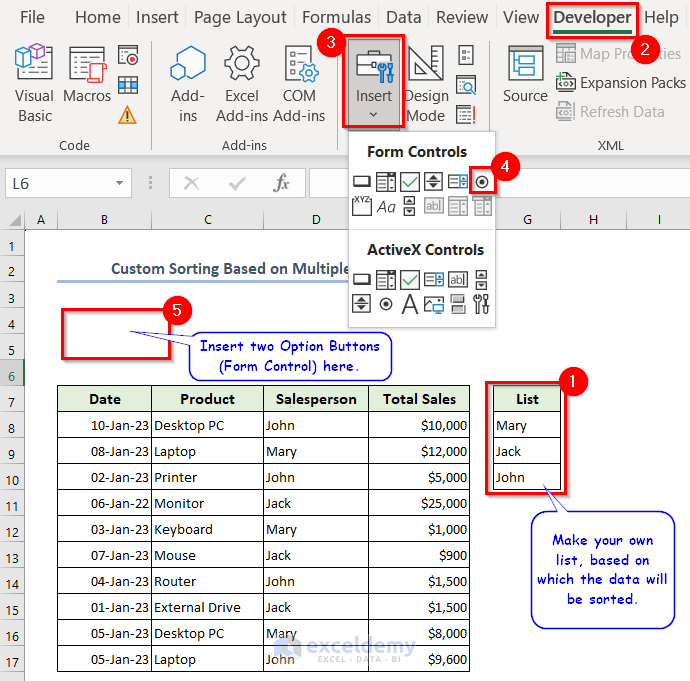
- Firstly, make the list based on which you want to sort your data.
- Secondly, from the Developer tab >> go Insert >> choose Option Button (Form Controls) >> drag Option Button >> similarly insert another Option Button.
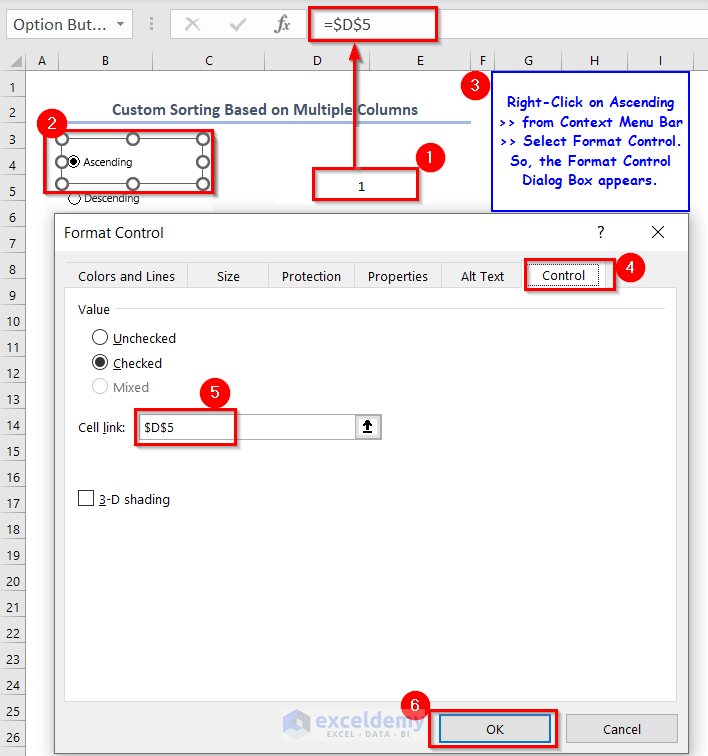
- Here, I have renamed the Option Buttons as Ascending and Descending.
- Then, write down “1” in the D5 cell.
- Right-click on Ascending >> from the Context Menu Bar >> choose Format Control. As a result, you will see the dialog box named Format Control.
- Now, from that dialog box, go to the Control menu >> select D5 cell in the Cell link box >> press OK.
- Now, insert a new Module and write down the following code in that.
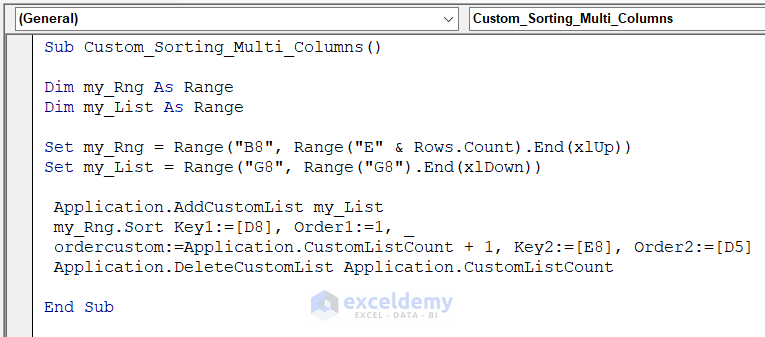
Sub Custom_Sorting_Multi_Columns()
Dim my_Rng As Range
Dim my_List As Range
Set my_Rng = Range("B8", Range("E" & Rows.Count).End(xlUp))
Set my_List = Range("G8", Range("G8").End(xlDown))
 Application.AddCustomList my_List
 my_Rng.Sort key1:=[D8], order1:=1, ordercustom:=Application.CustomListCount + 1, key2:=[E8], order2:=[D5]
 Application.DeleteCustomList Application.CustomListCount
End Sub
🔎 Code Breakdown:
- Here, I create a sub-procedure named Custom_Sorting_Multi_Columns.
- Then I declare two variables my_Rng, and my_List as Range.
- Then set the range in my_Rng from B8 to the last row of the E column of the dataset (E17).
- Set the range in my_List from G8 to the last row of the G column of the dataset (G10).
- Application.AddCustomList will add the my_List range to the custom list.
- In the Sort property, Key1 denotes the column based on which the prime sorting will be done. And Key2 denotes the dependency of secondary sorting.
- As I have linked Ascending and Descending to D5 cells so the order will depend on the D5 cell value.
- “Application.DeleteCustomList Application.CustomListCount” —> This will remove the custom list after sorting. So, when you re-open the Excel file then you will get the original one. If you want to keep the sorted data then remove this line or you can copy-paste the sorted data into a different sheet.
- Also, if you don’t delete the custom list, then you can’t add this same custom list twice. You must use a different custom list every time.

- Like the previous one, link the Option Button named Descending to the D5 cell.
- Then, from the Developer tab >> go to Insert >> select Button (Form Controls).
- Drag that Button on the D5 cell as the user can’t see the D5 cell value. And assign the above Macro named Custom_Sorting_Multi_Columns in the Button.
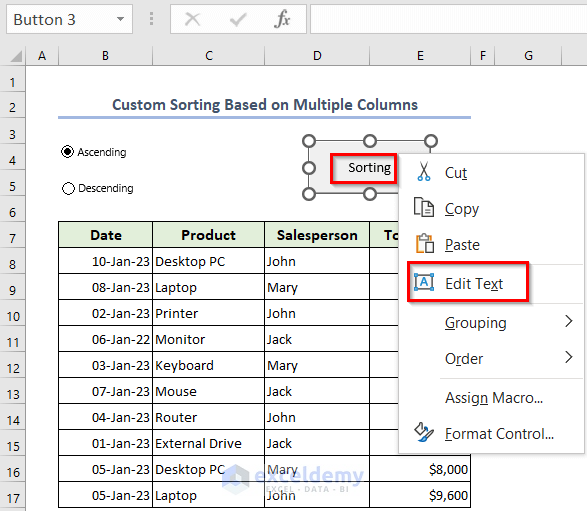
- Here, to change the name of the Button >> right-click on Button (Form Control) >> from the Context Menu Bar >> select Edit Text. I have named the Button to “Sorting”.
- Now, select any Option Button (either Ascending or Descending) >> then press on Sorting >> you will get the sorted data.
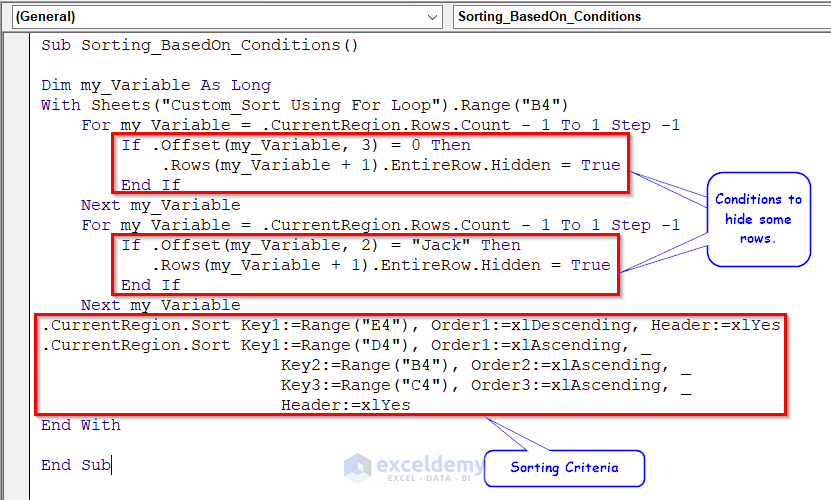
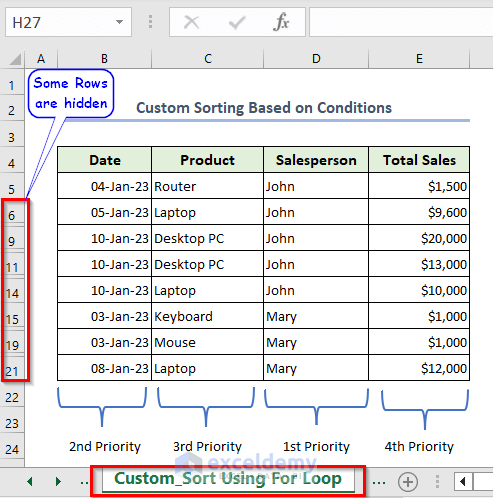
3. Using For Next Loop to Custom Sort Multiple Columns Based on Conditions
Here, you can see after running the code, some rows get not only hidden but also the remaining data are sorted. Which means you are filtering the data along with sorting.
So, if you want to apply some conditions to filter the data and want to sort that filtered data then this code is perfect for you.
Basically, when you have a very long dataset and you don’t need all that data, in that case, you can use this code.
- Use this code in a new Module to see the outcome.
Sub Sorting_BasedOn_Conditions()
Dim my_Variable As Long
With Sheets("Custom_Sort Using For Loop").Range("B4")
    For my_Variable = .CurrentRegion.Rows.Count - 1 To 1 Step -1
        If .Offset(my_Variable, 3) = 0 Then
            .Rows(my_Variable + 1).EntireRow.Hidden = True
        End If
    Next my_Variable
    For my_Variable = .CurrentRegion.Rows.Count - 1 To 1 Step -1
        If .Offset(my_Variable, 2) = "Jack" Then
            .Rows(my_Variable + 1).EntireRow.Hidden = True
        End If
    Next my_Variable
    .CurrentRegion.Sort Key1:=Range("E4"), Order1:=xlDescending, Header:=xlYes
    .CurrentRegion.Sort Key1:=Range("D4"), Order1:=xlAscending, _
                        Key2:=Range("B4"), Order2:=xlAscending, _
                        Key3:=Range("C4"), Order3:=xlAscending, _
                        Header:=xlYes
End With
End Sub
🔎 Code Breakdown:
- Here, With-End With statement denotes that all the properties are applicable for B4 range of the sheet named “Custom_Sort Using For Loop“. In addition, this code will run only for a sheet named “Custom_Sort Using For Loop“.
- The first For Next loop will go through all the rows and will check whether any cell of column E is zero. As I use the Offset property so the reference (B4) acts as (0,0) thus column E becomes 3 no column. Here, I use the If-End If statement. EntireRow.Hidden property will hide that cell which contains 0 as cell value.
- Similarly, with the help of the 2nd For Next loop and If-End If statement, I will hide the rows which contain Jack as a cell value in column D (2nd Column according to reference B4 cell).
- As the Sort property can’t take more than 3 Keys, I use two Sort properties.
- In the Sort property, the Key denotes the column based on which the sorting will be done. And Order denotes the way of sorting. If there is a Header in your data then you must mention that too.
- The 2nd Sort property gets the first priority. The data will sort according to Sales Person (whose name comes alphabetically first), if there are common names then it will check the Date (oldest date will come first), then if there is the same Date it will check the Product name (alphabetically which comes first), still, if the products are same, then it will go to Total sales (largest sales will go first). So, the sorting will follow this serial D column- Sales Person(Ascending) >> B-Date(Ascending) >> C-Product(Ascending) >> E -Total Sales(Descending).
- Now, from the Macros >> select Sorting_BasedOn_Conditions >> press Run to see the output.
- Finally, you will see the following sorted data.
Read More: Excel VBA to Sort Alphabetically
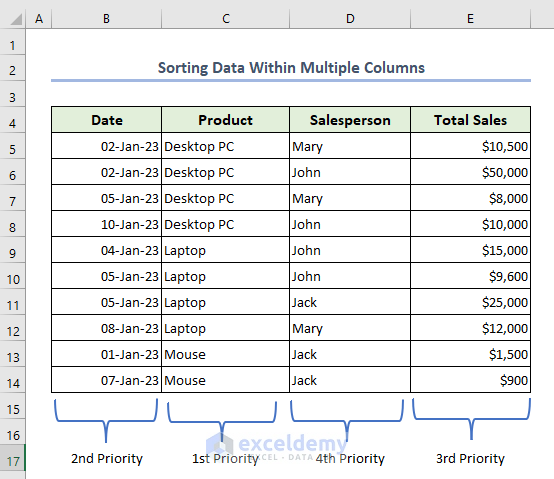
4. Sort Data Within Multiple Columns in Excel VBA
You can sort your data based on multiple columns. With this kind of sorting, you can find which product sells on which date. Also, you will get a clear idea about total sales based on product and date at a glance.
So, you can apply multiple Keys in the Sort property with any kind of dataset according to your need.

- So, write down the code given below in a new Module.
Sub Sorting_Within_MultipleColumns()
Dim my_Rng As Range
Set my_Rng = Range("B4", Range("E" & Rows.Count).End(xlUp))
With my_Rng
 .Sort Key1:=Range("B4"), Order1:=xlAscending, _
    Key2:=Range("E4"), Order2:=xlAscending, _
    Key3:=Range("D4"), Order3:=xlAscending, _
    Header:=xlYes
    .Sort Key1:=Range("C4"), Order1:=xlAscending, _
    Header:=xlYes
End With
End Sub
🔎 Code Breakdown:
- Here, I create a sub-procedure named Sorting_Within_MultipleColumns.
- Then I declare a variable my_Rng as Range.
- Then set the range from B4 to the last row of the E column of the dataset (E14). In this way, I make the range dynamic. So, you don’t need to mention how long your dataset is.
- I use both Sort properties for the same range by using With-End With statement.
- As the Sort property can’t take more than 3 Keys, I use two Sort properties.
- In the Sort property, the Key denotes the column based on which the sorting will be done. And Order denotes the way of sorting. If there is a Header in your data then you must mention that too.
- The 2nd Sort property gets the first priority. So, the data will sort according to Product name (which name comes alphabetically first), if there are common names then it will check the Date (the oldest date will come first) then if there is the same Date it will check Totale Sales (lowest sales will go first), still, if there are same sales amount, then it will go to Sales Person (alphabetically which will come first). So, the sorting will follow this serial C column-Product(Ascending) >> B-Date(Ascending) >> E-Total Sales(Ascending) >> D -Sales Person(Ascending).
- To see the output, from the Macros >> select Sorting_Within_MultipleColumns >> press Run. So, you will see the following sorted data.
Read More: Excel VBA Sort Array Alphabetically
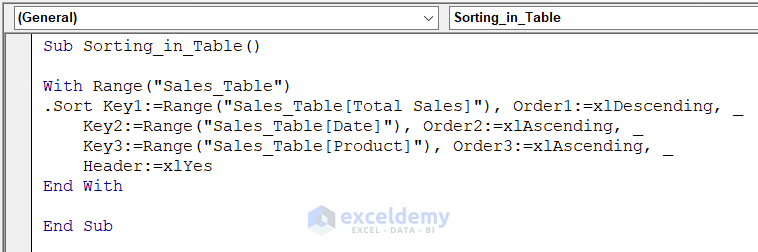
5. Sort Data in Excel Table with VBA
If you have an Excel table then you can also sort that table. You can apply multiple Keys in the Sort property with an Excel table too.
- Write down the corresponding code Module.
Sub Sorting_in_Table()
With Range("Sales_Table")
.Sort Key1:=Range("Sales_Table[Total Sales]"), Order1:=xlDescending, _
    Key2:=Range("Sales_Table[Date]"), Order2:=xlAscending, _
    Key3:=Range("Sales_Table[Product]"), Order3:=xlAscending, _
    Header:=xlYes
End With
End Sub
🔎 Code Breakdown:
- Here, you just need to use the table name inside the Range object.
- In the Sort property, Key denotes the column based on which the sorting will be done. And Order denotes the way of sorting. If there is a Header in your table then you must mention that too.
- The Key1 in Sort property gets the first priority. So, the data will sort according to Total Sales (largest sales will go first), if there are same selling prices then it will check Key2 (Date -the oldest date will come first) then if there is the same Date it will check Key3 (Product name- alphabetically which will come first).
- Here, the third bracket denotes the column header of the table.
- Now, Run the code and see the output.
Read More: VBA to Sort Table in Excel
How to Sort Data in Excel Using VBA
In this section, I will describe some basic usage of the Sort property. If you know the basic part of this Sort property then you can use it in a complex way. That’s why I’m trying to demonstrate the details of sorting with different cell values.
1. Sorting Data in Ascending Order
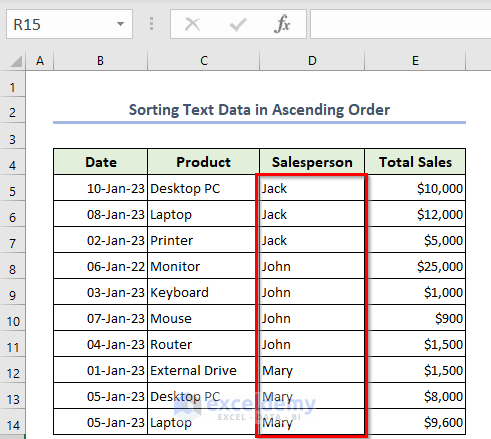
1.1 When Cells Have Text
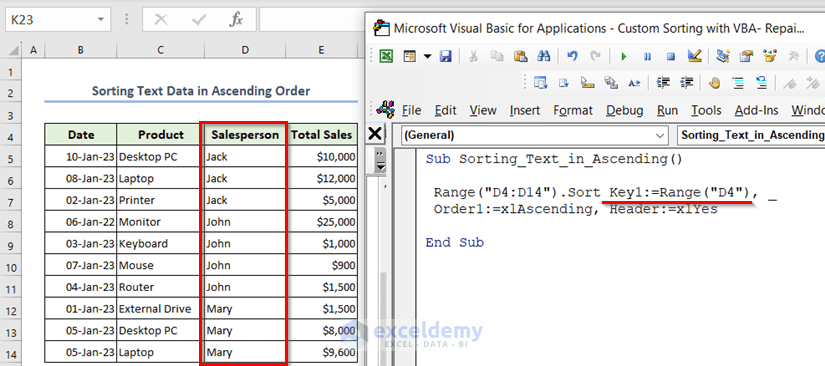
Here, the D column contains some text values. The code kept the D4 cell in Key1 and so the sorting has done based on column D (Salesperson). In the same way, you can custom sort this data based on the Product name using VBA in Excel also.

- You may write this code in Module and check the sorting.
Sub Sorting_Text_in_Ascending()
 Range("D4:D14").Sort Key1:=Range("D4"), Order1:=xlAscending, Header:=xlYes
End Sub- From Macros >> select sub-procedure named Sorting_Text_in_Ascending >> press Run. Then you will get the following result.
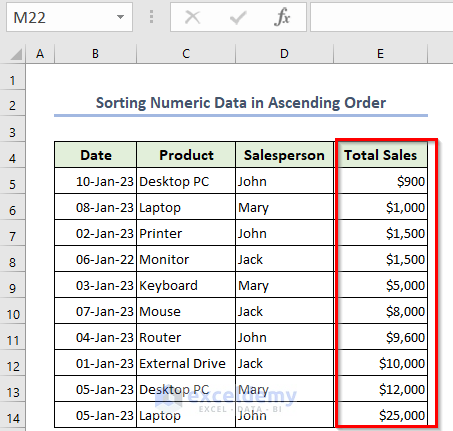
1.2 Cells Containing Number
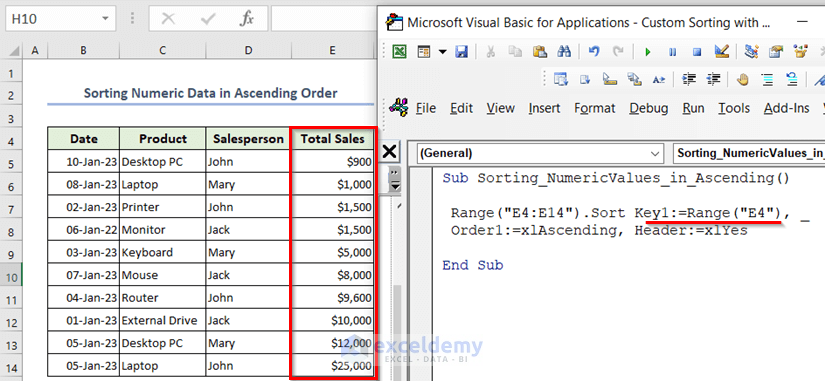
Here, the E column contains some numeric values as currency. The code kept E4 cell in Key1 and so the sorting has done based on column E (Total Sales).
You can custom sort students’ marks to see the highest mark holder, employee’s ID, student’s ID, serial numbers, and any type of numeric value in Excel VBA.

- In a Module, use this code to check the output.
Sub Sorting_NumericValues_in_Ascending()
 Range("E4:E14").Sort Key1:=Range("E4"), Order1:=xlAscending, Header:=xlYes
End Sub- After running the code, you will get the following result.
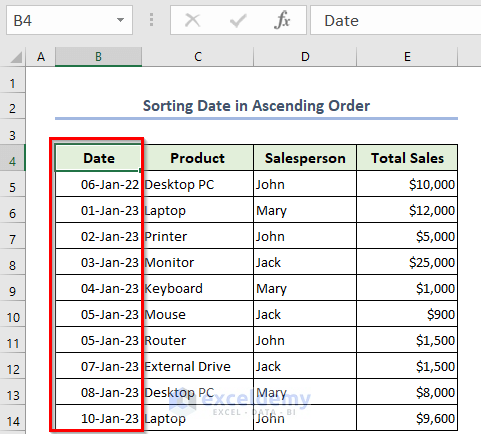
1.3 When Cells Contain Date
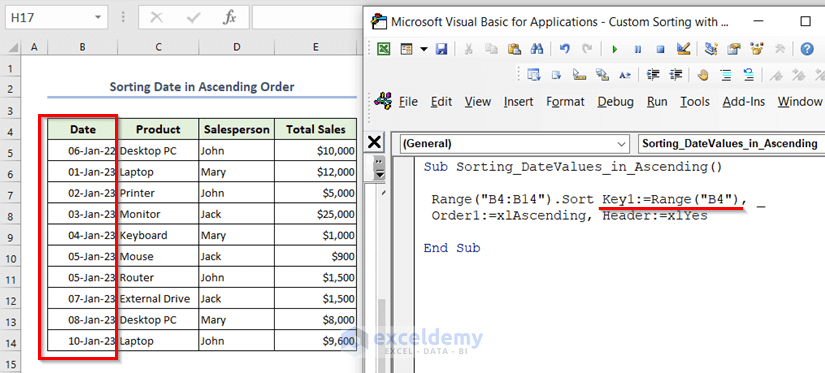
I have sorted the data based on the date as custom sort using VBA in Excel. So, when you need to focus on date in any type of dataset then you can use this code.

- In Module, write down the code.
Sub Sorting_DateValues_in_Ascending()
 Range("B4:B14").Sort Key1:=Range("B4"), Order1:=xlAscending, Header:=xlYes
End Sub- After running the code, you will get the following sorted data.
2. Sorting Data in Descending Order
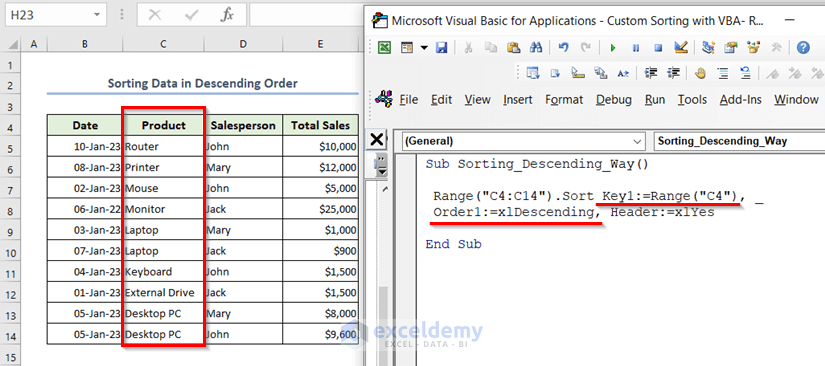
You can change the order in Descending way. Suppose, you want to see the earlier date first then you should use Descending order. For alphabetic values descending means Z to A, date- newest to oldest, and numbers- largest to lowest.

- Use a Module to see the output.
Sub Sorting_Descending_Way()
 Range("C4:C14").Sort Key1:=Range("C4"), Order1:=xlDescending, Header:=xlYes
End Sub- Now, from Macros >> select the sub-procedure named Sorting_Descending_Way >> press Run. Lastly, you will get the following result.

Read More: Excel VBA to Sort in Descending Order
How to Sort Data by Double Click in Excel VBA
Sorting is a necessary thing for any dataset. In the case of, large dataset sorting is a must. So, the easier the way is to sort, it will be more helpful for you. What if you can sort the data with a click on the mouse? So, here I will show you the code using which you can sort your data in the shortest time.
- Here, I define the dataset as Sales_Data (range B4:E14).
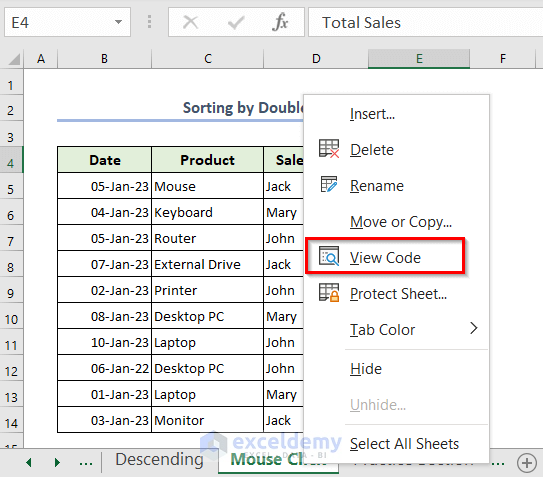
- You have to write the code in the particular sheet. As I’m going to use an event in the code. So, right-click on the sheet name >> choose View Code from the Context Menu Bar.
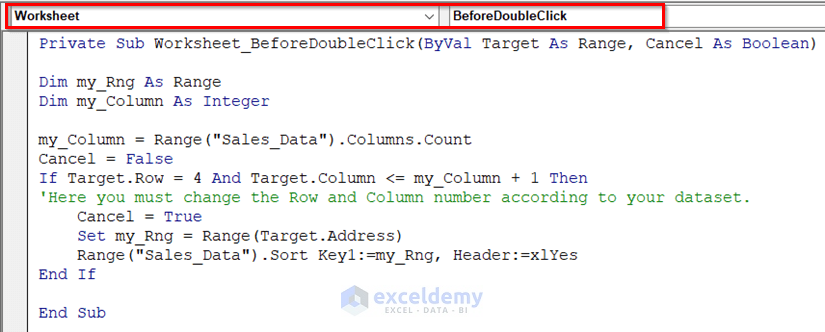
- Now, write the following code in that event.
Private Sub Worksheet_BeforeDoubleClick(ByVal Target As Range, Cancel As Boolean)
Dim my_Rng As Range
Dim my_Column As Integer
my_Column = Range("Sales_Data").Columns.Count
Cancel = False
If Target.Row = 4 And Target.Column <= my_Column + 1 Then
    Cancel = True
    Set my_Rng = Range(Target.Address)
    Range("Sales_Data").Sort Key1:=my_Rng, Header:=xlYes
End If
End Sub
🔎 Code Breakdown:
- Here, I open an event named BeforeDoubleClick.
- Then I declare two variables my_Rng as Range, and my_Column as Integer.
- Then fix my_Column value as the total column number of my defined range (4).
- Declare a variable Cancel which is assigned to False.
- If-End If statement says that if you are on 4th row and any column between 1st to 5th then the Cancel value will be True. And the sorting happens.
- So, click on any column Header to sort the dataset according to that column.
Frequently Asked Questions
1. Can you create your own custom list for sorting in Excel?
Yes, you can create your own custom list for sorting in Excel. You can see the 1st or 2nd examples for that purpose.
2. How do I sort A to Z in Excel VBA?
To sort from A to Z, you can sort data in ascending order in Excel VBA. You can check this section “When Cells Have Text Values”.
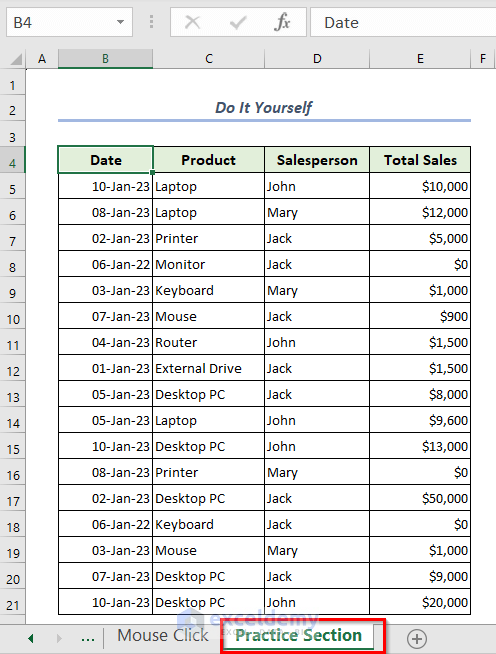
Practice Section
Now, you can practice by yourself.
Download Practice Workbook
You can download the practice workbook from here:
Conclusion
Here, I have explained the custom sorting along with the details of the Sort property in Excel VBA. Hopefully, it is clear to you how to custom sort in Excel with VBA. Please, drop comments, suggestions, or queries if you have any in the comment section below.
Related Articles
- [Fixed!!] VBA Sort Not Working in Excel
- How to Sort Array with Excel VBA
- Excel VBA to Sort Multidimensional Array


Hi Musiha
Thank you very much for the great examples.
BUT, what if I want MARY to appear at the TOP first ?
How can that be done ?
Thank you.
Thank you, Salome for your comment. I’m very glad that you like the examples.
Now, come to your question. As my understanding, you need to create a custom list for sorting. In that list MARY should be kept at first. I have explained this in 1st method. You can check this. If you want anything else, please let us know in detail.
Thank you.
Hi Musiha
I only now see your reply to my question of 10 July 2023, please accept my most sincere apology for this late response.
I have copied your VBA macro and it works great.
BUT — when I want to save the workbook it closes without saving and then makes my Excel crash. Below is the code I am using :
Range(“S_O”) = Custom Sort entries (named range)
Range(“L_D”) = List Data (Data to be sorted : columns B to V (named range)
Range(“S_X”) = Column for Custom Sort (“V2” named range)
Sub Sort_Classes() ‘Excel VBA to Sort data in a custom list
On Error Resume Next
Dim List_Rng As Variant
Application.AddCustomList ListArray:=Range(“S_O”)
List_Rng = Application.GetCustomListNum(Range(“S_O”).Value)
Range(“L_D”).Sort Key1:=Range(“S_X”), Order1:=xlDescending, _
Header:=xlYes, Orientation:=xlSortColumns, _
ordercustom:=List_Rng + 1
Application.DeleteCustomList List_Rng
On Error GoTo 0
End Sub
Could you maybe help me out on this one?
Thank you.
Kind regards
Salomé
Hi Musiha
If you need me to post my actual workbook for a better “investigation”, please let me know where I should send it to.
Thank you very much.
Awaiting your soonest reply.
Kind regards
Salomé
Hi Mushiha
Don’t worry about getting back to me. I got it working. You MUST add this line “activesheet.Sort.SortFields.Clear” BEFORE you can delete the custom sort list AND custom lists do not work with formulas in a cell. It MUST be values only.
Thank you in any way for putting my on the right path with your examples though.
Have a great weekend ahead.
Hello Salomé Magerstein,
You are most welcome.
Regards
ExcelDemy