Excel provides you with a various range of borders that you can add to format the cells according to your preference. You can also apply these borders using VBA in Excel. The main objective of this article is to explain how to use the Excel VBA border.
Adding borders manually can be time-consuming. But you can do it very easily by using VBA. VBA provides a wide range of border styles, colors, and border indexes. You can also define the thickness of the border using the Weight property. You can use the LineStyle property to set the border style, and the Color or the ColorIndex property to set the color of the border. To apply a border in Excel VBA, you will have to select the range where you want to add the border and then use the Borders property or the BorderAround method to add a border in the selected cell. You can use the properties according to your preference.
In this video, you can the basic use of Borders property to add a simple border to a specified cell in Excel VBA. You can add different formatting to this border also. Everything about borders will be explained in this article.
Download Practice Workbook
You can download the practice workbook from here.
How to Launch VBA Editor in Excel
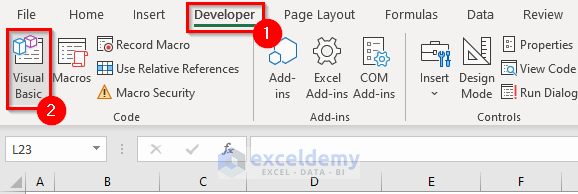
The first thing you need to know while working with VBA is how to launch the VBA editor. Let me show you the steps of launching the VBA editor in Excel.
- To begin with, go to the Developer tab.
- Select Visual Basic.
- Now, the Visual Basic Editor will open.
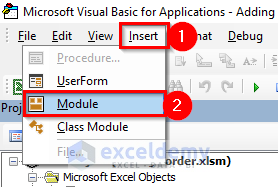
- Select Insert tab.
- Then, select Module.
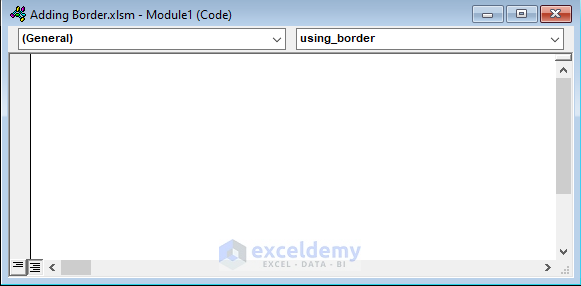
- Finally, a Module will open. You can write your VBA code here.
Note:
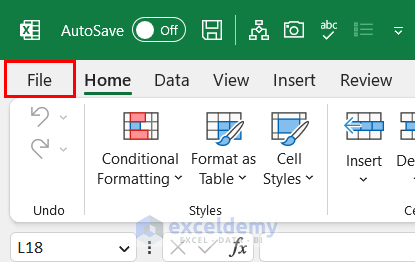
If you don’t have the Developer tab on your Ribbon then you can add it easily by following these steps.
- Go to the File tab.
- Select Options.
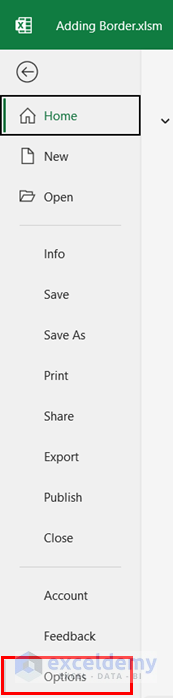
- Excel Options dialog box will open.
- Select Customize Ribbon tab.

- Select Developer from the Main Tabs.
- Then, select OK and the Developer tab will be added to the Ribbon.

Introduction to VBA Borders Property
There is a Property named Borders in VBA which you can use to add borders to your Excel sheet.
Syntax:
The syntax of Borders property is:
expression.Borders(Index as xlBordersIndex)Here, the expression is a variable that represents a Range object. And, the Index specifies which kind of border to return. If you don’t define the index, VBA will add a border to all sides of the selected range.
In Excel VBA you can use the following border Indexes.
| Name | Description |
|---|---|
| xlEdgeTop | Adds border at the top of the selected range. |
| xlEdgeBottom | Adds a border at the bottom of the selected range. |
| xlEdgeRight | Adds border at the right side of the selected range. |
| xlEdgeLeft | Adds border at the left side of the selected range. |
| xlDiagonalDown | Adds border from the upper-left corner to the lower-right corner of the selected range. |
| xlDiagonalUp | Adds border from the lower-left corner to the upper-right corner of the selected range. |
| xlInsideHorizontal | Adds horizontal border inside the selected range. |
| xlInsideVertical | Adds vertical border inside the selected range. |
How to Use Excel VBA Border
In this example, I used the VBA Bordes Property to add a border to a cell. I have sales data here. I added a border to cell F7 of this dataset. Let’s see how you can add this border.
- Open a Module in the VBA editor.
- Then, write the following code in the module.

Sub using_border()
Worksheets("Using Border").Range("F7").Borders.Weight = xlThin
End Sub
🔎 How Does the Code Work?
Worksheets("Using Border").Range("F7").Borders.Weight = xlThin- Here, I used the Worksheets object to specify the worksheet name, the Range object to define the cell range, and the Borders property to add a border to the specified cell range.
- Finally, Run the code and you will get your desired output.
How to Apply Different Types of Border Formatting in Excel VBA
You can apply different types of border formatting in Excel VBA. you can change the color, line style, and width of the border. In this section, I will show you how you can apply this formatting with examples.
1. Adding Different Colors to Border
Here, you can see that I have added a green border to the cell that has the highest Revenue and a red border to the cell that has the lowest Revenue. I used the ColorIndex property to define the color of the border in this example. Let me show you how you change the color of the Border in VBA Excel.
- Open a Module. And, write the following code in it.
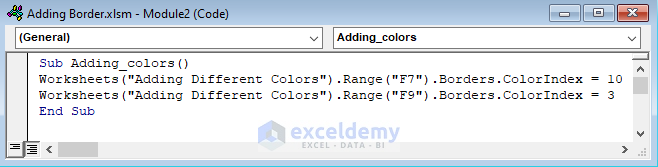
Sub Adding_colors()
Worksheets("Adding Different Colors").Range("F7").Borders.ColorIndex = 10
Worksheets("Adding Different Colors").Range("F9").Borders.ColorIndex = 3
End Sub
Here, I used the Borders.ColorIndex property to define the colors. I selected 2 different cell ranges and added 2 different colors to these ranges. For Cell F7, I used 10 as ColorIndex which refers to a green color. And for Cell F9, I used 3 as ColorIndex which refers to a red color.
- Now, Run the VBA code and you will get your desired result.
About Color and ColorIndex Property in Excel
You can use Borders.Color property or Borders.ColorIndext property to add color to a border in Excel VBA.
For Borders.Color property, you can define the colors by name (like vbRed, vbGreen). But you can not define a wide range of colors by name. In this case, you can use the RGB function to create your desired color.
For Borders.ColorIndext property, you can use a wide variety of colors by using their index number.
2. Using Different LineStyle for Border in VBA
In this example, I have used different line styles for borders to mark the highest Revenue and the Product ID that has the highest Revenue. I employed Borders.LineStyle property to define the border style. I used Dash Dot for the Revenue and Dash for the Product ID. Let’s see how you can use different LineStyle properties for your border in Excel VBA.
- Insert a Module in your Visual Basic Editor.
- Then, write the following code in the Module.
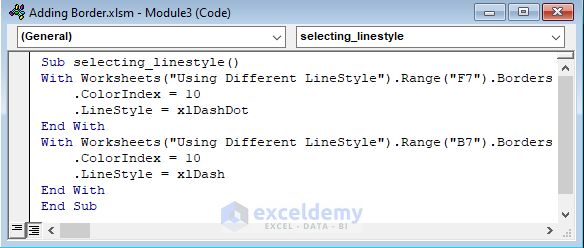
Sub selecting_linestyle()
With Worksheets("Using Different LineStyle").Range("F7").Borders
.ColorIndex = 10
.LineStyle = xlDashDot
End With
With Worksheets("Using Different LineStyle").Range("B7").Borders
.ColorIndex = 10
.LineStyle = xlDash
End With
End Sub
🔎 How Does the Code Work?
With Worksheets("Using Different LineStyle").Range("F7").Borders
.ColorIndex = 10
.LineStyle = xlDashDot
End With- Here, I used the With Statement to apply a series of properties on a single object without defining the object each time. In the With Statement, I used the ColorIndex property to add color to the border. Finally, I used the LineStyle property to set the line of the border as xlDashDot. It will return a dash-dotted border in the selected cell.
- For the other cell range, I used the same statements and properties. But here I used xlDash for the LineStyle property to get the dashed border.
- Finally, Run the code to get your desired borders.
More About LineStyle Property
You can use Borders.LineStyle property to add different line styles to the border. VBA provides different types of LineStyle for you. You can use your preferred one from the following table.
Name
Description
xlContinuous
It refers to a continuous line.
xlDash
It returns a dashed line.
xlDashDot
Returns a line with alternating dashes and dots.
xlDashDotDot
Returns a line with dashes followed by two dots.
xlDot
Refers to a dotted line.
xlDouble
It returns a double line.
xlSlantDashDot
Returns line with slanted dashes.
xlNone
It returns no line. (Used to remove borders)
3. Setting Weight of Border in Excel VBA
Here, you can see that I have set the thickness of the border according to my preference. I used VBA Borders.Weight property to define the thickness of the border in Excel. In this example, I marked the lowest Revenue and the Product ID that has the lowest Revenue. I used thick borders for this example. Let’s see how you can change the border thickness according to your preference.
- Firstly, open a Module in VBA.
- Write the following code in that Module.

Sub setting_weight()
With Worksheets("Setting Weight").Range("F9").Borders
.Weight = xlThick
.ColorIndex = 3
End With
With Worksheets("Setting Weight").Range("B9").Borders
.Weight = xlThick
.ColorIndex = 3
End With
End Sub
🔎 How Does the Code Work?
With Worksheets("Setting Weight").Range("F9").Borders
.Weight = xlThick
.ColorIndex = 3
End With- Here, I used the With Statement to apply a series of properties on a single object without defining the object each time. In the With Statement, I used the Border.Weight property to set the thickness of the border as xlThick, and the ColorIndex property to add color to the border. Finally, It will return a red thick border in the selected cell.
- For the other cell range, I used the same statements and properties.
- Finally, Run the code to get the desired output.
More About Weight Properties
You can use the following Borders.Weight properties to get your desired thickness.
Name
Description
xlHairline
It returns the thinnest border.
xlThin
It returns a thin borderline.
xlMedium
Refers to a line with a medium thickness.
xlThick
It returns the thickest border.
How to Add Cell Border in Different Positions with Excel VBA
In this section, I will add different types of cell borders using Index in the Borders property in Excel VBA. Different types of cell borders can be added using the border index. I will explain 5 suitable examples for better understanding.
1. Adding Top Border to Cell in Excel
In this example, I wanted to highlight the Revenue column. For that reason, I added a top border to the header cell of the Revenue column. Let’s see how you can add a border at the top of a cell using Excel VBA.
- Write the following code in a Module in Visual Basic Editor.
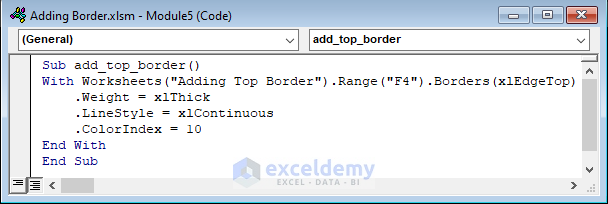
Sub add_top_border()
With Worksheets("Adding Top Border").Range("F4").Borders(xlEdgeTop)
.Weight = xlThick
.LineStyle = xlContinuous
.ColorIndex = 10
End With
End Sub
🔎 How Does the Code Work?
With Worksheets("Adding Top Border").Range("F4").Borders(xlEdgeTop)
.Weight = xlThick
.LineStyle = xlContinuous
.ColorIndex = 10
End With- Here, I used the With Statement to apply a series of properties on a single object without defining the object each time. I used xlEdgeTop as a border index to add a border at top of a cell. In the With Statement, I set xlThick as borders.Weight property used xlContinuous as the LineStyle property, and set the ColorIndex 10 to add green color to the border. Finally, It will return a green thick and continuous border in the selected cell.
You can use other LineStyle, Color, and Weight properties according to your preference.
- Now, Run to code to get the top border.
2. Including Bottom Border to Cell
Here, I added the bottom border to the cell that has the highest Revenue. Till now I was taking cell range manually. But, in this example, I used the code to find the Highest Revenue. And then, added the bottom border in that cell. Here I used the RGB function to define the green color and xltDouble as LineStyle to get a double line at the bottom of that cell. Let’s see the procedure.
- Open a Module.
- Write the following code in that module.
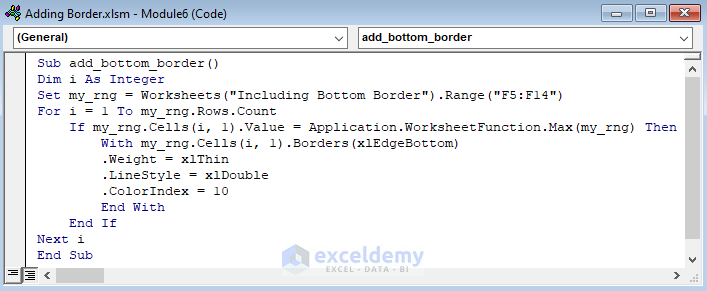
Sub add_bottom_border()
Dim i As Integer
Set my_rng = Worksheets("Including Bottom Border").Range("F5:F14")
For i = 1 To my_rng.Rows.Count
If my_rng.Cells(i, 1).Value = Application.WorksheetFunction.Max(my_rng) Then
With my_rng.Cells(i, 1).Borders(xlEdgeBottom)
.Weight = xlThin
.LineStyle = xlDouble
.ColorIndex = 10
End With
End If
Next i
End Sub
🔎 How Does the Code Work?
Dim i As Integer- Here, I declared i as an integer.
Set my_rng = Worksheets("Including Bottom Border").Range("F5:F14")- In this part, I used the Set Statement to assign a reference to my_rng which is going to be fixed throughout the whole procedure.
For i = 1 To my_rng.Rows.Count
If my_rng.Cells(i, 1).Value = Application.WorksheetFunction.Max(my_rng) Then
With my_rng.Cells(i, 1).Borders(xlEdgeBottom)
.Weight = xlThin
.LineStyle = xlDouble
.ColorIndex = 10
End With
End If
Next i- Here, I used a For Next Loop to go through every cell of my_rng.
- Then, I used the If Statement to check if the cell value matches the maximum value in my_rng. I used the Application.WorksheetFunction property to use the Max function here.
- Here, I used the With Statement to apply a series of properties on a single object without defining the object each time. I used xlEdgeBottom as a border index to add a border at the bottom of a cell. In the With Statement, I set xlThin as borders.Weight property used xlDouble as the LineStyle property, and set the ColorIndex as 10 to add green color to the border. Finally, It will return a green thin and double border in the selected cell.
- Now, Run the code to get your desired output.
3. Attaching Border at Right Side of Cell
In this example, I used a thick right border to highlight the lowest Revenue value. I used the VBA code to find the lowest value in the Revenue column and then added a thick red continuous border at the right side of the cell. Let me show you how you can do that.
- To begin with, open a Module and write the following code.
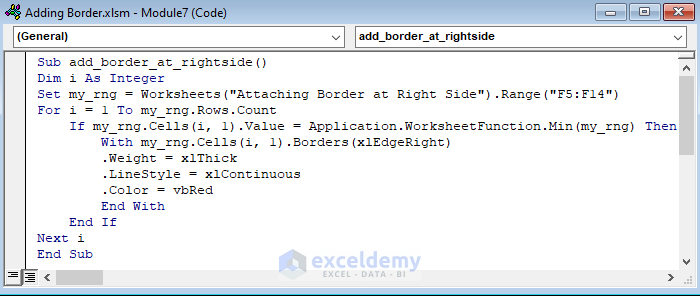
Sub add_border_at_rightside()
Dim i As Integer
Set my_rng = Worksheets("Attaching Border at Right Side").Range("F5:F14")
For i = 1 To my_rng.Rows.Count
If my_rng.Cells(i, 1).Value = Application.WorksheetFunction.Min(my_rng) Then
With my_rng.Cells(i, 1).Borders(xlEdgeRight)
.Weight = xlThick
.LineStyle = xlContinuous
.ColorIndex = 3
End With
End If
Next i
End Sub
This code is almost the same as the previous code. Here, in the If Statement, I used the Min function as I wanted to find the lowest value. And, I used xlEdgeRight as the border index to add a border at the right side of the cell. I also changed the Weight, LineStyle, and ColorIndex properties of the cell according to my preference.
- Run the code to get your desired border at your desired cell.
4. Adding Left Cell Border in Excel
Here, I wanted to add a border between the Unit Sold column and the Revenue column. For this reason, I added a border to the left side of each cell from the Revenue column. Let’s see how you can do that.
- Open a Module in the Visual Basic Editor.
- Then, write the following code in that Module.
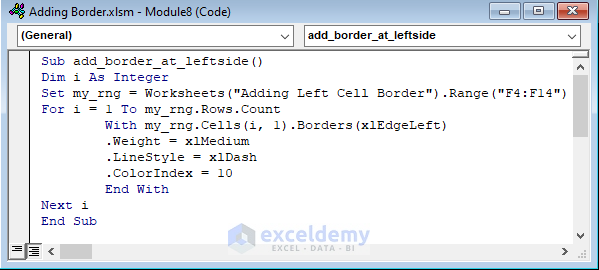
Sub add_border_at_leftside()
Dim i As Integer
Set my_rng = Worksheets("Adding Left Cell Border").Range("F4:F14")
For i = 1 To my_rng.Rows.Count
With my_rng.Cells(i, 1).Borders(xlEdgeLeft)
.Weight = xlMedium
.LineStyle = xlDash
.ColorIndex = 10
End With
Next i
End Sub
🔎 How Does the Code Work?
Dim i As Integer
- Here, I declared i as an integer.
Set my_rng = Worksheets("Adding Left Cell Border").Range("F4:F14")- In this part, I used the Set Statement to assign a reference to my_rng which is going to be fixed throughout the whole procedure.
For i = 1 To my_rng.Rows.Count
With my_rng.Cells(i, 1).Borders(xlEdgeLeft)
.Weight = xlMedium
.LineStyle = xlDash
.ColorIndex = 10
End With
Next i- Here, I used the For Next Loop to go through all the rows of the selected range. In the For Next Loop, I used the With Statement to define all the properties without defining the object each time. I used xlEdgeLeft to add a border on the left side of the cells.
- Now, Run the code to get your desired result.
5. Including Border Inside Cell
In this example, I wanted to put a red cross in the blank cell. So, I used two diagonal borders inside the cell to create the cross. Let me show you how to add a border inside a cell using Excel VBA.
- Open a VBA Module and write the following code.
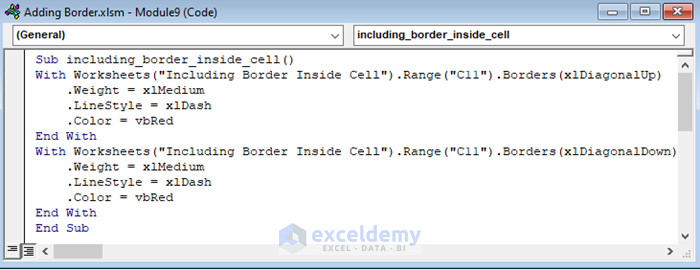
Sub including_border_inside_cell()
With Worksheets("Including Border Inside Cell").Range("C11").Borders(xlDiagonalUp)
.Weight = xlMedium
.LineStyle = xlDash
.Color = vbRed
End With
With Worksheets("Including Border Inside Cell").Range("C11").Borders(xlDiagonalDown)
.Weight = xlMedium
.LineStyle = xlDash
.Color = vbRed
End With
End Sub
🔎 How Does the Code Work?
With Worksheets("Including Border Inside Cell").Range("C11").Borders(xlDiagonalUp)
.Weight = xlMedium
.LineStyle = xlDash
.Color = vbRed
End With- Here, I used the With Statement to apply a series of properties on a single object without defining the object each time. I used xDiagonalUp as a border index to add a diagonal border from the lower-left corner to the upper-right corner of the cell. In the With Statement, I set the Weight, LineStyle, and Color properties according to my preference.
- I followed the same procedure for adding another diagonal border from the upper-left corner to the lower-right corner of the same cell. Here, I used xlDiagonalDown as the border index.
- Now, Run the VBA code to get your desired border.
How to Use VBA BorderAround Method in Excel
Excel VBA has another method called BorderAround to add a border around a cell. You can also use this method while adding a border around a cell or a cell range.
Syntax:
The syntax of the BorderAround method is:
expression.BorderAround ([LineStyle], [Weight], [ColorIndex], [Color], [ThemeColor])Here, the expression is a variable that represents a Range object.
You must specify ColorIndex, Color, or ThemeColor property. You can also specify either LineStyle or Weight property. If you don’t specify any of these properties, Excel uses the default ones.
1. Applying BorderAround Method to Range of Cells
In this example, I added a border with medium thickness around the cell range B4:F14. Let me show you how you can add this type of border in Excel VBA.
- To begin with, open the VBA Module and write the following code in that Module.
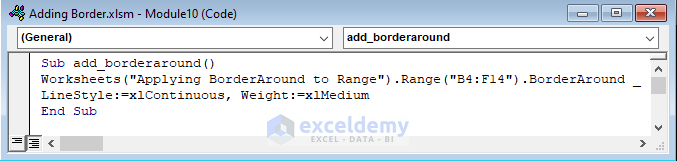
Sub add_borderaround()
Worksheets("Applying BorderAround to Range").Range("B4:F14").BorderAround _
LineStyle:=xlContinuous, Weight:=xlMedium
End Sub
🔎 How Does the Code Work?
Worksheets("Applying BorderAround to Range").Range("B4:F14").BorderAround _
LineStyle:=xlContinuous, Weight:=xlMedium- Here, I used the Worksheets and Range method to define where I want to add the border.
- Then, I used the BorderAround method to add a border to the selected range. I also used the LineStyle and Weight properties to get my desired border. Here, I used xlMedium to add a border with a medium thickness.
- Finally, Run the code and you will get your desired output.
2. Attaching BorderAround Method to Each Cell of Selected Range
Here, I added a border around each cell of a selected range in Excel VBA. I used the BorderAround method for this example. Let’s see how you can add this border.
- Write the following code in a VBA Module.

Sub borderaround_each_cell()
Set my_rng = Worksheets("BorderAround Each Cell").Range("B4:F14")
For Each cell In my_rng
cell.BorderAround LineStyle:=xlContinuous, Weight:=xlThin
Next cell
End Sub
🔎 How Does the Code Work?
Set my_rng = Worksheets("BorderAround Each Cell").Range("B4:F14")- Here, I used the Set Statement to define my_rng.
For Each cell In my_rng
cell.BorderAround LineStyle:=xlContinuous, Weight:=xlThin
Next cell- In this part, I used the For Each Loop to add a border around each cell of my_rng. I also set the LineStyle and Weight properties according to my preference.
- Run the VBA code to add a border around each cell of your preferred range.
How to Add Border to All Cells in a Range in Excel VBA
In this section, I will add borders to all cells in a range in Excel VBA. Here, I will use the Borders property to add the border. Let’s explore some examples.
1. Inserting Border to All Cells in a Range
In this example, I added a bottom border to all cells in cell range B4:F14. I added a green continuous line with medium thickness as the border. Let’s see how you can add a border to all cells in a range in Excel VBA.
- Open a VBA Module and write the following code in it.
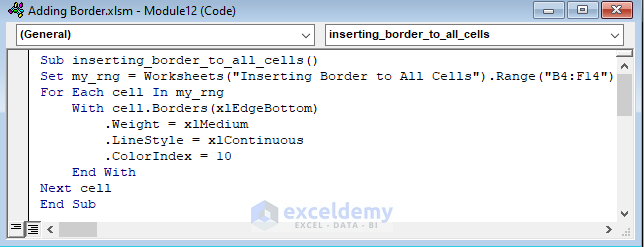
Sub inserting_border_to_all_cells()
Set my_rng = Worksheets("Inserting Border to All Cells").Range("B4:F14")
For Each cell In my_rng
With cell.Borders(xlEdgeBottom)
.Weight = xlMedium
.LineStyle = xlContinuous
.ColorIndex = 10
End With
Next cell
End Sub
🔎 How Does the Code Work?
Set my_rng = Worksheets("Inserting Border to All Cells").Range("B4:F14")- In this part, I used the Set Satement to specify my_rng.
For Each cell In my_rng
With cell.Borders(xlEdgeBottom)
.Weight = xlMedium
.LineStyle = xlContinuous
.ColorIndex = 10
End With
Next cell- Here, I used the For Each Loop to add a border to all cells in my_rng.
- In the For Each Loop, I used the With Statement to set Weight, LineStyle, and ColorIndex properties without defining the object every time.
- Now, Run to code to get your desired result.
2. Adding Border to All Used Cells in Range with Excel VBA
Here, you can see that I have added a bottom border to all the used cell in the worksheet. Now, I will show you how to add borders to all used cells in a range in Excel VBA.
- To begin with, write the following VBA code in a Module.
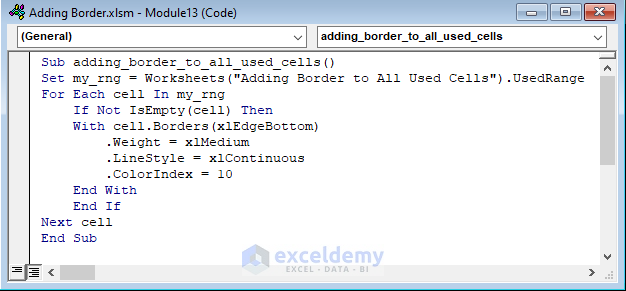
Sub adding_border_to_all_used_cells()
Set my_rng = Worksheets("Adding Border to All Used Cells").UsedRange
For Each cell In my_rng
If Not IsEmpty(cell) Then
With cell.Borders(xlEdgeBottom)
.Weight = xlMedium
.LineStyle = xlContinuous
.ColorIndex = 10
End With
End If
Next cell
End Sub
🔎 How Does the Code Work?
Set my_rng = Worksheets("Adding Border to All Used Cells").UsedRange- Here, I used the Set Statement to specify my_rng. I used the UsedRange property to get all the cells that have data in the specified worksheet.
For Each cell In my_rng
If Not IsEmpty(cell) Then
With cell.Borders(xlEdgeBottom)
.Weight = xlMedium
.LineStyle = xlContinuous
.ColorIndex = 10
End With
End If
Next cell- Then, I used the For Each Loop to add a border to each cell of my_rng.
- In the For Each Loop, I used the If Statement to check if the cell is empty or not. Here, I used the IsEmpty function to check if the selected cell is empty. Also used the Not operator to find the cells that are not empty.
- In the If Statement, I used a With Statement to define the properties of the border.
- Finally, Run the VBA code to add a border to the used cells in an Excel sheet.
3. Inserting Border to All Cells Based on Condition
In this example, I added a bottom border to the cells where the Sold Units are less than 25. I added a red double line as the bottom border to mark those cells. Let’s see how you can add a border to cells depending on a condition.
- Open the VBA Module and writhe the following code in it.
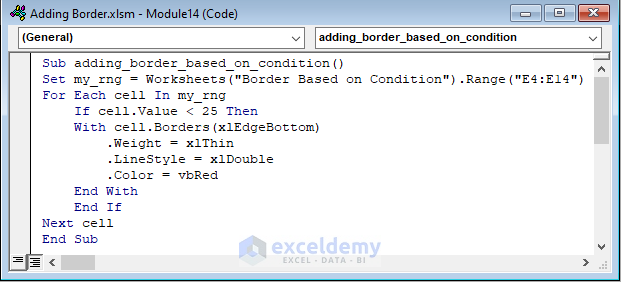
Sub adding_border_based_on_condition()
Set my_rng = Worksheets("Border Based on Condition").Range("E4:E14")
For Each cell In my_rng
If cell.Value < 25 Then
With cell.Borders(xlEdgeBottom)
.Weight = xlThin
.LineStyle = xlDouble
.Color = vbRed
End With
End If
Next cell
End Sub
Here, I followed the same procedure as the previous code. But now in the If Statement, I checked if the cell value is less than 25. And, I changed the Weight, LineStyle, and Color properties according to my preference.
- Run the code to add a border to the cells that fulfill the given condition.
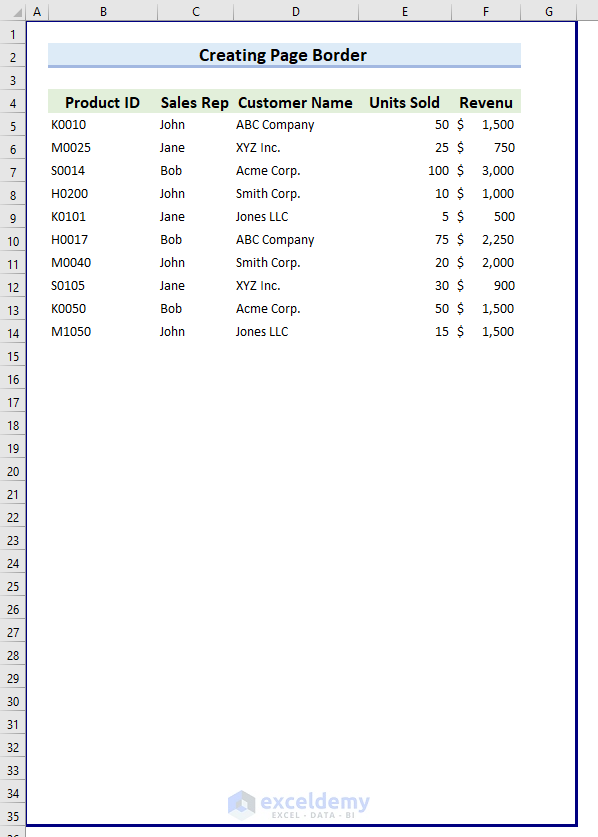
How to Create Page Border with Excel VBA
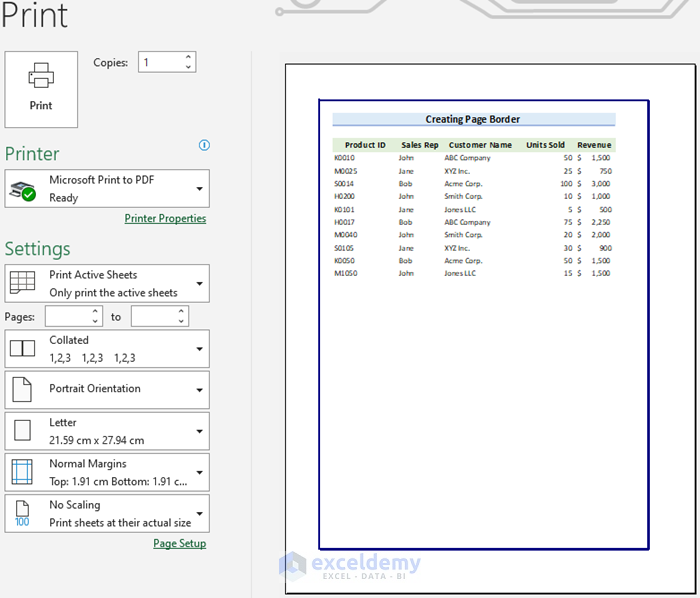
In this section, I will show you how you can add a page border using Excel VBA. Let me show you the steps.
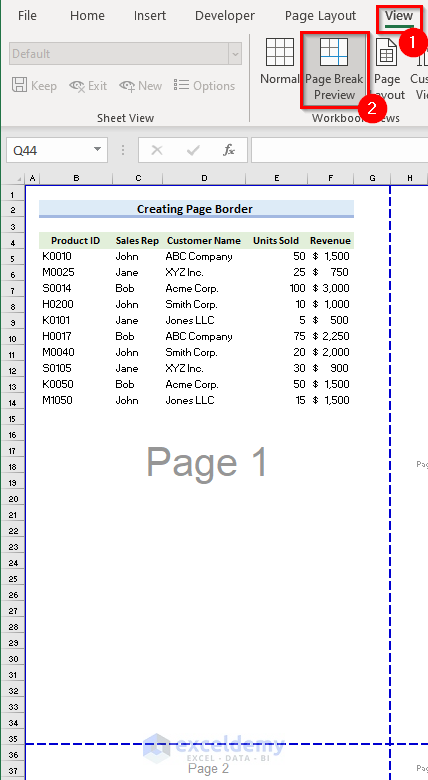
- To begin with, go to the View tab.
- Select Page Break Preview and you will be able to see the page breaks of your Excel sheet. You will be able to see the cells that will be on a page after printing.
- Write the following code in a VBA Module.
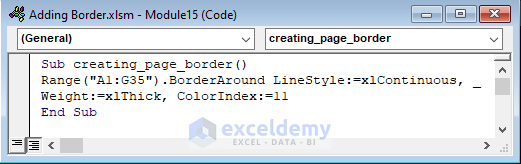
Sub creating_page_border()
Range("A1:G35").BorderAround LineStyle:=xlContinuous, _
Weight:=xlThick, ColorIndex:=11
End Sub
🔎 How Does the Code Work?
Range("A1:G35").BorderAround LineStyle:=xlContinuous, _
Weight:=xlThick, ColorIndex:=11- Here, I selected cell range A1:G35 as Range as the first page contains this cell range. I used the BorderAround Method to add a border. Also, I set LineStyle, Weight, and ColorIndex properties according to my preference.
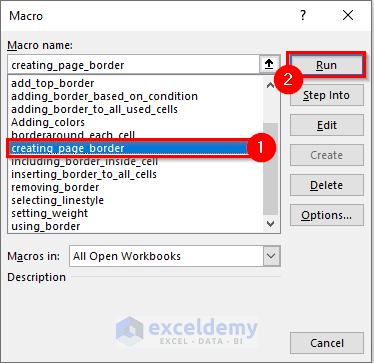
- Now, go to the Developer tab.
- Select Macros.
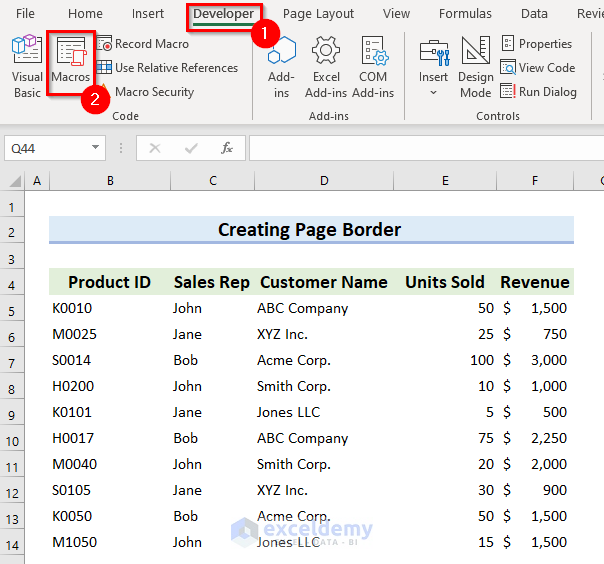
- Mecro dialog box will appear.
- Select creating_page_boder as the Macro name.
- Finally, select Run to get the border.
- Now, you will see a page border is added.
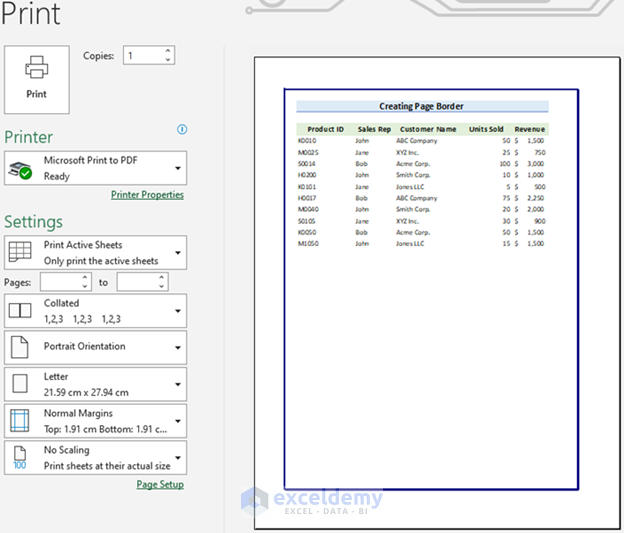
- Press Ctrl + P on your keyboard and you will be able to see the Print Preview. Here, you will see the page border you added.
How to Remove Border in Excel VBA
You can see that I have removed borders from a range of cells in this example. Let’s see how you can remove the border in Excel VBA.
- Open a VBA Module and write the following code.
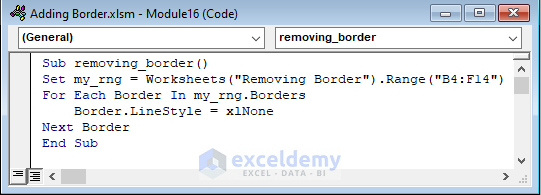
Sub removing_border()
Set my_rng = Worksheets("Removing Border").Range("B4:F14")
For Each Border In my_rng.Borders
Border.LineStyle = xlNone
Next Border
End Sub
🔎 How Does the Code Work?
For Each Border In my_rng.Borders
Border.LineStyle = xlNone
Next Border- Here, I used the For Each Loop to go through each border of the selected range. Then, I used xlNone as LineStyle to remove the lines.
- Now, Run the code to remove the borders from the range.
Things to Remember
- Whenever working with Excel VBA, you must Save the Excel file as Excel Macro-Enabled Workbook. Otherwise, the Macro will not work.
- You can use the properties to define your border according to your preference.
Excel VBA Border: Knowledge Hub
- Use of VBA Border LineStyle Property
- Use of VBA Border ColorIndex Property
- Use of VBA Border Weight Property
Conclusion
So, you have reached the end of my article. I tried to cover everything about how to use Excel VBA border property in this article. I hope this article was clear to you. Finally, I recommend you practice by yourself for better understanding. Please let us know if you face any problems.
Get FREE Advanced Excel Exercises with Solutions!
