STEP 1: Enter Documents for Double Entry Bookkeeping
The sample dataset contains an initial balance sheet of a company organized into Particulars, Credit/Debit, Debit, and Credit columns.
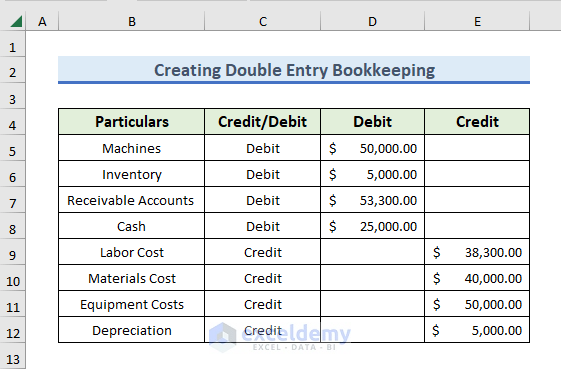
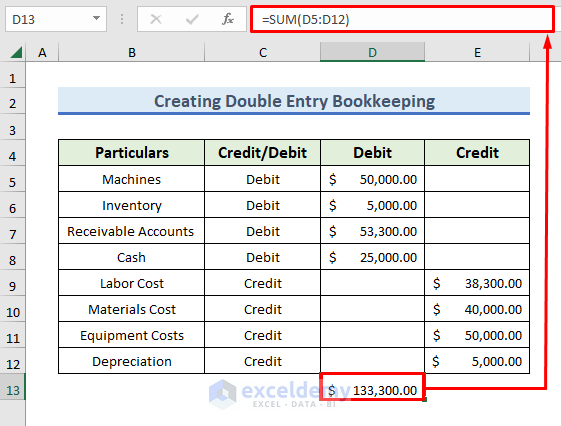
- Calculate the total Debit amount by entering the following formula.
=SUM(D5:D12)- Press Enter.
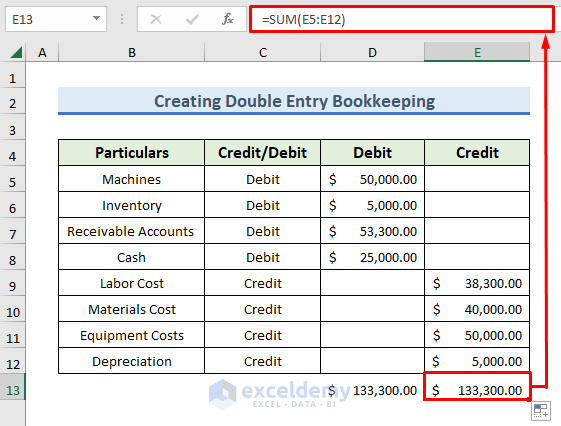
- Calculate the Credit amount by entering the following formula.
=SUM(E5:E12)- Press Enter.
STEP 2: Make Journal Entries in Excel
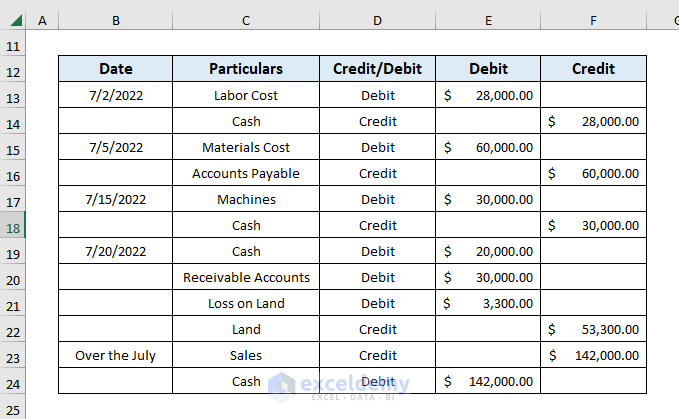
- In the following step, we need to track the financial activities for a certain period, in this case July 2022.

- The information is reorganized into a balance sheet.
- We will now combine the entries from both balance sheets.
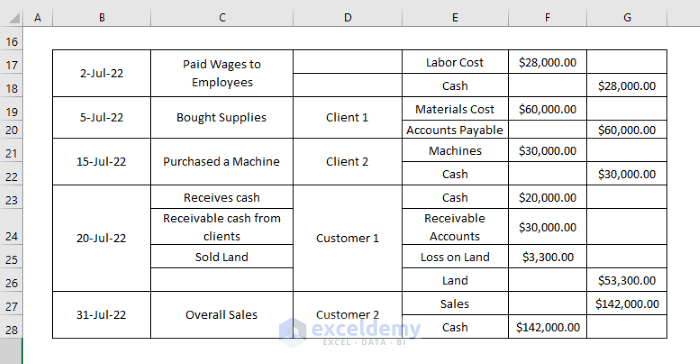
- Insert the following formula to find the Machine Debit entry.
=Dataset!D5+Entries!E17- Press Enter.
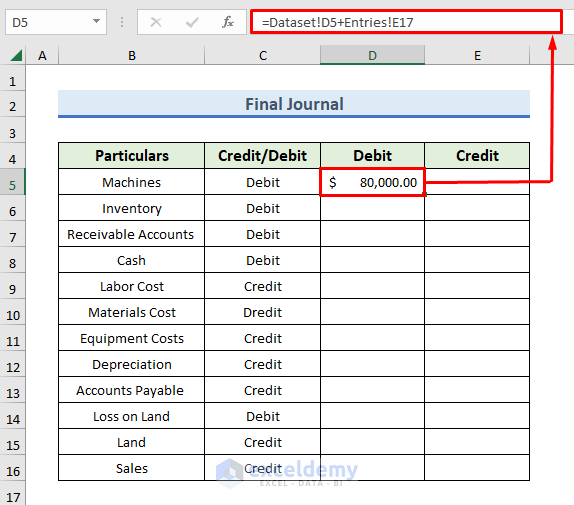
Here, Dataset refers to the initial balance sheet and Entries is our newly formed balance sheet.
A Machine entry is recorded in the Debit column of both sheets.
In the Dataset balance sheet, it is presented in the D5 cell and in the Entries balance sheet, it is presented in the E15 cell.
So, we have added the Debit values together and found our new balance.
- Insert the following formula in the Debit column for Inventory.
=Dataset!D6- Press Enter.
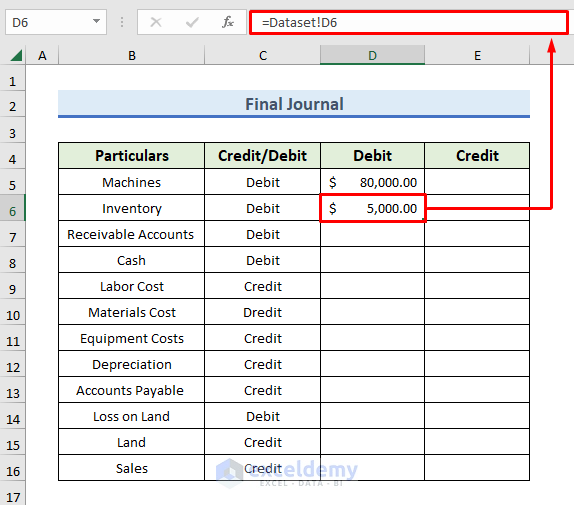
There is no Inventory in the Entries dataset, so it has only recorded the information from the Dataset sheet.
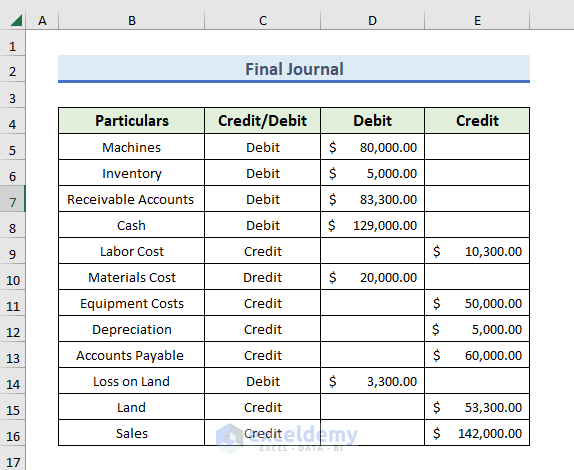
- Repeat for the entries of each financial statement.
- When the Journal is complete we can analyze the condition of the company.
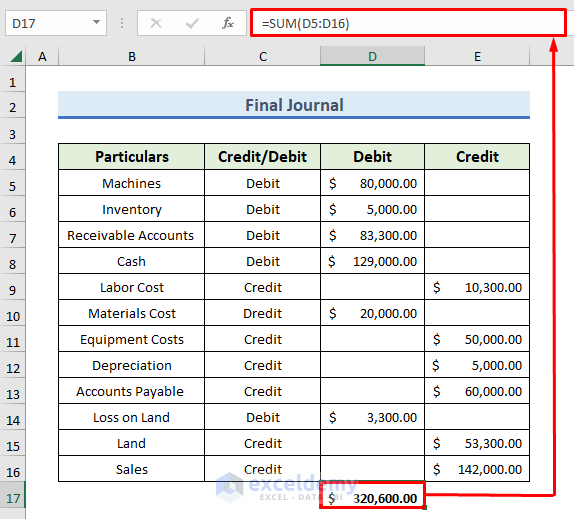
- Now, we will check our calculations by the summation of Debit and Credit.
- Use the following formula in the Debit column to calculate the total:
=SUM(D5:D16)- Hit Enter.
- Use the following formula in the Credit column to calculate the total.
=SUM(E5:E16)- Hit Enter.
- As Debit equals Credit the balance sheet is correct.

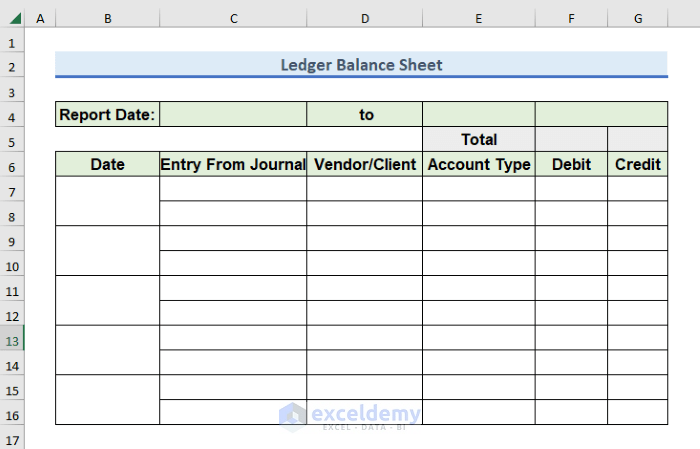
STEP 3: Create Ledger and Trial Balance from Journal Entries
- Create a ledger format with allocations for all the items.
- Insert two columns for the start and end dates.
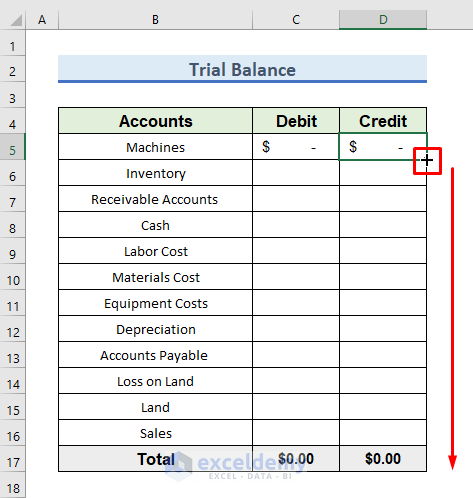
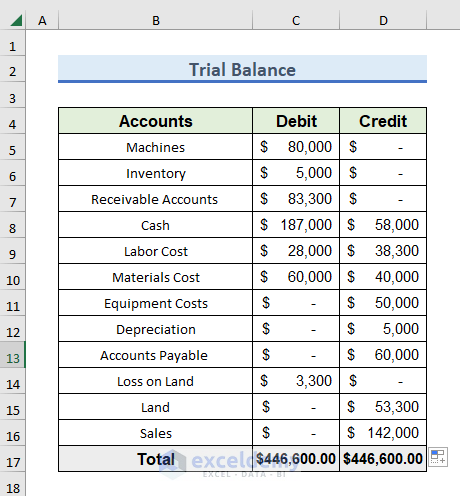
- Create a new worksheet to store the trial balance data linked with the ledger balance sheet, with 3 columns for Accounts, Debit, and Credit.
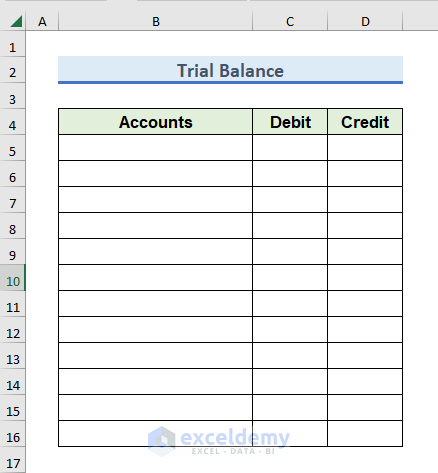
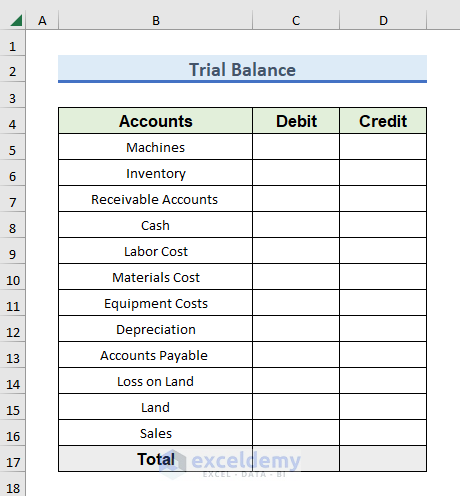
- Insert the account names in the Accounts column of Trial Balance.
- We will use these account names in the ledger sheet.
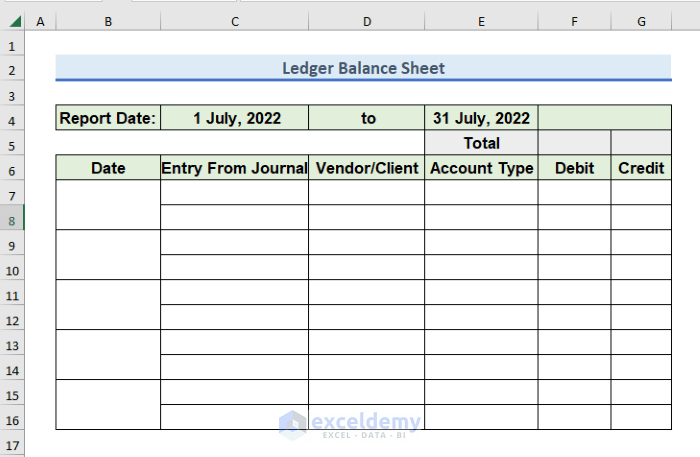
- Insert the end day and start date of the Ledger Balance Sheet, in this instances the first and last day of July 2022.
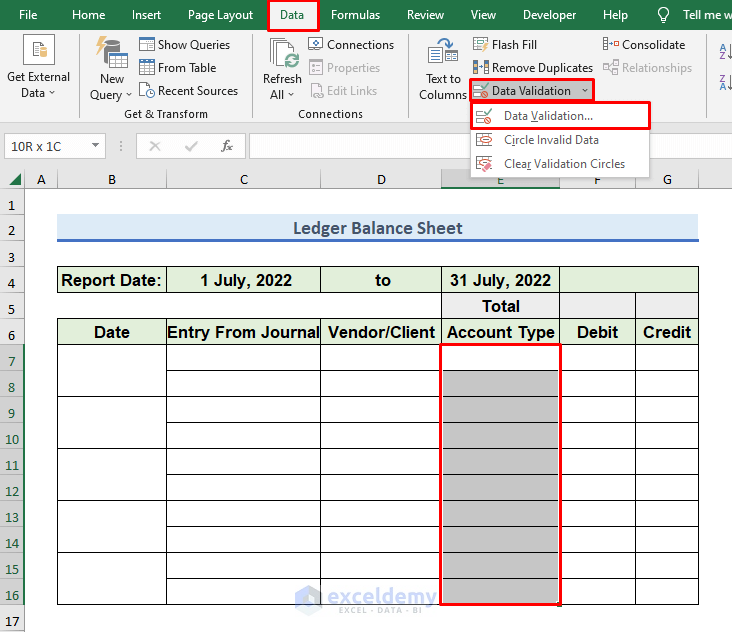
- Create a drop-down menu for the Account Type column by selecting the column.
- Go to the Data tab in the top ribbon.
- Click on the drop-down menu of Data Validation from the Data Tools group.
- A task wizard will open.
- Select Data Validation from there.
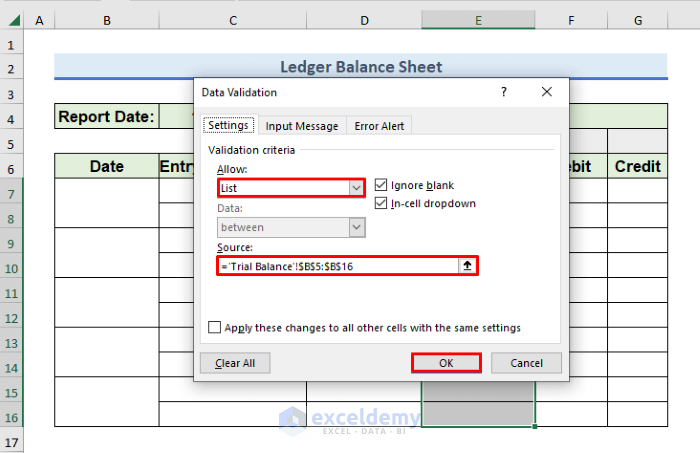
- In the Data Validation window, select List in the Allow criteria option.
- Rename the Ledger Balance Sheet as Trial Balance.
- Select the range B5:B16 of the “Trial Balance” worksheet in the Source box.
- Press the OK button.
- We can now select any of the accounts from the list of available accounts by clicking on the drop–down in the Account Type column.
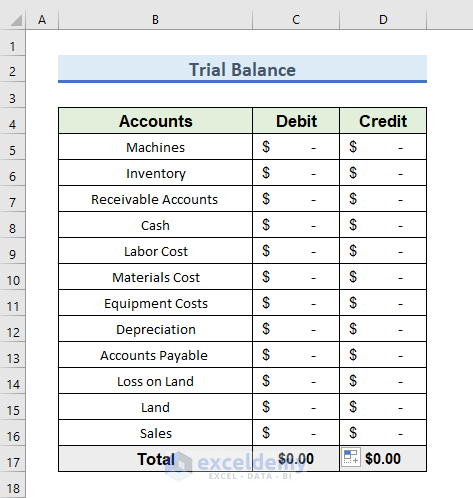
- In the next step, move to the Trial Balance worksheet and insert the following formula in cell C5 to calculate the total debit amount for each account.
=SUMIF(Ledger!$E$7:$E$26,'Trial Balance'!B5,Ledger!$F$7:$F$26)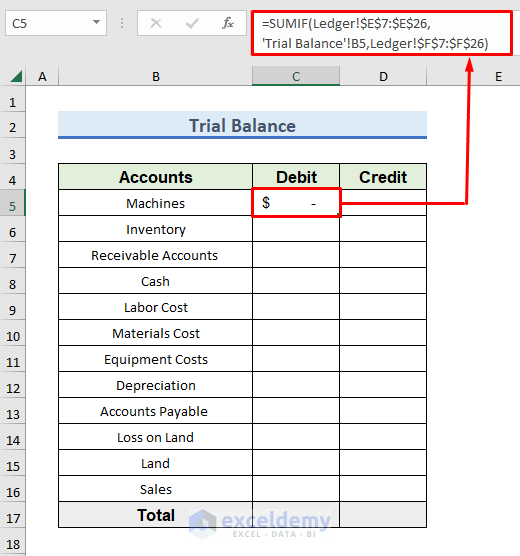
- Insert the following formula in cell D5 to calculate the total Credit amount for each account.
=SUMIF(Ledger!$E$7:$E$26,'Trial Balance'!B5,Ledger!$G$7:$G$26)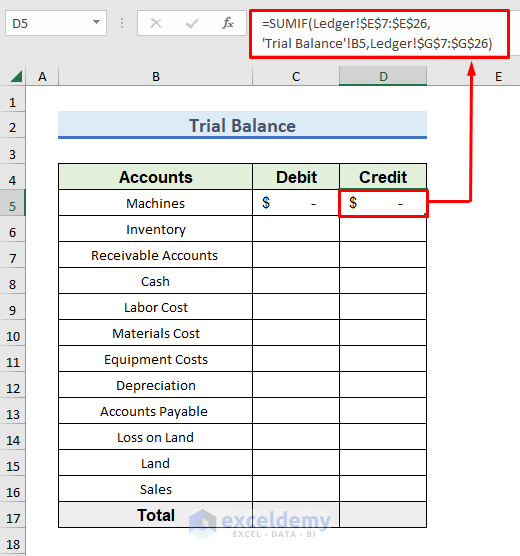
- Drag the Fill Handle icon to paste the used formula respectively to the other cells of the column.
- We have successfully inserted the formula in the Trial Balance sheet to calculate Trial Balance from the Ledger.
- Return to the Ledger Balance Sheet and make a Ledger from the Journal using the input from the initial dataset of the Journal against the date of 1st July 2022.
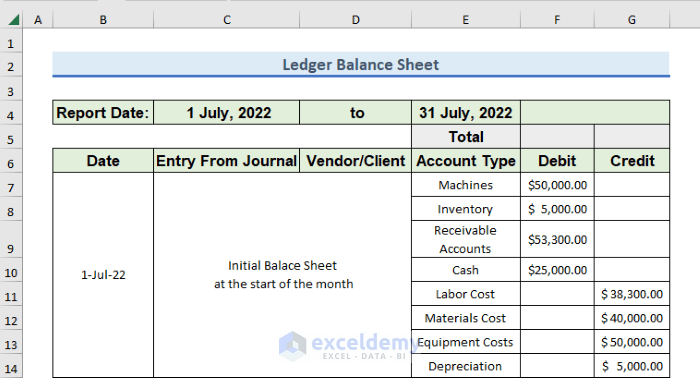
- A Ledger has been created from the newly inserted Journal entries.
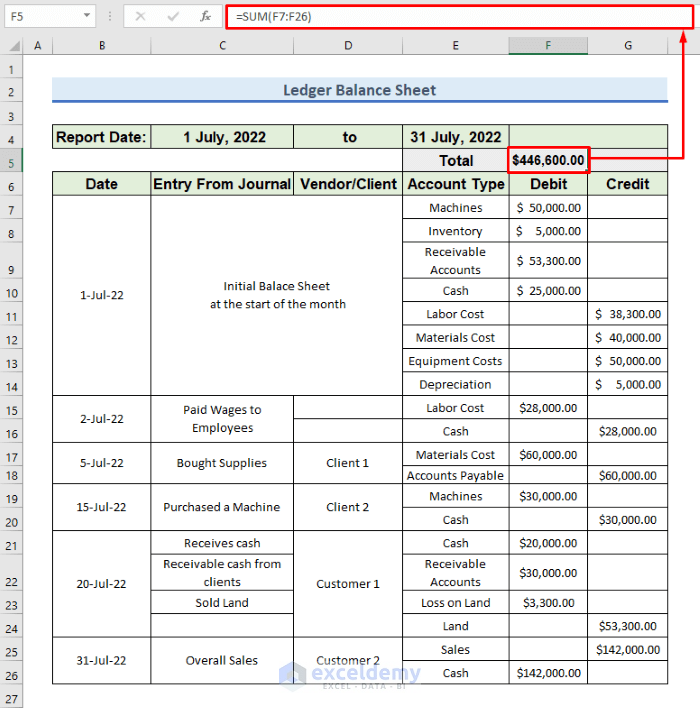
- Insert the following formula in the F5 column to sum the Debit total:
=SUM(F7:F26)- Press Enter.
- Insert the following formula in the G5 column, to sum up the Debit total.
=SUM(G7:G26) 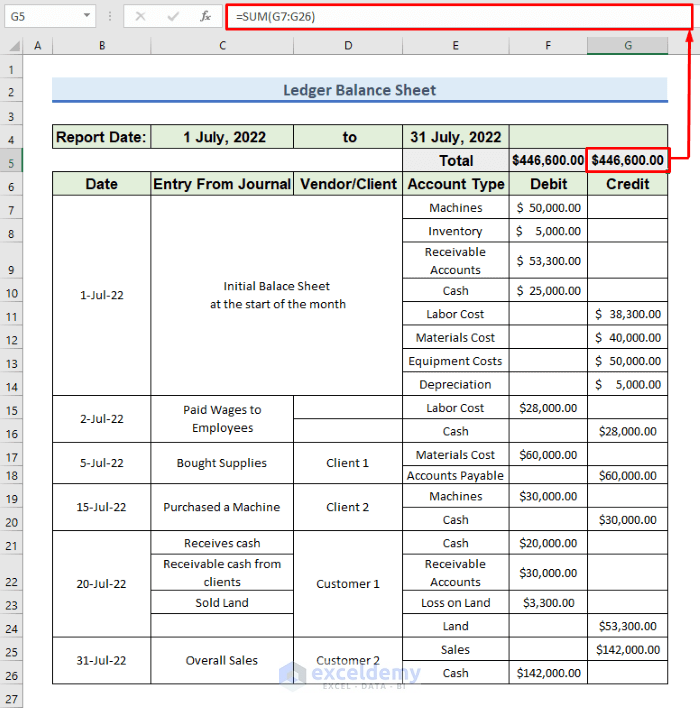
- After inserting the data in Ledger, automatically update the value in Trial Balance.
- We have successfully formed a Trial Balance from Ledger and also a Ledger from Journal.
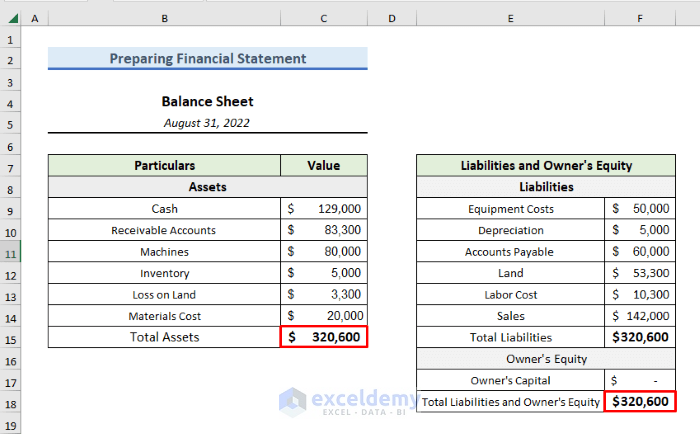
STEP 4: Prepare Financial Statements from Trial Balance
- Insert Asset items and their values from the Ledger.

- Summarize the Assets by entering the below formula in C15 to calculate Total Assets:
=SUM(C9:C14) 
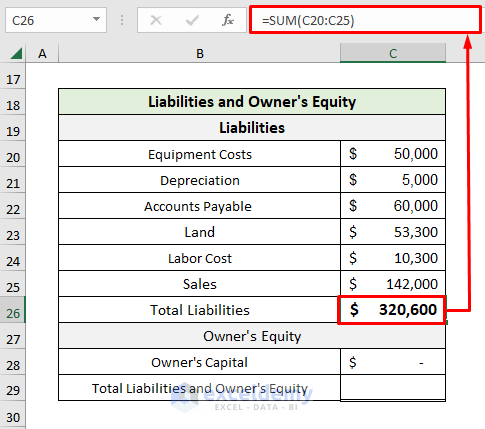
- Liabilities are things that the company owes to a person or another company, like cash, loans, etc.
- Owner’s Equity represents the value for a company’s shareholders after all the company’s assets have been sold off and all company liabilities have been paid off.
- I the following figure, we have inserted Liabilities and Owner’s Equity from the Ledger.

- Calculate the Liabilities by pasting the following formula in the C26 cell:
=SUM(C20:C25)- Hit Enter.
- Add Total Liabilities and Owner’s Equity data by pasating the following formula in the C29 cell:
=C26+C28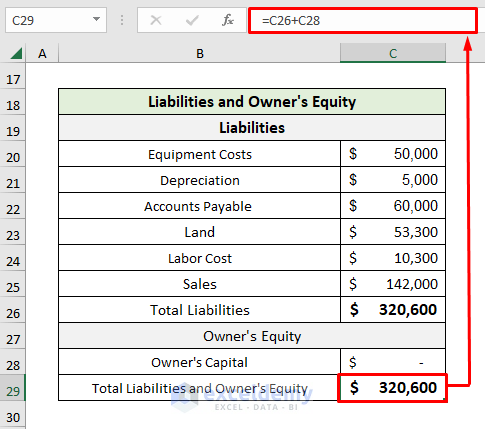
Final Output
- We have successfully created Financial Statement using double-entry bookkeeping in Excel.
Download Practice Workbook
Related Articles
<< Go Back to Excel Bookkeeping Templates | Accounting Templates | Excel Templates
Get FREE Advanced Excel Exercises with Solutions!

I really love working with Excel and look forward to improving my knowledge and experience with learning more.
Hello Cathy,
Glad to hear that. Excel is such a powerful tool, and there’s always something new to learn. Wishing you all the best as you continue to grow your skills!
ExcelDemy will be hear to help you.
Regards
ExcelDemy