Method 1 – Alter the Cell Format to Change Time Format in Excel
Step 1:
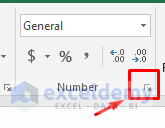
- Select the cells in an Excel sheet where you wish to apply or alter the time format.
- On the Home Tab, press Ctrl + 1 to open the Format Cells dialog box.
Step 2:
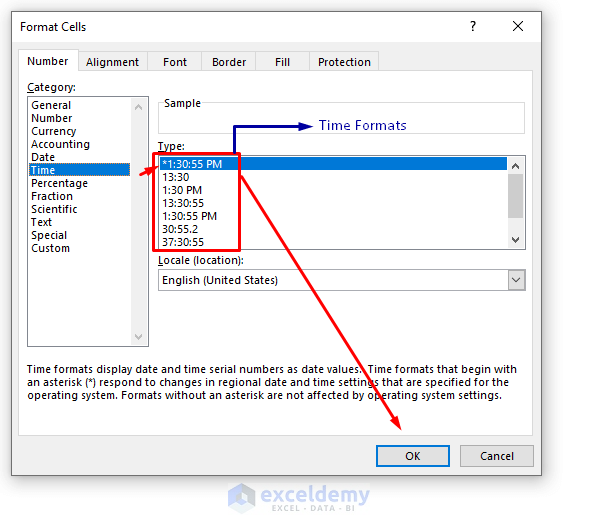
- Choose Time from the category list in the Format Cells box, and then select the required time format from the Type list.
- To apply the chosen time format and dismiss the dialog box, click OK.
Step 3:
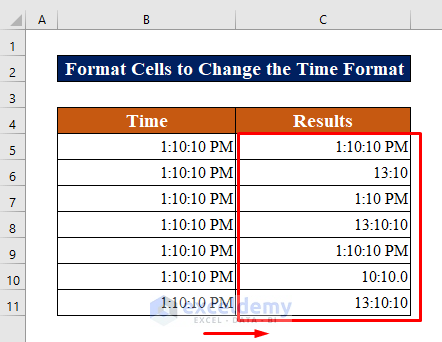
- Apply all the existing formats to see the changes.
Method 2 – Create A Custom Format to Change Time Format in Excel
You may sometimes want to create a unique time format that better serves the demands of a certain page. To do this, open the Format Cells dialog box, choose Custom from the Category list, then specify the desired time format. Let’s take a look at these two scenarios.
Custom Number Formatting
You can design your customized number formats using the Custom section of the Format Cells Menu.
You must define how to display hours, minutes, and/or seconds to establish custom number formatting for times. As a guide, use the table below.
| Code | Description | Display as |
|---|---|---|
| h | represents Hours lacks a leading zero | 0-13 |
| hh | represents Hours with a leading zero | 00-13 |
| m | represents Minutes lacks a leading zero | 0-49 |
| mm | shows Minutes with a leading zero | 00-49 |
| s | shows Seconds lack with a leading zero | 0-49 |
| ss | shows Seconds with a leading zero | 00-49 |
| AM/PM | display as Periods of the day
(If this field is left blank, the 24-hour time format is applied.) |
AM or PM |
The examples above can be used to represent hours, minutes, or seconds. You can also merge them to make a whole time.
Custom Formats to Change the Time Format in Excel for 24-Hours Interval
When calculating times, a cell indicating the total of time amounts in Excel may exceed 24 hours. To get Microsoft Excel to correctly show times beyond 24 hours, use one of the custom time formats listed below.
You can also customize your own preferred time format.
| Format | Displays as | Explanation |
|---|---|---|
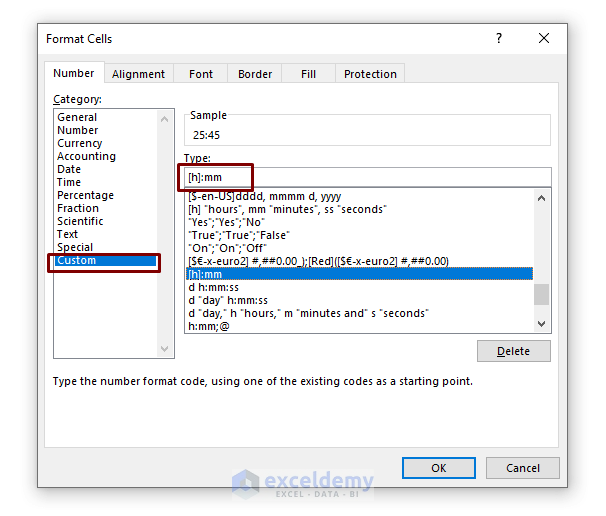
| [h]:mm | 25:45 | 41 hours and 30 minutes |
| [h]:mm:ss | 25:45:30 | 41 hours, 30 minutes, and 10 seconds |
| [h] “hours”, mm “minutes”, ss “seconds” | 25 hours, 45 minutes, 30 seconds | |
| d h:mm:ss | 1 1:45:30 | 1 day, 1 hour, 45 minutes, and 30 seconds |
| d “day” h:mm:ss | 1 day 1:45:30 | |
| d “day,” h “hours,” m “minutes, and” s “seconds” | 1 day, 1 hour, 45 minutes, and 30 seconds |
Step 1:
- Select the cell(s) in an Excel sheet where you wish to apply or alter the time format.
- Press Ctrl+1 or click the Dialog Box Launcher icon next to Number in the Number group on the Home Tab to open the Format Cells dialog.
Step 2:
- Choose Time from the Category list on the Number tab, and input the appropriate time format. For Example, we use [h] “hours”, mm “minutes”, ss “seconds”
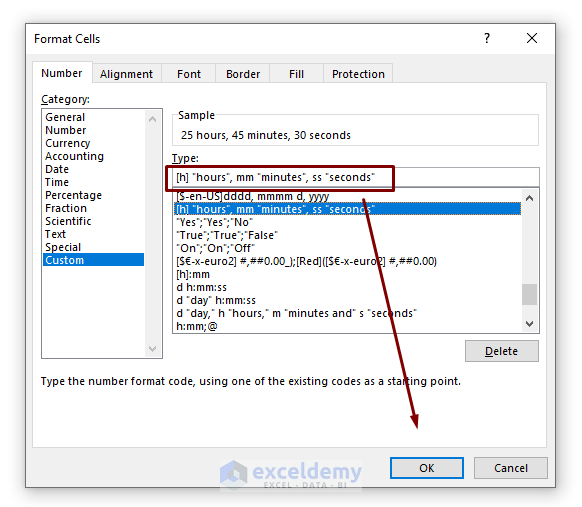
The custom time format you’ve created will be in the Type list the next time you need it.
Step 3:
- To apply the chosen time format and dismiss the dialog box, click OK.

Method 3 – Apply the TEXT Function to Change the Time Format in Excel
The TEXT Function is an excellent technique to show a time in text format. The TEXT Function, like the Custom Number Formatting covered above, allows you to show times in formats.
Let’s look at how the TEXT Function formula works first.
=TEXT(value, format_text)
We will apply this function to complete our task. We can use both the basic TEXT function and the combination of both the TEXT function and the NOW function.
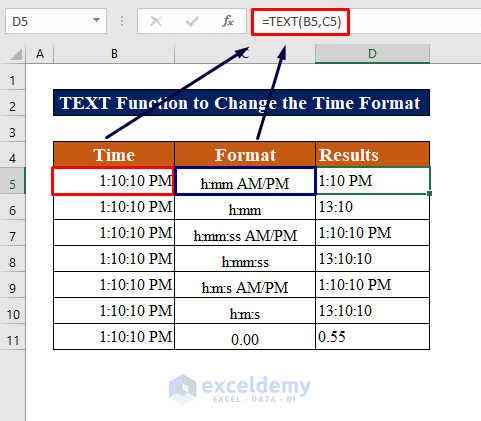
3.1 Use the Basic TEXT Function
Steps:
- Select a blank cell next to your date, for instance, D5.
- Type this following formula,
=TEXT(B5,C5) - Press Enter to get the result.
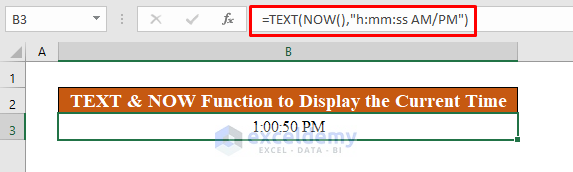
3.2 The Combination of the TEXT and the NOW Function
Steps:
- In cell B3, type the following formula,
=TEXT(NOW(),"h:mm:ss AM/PM")- Press Enter to get the desired format.
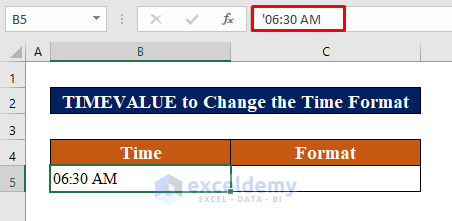
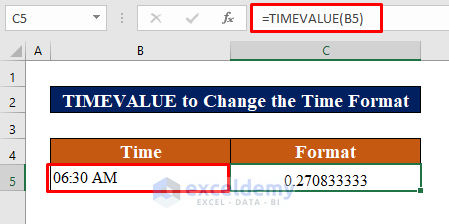
Method 4 – Convert Time as Text to Change the Time Format in Excel
Step 1:
- To store a time as text, type an apostrophe (‘) in front of the time.
Step 2:
- Enter TIMEVALUE function In cell C5, apply the function.
=TIMEVALUE(B5)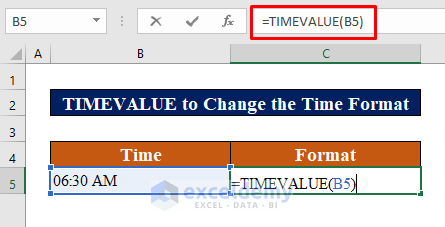
- Press Enter to get the result.
✍ Things to Remember
✎ Excel will display the month instead of minutes if the “m or mm” code does not immediately follow after the h or hh code or exactly before the ss code.
✎ While applying the TIMEVALUE function, make sure to put an apostrophe (‘) in front of the time, otherwise, it will be not stored as Text.
Download Practice Workbook
Related Article
<< Go Back to Number Format | Learn Excel
Get FREE Advanced Excel Exercises with Solutions!

I have looked everywhere for a solution but have not found it.
i have a machine that makes timestamps that look like this: 132145
(1:21:45 pm)
i collect multiple lines of these timestamps and am trying to convert them like this:
132145 to 13:21:45
131321 13:13:21
132135 13:21:35
what am i missing in excel?
Hello, AUSTIN!
Thanks for sharing your problem with us!
To convert values into timestamps, follow the instructions below.
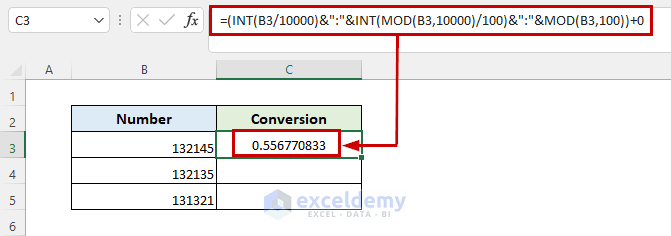
1. select the cell and put the formula into that cell.
2. Press Enter.
=(INT(B3/10000)&":"&INT(MOD(B3,10000)/100)&":"&MOD(B3,100))+03. This will convert the values into time values.
4. Now, go to Home tab by selecting the resulted cell and click on Number Format drop-down menu under Number group.
5. Drag the Fill Handle icon down to duplicate the formula over the range. Or, to AutoFill the range, double-click on the plus (+) symbol.
6. And, that’s it! But there is an issue. as 13 represent 1 in time, so 13 will replaced by 1.
Hope this will help you!
If not, can you please send me your excel file via email? ([email protected]).
Good Luck!
Best Regards
Sabrina Ayon
Author, ExcelDemy.
Hi asking how can I covert this time format (ex: 28m 47s to 28:47)
Greetings Frank,
From your question, we can assume that your time format is formatted in [h] “hr”, mm “m”, ss “s” format. We need to change it into h:mm:ss format. You need to customize this format with the following steps.
Best regards,
Bhubon Costa, ExcelDemy