When working with UserForms in Excel VBA, it is often necessary to format the date values displayed in TextBox controls for a better user experience. Additionally, you might need to check whether the user has inserted a valid date and allow them to choose their preferred date format. By using Excel VBA, we can format dates in TextBoxes in various ways. This article covers all the functionality you need when working with date formatting.
Introduction to UserForm Textbox
A UserForm in Excel can include various control elements, and one of them is the Textbox. The Textbox allows users to input text, names, addresses, or any alphanumeric data. It can also save data entered by the user onto the worksheet. To add a Textbox to a UserForm, follow these steps:
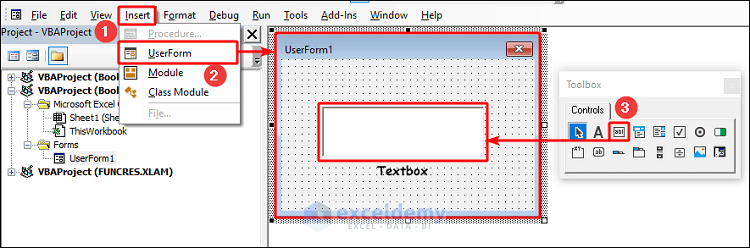
- Open the Visual Basic Editor in Excel.
- Click on Insert from the menu.
- Choose UserForm from the dropdown.
- Once the UserForm appears, you’ll also see an additional module called Toolbox. If the Toolbox isn’t visible, go to View and select Toolbox.
- In the Toolbox, you’ll find all the control elements that can be added to the UserForm. Select the Textbox (which appears as a rectangle) and drag it onto the UserForm.
Textboxes offer many properties that you can customize, such as font type, size, and formatting options. They are a great way to collect user input and incorporate it into your Excel macros.
Method 1 – Format Textbox Input Date as DD/MM/YYYY
Suppose you want to capture user input from a textbox, and regardless of how the user provides the date, you want it to be displayed in the Excel Short Date format, which is DD/MM/YYYY” This means that if the user inputs the date as YYYY/MM/DD, the text will automatically format it as DD/MM/YYYY. Even if a serial number is entered, the text will be auto formatted.
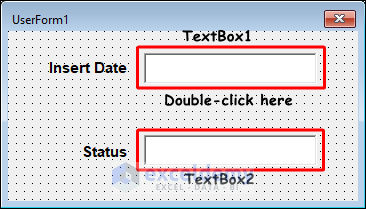
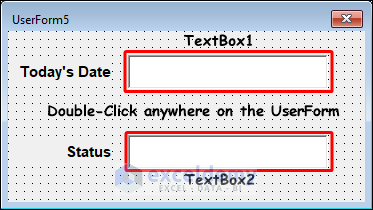
For this demonstration, we’ll include two textboxes:
- Textbox1: To take input from the user.
- Textbox2: To display an update about the date format in Textbox1.
Let’s get to coding:
- First, add two Textboxes to your UserForm.
Note: We’ve used other control elements such as Labels and Frames. However, for understanding date formatting, these control elements are not necessary. We’ll keep the code as simple as possible.
- Double-click on Textbox1, and a code window will appear where we’ll write our code to format the date.
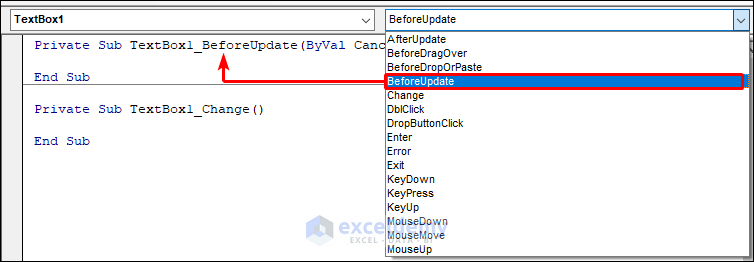
- In the code window, you’ll see two drop-down menus at the top: one for the Object and one for the Event
- Textbox1 will automatically be selected in the Object box as you click it.
- For the Event, select BeforeUpdate from the drop-down menu and a subroutine will be created.

- Inside the subroutine, write the following code to display the user’s input date in your preferred format:
Private Sub TextBox1_BeforeUpdate(ByVal Cancel As MSForms.ReturnBoolean)
With TextBox1
    .Text = Format(.Text, "dd/mm/yyyy")
    TextBox2.Text = "Date Format Updated"
    Frame1.Enabled = False
End With
End Sub- Create another subroutine by selecting Change from the Event drop-down menu and write the following code:
Private Sub TextBox1_Change()
Frame1.Enabled = True
If TextBox1.Text = "" Then
TextBox2.Text = ""
Frame1.Enabled = False
End If
End Sub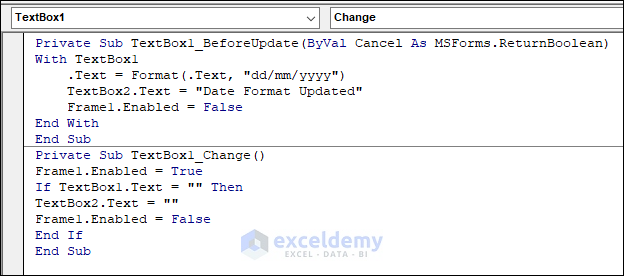
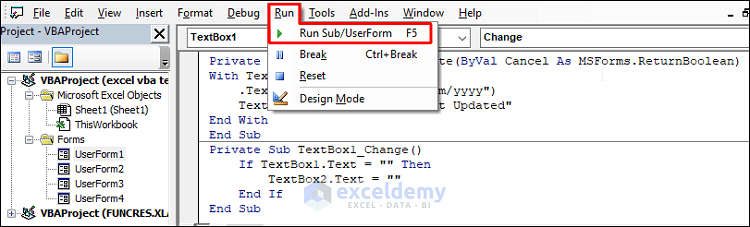
- Press F5 or go to the Run tab, and from the drop-down menu, click Run Sub/Userform to execute the code.
Code Breakdown
The code comprises two Event procedures.
Private Sub TextBox1_BeforeUpdate(ByVal Cancel As MSForms.ReturnBoolean)
With TextBox1
    .Text = Format(.Text, "dd/mm/yyyy")
    TextBox2.Text = "Date Format Updated"
    Frame1.Enabled = False
End With
End Sub- The first Event procedure, TextBox1_BeforeUpdate, triggers when the user attempts to update the value in TextBox1. Regardless of how the user inputs the date, the Format function converts the text to the format DD/MM/YYYY. This formatted date is then assigned back to TextBox1 using the .Text property of the text box. Upon updating the format, TextBox2 displays “Date Format Updated“.
- Additionally, TextBox2 resides within Frame1, which is disabled to prevent the user from tampering with the status update.
Private Sub TextBox1_Change()
Frame1.Enabled = True
If TextBox1.Text = "" Then
TextBox2.Text = ""
Frame1.Enabled = False
End If
End Sub- The second Event procedure, TextBox1_Change(), is activated when the user deletes the content in TextBox1. Before this action, Frame1 is enabled again so that when the content of TextBox1 is deleted, TextBox2 can be updated accordingly. If TextBox1 becomes empty, TextBox2 is also cleared using the .Text property.
Method 2 – Formatting Textbox Input as Long Date
Suppose you desire your dates formatted with detailed information, such as Tuesday, May 16 2023, but you prefer entering them as 16/05/2023. By slightly modifying our previous code, this formatting becomes achievable. In Excel, this version of date formatting is termed as Long Date.
Similar to the previous method, we will utilize two textboxes and two Event procedures here.
- Begin by adding two textboxes to your UserForm.

- Double-click on Textbox1 to open a code window where we’ll write our code for formatting the date.
- In the code window, you’ll notice two drop-down menus at the top: one for the Object and one for the Event. As you select Textbox1 in the Object box and BeforeUpdate from the Event drop-down menu, a subroutine will be created.

- Within the subroutine, insert the following code to display the user’s input date in the desired format. The complete code will resemble the following:
Private Sub TextBox1_BeforeUpdate(ByVal Cancel As MSForms.ReturnBoolean)
With TextBox1
    .Text = Format(.Text, "Long date")
    TextBox2.Text = "Date Format Updated"
    Frame1.Enabled = False
End With
End Sub- Create another subroutine by selecting Change from the Event drop-down menu, and then, insert the following code:
Private Sub TextBox1_Change()
Frame1.Enabled = True
If TextBox1.Text = "" Then
TextBox2.Text = ""
Frame1.Enabled = False
End If
End Sub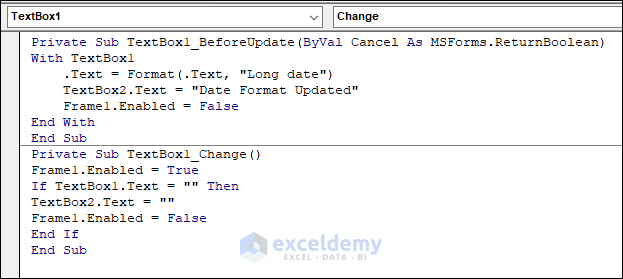
- Now, press F5 or navigate to the Run tab and click Run Sub/Userform from the drop-down menu to execute the code.
Read More: Date Variable in VBA Codes
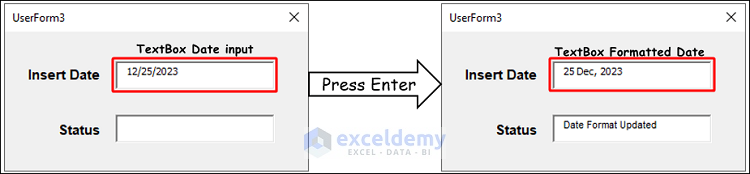
Method 3 – Format Textbox Input as “DD MMM, YYYY”
If you prefer your date in an Excel VBA TextBox to be displayed as 17 Dec, 2023 or any other custom date format, that’s entirely feasible. Similar to previous examples, we’ll utilize two textboxes and two Event procedures.
- Start by adding two Textboxes to your UserForm.

- Double-click on Textbox1 to open a code window where we’ll write our code for formatting the date.
- In the code window, you’ll see two drop-down menus at the top: one for the Object and one for the Event. As you select Textbox1 in the Object box and BeforeUpdate from the Event drop-down menu, a subroutine will be generated.
- Within the subroutine, insert the following code to display the user’s input date in your preferred format. The complete code will look like this:
Private Sub TextBox1_BeforeUpdate(ByVal Cancel As MSForms.ReturnBoolean)
With TextBox1
    .Text = Format(.Text, "dd mmm, yyyy")
    TextBox2.Text = "Date Format Updated"
    Frame1.Enabled = False
End With
End Sub- Create another subroutine by selecting Change from the Event drop-down menu, and then, insert the following code:
Private Sub TextBox1_Change()
Frame1.Enabled = True
If TextBox1.Text = "" Then
TextBox2.Text = ""
Frame1.Enabled = False
End If
End Sub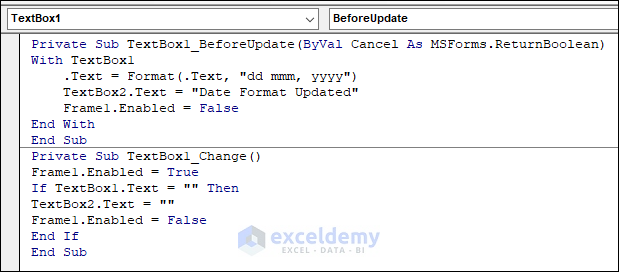
- Now, press F5 or navigate to the Run tab and click Run Sub/Userform from the drop-down menu to execute the code.
This code is nearly identical to the previous examples. Instead of using “DD/MM/YYYY” or “Long Date”, we utilized “DD MMM, YYYY”. Feel free to adjust the formatting to suit your preferences.
Method 4 – Format Textbox Input with Date Validation
In this example, we’ll explore how to incorporate a date validation feature into your UserForm TextBox. To verify whether the user has inputted a valid date, we’ll utilize the VBA IsDate function. This function, belonging to the variant data type, assesses whether a string constitutes a date or time and yields a boolean value of True or False. Apart from the code, our UserForm design will retain its structure with two Textboxes.
- Start by adding two Textboxes to your UserForm.

- Double-click on Textbox1 to open a code window where we’ll write our code for handling the date validation.
- In the code window, you’ll observe two drop-down menus at the top: one for the Object and one for the Event. As you select Textbox1 in the Object box and BeforeUpdate from the Event drop-down menu, a subroutine will be generated.

- Within the subroutine, insert the following code to indicate whether the user has provided a correct date in your preferred format. The complete code will look like this:
Private Sub TextBox1_BeforeUpdate(ByVal Cancel As MSForms.ReturnBoolean)
    If Not IsDate(TextBox1.Text) Then
        TextBox2.Text = "Please Enter Correct Date"
        Frame1.Enabled = False
    Else
        TextBox1.Text = Format(TextBox1.Text, "dd mmm, yyyy")
        TextBox2.Text = "Date Format Updated"
        Frame1.Enabled = False
    End If
End Sub- Create another subroutine by selecting Change from the Event drop-down menu, and then, insert the following code:
Private Sub TextBox1_Change()
If TextBox1.Text = "" Then
TextBox2.Text = ""
Frame1.Enabled = True
End If
End Sub
- Now, press F5 or navigate to the Run tab and click Run Sub/Userform from the drop-down menu to execute the code.
Code Breakdown
The code comprises two Event procedures.
Private Sub TextBox1_BeforeUpdate(ByVal Cancel As MSForms.ReturnBoolean)
    If Not IsDate(TextBox1.Text) Then
        TextBox2.Text = "Please Enter Correct Date"
        Frame1.Enabled = False
    Else
        TextBox1.Text = Format(TextBox1.Text, "dd mmm, yyyy")
        TextBox2.Text = "Date Format Updated"
        Frame1.Enabled = False
    End If
End Sub- The first Event procedure, TextBox1_BeforeUpdate, triggers when the user attempts to update the value in TextBox1. It employs the IsDate function to verify the date input by the user. If the input is not a valid date, “Please Enter Correct Date” is displayed in TextBox2, and TextBox1 is cleared.
- If the entered date is valid, the Else branch is executed, formatting the date in the specified format.
- Subsequently, TextBox2 displays “Date Format Updated“, and Frame1 is disabled to prevent further input.
Private Sub TextBox1_Change()
Frame1.Enabled = True
If TextBox1.Text = "" Then
TextBox2.Text = ""
Frame1.Enabled = False
End If
End Sub- The second Event procedure, TextBox1_Change(), activates when the user deletes the content in TextBox1. Before this action, Frame1 is enabled again so that TextBox2 can be updated accordingly. If TextBox1 becomes empty, TextBox2 is also cleared, and Frame1 is disabled to prevent input.
Read More: VBA to Remove Time from Date in Excel
How to Automatically Enter Today’s Date in a TextBox Using Excel VBA
If you want a textbox to automatically display the current date in your preferred format, you can customize it with VBA Script. Follow these steps to learn how to display the present date in a UserForm TextBox using Excel VBA.
- Begin by adding two Textboxes to your UserForm.
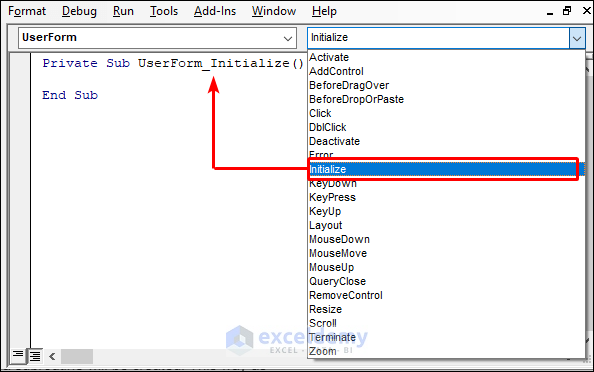
- Double-click on the UserForm, and a code window will appear where we’ll write our code to format the date.
- In the code window, you’ll notice two drop-down menus at the top: one for the Object and one for the Event.
- UserForm will automatically be selected in the Object box. Select Initialize from the Event drop-down menu, and a subroutine will be created. This ensures that as soon as the UserForm is activated, the current date will appear in TextBox1.
- Within the subroutine, insert the following code to display the current date in your preferred format. The complete code will look like this:
Private Sub UserForm_Initialize()
TextBox1.Text = Format(Now(), "dd mmm, yyyy")
Frame1.Enabled = False
TextBox2.Text = "Current Date Updated"
Frame2.Enabled = False
End Sub
- Now, press F5 or navigate to the Run tab, and from the drop-down menu, click Run Sub/Userform to execute the code.
Code Breakdown
Private Sub UserForm_Initialize()
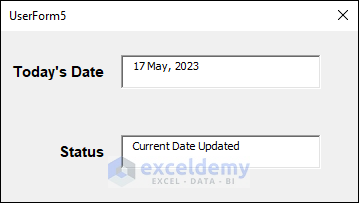
TextBox1.Text = Format(Now(), "dd mmm, yyyy")
Frame1.Enabled = FalseThe code initializes as soon as the UserForm loads.
- TextBox1 is set to display the current date using the Now() function, and the format is specified as “dd mmm, yyyy“.
- After displaying the date in TextBox1, Frame1 is disabled to prevent the date from being changed.
TextBox2.Text = "Current Date Updated"
Frame2.Enabled = False
End Sub- TextBox2 updates its status to indicate that the current date has been updated, and Frame2 is disabled to prevent changes.
This setup ensures that TextBox1 automatically shows today’s date in the desired format as soon as the UserForm is activated.
How to Adjust Date Format in a TextBox Using Excel VBA
If you desire to change the date format from a range of options within your UserForm, this example will demonstrate how to achieve that using Excel VBA.
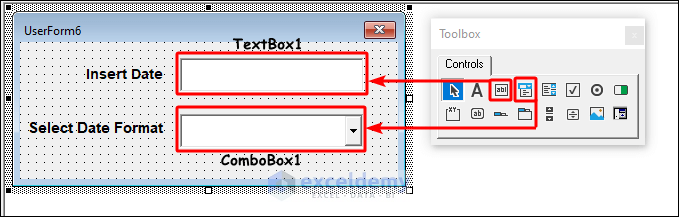
- Start by adding one TextBox and one ComboBox to your UserForm.
- Double-click on the UserForm to open a code window where we’ll write our code to include the date formats in the ComboBox.
- In the code window, you’ll see two drop-down menus at the top: one for the Object and one for the Event.
- UserForm will be automatically selected in the Object box. Select Initialize from the Event drop-down menu, and a subroutine will be created. This ensures that as soon as the UserForm activates, the date formats will appear in ComboBox1, and you can select one.

- Write the code within this subroutine to include every format you desire. Below is an example code snippet:
Private Sub UserForm_Initialize()
    ComboBox1.Text = "Choose Format"
    ComboBox1.AddItem "DD/MM/YYYY"
    ComboBox1.AddItem "MM/DD/YYYY"
    ComboBox1.AddItem "YYYY/MM/DD"
    ComboBox1.AddItem "DD-MMM-YYYY"
    ComboBox1.AddItem "MMMM DD, YYYY"
End Sub- Create another subroutine by selecting ComboBox1 from the Object drop-down menu and Change from the Event drop-down menu. Then, insert the following code:
Private Sub ComboBox1_Change()
Dim selectedFormat As String
    selectedFormat = ComboBox1.Value
    If IsDate(TextBox1.Value) Then
        TextBox1.Value = Format(TextBox1.Value, selectedFormat)
    End If
End Sub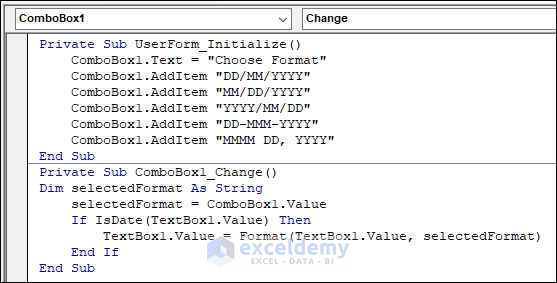
- Press F5 or navigate to the Run tab, and from the drop-down menu, click Run Sub/Userform to execute the code.
Code Breakdown
The code comprises two Event procedures.
Private Sub UserForm_Initialize()
    ComboBox1.Text = "Choose Format"
    ComboBox1.AddItem "DD/MM/YYYY"
    ComboBox1.AddItem "MM/DD/YYYY"
    ComboBox1.AddItem "YYYY/MM/DD"
    ComboBox1.AddItem "DD-MMM-YYYY"
    ComboBox1.AddItem "MMMM DD, YYYY"
End Sub- The first event, UserForm_Initialize(), is triggered when the UserForm is initialized. This subroutine populates ComboBox1 with date format options as soon as the UserForm activates.
- The initial text of ComboBox1 is set to “Choose Format“, and then five date format options are added using the .AddItem method.
Private Sub ComboBox1_Change()
Dim selectedFormat As String
    selectedFormat = ComboBox1.Value
    If IsDate(TextBox1.Value) Then
        TextBox1.Value = Format(TextBox1.Value, selectedFormat)
    End If
End Sub- The second event, ComboBox1_Change(), triggers when the value of ComboBox1 is changed.
- It retrieves the selected format from ComboBox1 and checks if the value in TextBox1 is a valid date using the IsDate function.
- If it’s valid, the date in TextBox1 is formatted according to the selected format using the Format function, and the formatted date is displayed back in TextBox1.
Frequently Asked Questions
- How can I clear the date value from a TextBox in VBA?
Ans: To clear the date value from a TextBox in VBA, you can assign an empty string to its Value property: TextBox1.Value = “”.
- Is it possible to use a calendar control or date picker to select a date for a TextBox?
Ans: Excel VBA does not have a built-in calendar control or date picker, but you can create one using additional controls or explore third-party add-ins. However, we have an excellent article on How to Make Textbox Datepicker with Excel VBA. Feel free to check it out.
- Can I change the date format in a TextBox based on the regional settings of the user’s computer?
Ans: Yes, you can achieve this by using VBA’s Format function and referencing the system’s regional settings. You can dynamically format the date value in the TextBox to match the user’s preferred date format. You can use Application.International(xlDateOrder) as the date format inside the Format function to apply the regional setting.
Download Practice Workbook
You can download the practice workbook from here:
Get FREE Advanced Excel Exercises with Solutions!

