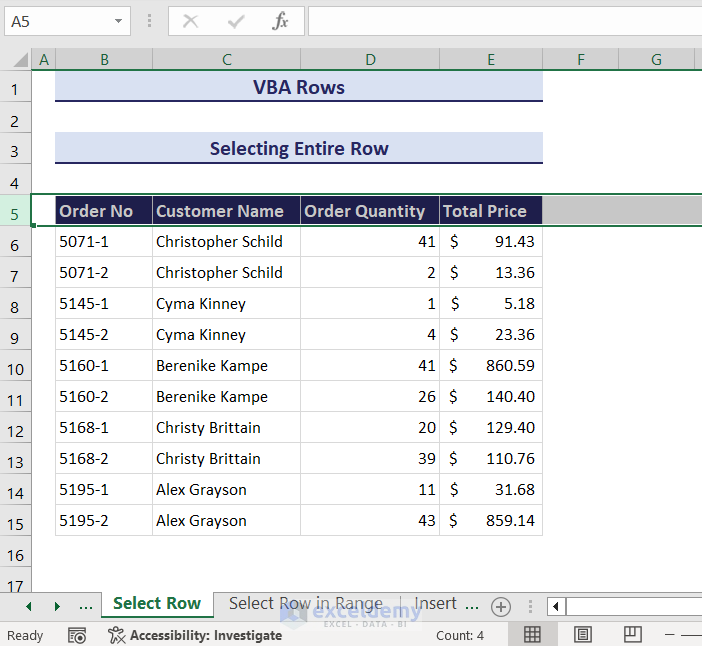
For example, in the GIF below, you can see that we have selected the header row of our dataset. We have used the Rows property along with the Select method to select an entire row.
⏷Syntax of Rows Function in Excel VBA
⏷Select Rows Using VBA in Excel
⏵Selecting Entire Row
⏵Selecting Rows in a Range
⏷Insert Rows in Excel with VBA
⏵Inserting Row
⏵Inserting Row and Copying Formula
⏷Set Row Height Using VBA in Excel
⏵Setting Row Height Based on User Input
⏵Autofitting Row Height
⏷Count Rows with VBA in Excel
⏵Counting Rows in a Range
⏵Counting Rows in a Range with Data
⏷Copy-Paste Rows in Excel with VBA
⏷Hide and Unhide Rows Using VBA in Excel
⏵Hiding Rows
⏵Unhiding Rows
⏷Group and Ungroup Rows in Excel With VBA
⏵Grouping Rows
⏵Ungrouping Rows
⏷Delete Rows Using VBA in Excel
⏵Deleting Rows
⏵Deleting Rows Based on Criteria
⏷Freeze Rows Using VBA in Excel
⏷Highlighting Rows That Meet a Certain Condition
⏷Find Duplicate Rows with VBA in Excel
What Is the VBA Rows Property?
In VBA (Visual Basic for Applications), the Rows property refers to single or multiple rows within a range or a worksheet. This property is advantageous when you want to modify or interact with rows in Excel through VBA code. By using the Rows property, you can perform various operations on rows, such as copying, formatting, deleting, or inserting rows.
You can use the Rows property with an object qualifier such as Range or Worksheet.
Range.Rows Property
You can change or interact with the rows within a range using this property.
Worksheet.Rows Property
By using this property, you can manipulate or interact with the entire collection of rows in a worksheet.
You can use the Rows property without an object qualifier, which is equivalent to using ActiveSheet.Rows. But, if the active document is not a worksheet, the Rows property will fail to fetch data.
What Is the Syntax of Rows Function in Excel VBA?
The basic syntax of the Rows function in Excel VBA is:
Here, row_index is the index or indices of the rows. It can be a single row or a range of rows. For example, to refer to a single row, you can use the Rows function as Rows(5). To refer to a range of rows, you can use the Rows function as Rows(“5:8”).
Range(“D2:J10”).Rows(3) will specify the 3rd row in the range D2:J10 whereas Worksheets(“Sheet1”).Rows(3) will specify the 3rd row in the worksheet named “Sheet1”.
How to Select Rows Using VBA in Excel
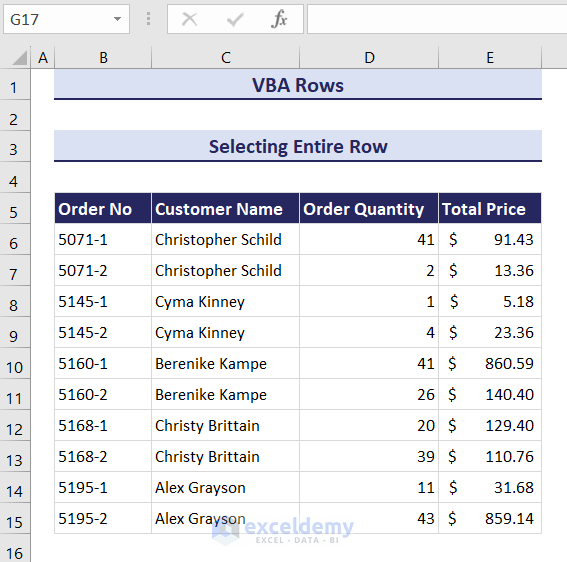
We will use the dataset below to select rows without range and within a range using Excel VBA.
Method 1 – Selecting an Entire Row
- Go to the Developer tab.
- In the Code group, selsect the Visual Basic option.
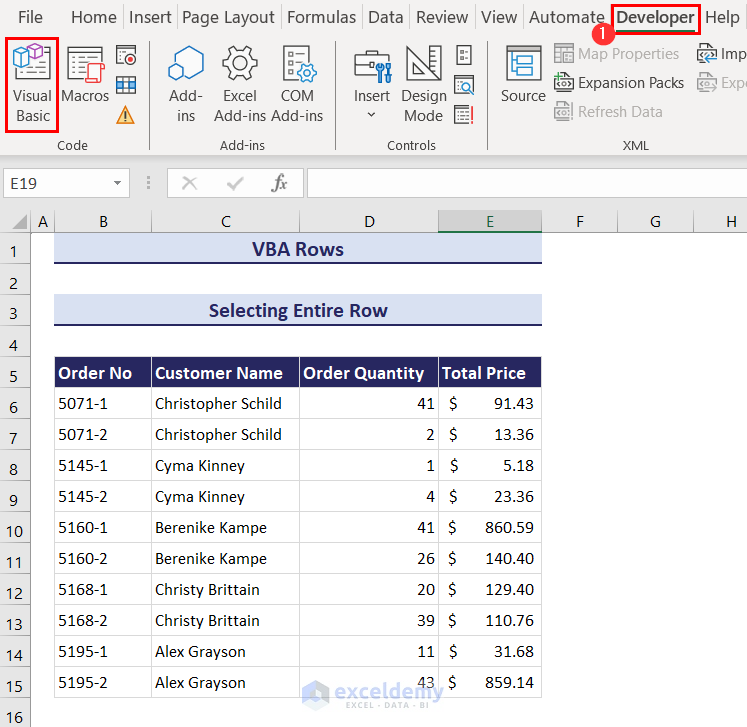
- This opens the Visual Basic Editor window.
- Click on the Insert menu.
- Select the Module option.
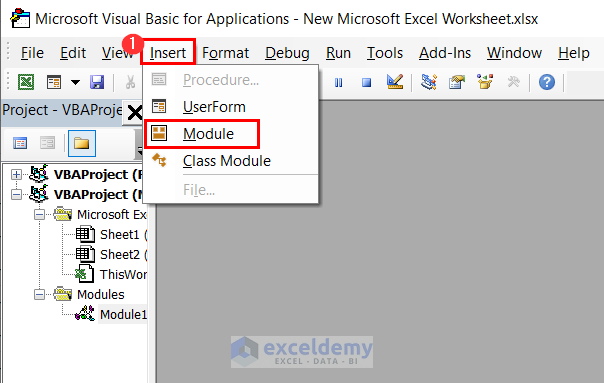
- This opens a new module where you can enter your VBA code.
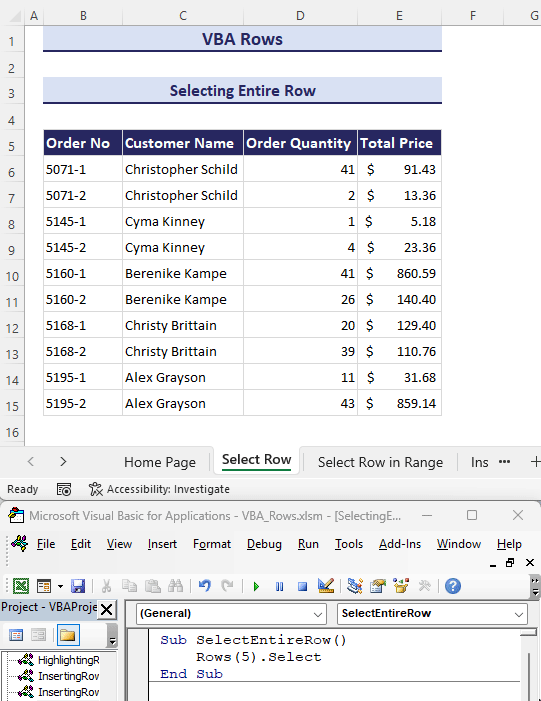
- Suppose we want to select the header row of our dataset which is row number 5 in the worksheet. Use the following VBA code to do so:
Sub SelectEntireRow()
    Rows(5).Select
End Sub
- Enter the provided code in the module and click on the Run button.
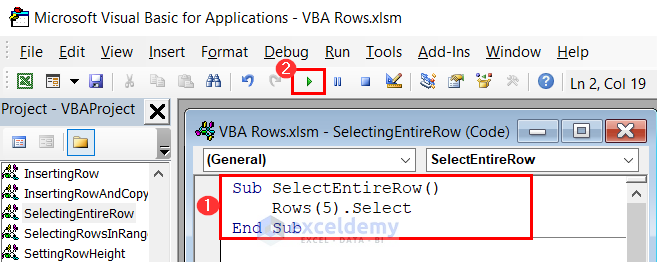
- This will automatically select the row number 5 of your current worksheet.
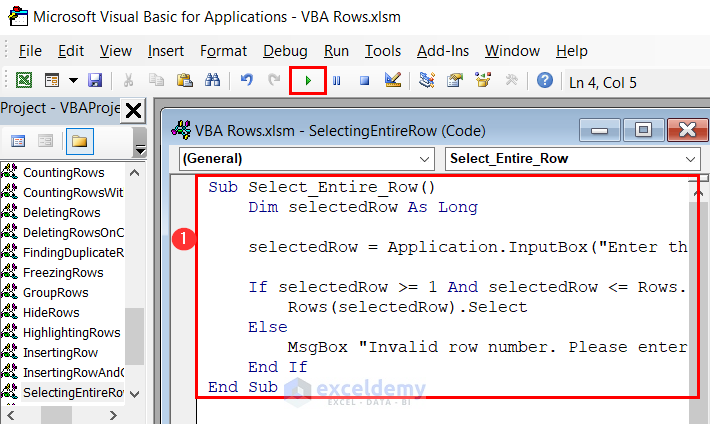
- If you want to select a different row, you can use an input box to take the row number input for selecting a row. Here is the modified code:
Sub Select_Entire_Row()
    Dim selectedRow As Long

    selectedRow = Application.InputBox("Enter the row number to select:", Type:=1)

    If selectedRow >= 1 And selectedRow <= Rows.count Then
        Rows(selectedRow).Select
    Else
        MsgBox "Invalid row number. Please enter a valid row number."
    End If
End Sub- Enter the provided code in the module and run it.
- You will get an input box. Enter the desired row number that you want to select in the input box. We have entered 8.
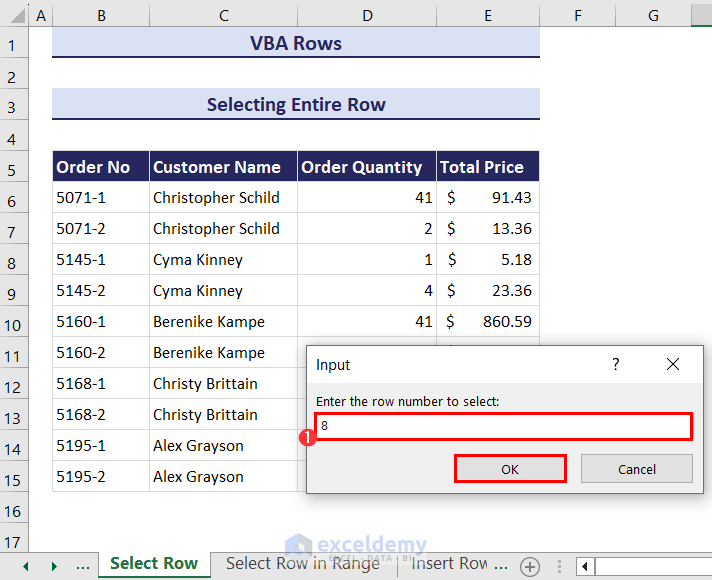
- Click OK.
- The entire 8th row is now selected.

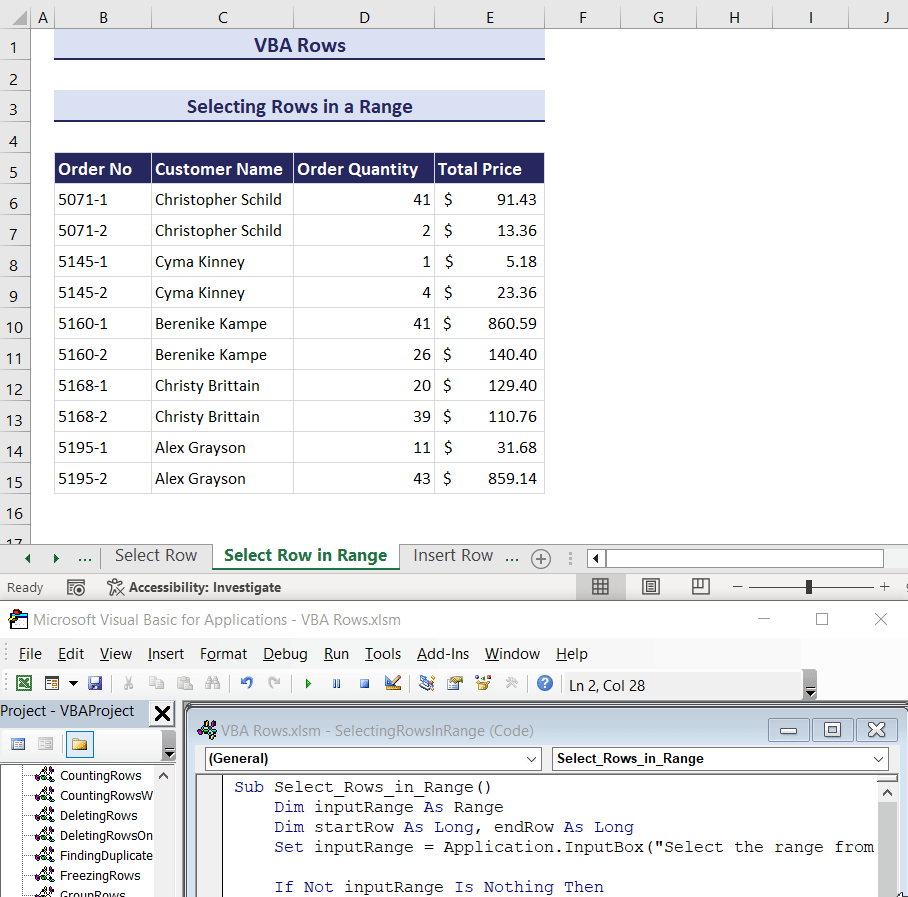
Method 2 – Selecting Rows in a Range
- Insert a new module and enter the following code:
Sub Select_Rows_in_Range()
    Dim inputRange As Range
    Dim startRow As Long, endRow As Long

    Set inputRange = Application.InputBox("Select the range from where you want to select rows:", Type:=8)

    If Not inputRange Is Nothing Then

        startRow = Application.InputBox("Enter the start row number:", Type:=1)
        endRow = Application.InputBox("Enter the end row number:", Type:=1)

        If startRow >= 1 And endRow >= startRow Then
            inputRange.Rows(startRow & ":" & endRow).Select
        Else
            MsgBox "Invalid row numbers. Please enter valid start and end rows."
        End If
    Else
        MsgBox "No valid range is selected."
    End If
End Sub- After clicking the Run button, you will get three input boxes.
- In the first input box, choose the range from which you want to select rows and click OK.
- In the second input box, specify the starting row number for selection and click OK.
- In the third input box, enter the row number where you want to stop the selection.
- Click OK.
Click the GIF to enlarge it
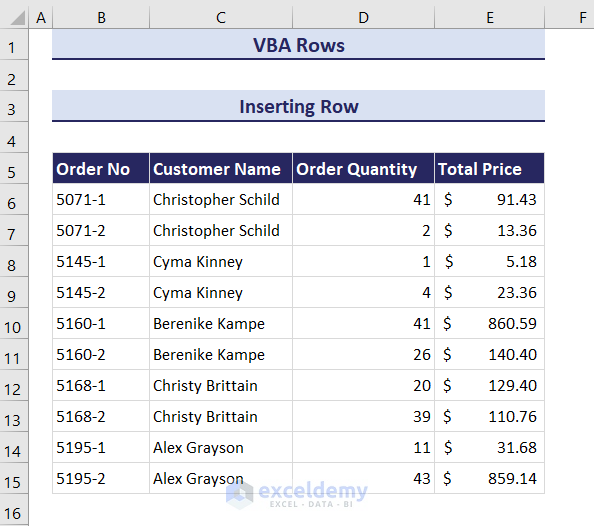
How to Insert Rows in Excel with VBA
Method 1 – Inserting Blank Rows
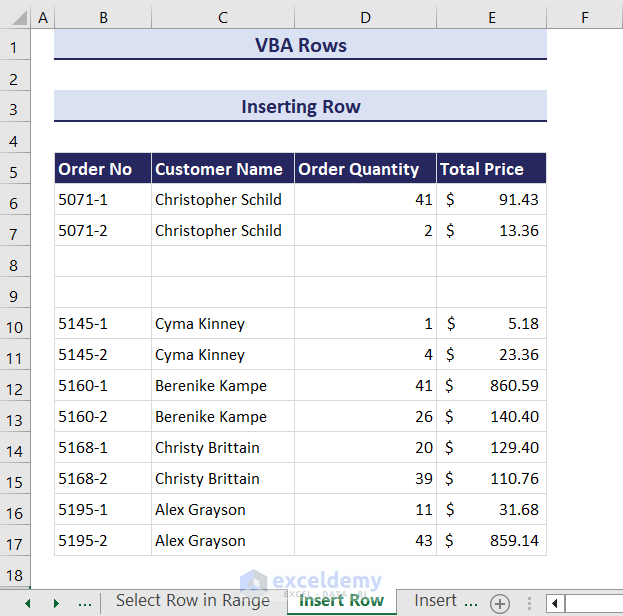
Let’s insert two blank rows right below the 6th row of the worksheet.
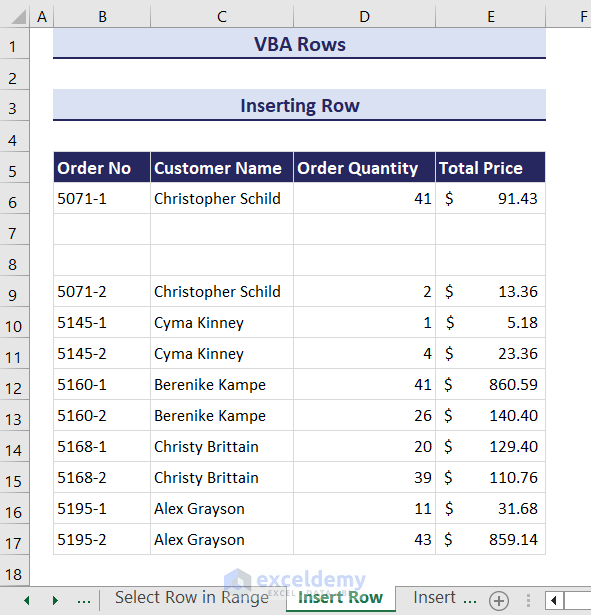
- Enter the following code in a module and click on the Run button from the ribbon.
Sub InsertRows()
Rows("7:8").Insert
End Sub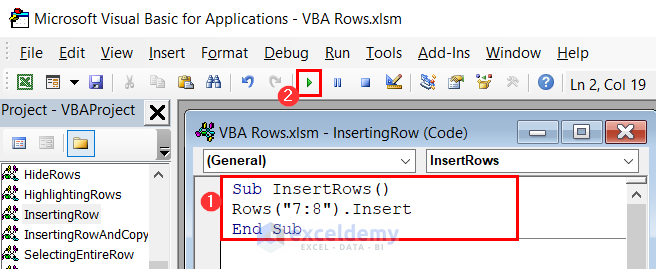
- This will insert two blank rows in your current worksheet right below the 6th row.
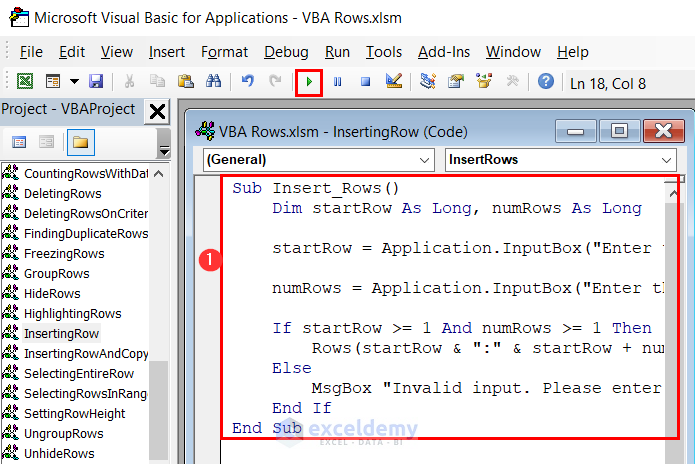
- You can use the code below if you want a more dynamic code. This code takes two inputs: where you want the rows, and how many of them.
Sub Insert_Rows()
    Dim startRow As Long, numRows As Long

    startRow = Application.InputBox("Enter the start row number where you want to insert rows:", Type:=1)

    numRows = Application.InputBox("Enter the number of rows to insert:", Type:=1)

    If startRow >= 1 And numRows >= 1 Then
        Rows(startRow & ":" & startRow + numRows - 1).Insert
    Else
        MsgBox "Invalid input. Please enter valid start row and number of rows."
    End If
End Sub- Enter the provided code in a module.
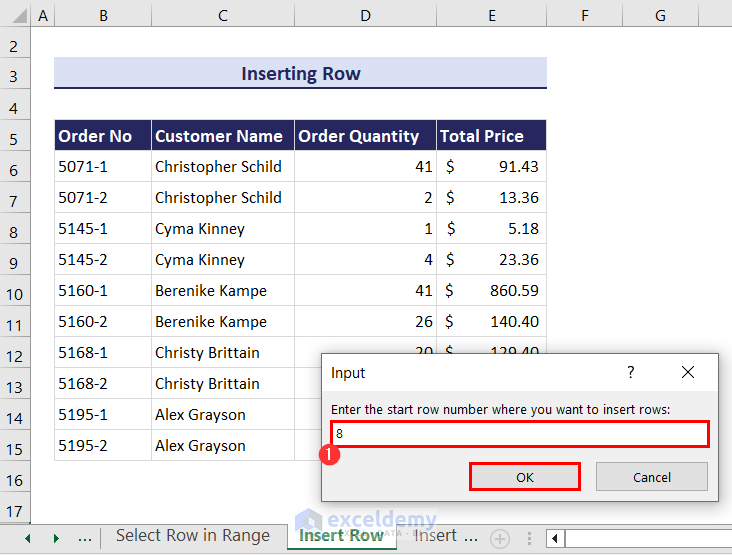
- Click on the Run button and you will get an input box.
- Enter the start row number from where you want to insert rows. We have entered 8 to insert rows after the 7th row.
- Click the OK button and another input box will appear. Enter the number of rows that you want to insert. We have entered 2.
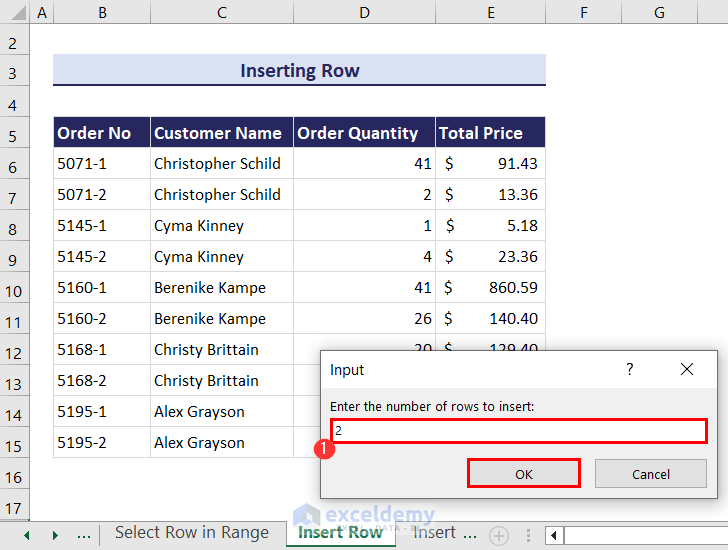
- Click the OK button in the input box.
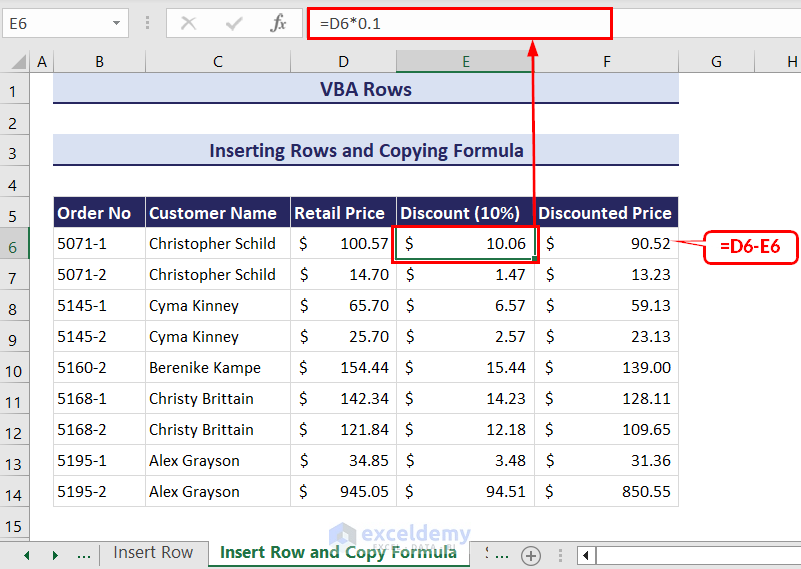
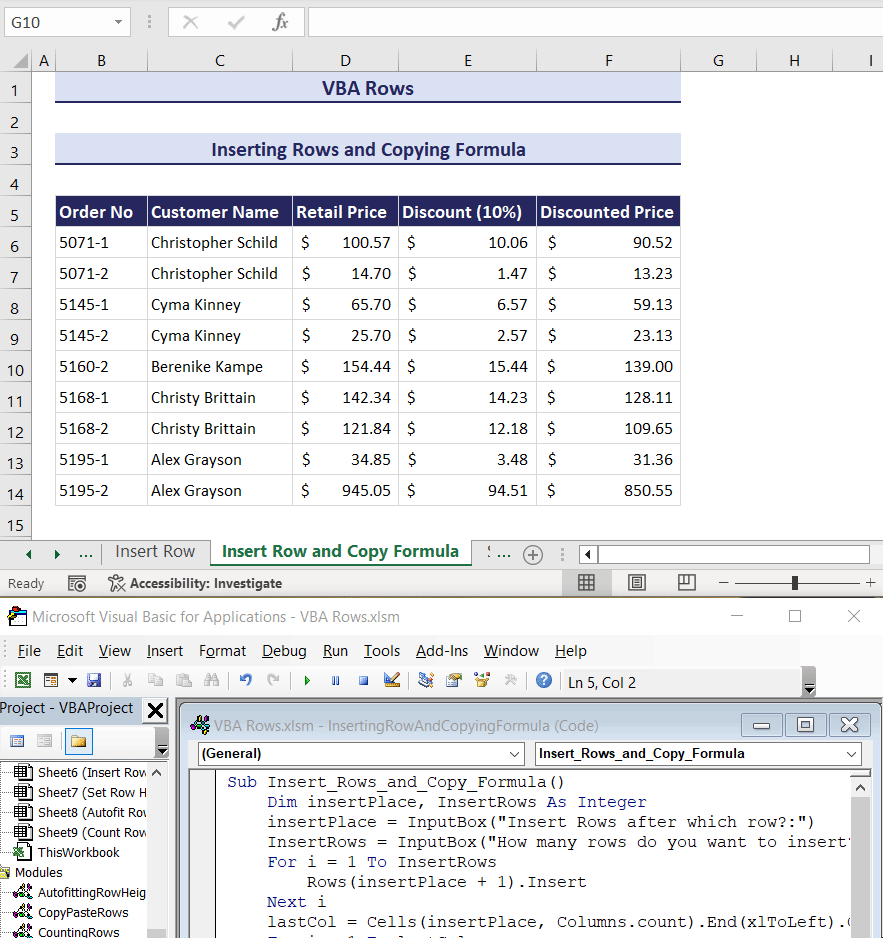
Method 2 – Inserting Rows and Copying Formula
Consider the following dataset. The cells of the column Discount (10%) and Discounted Price contain formulas to calculate the discount amount and discounted price respectively. If we were to insert new rows in this dataset manually, they will be blank.
- Enter the following code in a new module.
Sub Insert_Rows_and_Copy_Formula()
    Dim InsertRows As Integer
    insertPlace = InputBox("Insert Rows after which row?:")
    InsertRows = InputBox("How many rows do you want to insert?:")
    For i = 1 To InsertRows
        Rows(insertPlace + 1).Insert
    Next i
    lastCol = Cells(insertPlace, Columns.count).End(xlToLeft).Column
    For i = 1 To lastCol
        If Cells(insertPlace, i).HasFormula = True Then
            Cells(insertPlace, i).Copy
            For j = 1 To InsertRows
                Cells(insertPlace + j, i).PasteSpecial Paste:=xlPasteFormulas
            Next j
            Application.CutCopyMode = False
        End If
    Next i
End Sub- After pressing the Run button, two input boxes will pop up.
- In the first input box, enter the row number from where you want to start inserting rows and click the OK button. We have entered 10.
- In the second input box, enter how many rows you want to insert. We have entered 2.
- Press the OK button, and you will get the desired result.
Click the GIF to enlarge it
How to Set Row Height Using VBA in Excel
Method 1 – Setting Row Height Based on User Input
- Enter the following code in a module.
Sub Set_Row_Height_Based_on_User_Input()
    Dim rowHeight As Double
    Dim selectRows As Range

    Set selectRows = Application.InputBox("Select the rows to adjust height:", Type:=8)

    If Not selectRows Is Nothing Then
        rowHeight = val(InputBox("Enter the Row Height:"))

        If rowHeight > 0 Then
            selectRows.EntireRow.rowHeight = rowHeight
        Else
            MsgBox "Invalid row height entered."
        End If
    Else
        MsgBox "No rows selected."
    End If
End Sub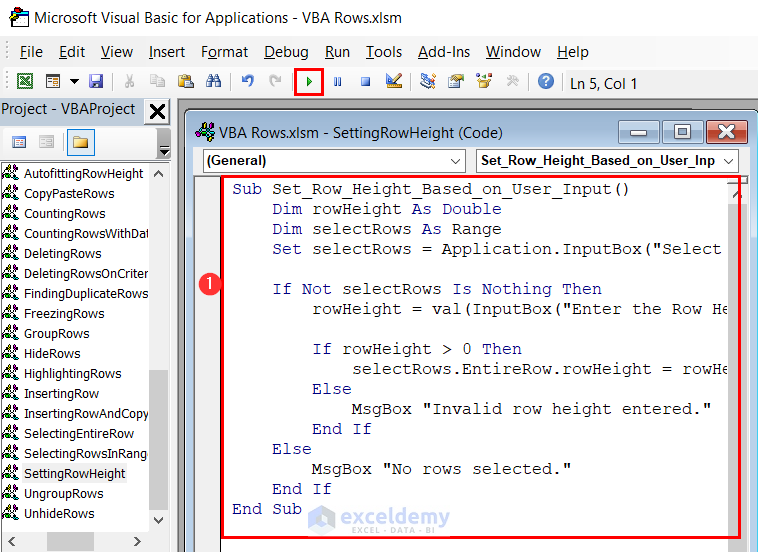
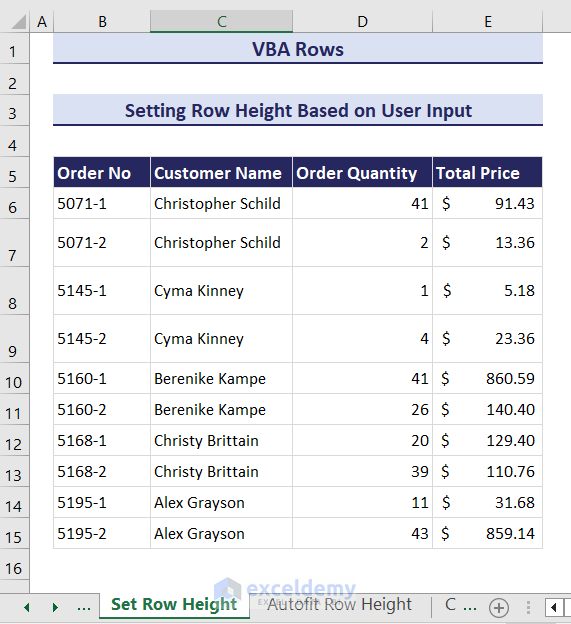
- Click on the Run button and an input box will ask you to select the range of rows that you want to adjust the height. We have selected the range B7:C9.
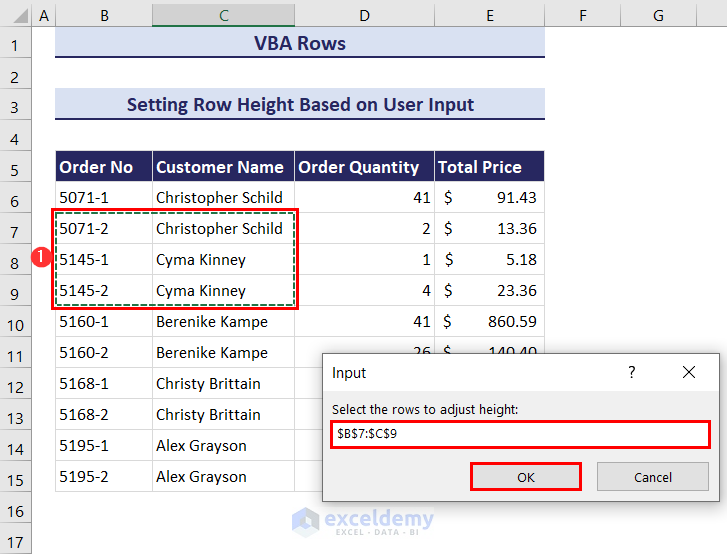
- Click OK and another input box will ask you to enter the row height in pixels. We have entered 30.
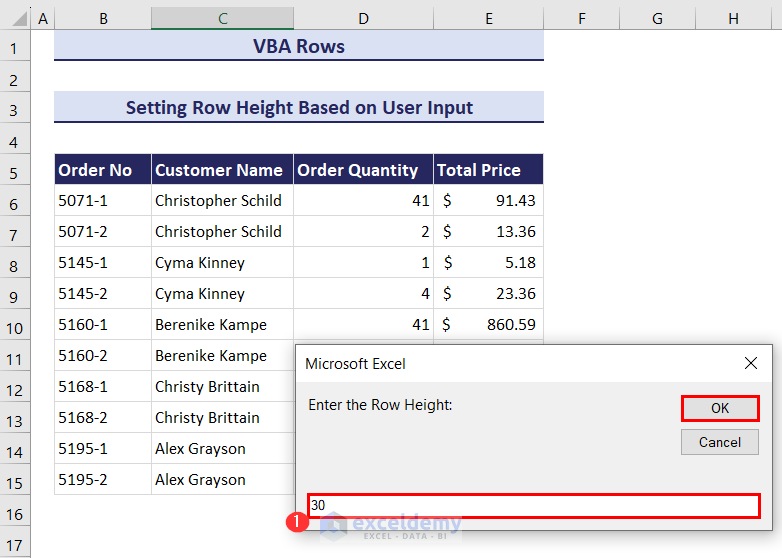
- Click on the OK button and the selected rows will have the specified row height.
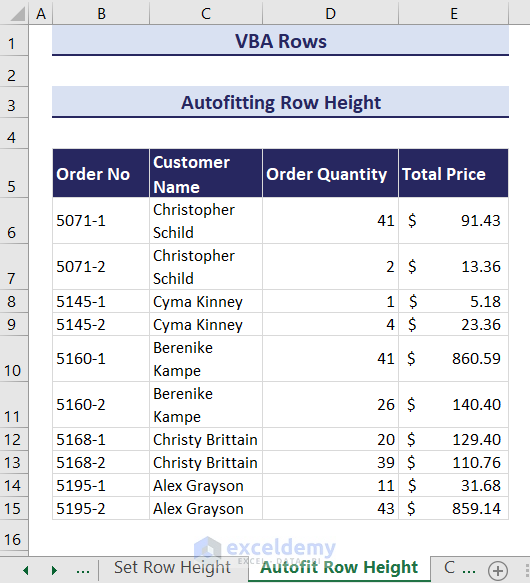
Method 2 – Autofitting Row Height
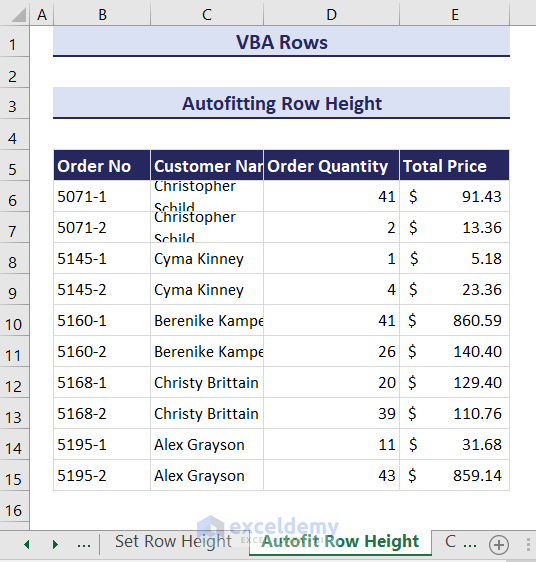
Consider the following dataset. The content of some cells is not visible properly within the current row height.
- Enter the following code in a module.
Sub Autofit_Row_Height()
    Dim targetRows As Range

    Set targetRows = Application.InputBox("Select the range of rows to autofit:", Type:=8)

    If Not targetRows Is Nothing Then
        targetRows.WrapText = True
        targetRows.EntireRow.AutoFit
    Else
        MsgBox "Invalid selection. Please select a valid range of rows."
    End If
End Sub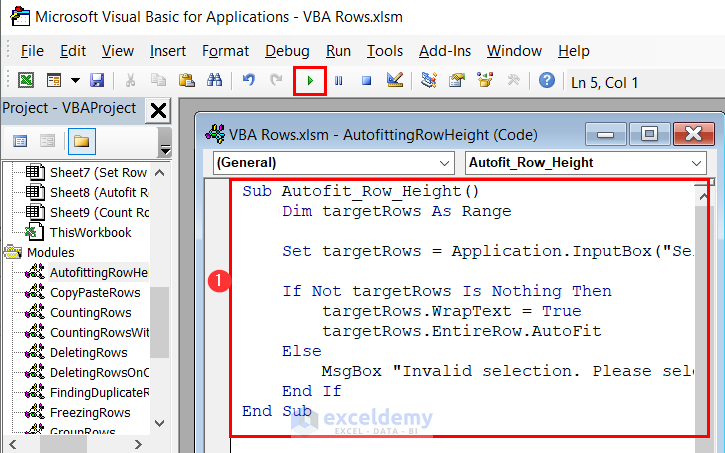
- Click on the Run button and an input box will ask you to select the range of rows where you want to autofit the row height. We have selected the range B5:C15.
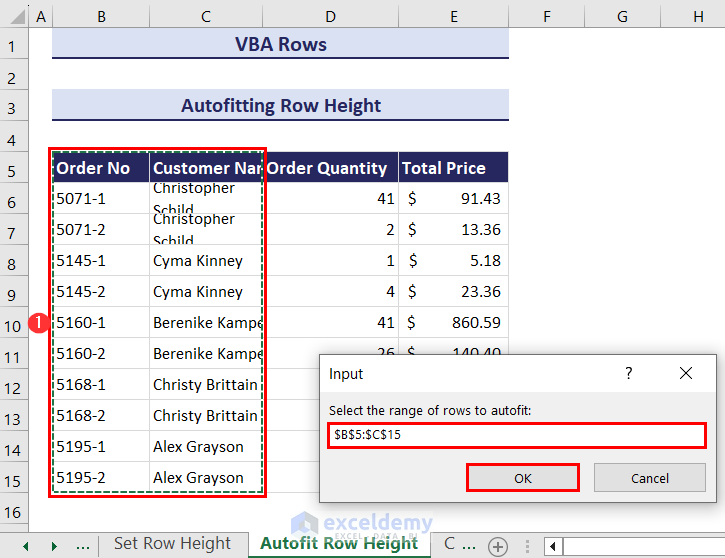
- Click OK and the rows in the selected range will autofit.
How to Count Rows with VBA in Excel
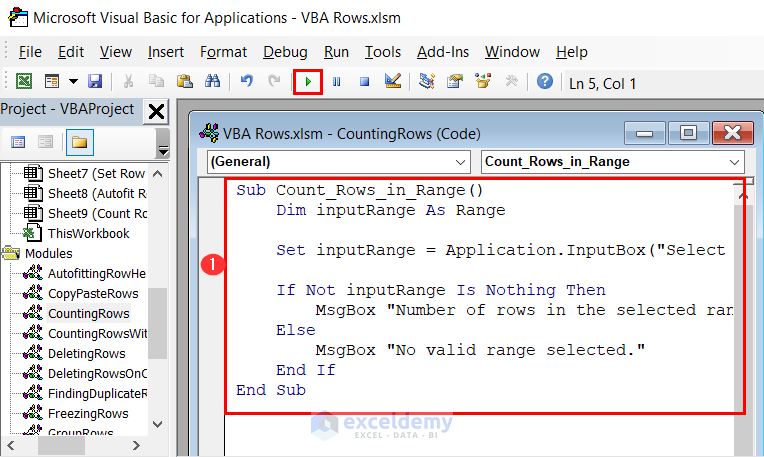
Method 1 – Counting Rows in a Range
- Enter the following code in a module.
Sub Count_Rows_in_Range()
    Dim inputRange As Range

    Set inputRange = Application.InputBox("Select the range to count rows:", Type:=8)

    If Not inputRange Is Nothing Then
        MsgBox "Number of rows in the selected range: " & inputRange.Rows.count
    Else
        MsgBox "No valid range selected."
    End If
End Sub
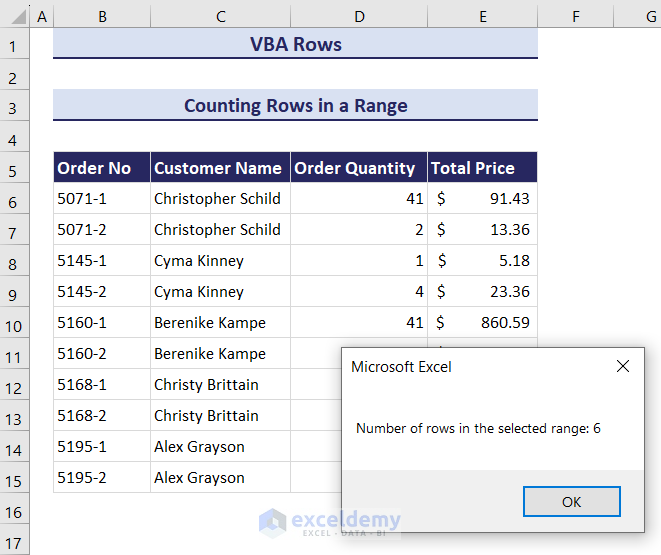
- After clicking the Run button, an input box will ask you to select the range for which you want to count the number of rows in that range. We have selected the range B6:C11.
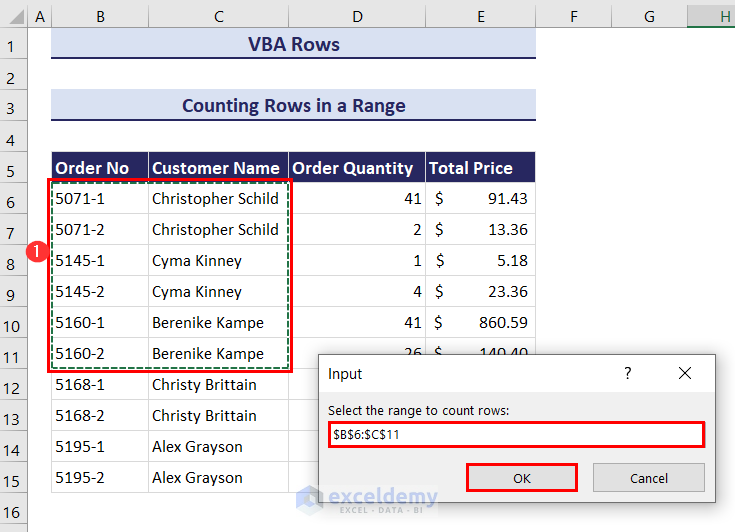
- Click OK to find a message box displaying the total number of rows in the selected range.
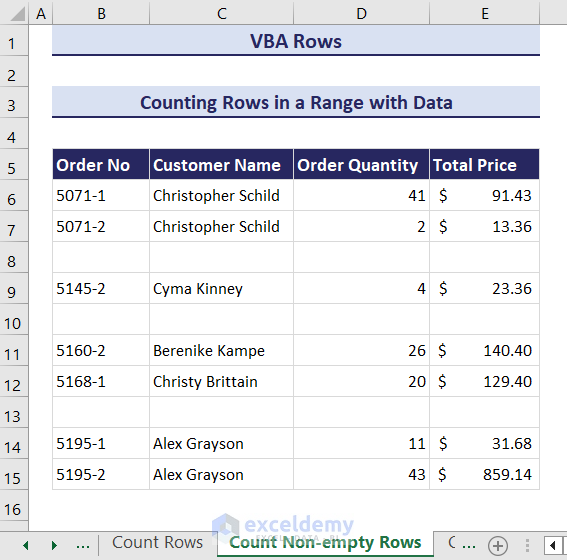
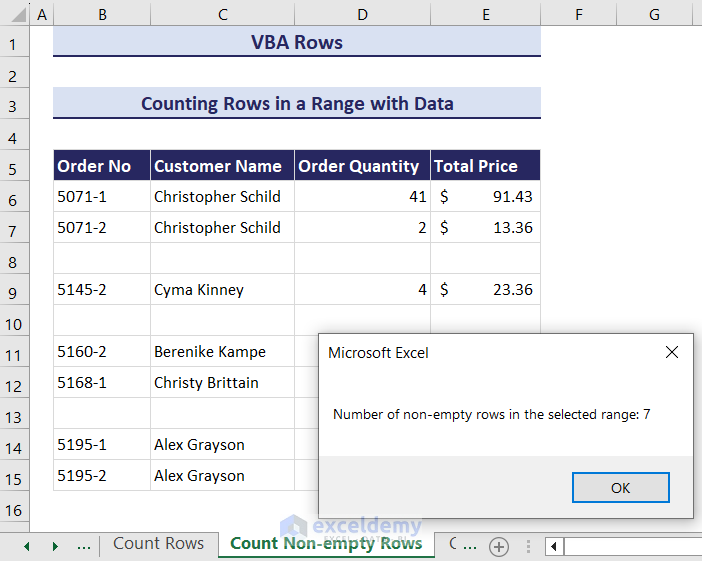
Method 2 – Counting Rows with Data in a Range
In this example, rows 8, 10, and 13 are empty.
- Enter the following code in a module.
Sub Count_NonEmpty_Rows_in_Range()
    Dim inputRows As Range
    Dim nonEmptyRows As Long

    Set inputRows = Application.InputBox("Select the range to count non-empty rows:", Type:=8)

    If Not inputRows Is Nothing Then
        nonEmptyRows = 0

        For Each Row In inputRows.Rows
            If WorksheetFunction.CountA(Row) > 0 Then
                nonEmptyRows = nonEmptyRows + 1
            End If
        Next Row

        MsgBox "Number of non-empty rows in the selected range: " & nonEmptyRows
    Else
        MsgBox "No valid range selected."
    End If
End Sub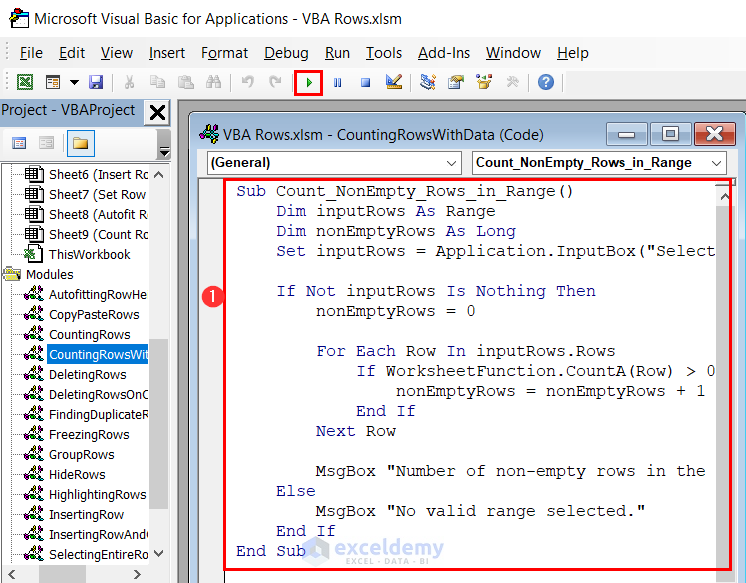
- Click the Run button and you will get an input box. Enter the range for which you want to count the non-empty rows. We have selected the range B6:C15.
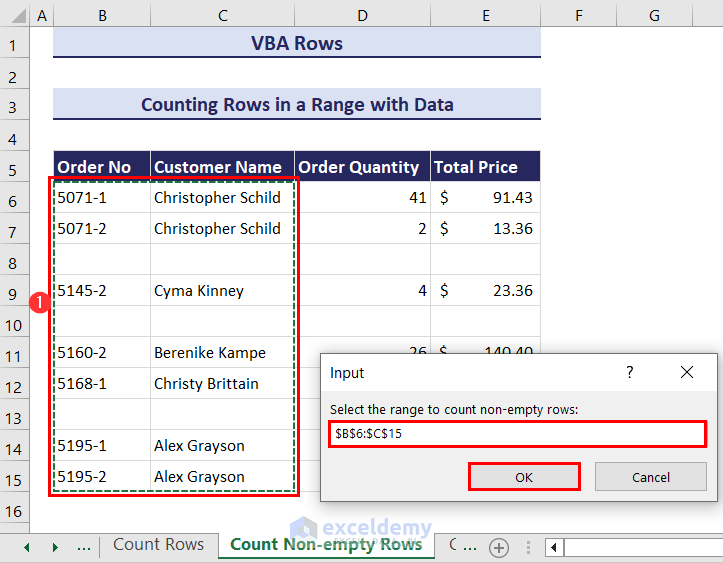
- Click OK and the code will display the total number of non-empty rows in the selected range in a message box.
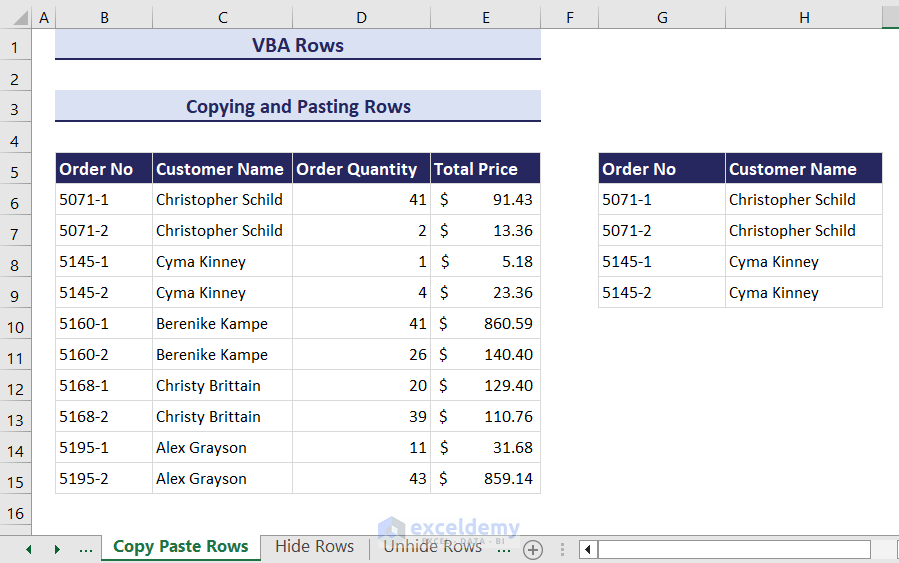
How to Copy-Paste Rows in Excel with VBA
- Enter the following code in a module.
Sub Copy_Paste_Rows()
    Dim copyRange As Range
    Dim destination As Range

    Set copyRange = Application.InputBox("Enter the range that you want to copy:", Type:=8)
    Set destination = Application.InputBox("Enter the destination range:", Type:=8)

    If Not copyRange Is Nothing And Not destination Is Nothing Then
        copyRange.Copy destination:=destination
    Else
        MsgBox "Invalid range."
    End If
End Sub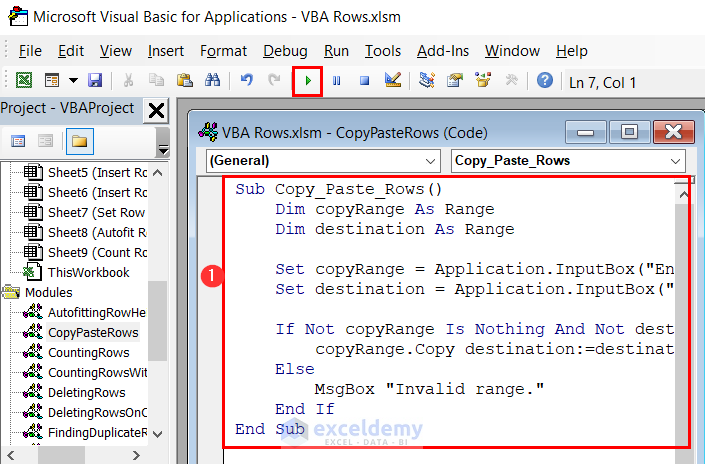
- Click the Run icon and an input box will appear. It will ask you to select the range of rows that you want to copy. We have entered the range B5:C9.
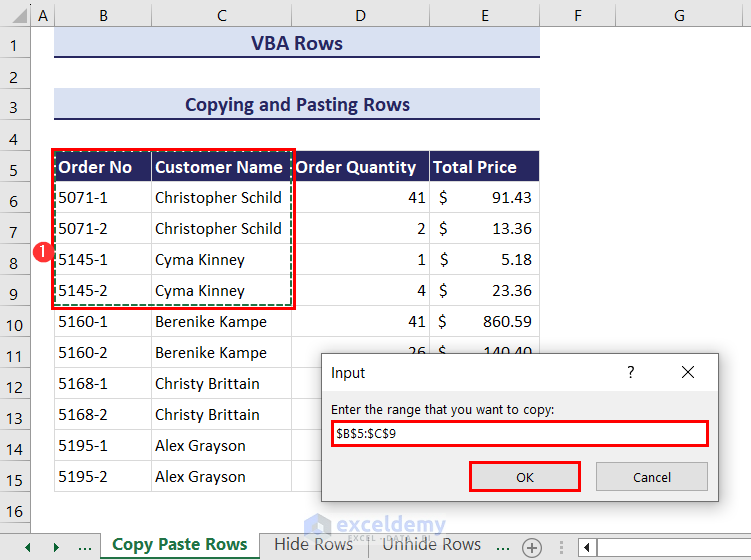
- Click OK and another input box will now ask you to select the destination range where you would like to paste the copied rows. We have set the destination range to cell G5.
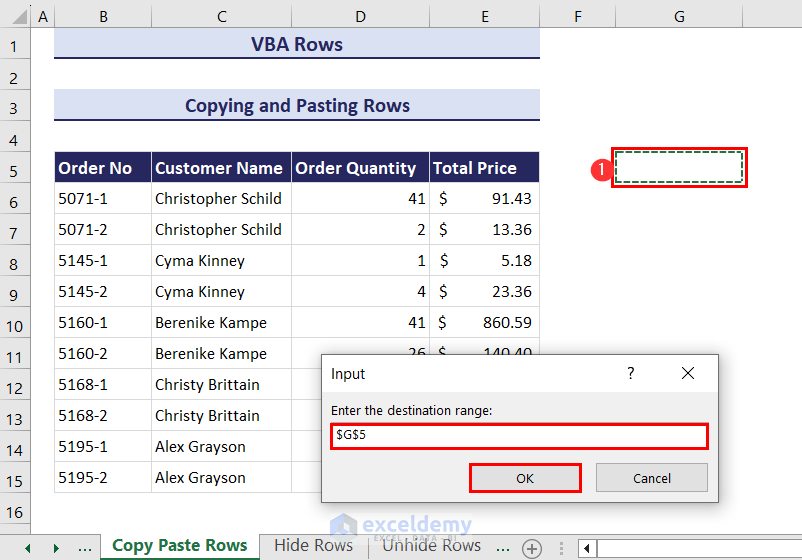
- Click OK and the copied cells will be pasted in your desired destination.
Click the image to enlarge it
How to Hide and Unhide Rows Using VBA in Excel
Method 1 – Hiding Rows
We want to hide rows 7 and 8 of the worksheet.
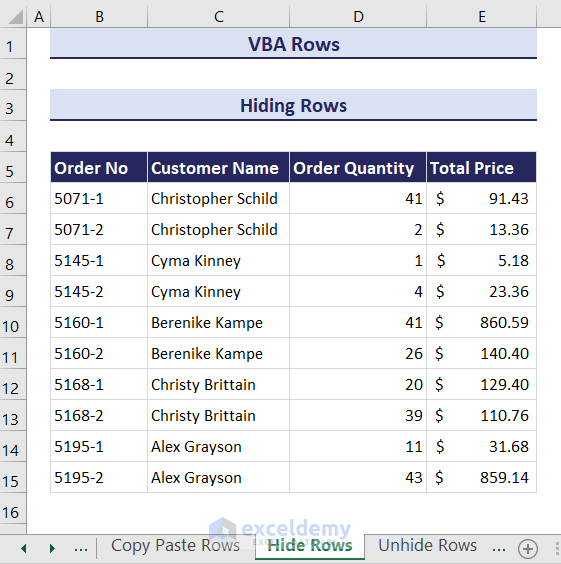
- Enter the following code in a module and click on the Run button.
Sub HideRows()
    Rows("7:8").Hidden = True
End Sub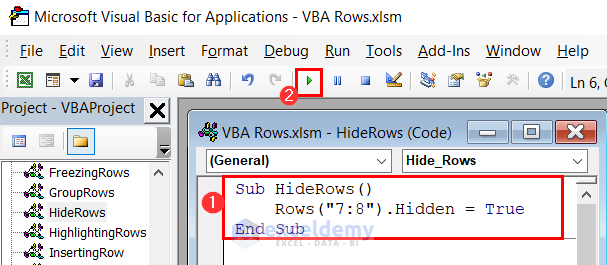
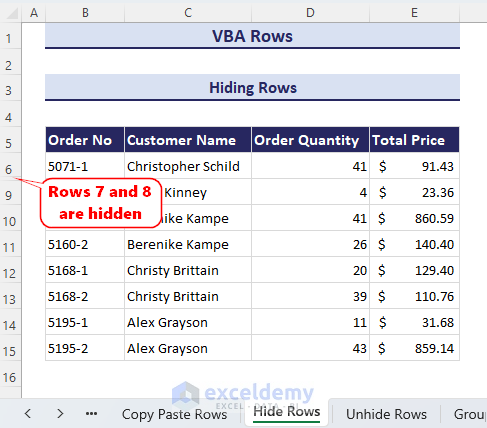
- This will hide the 7th and 8th number row of your current worksheet.
- If you want to hide a range of rows of your current worksheet based on your requirements, you can use an Input Box to take the input of the range for hiding rows. Here is the modified code:
Sub Hide_Rows()
    Dim targetRows As Range

    Set targetRows = Application.InputBox("Select the range of rows to hide:", Type:=8)

    If Not targetRows Is Nothing Then
        targetRows.EntireRow.Hidden = True
    Else
        MsgBox "Invalid selection. Please select a valid range of rows."
    End If
End Sub- Enter the provided code in a module.
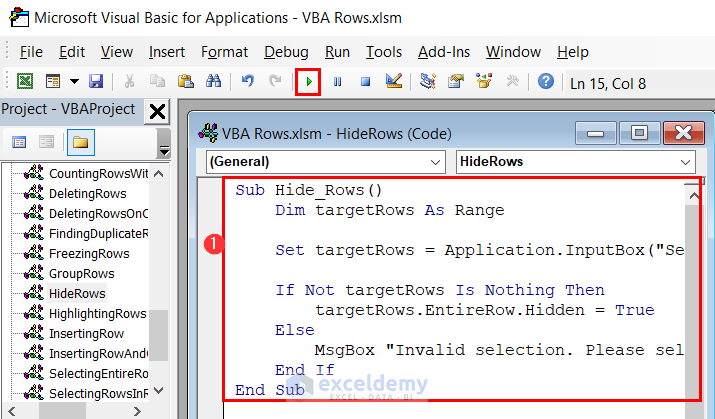
- Click on the Run icon and an input box will ask you to select the range of rows that you want to hide. We have selected the range B7:E8.
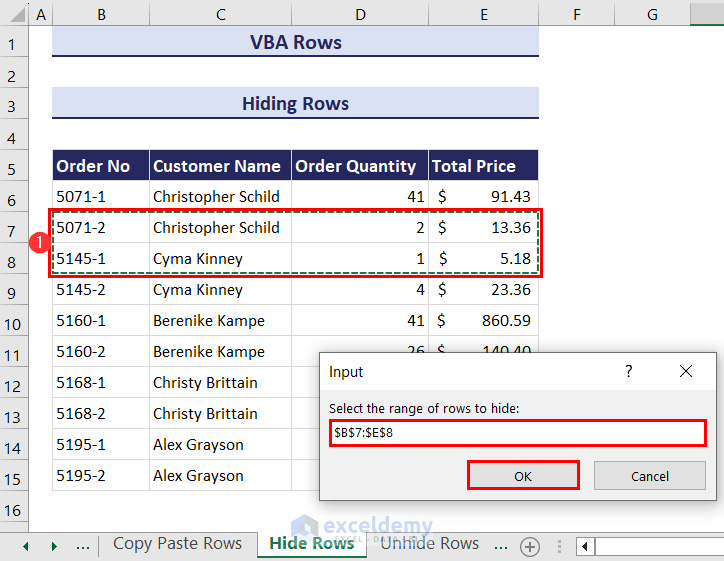
- Click OK and it will hide the rows that you selected.

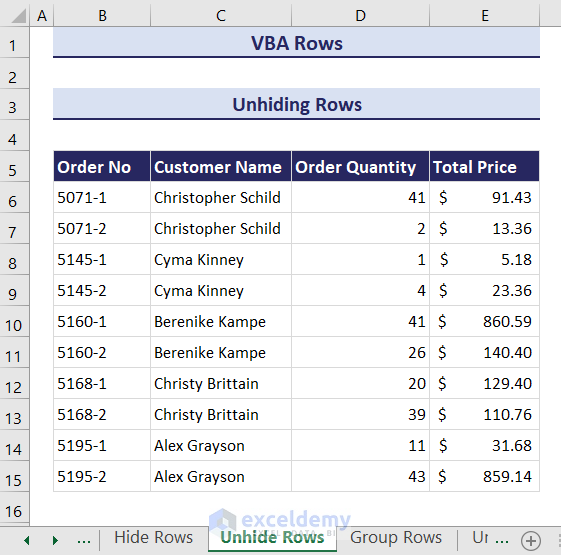
Method 2 – Unhiding Rows
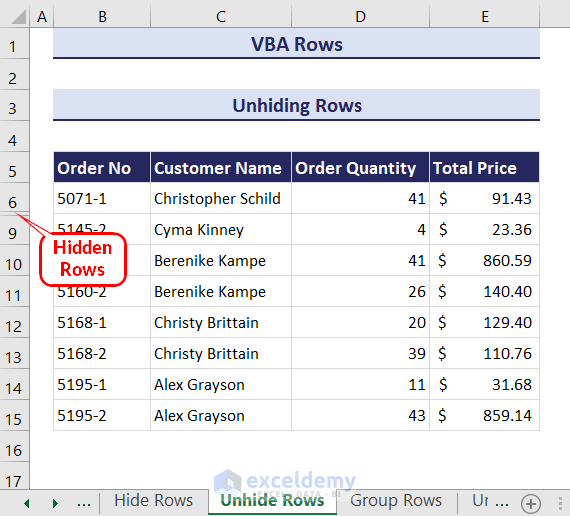
In the following dataset, there are some hidden rows, and we want to unhide all these hidden rows from the worksheet.
- Enter the following code in a module and click on the Run button.
Sub Unhide_Rows()
    ActiveSheet.UsedRange.EntireRow.Hidden = False
End Sub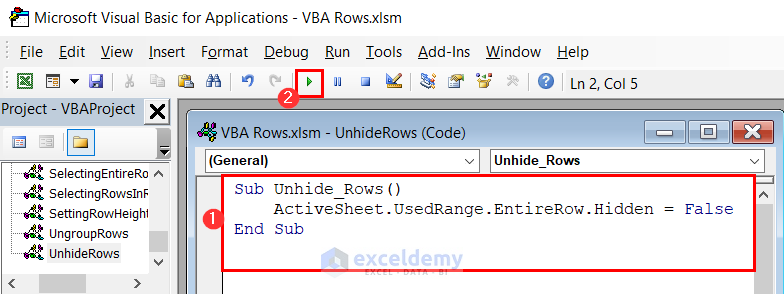
- This will unhide all the hidden rows in the current worksheet.
How to Group and Ungroup Rows in Excel With VBA
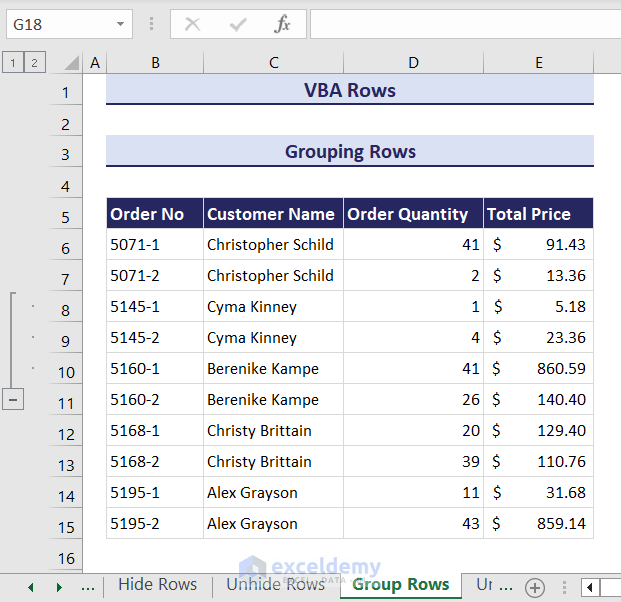
Method 1 – Grouping Rows
Suppose we want to group rows 8 to 10 in the dataset that we have been using so far.
- Enter the following code in a module and click on the Run button.
Sub GroupRows()
    Rows("8:10").Group
End Sub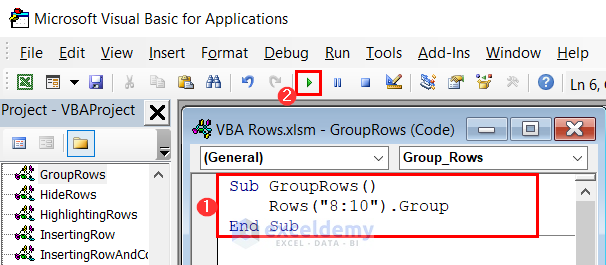
- Rows 8 to 10 are now grouped.
- To group the rows of your preference, you can modify the above code to take a range of rows as input. Here is the modified code.
Sub Group_Rows()
    Dim targetRows As Range
    Set targetRows = Application.InputBox("Select the range of rows to group:", Type:=8)

    If Not targetRows Is Nothing Then
        targetRows.EntireRow.Group
    Else
        MsgBox "Invalid selection. Please select a valid range of rows."
    End If
End Sub- Apply the above code in a module and click the Run button.
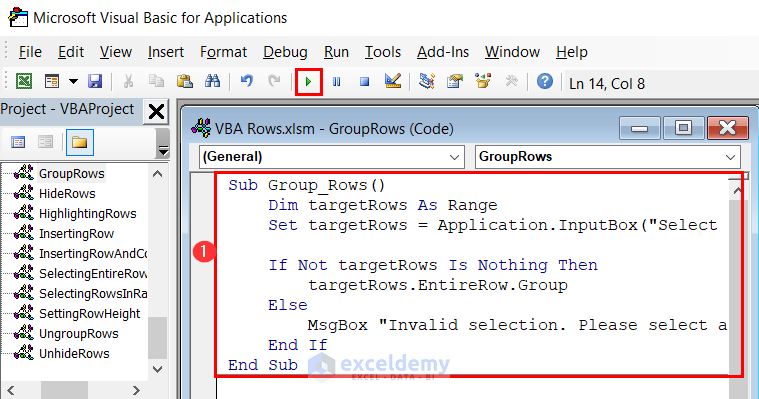
- After clicking the Run button, you will get an input box like the following. Enter the range of rows you want to group. We have selected the range B8:E10.
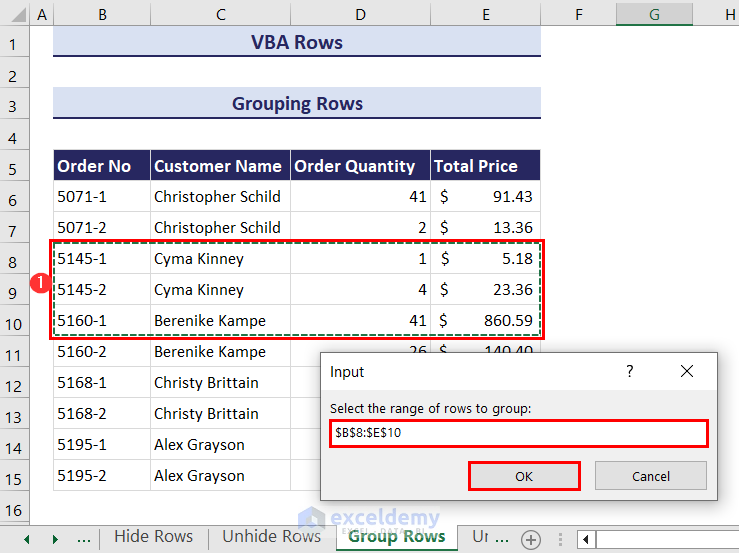
- Click OK and the rows of the selected cells will be grouped.

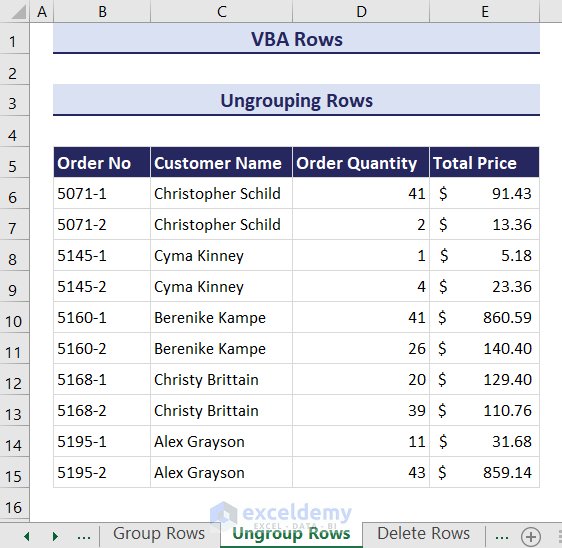
Method 2 – Ungrouping Rows
In the following dataset, we have some rows that are grouped, and we want to ungroup all rows from the current worksheet.
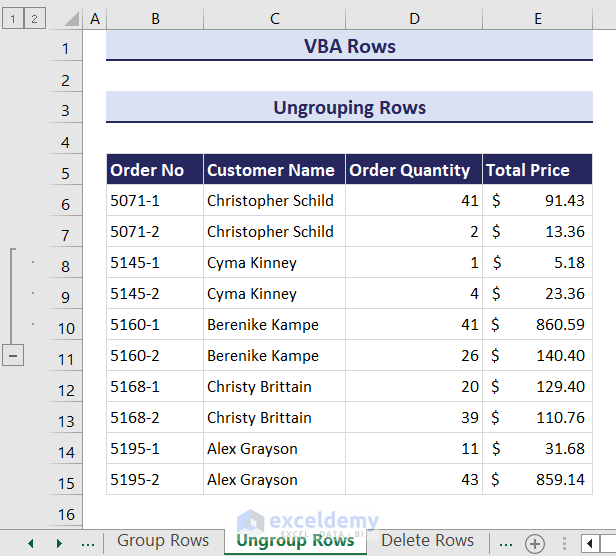
- Enter the following code in a module and click on the Run button.
Sub Ungroup_Rows()
    ActiveSheet.UsedRange.EntireRow.Ungroup
End Sub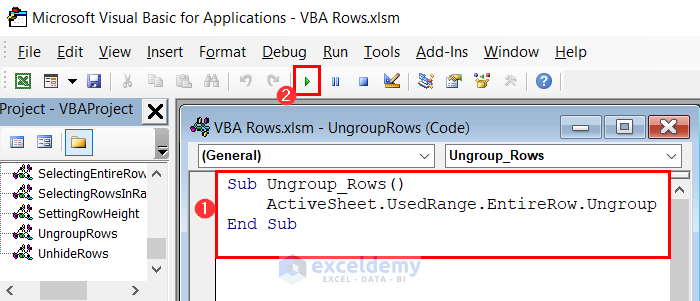
- All grouped rows from the current worksheet are now ungrouped.
How to Delete Rows Using VBA in Excel
Method 1 – Deleting Rows
Suppose we want to delete rows 8 to 10 in the dataset that we have been using so far.
- Enter the following code in a module and click on the Run button.
Sub DeleteRows()
    Rows("7:8").Delete
End Sub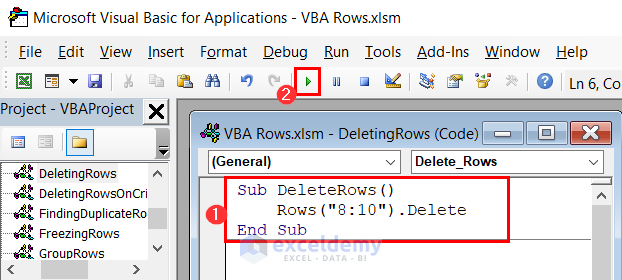
- This will eliminate rows 8 to 10 from the current worksheet.
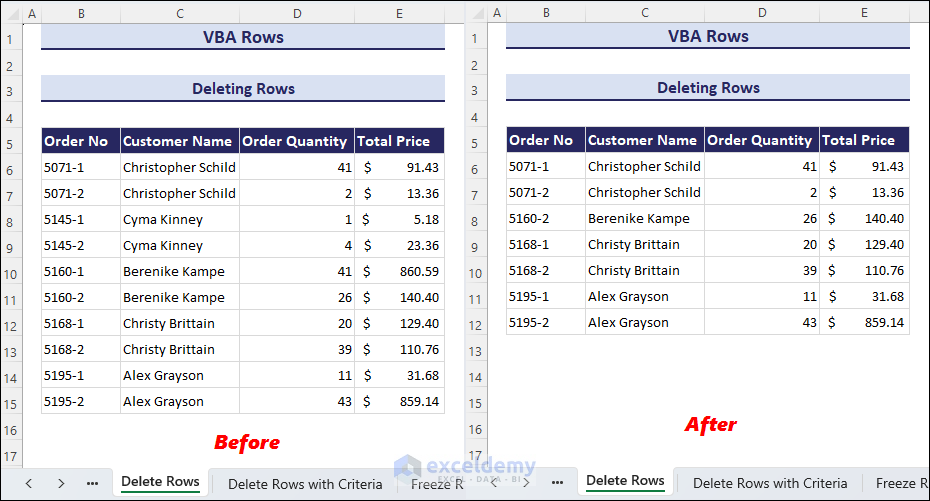
Click the image to enlarge it
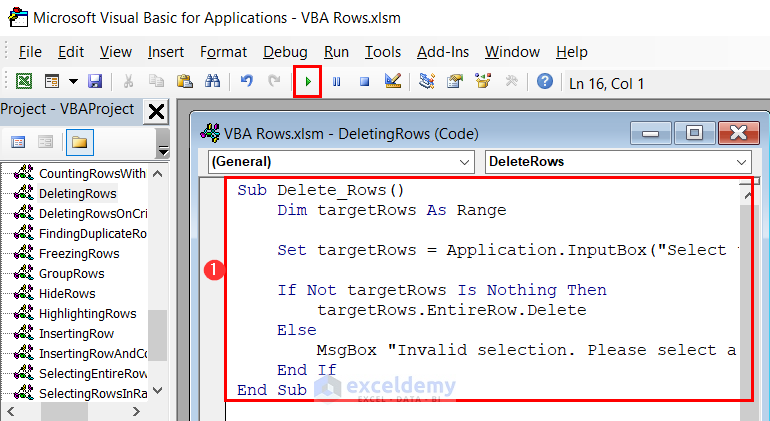
- To delete a range of rows based on user input, you can modify the code as the following. This code takes a range of rows as input from the user and deletes the rows.
Sub Delete_Rows()
    Dim targetRows As Range

    Set targetRows = Application.InputBox("Select the range of rows to delete:", Type:=8)

    If Not targetRows Is Nothing Then
        targetRows.EntireRow.Delete
    Else
        MsgBox "Invalid selection. Please select a valid range of rows."
    End If
End Sub- Enter the above code in a module and click the Run button.
- After clicking the Run button you will get an input box. Select the range of rows that you want to delete. We have selected the range B8:E10.
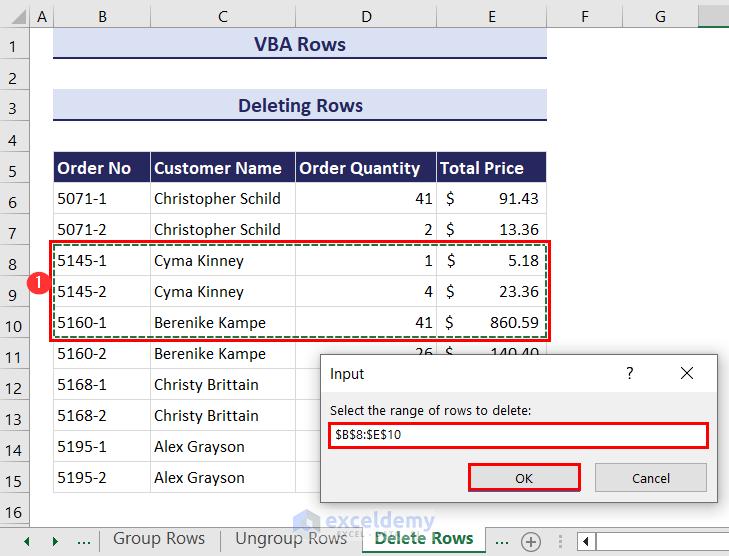
- Click OK and the rows of the selected cells will be deleted.

You can click the image to enlarge it
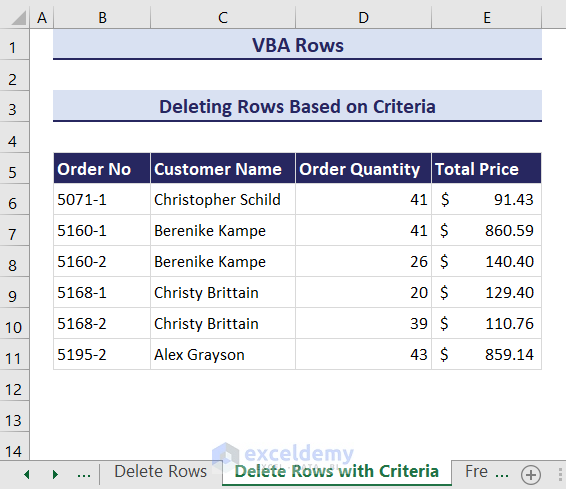
Method 2 – Deleting Rows Based on Criteria
In our dataset, if the Order Quantity of any particular order is less than 20, we want to delete that row from the dataset.
- Enter the following code in a module.
Sub Delete_Rows_Based_on_Criteria()
    Dim inputRange As Range

    Set inputRange = Application.InputBox("Select the column range to test the criteria:", Type:=8)

    If inputRange Is Nothing Then
        MsgBox "No range is selected."
        Exit Sub
    End If

    Dim cell As Range
    Dim i As Long

    For i = inputRange.Rows.count To 1 Step -1
        For Each cell In inputRange.Rows(i).Cells

            If cell.Value < 20 Then
                inputRange.Rows(i).EntireRow.Delete
                Exit For
            End If
        Next cell
    Next i
End Sub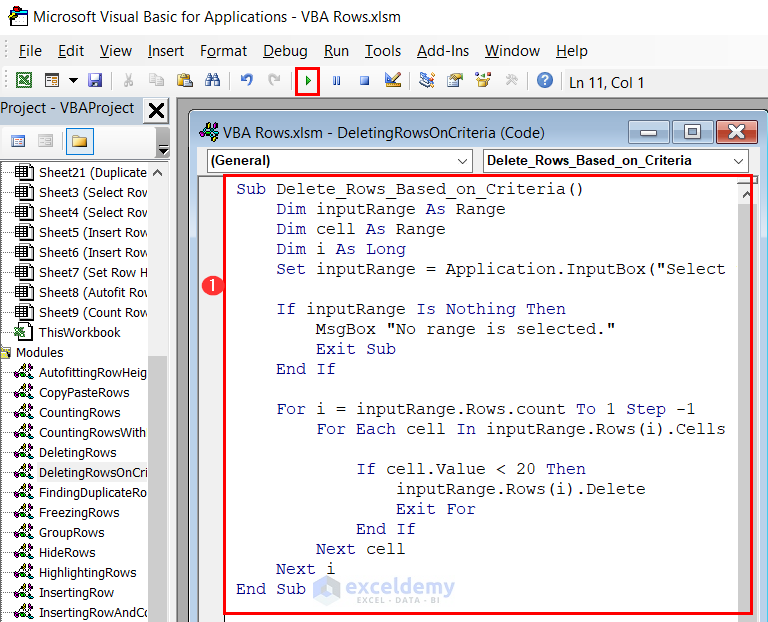
- Click on the Run button and an input box will ask you to select the column range where you want to test the criteria. We have selected the range D6:D15.
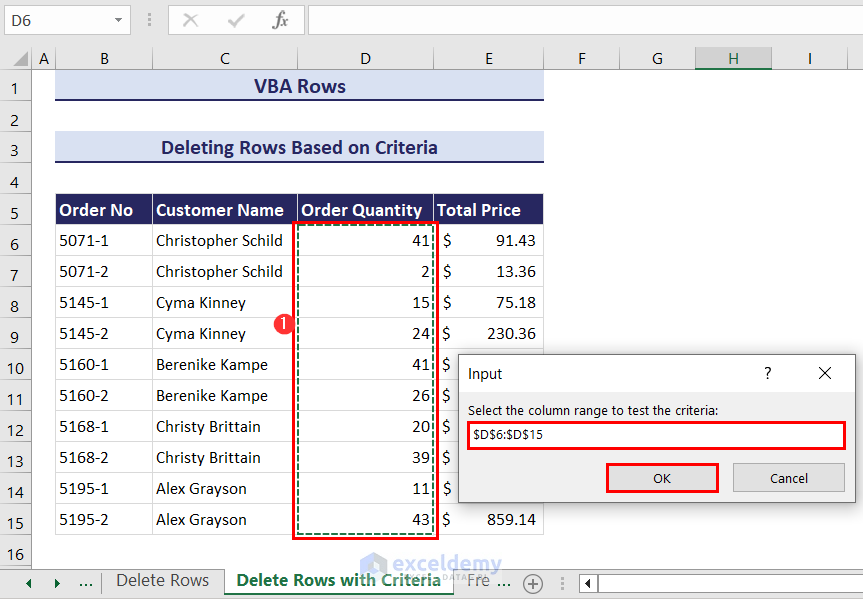
Click the image to enlarge it
- Click OK and the rows which have an order quantity of less than 20 will be deleted.
How to Freeze Rows Using VBA in Excel
Suppose we want to freeze all the rows above row number 4 in our dataset.
- Use the following code to do so.
Sub FreezeRow()
    Rows(4).Select
    ActiveWindow.FreezePanes = True
End Sub
Click the GIF to enlarge it
- If you want a more dynamic code, you can use the code below. The following code takes the row number input to freeze rows through an input box.
Sub Freeze_Row()
    Dim rowNum As Integer

    rowNum = InputBox("Enter the row number to freeze:", "Freeze Row")

    If rowNum > 0 Then
        ActiveWindow.FreezePanes = False
        Rows(rowNum & ":" & rowNum).Select
        ActiveWindow.FreezePanes = True

        MsgBox "Row " & rowNum & " has been frozen.", vbInformation
    Else
        MsgBox "Invalid row number entered.", vbExclamation
    End If
End Sub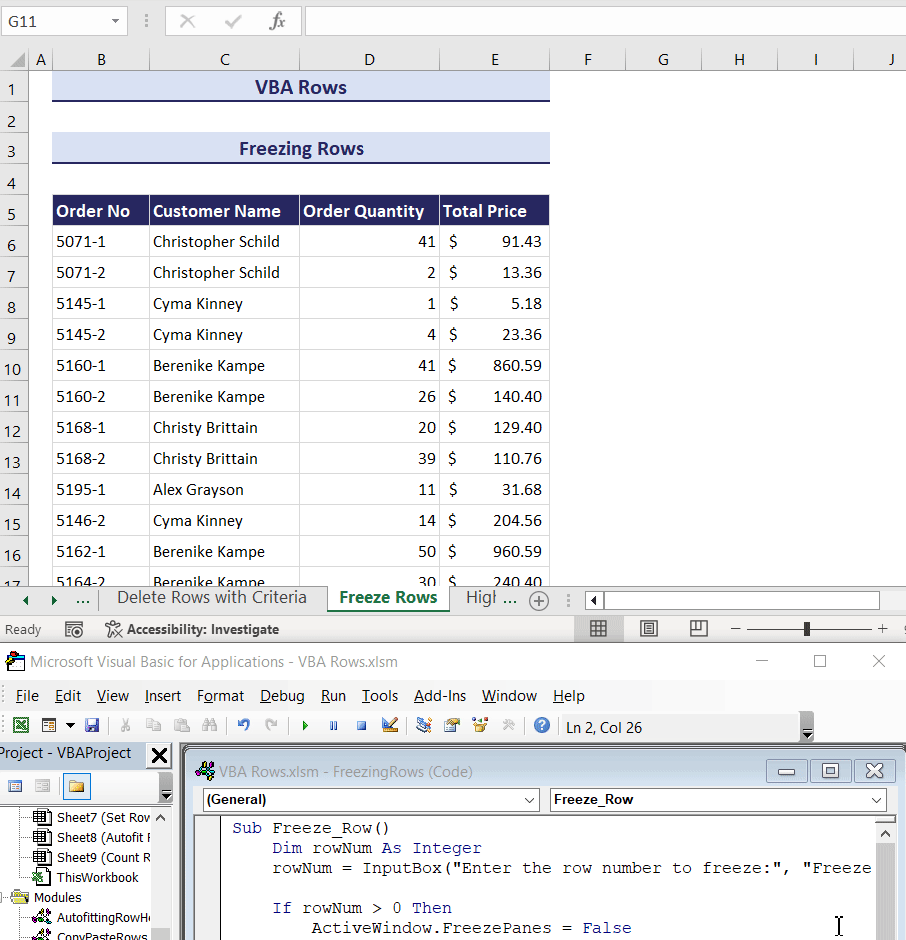
You can click the GIF to enlarge it
How to Use VBA for Highlighting Rows That Meet a Certain Condition
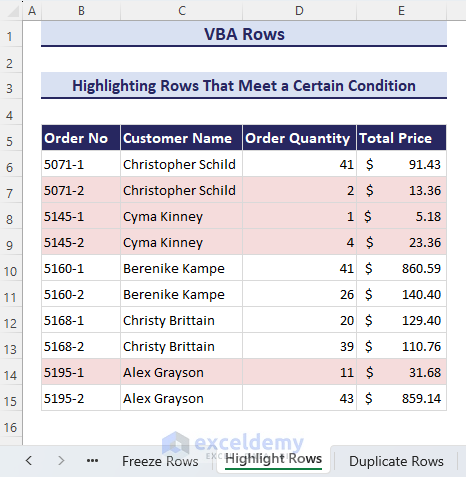
Suppose we want to highlight rows based on a specific value in the cells. For our dataset, if the Order Quantity of any particular order is less than 20, we want to highlight that row in the dataset.
- Enter the following code in a module.
Sub Highlight_Rows_Based_on_Condition()
    Dim datasetRange As Range
    Dim columnRange As Range
    Dim cell As Range
    Dim i As Long

    Set datasetRange = Application.InputBox("Select the dataset range:", Type:=8)

    If datasetRange Is Nothing Then
        MsgBox "No dataset range is selected."
        Exit Sub
    End If

    criteriaColIndex = InputBox("Index of the Criteria Column in the Selected range:")
    highlightCriteria = 20

    If IsEmpty(criteriaColIndex) = True Or IsNumeric(criteriaColIndex) = False Then
        MsgBox "Invalid Index Value!"
        Exit Sub
    End If

    For i = 1 To datasetRange.Rows.count
        If datasetRange.Cells(i, Int(criteriaColIndex)).Value < highlightCriteria Then
            datasetRange.Rows(i).Interior.Color = RGB(245, 220, 220)
        End If
    Next i
End Sub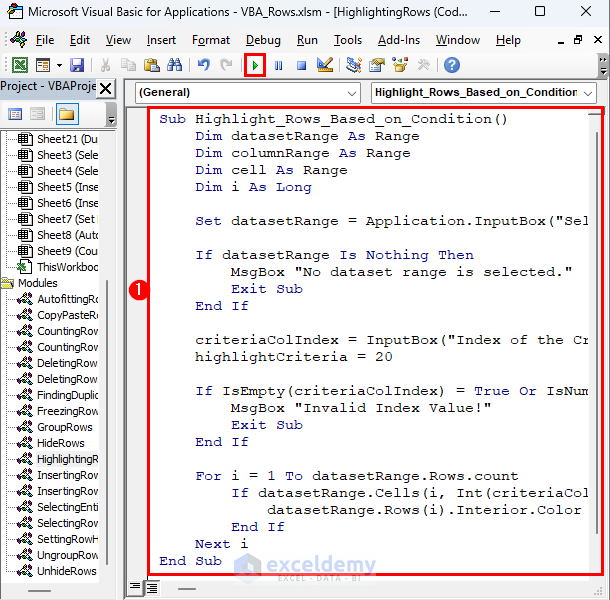
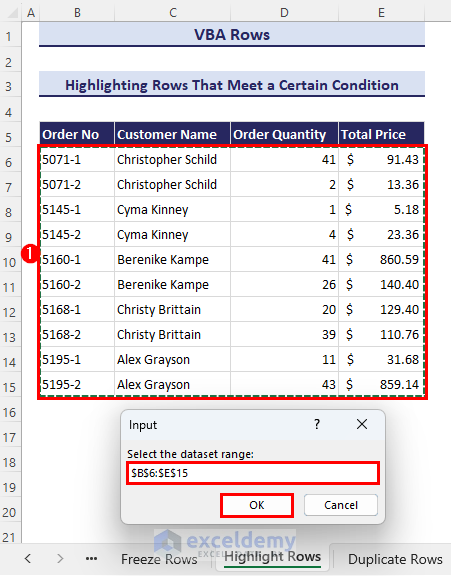
- Click on the Run button, and an input box will appear. Enter the range of our dataset to highlight. We have entered the range B6:E15.
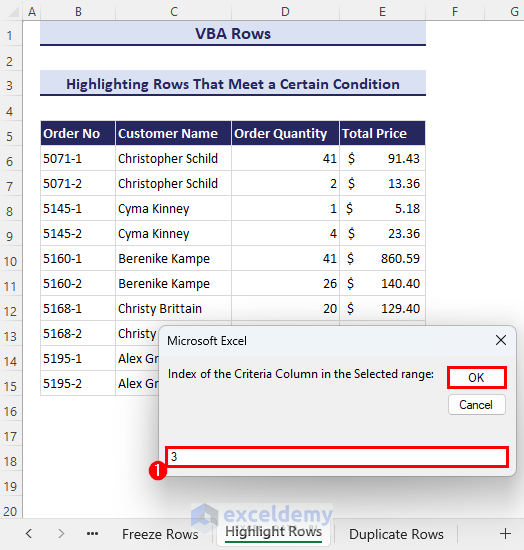
- After clicking the OK button, another input box will ask you to enter the index of the criteria column in the selected range. You’ll find the OK button in the input box.
- As the Order Quantity column is the 3rd column in the selected range, we have entered 3 here.
- Click OK and it will highlight all the rows in the selected range that meet the criteria.
How to Find Duplicate Rows with VBA in Excel
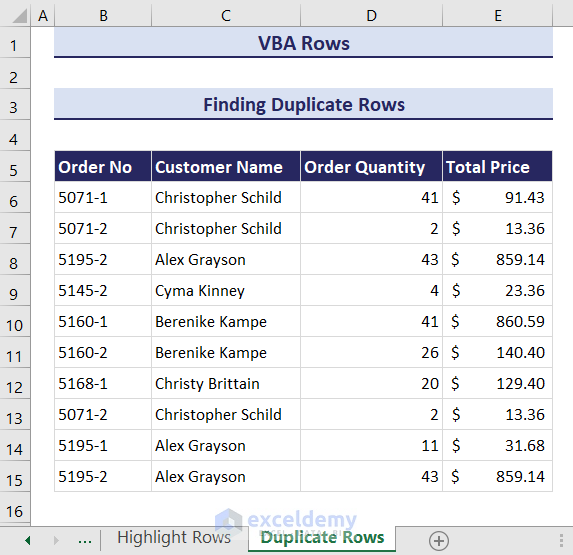
Consider the following dataset. Row 13 is a duplicate of row 7 and row 15 is a duplicate of row 8. Let’s highlight them.
- Enter the following code in a module.
Sub Finding_Duplicate_Rows()
    Dim inputRange As Range
    Dim i As Integer, j As Integer, k As Integer
    Dim baseRow As String, checkRow As String
    Dim count As Integer

    Set inputRange = Application.InputBox("Select the range to find duplicate rows:", Type:=8)

    If inputRange Is Nothing Then
        MsgBox "No valid range selected. Exiting..."
        Exit Sub
    End If

    inputRange.Interior.Pattern = xlNone
    count = 0

    For i = 1 To inputRange.Rows.count

        If inputRange.Rows(i).Interior.Color = RGB(255, 255, 255) Then
            baseRow = ""

            For j = 1 To inputRange.Columns.count
                baseRow = baseRow & inputRange.Cells(i, j).Value
            Next j

            For k = i + 1 To inputRange.Rows.count
                If inputRange.Rows(k).Interior.Color = RGB(255, 255, 255) Then
                    checkRow = ""

                    For j = 1 To inputRange.Columns.count
                        checkRow = checkRow & inputRange.Cells(k, j).Value
                    Next j

                    If checkRow = baseRow Then
                        inputRange.Rows(i).Interior.Color = RGB(255, 220, 220)
                        inputRange.Rows(k).Interior.Color = RGB(255, 220, 220)
                    End If
                End If
            Next k
        End If
    Next i

    For i = 1 To inputRange.Rows.count
        If inputRange.Rows(i).Interior.Color = RGB(255, 220, 220) Then
            count = count + 1
        End If
    Next i

    MsgBox count & " duplicate rows found and highlighted.", vbInformation
End Sub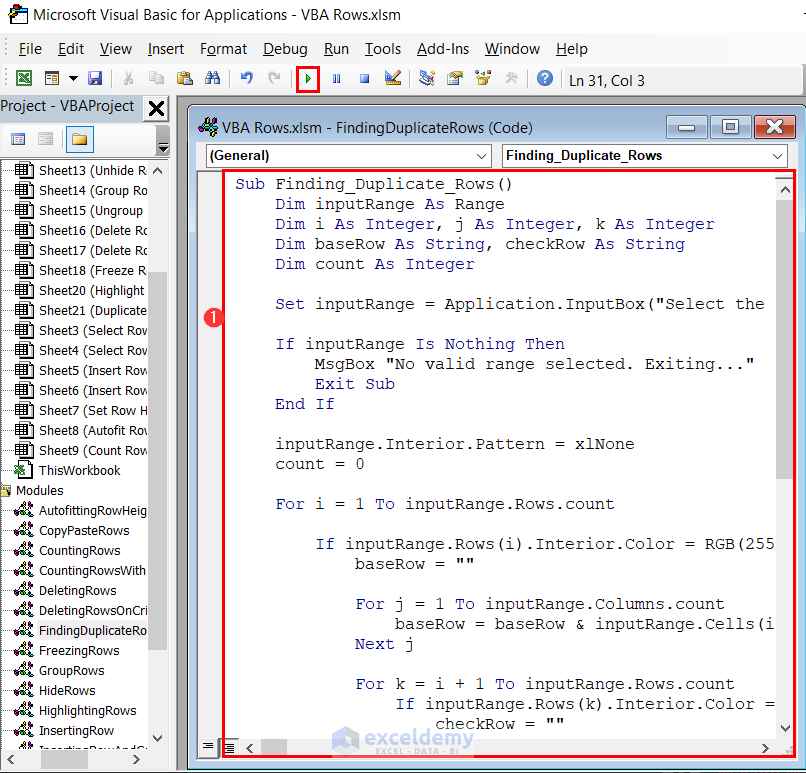
- Click on the Run button and an input box will ask you to select the range of cells where you want to find the duplicate rows. We entered the range B6:E15.
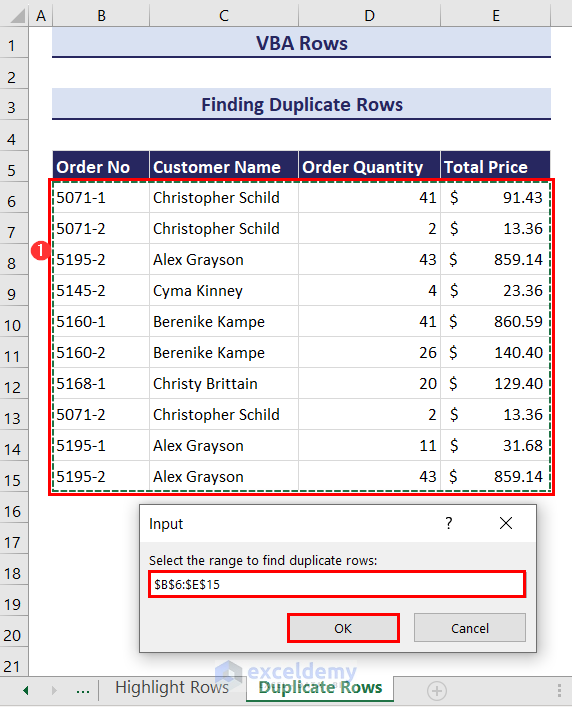
- Click OK. This will highlight all the duplicate rows in the dataset, and a message box will pop up displaying how many row duplicates have been found and highlighted.
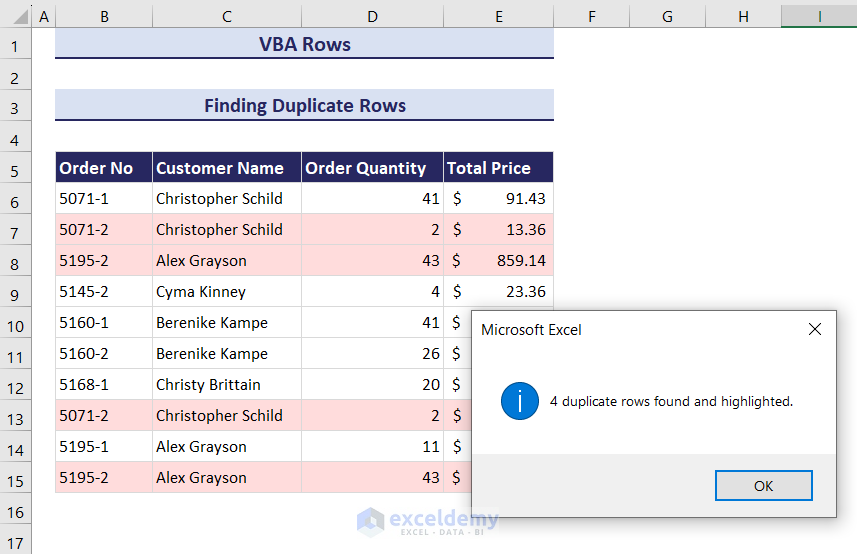
Click the image to enlarge it
Download the Practice Workbook
Get FREE Advanced Excel Exercises with Solutions!
