Excel Flash Fill
Excel Flash Fill is a feature or tool that analyzes entries when users enter them and fills the data after recognizing a pattern automatically. Excel offers the Flash Fill feature from Excel version 2013 and onwards.
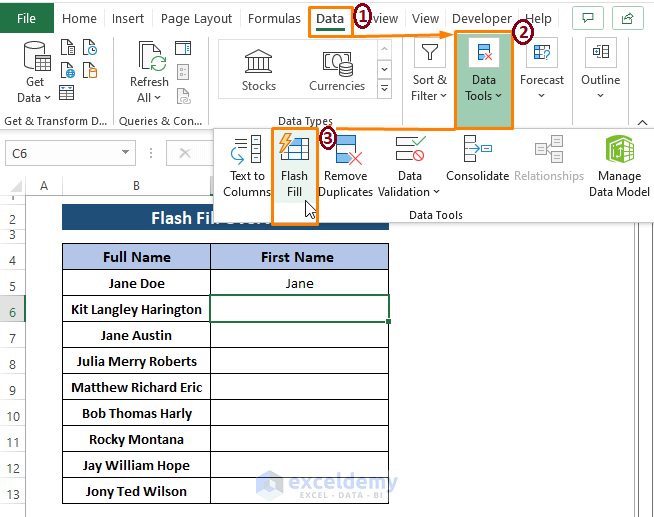
To apply Flash Fill, Go to the Date tab > Select Flash Fill (from the Data Tools section).
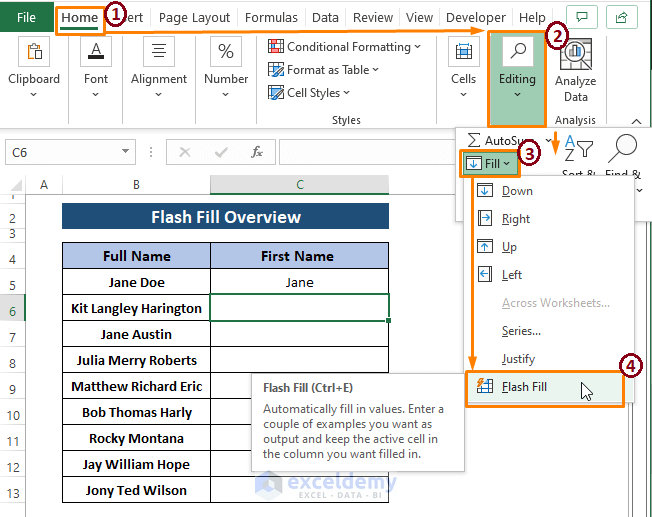
There is also an alternative to executing the Flash Fill feature. Hover to the Home tab > Select Fill (from the Editing section) > Choose Flash Fill from the options.
After selecting Flash Fill, the other cells are automatically filled with the First Names as Flash Fill recognizes the pattern.

We can apply Flash Fill just by pressing CTRL+E. The nature of Flash Fill is that it first analyzes the inputted data pattern and then fills the rest of the data complying with the pattern. However, in some user-ill-handled cases, Flash Fill shows a notification that it fails to recognize any pattern entry or entries. In the latter sections, we demonstrate ways to resolve the issue.
Method 1 – Providing More Entries to Mimic to Resolve Flash Fill Not Recognizing a Pattern
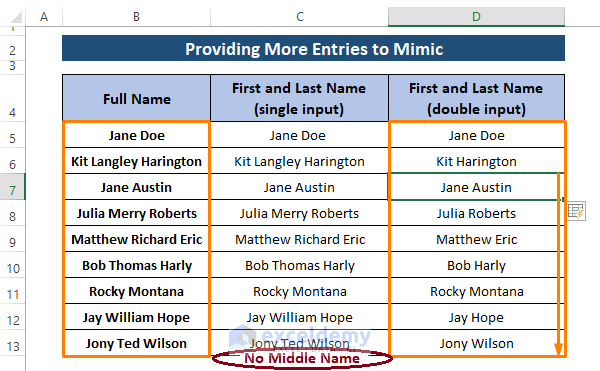
Suppose we have Full Name entries as depicted in the following image and want the First and Last Name. To explain the situation, we enter two types of inputs. In the single input type entry, we enter an entry’s first and last name. We enter two entries with First and Last Names for the double input type entry.

➤ Follow any way to apply the Flash Fill feature shown in the Excel Flash Fill section for a single input type column.

You see middle names also appear in the resultant cells. This happens because Flash Fill doesn’t have many inputted entries to mimic the pattern. Flash Fill assumes you want the Full Name entries in the First and Last Name columns as they are in the Full Name column.
STEPS:
- Follow any way to apply the Flash Fill feature shown in the Excel Flash Fill section for a single input type column.
You see middle names also appear in the resultant cells. This happens because Flash Fill doesn’t have many inputted entries to mimic the pattern. Flash Fill assumes you want the Full Name entries in the First and Last Name columns as they are in the Full Name column.
- Apply the Flash Fill operation for the double input type. This time, Flash Fill ignores the middle names in the Full Name column and fills the data with desired outputs.
Read More: [Solved!] Flash Fill Not Working in Excel
Method 2 – Removing any Hidden Blank Column to Resolve Flash Fill Not Recognizing Pattern
Now, we want to execute the Flash Fill tool, and we provide sufficient entries to mimic the pattern. Nevertheless, Flash Fill shows an error window saying it looked at all the data next to the selection and didn’t see a pattern in the value….
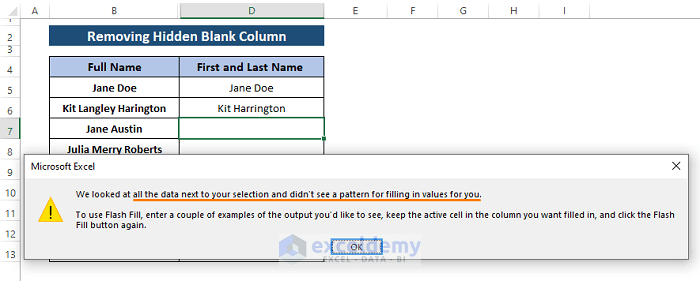
What’s gone wrong with the procedure? After inspecting the data, we see a missing or hidden blank column between columns B and D. The hidden blank column C is the reason Flash Fill can’t find any pattern in the dataset.

STEPS:
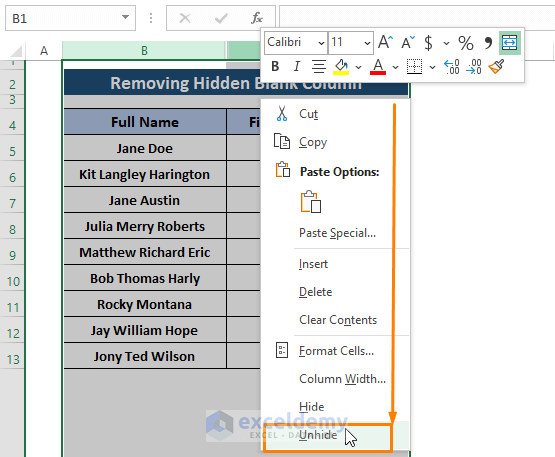
- Select both columns using the Column Number Header.
- Right-Click on the selection.
- The Context Menu (use SHIFT+F10) appears.
- From the Context Menu, Select the Unhide option.
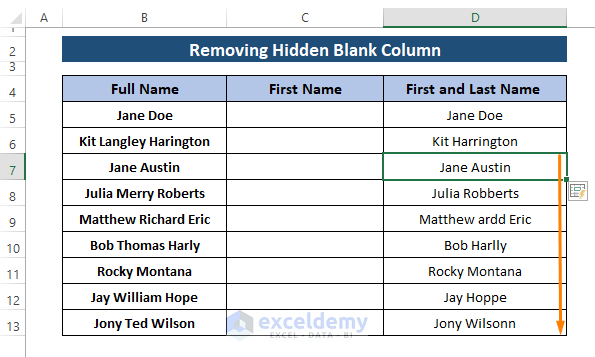
- The blank hidden column appears as shown in the following picture.

- Type anything (i.e., First Name) on the column (i.e., Column C) header. After that apply the Flash Fill, you’ll see all the cells get filled with the First and Last Names as depicted in the image below.
You can delete the hidden column and then apply the Flash Fill. When working with a huge dataset with numerous columns, it’s normal to hide 1 or 2 columns for data representation. As a result, these hidden blank columns pose an issue when applying the Flash Fill feature in datasets.
Method 3 – In Case of Existing Entries in Rows
Suppose we want to apply Flash Fill to our Full Name Dataset. However, we overlooked an existing entry, as shown in the screenshot below. In reality, there will be hundreds of rows, and maybe 1 or 2 entries will be present in the column prior to the Flash Fill application.
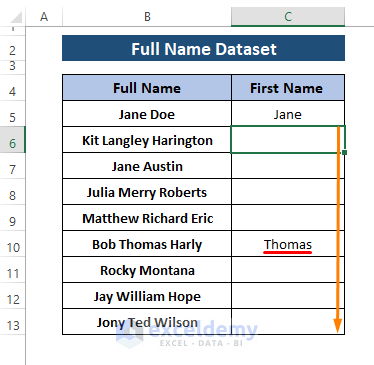
Execute Flash Fill and find irrelevant outcomes as depicted in the picture below.
We want the First Names in the First Name column. However, as an existing middle name (i.e., Thomas) was present before our Flash Fill application, Excel returns an amalgamation of first and middle names. And the outcomes are misleading to the core.
STEPS:
To make the Flash Fill work properly,
- Clear all the contents in the cell except the 1st one.
- Go to the Home tab > Select Clear (from the Editing section) > Choose Clear Contents.
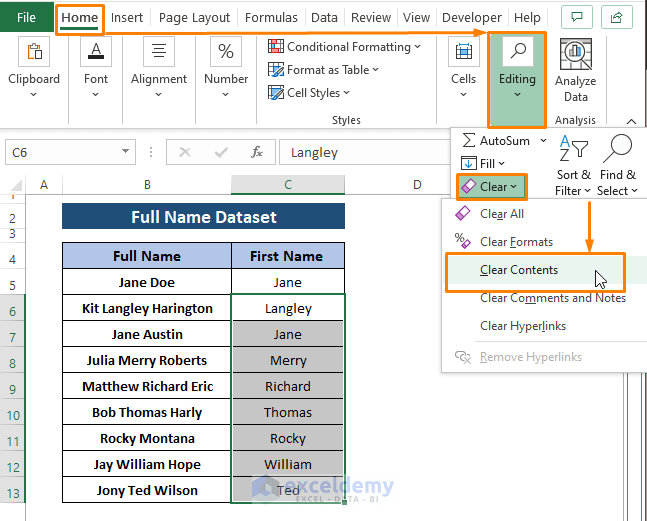
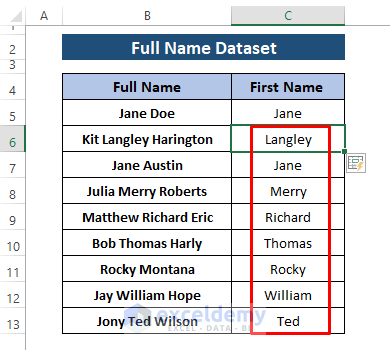
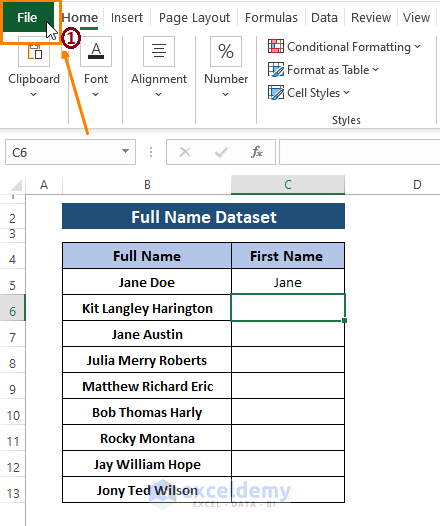
The Clear Contents command removes all the entries and leads to a scenario similar to the image below.

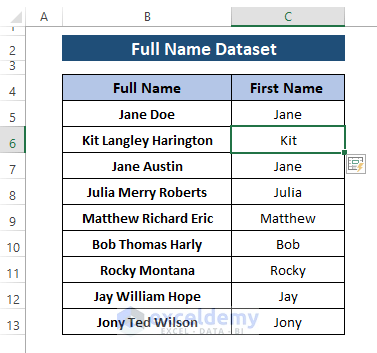
- Apply the Flash Fill following one of the ways shown in the Excel Flash Fill section. You get all the First Names as depicted in the picture below.
You do not necessarily have to apply Flash Fill for just First, Last, or Middle Names. You can use it to fill any type of data with a pattern in its entries.
Method 4 – Enabling Automatically Flash Fill Option
STEPS:
➤ Go to the File ribbon.
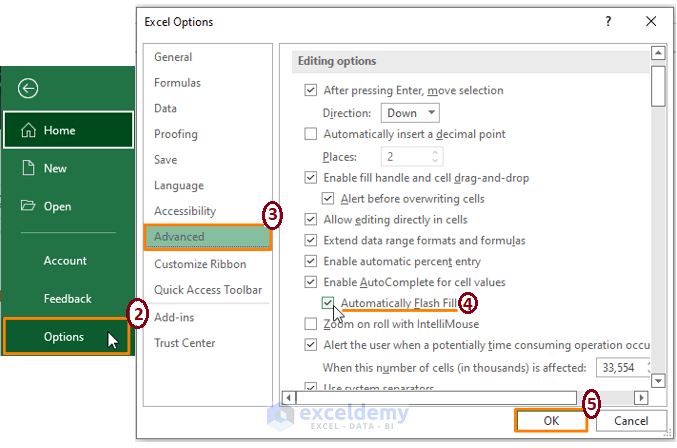
- In the File ribbon options, Select Options (on the left side of the window).
- Choose Advanced (from the Excel Options window).
- Check the Automatically Flash Fill option.
- Click OK.
 After returning to the dataset, apply Flash Fill. You’ll get the desired result as it is supposed to be.

Download the Excel Workbook
Further Readings
- How to Use Flash Fill in Excel to Split Data
- How to Turn Off Flash Fill in Excel
- Creating Email Addresses from a Single Column with Flash Fill, TEXT Formulas & Commentator’s Text Formula Suggestions
<< Go Back to Flash Fill Excel | Learn Excel
Get FREE Advanced Excel Exercises with Solutions!
