Example 1 – VBA Worksheet Change Event Based on the Continuous Multiple Cells
Steps:
- In Excel, you can open the VBA Editor by pressing “Alt + F11” or by going to the “Developer” tab and selecting the “Visual Basic” button.
- Locate and choose the worksheet where you want to track changes in the VBA Editor.
- Enter the Worksheet Change Event code in the worksheet’s code module. Keep in mind that you must enter the event in the worksheet’s code module; you cannot modify it in a regular module. To do that, you can right-click on the sheet name and click on View Code.
- The worksheet’s code module should now contain the following VBA code:
Code:
Private Sub Worksheet_Change(ByVal Target As Range)
    ' Specify the cells you want to monitor
    Dim monitoredRange As Range
    Set monitoredRange = Range("D5:D14") ' Modify this range as needed
    ' Check if the changed cells are within the monitored range
    If Not Intersect(Target, monitoredRange) Is Nothing Then
        ' Perform actions based on the changed cells
        ' Add your code here
        MsgBox "One of the monitored cell has been changed!"
    End If
End Sub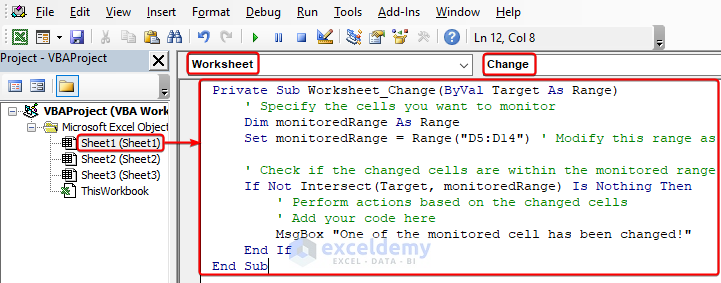
Note
It is important to know the Target parameter when working with events in Excel VBA. In the Worksheet_Change event, it represents the cell or cells that trigger the event. In other words, the Target parameter defines the range that has been changed.
VBA Explanation:
Private Sub Worksheet_Change(ByVal Target As Range)- In this line, we initiated the Worksheet_Change event procedure. It specifies that the code will execute each time the worksheet is changed.
Dim monitoredRange As Range- This line declares a Range-type variable with the name monitoredRange. The range of cells you want to keep an eye on changes will be stored in this variable.
Set monitoredRange = Range("D5:D14") ' Modify this range as needed- The monitoredRange variable is set to the set of cells that you want to track in this line. It is set to the cells D5 to D14 in this illustration. This range can be changed to meet your unique needs.
If Not Intersect(Target, monitoredRange) Is Nothing Then- This line determines whether the monitoredRange and the changed cells (Target) cross. The overlapping region between two ranges is represented by the range object that the intersect function returns. The changed cells are in the monitored range if the Intersect function returns a non-null value.
MsgBox "One of the monitored cells has been changed!"- This line indicates the presence of a change within the monitored range by displaying a message box with the text “One of the monitored cells has changed!”
End If- The If statement block ends with this line.
End Sub- The “Sub” block ends with this line.
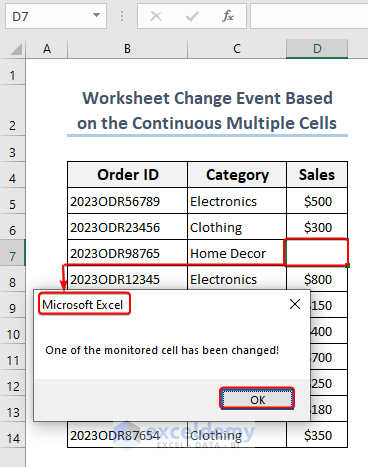
- In the following image, you can see the final result of changing or deleting cell values. After any kind of changes, Microsoft Excel will show the message “One of the monitored cells has been changed!”
Example 2 – Worksheet Change Event Based on the Non-Continuous Multiple Cells
Steps:
- Launch the VBA Editor.
- Select the worksheet in the VBA Editor where you want to keep track of changes.
- Enter the Worksheet Change Event code in the worksheet’s code module.
- The following VBA code ought to be present in the worksheet’s code module:
Code:
Private Sub Worksheet_Change(ByVal Target As Range)
    ' Specify the cells you want to monitor
    Dim monitoredRange2 As Range
    Set monitoredRange2 = Range("D5:D7,D10:D14") ' Modify this range as needed
    ' Check if the changed cells are within the monitored range
    If Not Intersect(Target, monitoredRange2) Is Nothing Then
        ' Perform actions based on the changed cells
        ' Add your code here
        MsgBox "One of the monitored cells has changed!"
    End If
End Sub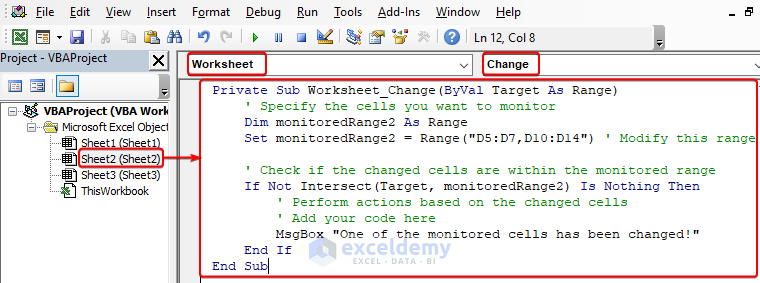
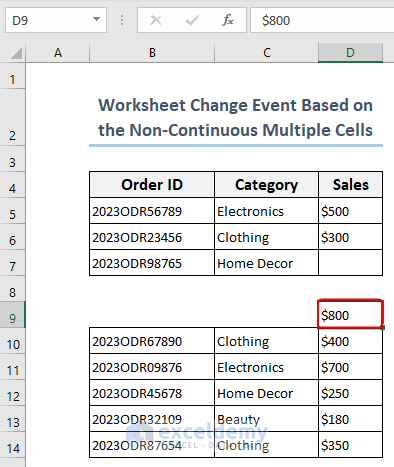
- After changing the D7 cell, one of the cells in the range of D4:D7, Microsoft Excel will show a message One of the monitored cells has been changed!.
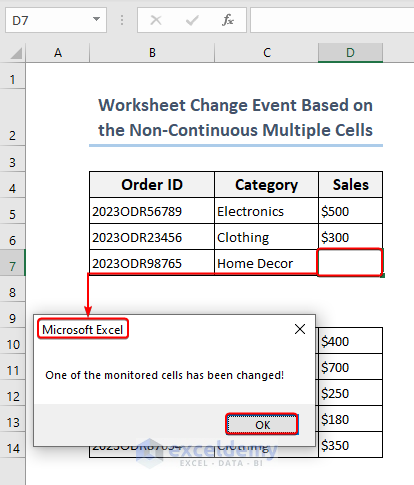
- The cell out of the ranges D4:D7 and D10:D14 has been changed, as in the following image.
How to Solve If VBA Worksheet Change Event is Not Working in Excel
Solution:
- Launch the VBA Editor.
- Choose the worksheet where you want to track changes.
- In the worksheet’s code module, type the Worksheet Change Event code.
- The worksheet’s code module should contain the following VBA code:
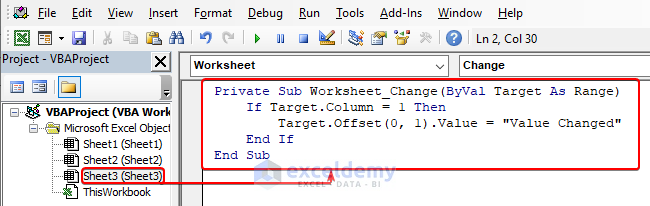
Private Sub Worksheet_Change(ByVal Target As Range)
    ' Incorrect code: missing "Then" keyword
    If Target.Column = 1 ' Incorrect syntax
        Target.Offset(0, 1).Value = "Value Changed"
    End If
End Sub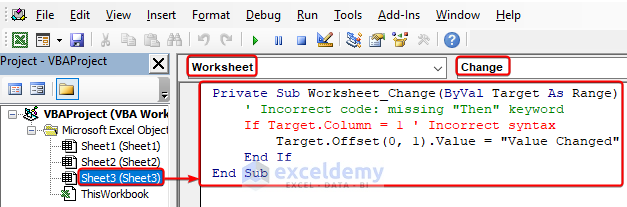
- You need to correct any kind of error showing in the red line in the previous image. By adding “Then” you can solve the issue and fix the error.
Download Practice Workbook
Get FREE Advanced Excel Exercises with Solutions!

I like your layout, and explanations.
I have been having trouble with two critical details, and after a while I was able to figure out my problems. 1. I’ve gone 30 years programming in vba, and never use the Project Explorer, and when you said to put the code in a worksheet’s module, I was putting it in a regular module, and for days nothing was working! YOU MAY WANT TO MENTION “OPEN THE PROJECT EXPLORER, AND CLICK ON THE WORKSHEET” SO IT GOES THERE!
2. I’ve looked through dozens of web pages showing usage of the “Worksheet_Change” event, and nobody does a decent job of saying what “Target” is. I think it might be better named as “Trigger”. You and the other guys don’t explain what is in the “Target” data item, when the process comes into this routine. I’m gleaning from multiple examples that maybe it’s a cell that changed, triggering the event called Worksheet_Change. I’ve even seen some paragraphs on this event talking about “Target” and “Destination”, when nothing is moving, as far as I can see. What confusion!
3. I see a line in your code that concatenates multiple selected values into the cell, with commas between them, and I CAN NEVER GET THAT PART TO WORK!!! Ugh!
Hello Irish Jim
Thanks for your compliments. Your appreciation and suggestions mean a lot to us. You are right; it would be great to mention right-clicking and clicking on View Code when inserting code in the sheet module. Also, it is important to mention the Target parameter when discussing events in Excel.
Thank you once again for visiting our blog and providing beneficial suggestions. Based on your suggestion, we have updated the sections. Hopefully, other visitors will have a better reading experience.
Regards
ExcelDemy