Sorting implies rearranging data to get a better visual presentation of your dataset. It is such a powerful tool that can organize text, numbers, and dates. In this tutorial, I’ll show the ways to sort by date and time in Excel smartly including real-life examples.
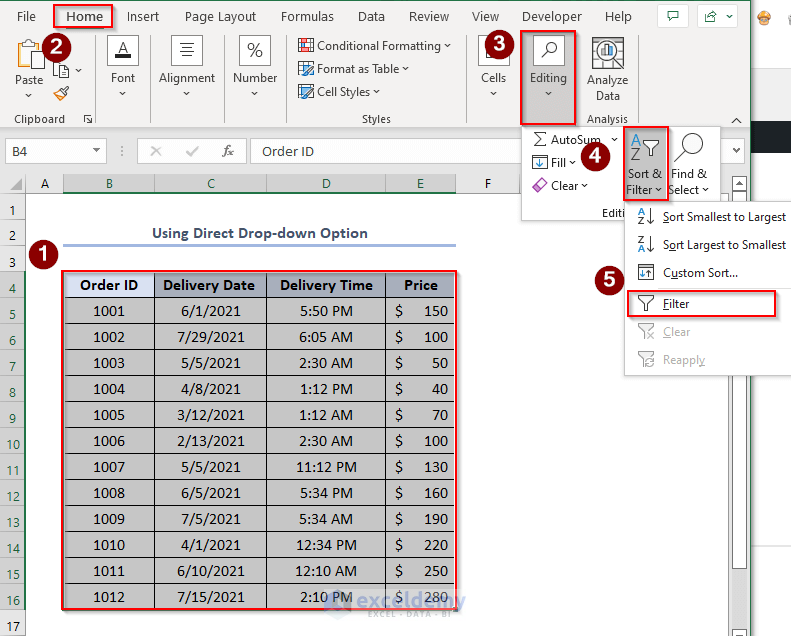
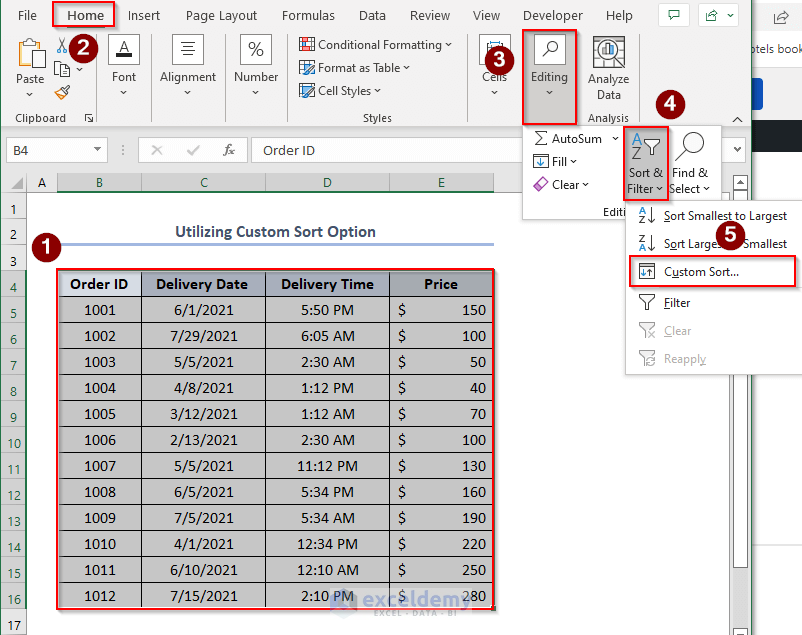
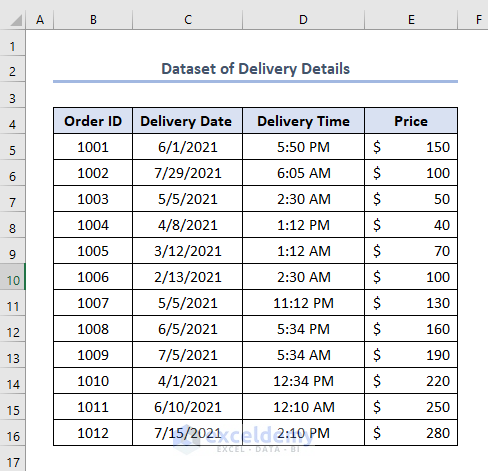
Let’s have a look at our following dataset. Here, the Order ID of products is given along with their Delivery Date, Delivery Time, and also Price.
Now we’ll sort the above dataset based on Delivery Date and Time.
Let’s get started.
1. Using Direct Excel Drop-down Option to Sort Date & Time
Using the direct drop-down option, you can simply sort the dataset by date and time separately. Actually, this method doesn’t provide sorted data by date and time combinedly. But we have to know, what’s the problem with it!
For this just follow the following steps.
- Firstly, select the whole dataset.
- Secondly, click Home tab > Sort & Filter toolbar > Filter
- Alternatively, you can press the effective shortcut CTRL+SHIFT+L.
- Eventually, you’ll get the drop-down arrow for each heading of the dataset like this.
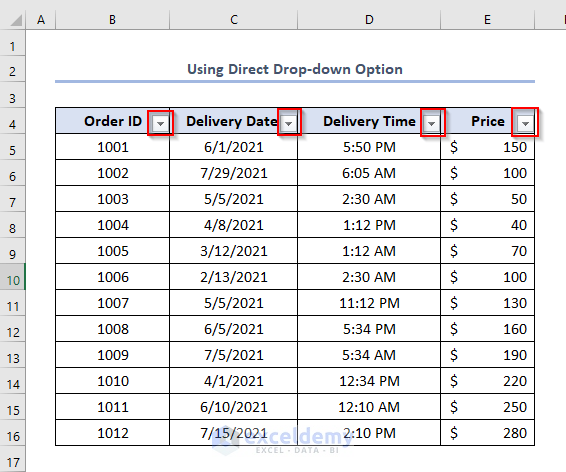
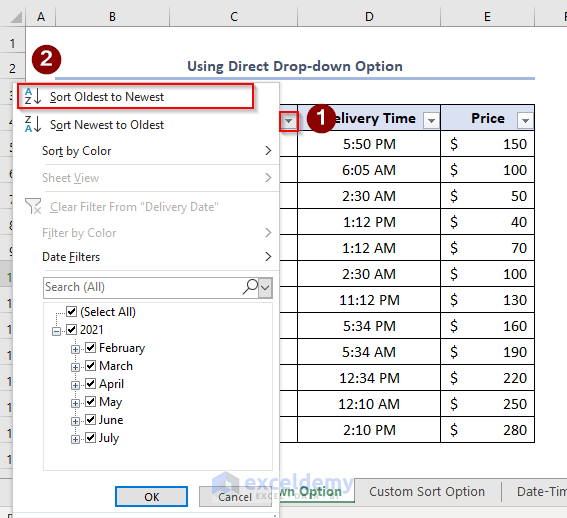
- Thirdly, as you want to sort the dates, click on the drop-down arrow of the Delivery Date
- Fourthly, choose the Sort Oldest to Newest if you need to sort the dataset chronologically.
- Finally, press OK.
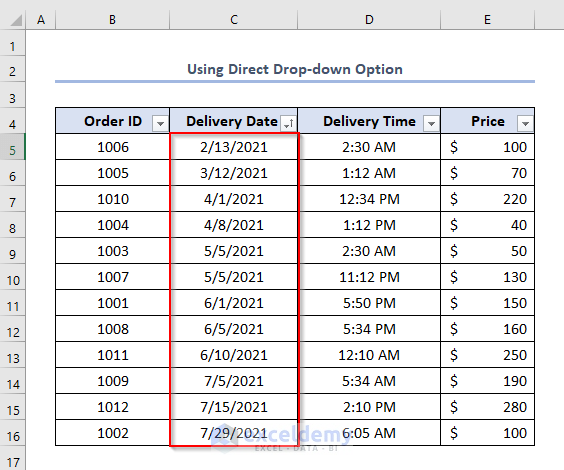
Consequently, the Delivery Date will be sorted chronologically like this.
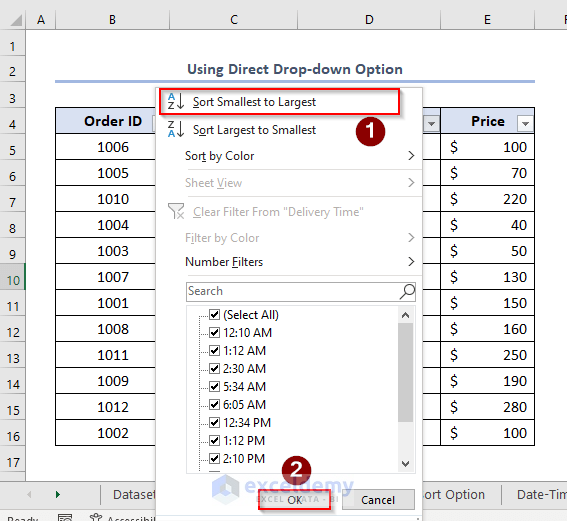
- Similarly, click on the heading of the Delivery Time And, choose Sort Smallest to Largest if you wish to arrange time from start to endpoint.
- After that, you’ll get the following sorted dataset.
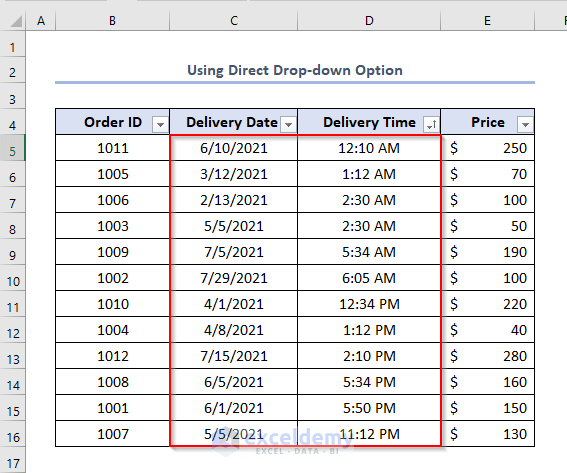
The above screenshot clearly reveals that the Order ID is sorted based on Time and the Date is ignored here. How can we solve the problem? We’ll introduce you to a simple but powerful sorting option.
Read More: How to Undo Sort in Excel
Similar Readings
- Auto Sort in Excel Without Macros
- How to Sort in Excel by Number of Characters
- Excel Sort by Column Without Header
- Excel Sort Column by Value
- How to Sort Multiple Columns in Excel Independently of Each Other
- How to Sort Alphabetically in Excel with Multiple Columns
- How to Perform Custom Sort in Excel
- How to Add Sort Button in Excel
- How to Sort by Last Name in Excel
2. Applying Custom Sort Option to Sort Date & Time in Excel
Custom sort is a special feature in Excel where you can specify different headings as levels and it provides the result combined based on the inserted levels.
Let’s see the application of the essential option in the case of our dataset.
- Firstly, select the dataset.
- Secondly, click on the Home tab>Sort & Filter toolbar>Custom Sort.
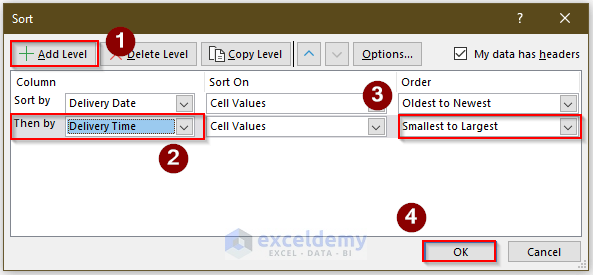
- Eventually, a Sort dialog box will appear.
- Thirdly, select the Delivery Date from the heading in the Sort by
- Fourthly, choose the Oldest to Newest in the Order.
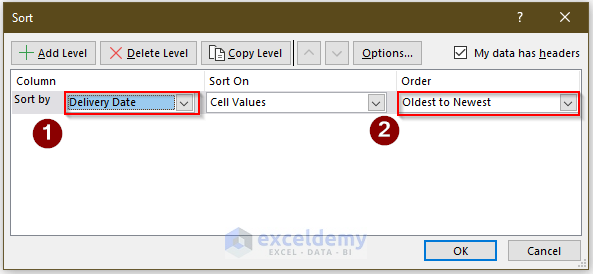
- As we want to sort time also, we have to append the desired heading. For this, click on the +Add Level Later, specify the Delivery Time as the heading, and Smallest to Largest as Order.
- Fifthly, click OK.
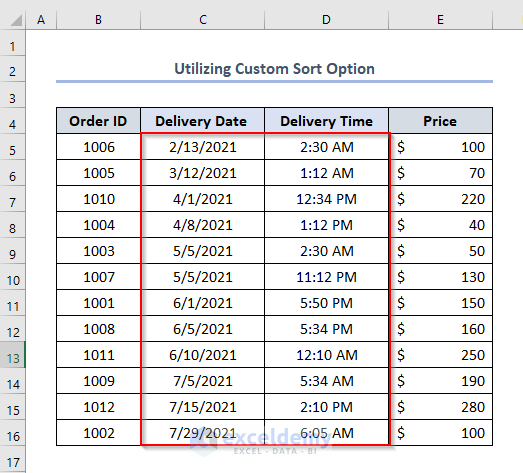
Consequently, the output will be like this in a chronological manner.
Read More: Excel Auto Sort when Data is Entered
Similar Readings
- Excel Auto Sort when Data Changes
- How to Sort Data in Excel by Value
- How to Sort Data in Alphabetical Order in Excel
- How to Put Numbers in Numerical Order in Excel
- How to Sort Alphanumeric Data in Excel
- How to Sort Multiple Columns in Excel
- How to Auto Sort Multiple Columns in Excel
3. Converting Date-Time to Number and Sorting in Excel
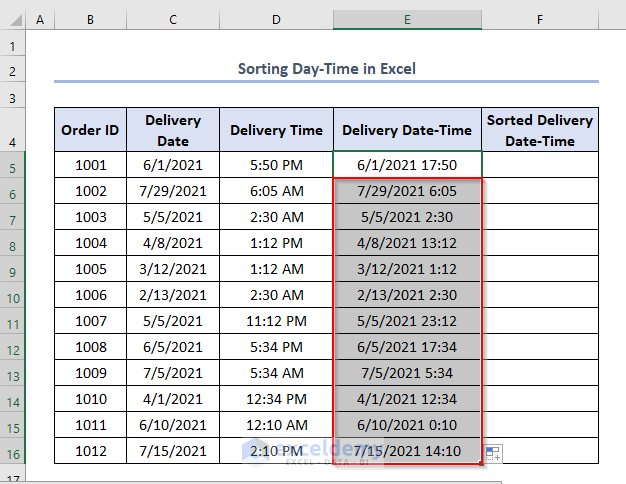
Assuming that, the Delivery Date and Time are provided together simultaneously. Interestingly, you can do that.
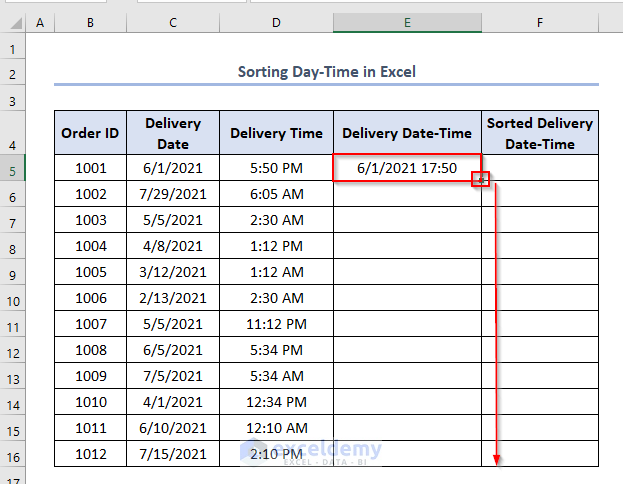
- Just insert the following formula in the E5 cell and press Enter.
=C5+D5
Here, C5 is the Delivery Date and D5 is the Delivery Time.
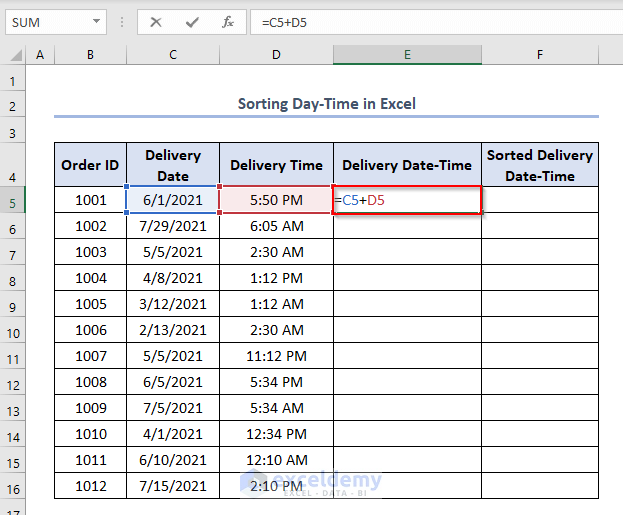
- Secondly, press ENTER.
- Thirdly, use the Fill Handle by dragging down the cursor while holding the right-bottom corner of the E5
- Eventually, we’ll get the outputs like this.
You may be surprised how it is possible to add dates and times concurrently.
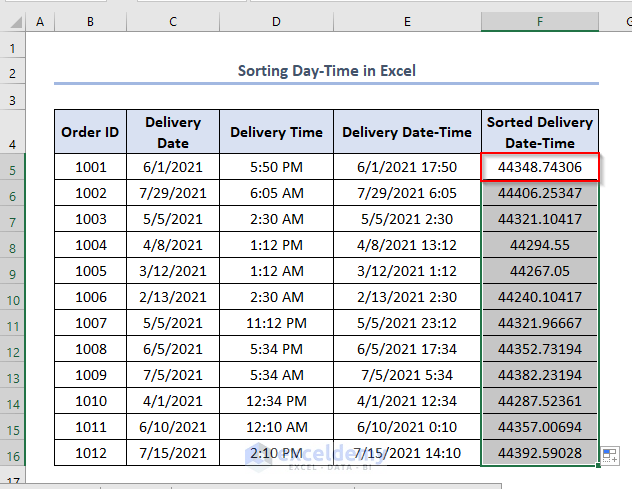
But it is really a simple thing, Excel counts the date as the serial number and time as a fraction of the serial number.
As we want to sort the Delivery Date-Time data, we have to convert the data into serial numbers.
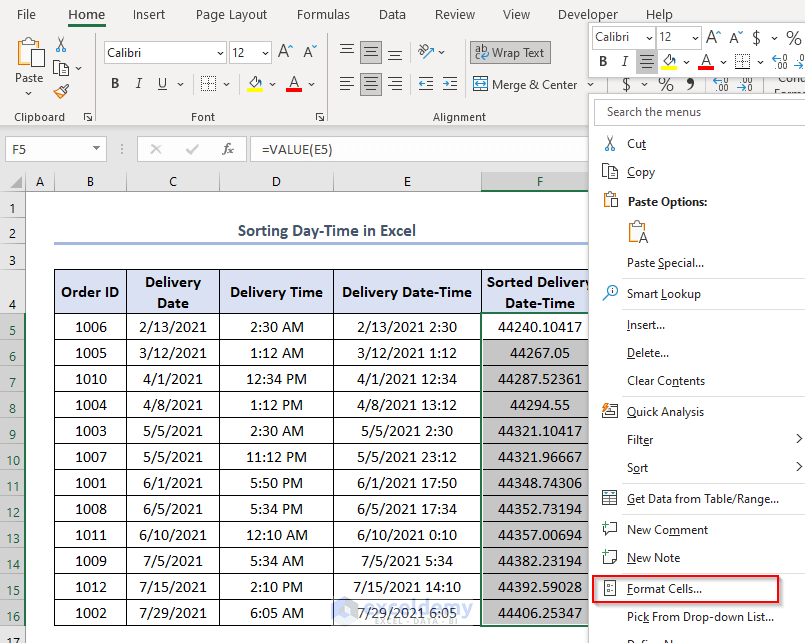
- For this, fourthly, insert the following formula in the F5 cell like this.
=VALUE(E5)
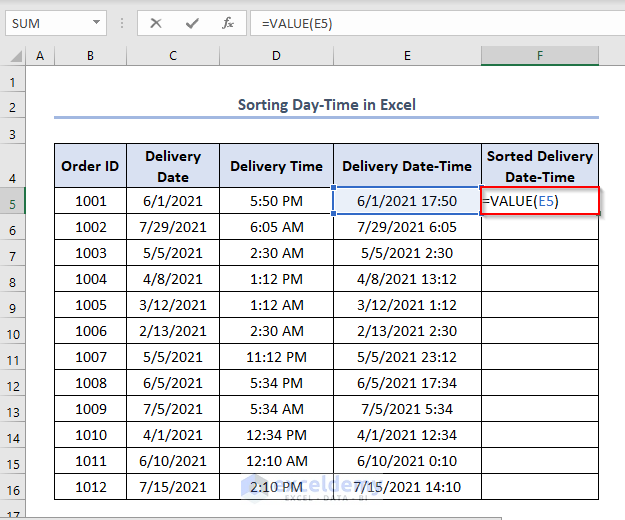
- Fifthly, press ENTER and use the Fill Handle.
Now, we need to sort Delivery Date-Time in a chronological manner.
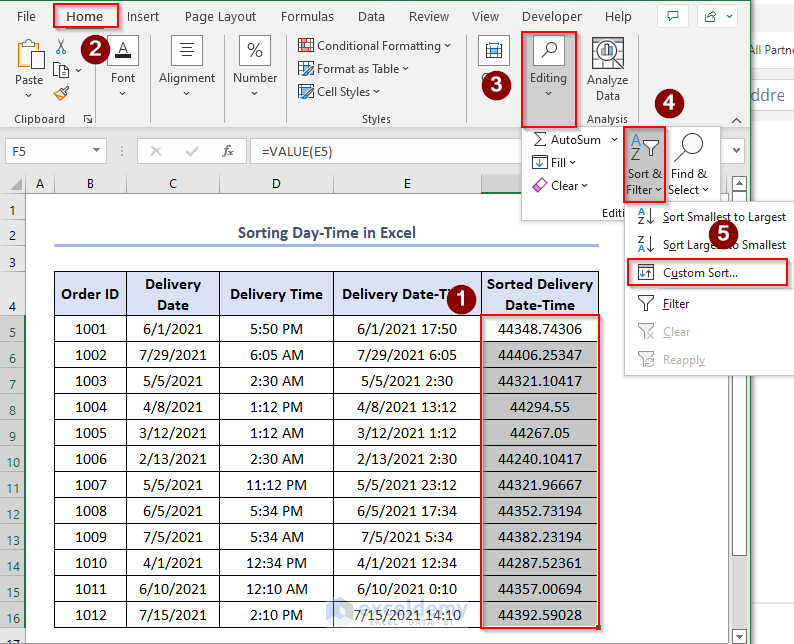
- To do this, firstly, select the dataset.
- Secondly, go to Home > click Editing > choose Sort & Filter > select Custom Sort.
If we don’t select the whole dataset, this warning will appear. Then select Expand the selection and click Sort.
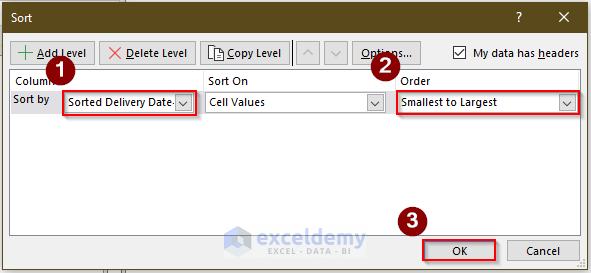
- Eventually, the Sort window will appear.
- Sixthly, choose Sorted Delivery Date-Time in the Sort by box and Smallest to Largest in the Order
- Seventhly, click OK.
Eventually, we’ll get the outputs in Column F in a different format.
To fix the format, firstly, right-click the data of Column F > select Format Cells.
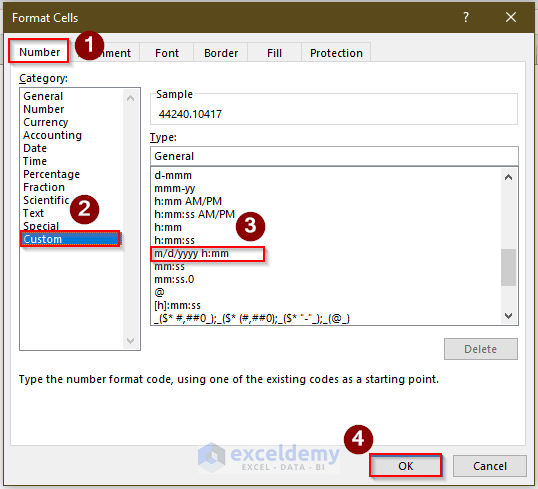
- Eventually, a Format Cells window will appear.
- Secondly, go to Number > select Custom > choose m/d/yyyy h:mm in the Type
- Finally, click OK.
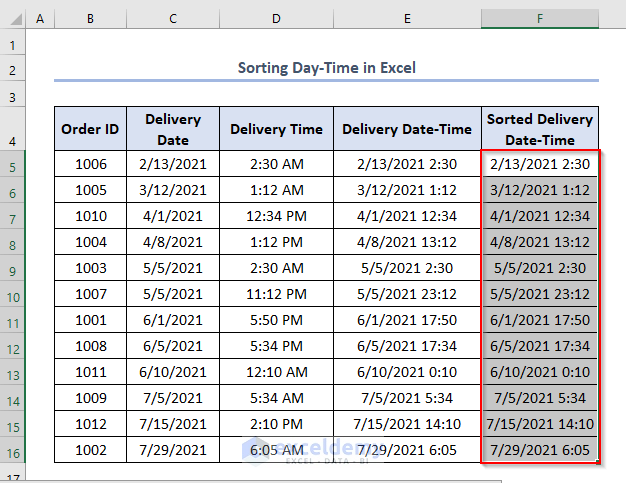
- Consequently, we’ll see the output like this.
Read More: How to Sort and Filter Data in Excel
Similar Readings
- How to Sort Two Columns in Excel to Match
- Excel Sort by Row not Column
- How to Sort Rows in Excel
- Excel Sort Rows by Column
- How to Sort Alphabetically in Excel and Keep Rows Together
- How to Sort by Date in Excel
- How to Sort Data in Excel Using Formula
- How to Sort Dates in Excel by Year
- How to Sort Numbers with Letter Suffix in Excel
- How to Sort Dates in Chronological Order in Excel
4. Applying Excel MID and SEARCH Functions to Sort by Time & Date
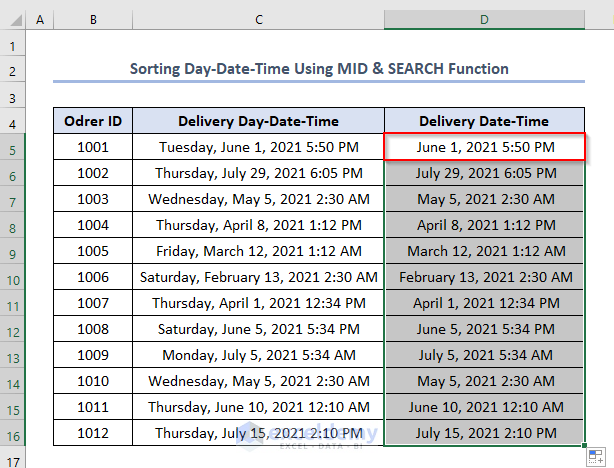
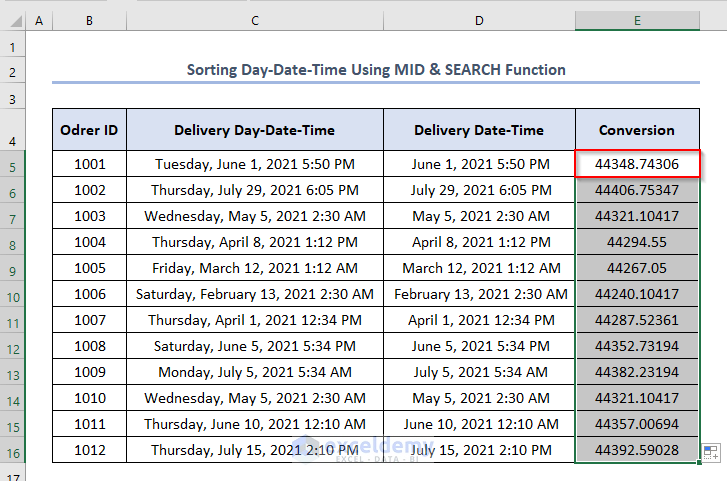
If you need to sort the dataset from the given Delivery day-date-time data, what can you do?
Firstly, we have to lessen the name of the day from the data. And, we may insert the combination of MID and SEARCH functions for doing that.
The MID function returns the middle number from a given text string. The syntax of the function is.
=MID (text, start_num, num_chars)
The arguments are-
text – The text to extract from.
start_num – The location of the first character to extract.
num_chars – The number of characters to extract.
Besides, the SEARCH returns the position of the first character of find_text inside within_text.
=SEARCH (find_text, within_text, [start_num])
The arguments are
find_text – The text to find.
within_text – The text to search within.
start_num – [optional] Starting position in the text to search. Optional, defaults to 1.
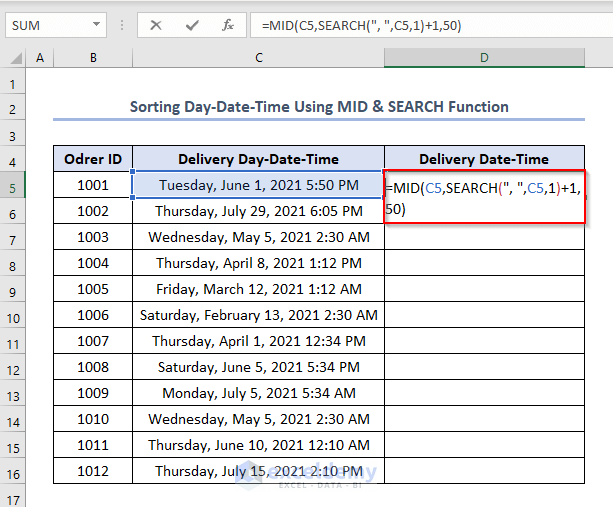
- Now apply the following formula in the D5
=MID(C5,SEARCH(", ",C5,1)+1,50)
Here, C5 is the Delivery Day-Date-Time.
- Secondly, press ENTER.
- Thirdly, use the Fill Handle.
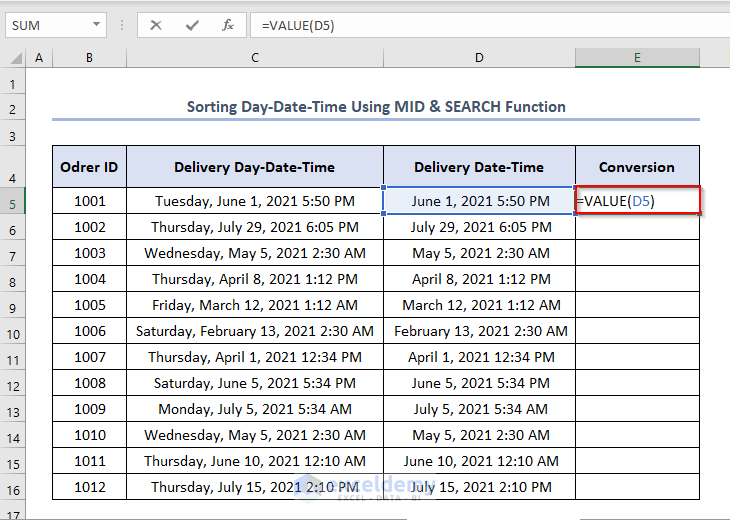
- Repeatedly, write the formula in the E5 cell to change Delivery Date-Time into a number using the VALUE function in order to sort them later.
=VALUE(D5)
- Thirdly, press ENTER and use the Fill Handle.
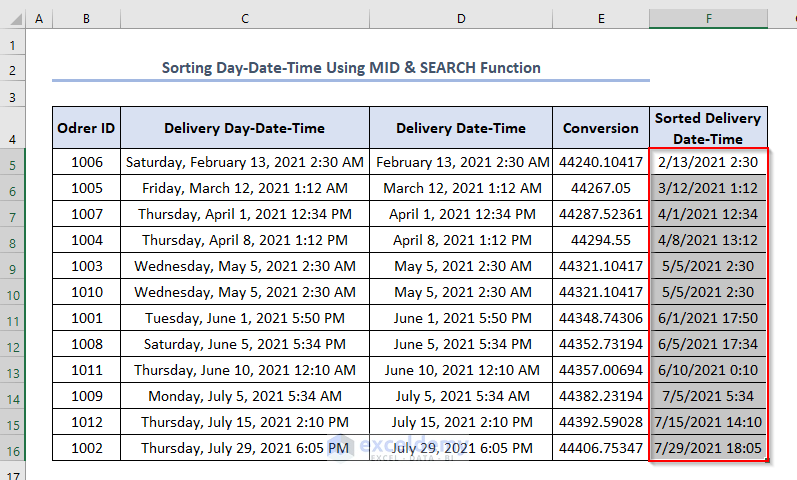
- Fourthly, to sort the values chronologically, firstly, copy cells E5:E16 and paste those to F5.
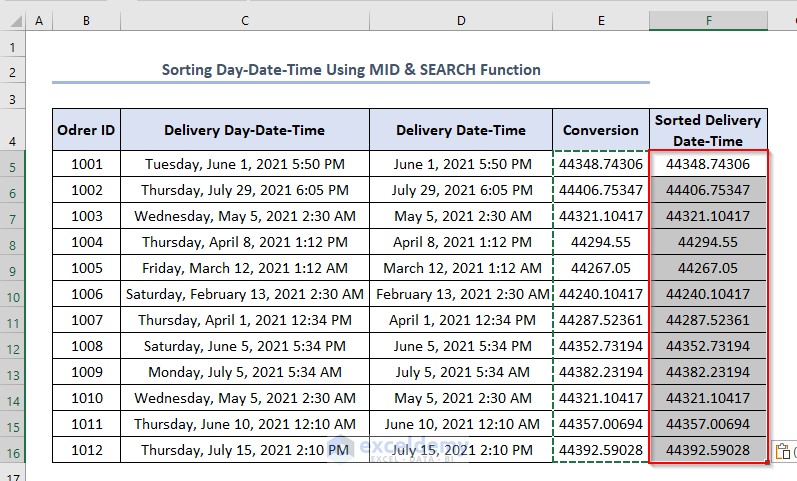
- Similarly, as before, you need to select the cells and Sort them and then use the Format Cells option to give the specific format.
- After doing this, you’ll get the output like this.
Read More: How to Sort Dates in Excel by Month and Year
Similar Readings
- How to Sort Excel Sheet by Date
- How to Sort by Month in Excel
- Sort IP Address in Excel
- Random Sort in Excel
- How to Sort Birthdays in Excel by Month and Day
- How to Sort Excel Tabs
- How to Sort by Color in Excel
- How to Remove Sort by Color in Excel
- Advanced Sorting in Excel
- How to Sort Duplicates in Excel
- Excel Sort Unique
- How to Sort Numbers in Excel
- How to Auto Sort Table in Excel
- Advantages of Sorting Data in Excel
- Difference Between Sort and Filter in Excel
- Sort and Filter in Excel Not Working
- Excel Not Sorting Numbers Correctly
- Excel Sort by Cell Color Not Working
- Excel Sort Largest to Smallest Not Working
- How to Sort by Name in Excel
Things to Remember
- Don’t forget that Excel stores date as serial numbers. If you get your desired output as a serial number, just change the format using the Format Cells option.
- Also, be careful about the sorted data whether the whole dataset is changed or not.
Download Practice Workbook
Conclusion
That’s all about today’s session. And these are the ways to Excel sort by date and time. We strongly believe this article would be highly beneficial for you. Don’t forget to share your thoughts and queries in the comments section and explore our website ExcelDemy, a one-stop Excel solution provider.
Related Articles
- How to Remove Sort in Excel
- Excel Sort Not Working
- How to Sort Drop Down in Excel
- How to Sort Merged Cells in Excel
- How to Sort Merged Cells of Different Sizes in Excel
- Sorting Columns in Excel While Keeping Rows Together
- How to Use Excel Shortcut to Sort Data
- How to Sort by Ascending Order in Excel
- [Fix] Excel Sort by Date Not Working
- Excel Sort and Ignore Blanks
- How to Sort Columns in Excel Without Mixing Data
- How to Arrange Numbers in Ascending Order with Excel Formula