In this article, we will explain the different attributes of excel hidden rows. While working with a big dataset there might be a lot of hidden rows or columns. On the other hand for the convenience of our work sometimes we need to hide or unhide hidden rows or columns. As a result, understanding how to properly manage excel hidden rows is essential. We’ll go over a few instances with our unique dataset to show you how this works.
Download Practice Workbook
You can download the practice workbook from here.
3 Different Attributes of Hidden Rows in Excel
We will discuss the functioning of excel hidden rows in 3 cases. This article will encapsulate how to hide rows, delete excel hidden rows, and unhide excel hidden rows.
1. Hide Rows in Excel
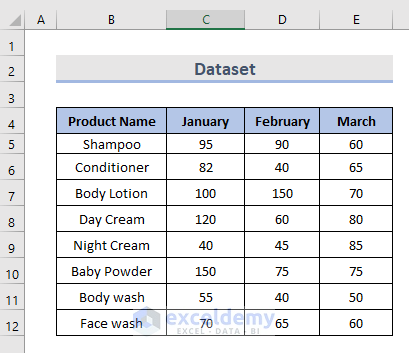
First and foremost, to illustrate the attributes of excel hidden rows we will explain how to hide rows in excel. We will show different methods to hide rows in excel. For all the methods we will use the same dataset. We have provided an image of the dataset below. This dataset consists of the name of the Salesperson, their Location, Region, and Total Amount of sales.
1.1 Create Excel Hidden Rows Using the Ribbon
In this example, we will create excel hidden rows by using the ribbon. In the following dataset, we will hide the highlighted rows which means row numbers 5, 7 & 8.
So, let’s see how we can do this by following simple steps.
STEPS:
- Firstly, select rows 5,7 & 8. To select multiple rows press the Ctrl key and select the rows.
- Secondly, go to the Home tab.
- Thirdly, select the option Format from the Cells section of the Home tab.
- Fourthly, from the drop-down, select the option “Hide & Unhide”.
- After that, select the option “Hide Rows”.
- Lastly, we can see row numbers 5,7 & 8 are not visible anymore.
Read More: How to Hide Rows Based on Cell Value in Excel (5 Methods)
1.2 Use the Right-Click to form Excel Hidden Rows
Using the Right-Click is another effective method to create excel hidden rows. To illustrate this method, we will not only use the same dataset but also hide the same rows that we have hidden in the previous method.
Let’s see the steps regarding this method.
STEPS:
- First, select row numbers 5,7 & 8.
- Next, do a right-click on the row index.
- After that, select the option Hide from the right-click.
- Finally, we can see that row numbers 5,7 & 8 are hidden now.
1.3 Excel Keyboard Shortcut to Generate Excel Hidden Rows
We use keyboard shortcuts to do any task faster which saves our time. We can easily form excel hidden rows by using a keyboard shortcut. Take a look at the following figure, we will hide the same rows of our previous dataset but this time we will use a keyboard shortcut.
- The shortcut for windows: Ctrl + 9
- The shortcut for Mac: ^ + 9
Just follow the below steps to perform this action.
STEPS:
- In the beginning, select row numbers 5,7 & 8.
- After that, press ‘Ctrl + 9’ if you are using windows and press ‘^ + 9’ if you are on Mac.
- Finally, we can see that row numbers 5,7 & 8 are now hidden.
Read More: Excel Macro: Hide Rows Based on Cell Text in Excel (3 Simple Methods)
1.4 Use Group Feature to Hide Rows in Excel
The use of the Group feature is another unique way to create excel hidden rows in. We can use this method only for hiding continuous rows. In the following dataset, we will hide row numbers 5,7 & 8.
So, let’s see how we can do this step by step.
STEPS:
- Firstly, select row numbers 5,7 & 8.
- Secondly, go to the Data.
- Next, from the Data tab go to the Outline.
- Then from the Outline option select the option Group.
- Select the option Group from the drop-down of the option.
- In short: Data > Outline > Group > Group.
- Secondly, a new popup window will appear.
- From the new window check the option Rows and click on OK.
- Thirdly, a minus sign will become visible beside the group of rows.
- After that, click on the minus sign.
- Lastly, the above action hides row numbers 5,7 & 8.
Read More: VBA to Hide Rows Based on Cell Value in Excel (14 Examples)
1.5 Hide Rows Containing Blank Cells
It’s very common that the rows that we want to hide will contain blank cells. If any row contains blank cells we will not be able to hide them by using the above methods. We have a screenshot of our dataset in the below image. There are blank cells in row numbers 6, 9, 11 & 13. In this example, we will unhide these rows that contain blank cells.
We will follow the below steps to perform this method.
STEPS:
- First, select all the data ranges (B4:C15) of our worksheet.
- Next, go to the Home tab.
- From the Home tab, select Find & Select from the Editing.
- Then, from the drop-down select Go To Special.
- In short: Home > Find & Select > Go To Special.
- Now, a new popup window will appear.
- In the window select the check the option Blanks and click on OK.
- The above command will select all the rows that contain blank cells.
- After that press Ctrl + 9.
- Finally, the above action hides the rows that contain blank cells.
Read More: How to Hide Blank Rows in Excel VBA (4 Useful Methods)
1.6 Apply VBA Code to Hide Rows in Excel
In this example, we will use the VBA (Visual Basic for Applications) code to hide rows in excel. We will apply the VBA code to delete row numbers 6,7 & 8 from the following dataset.
So, let’s see the steps regarding this method.
STEPS:
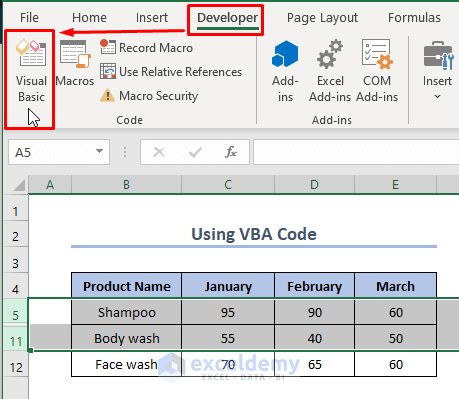
- In the beginning, go to the Developer tab and select the option “Visual Basic”.
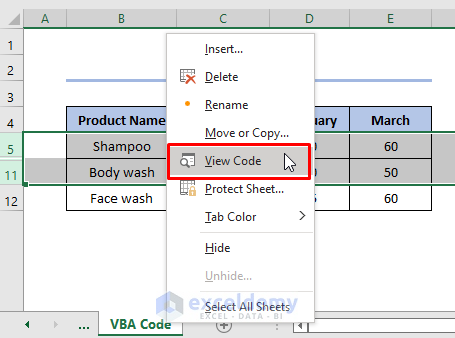
- Next, do a right-click on the active sheet and select the option “View Code”.
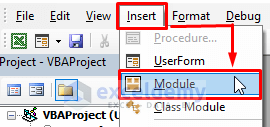
- Now, a new blank VBA module will appear.
- Insert the following code in the blank module:
Sub VBAtoHideRows()
Rows("6:8").Hidden = True
End Sub
- After that, click on the Run.
- Finally, the above command hides rows 6,7 & 8.
Read More: VBA to Hide Rows Based on Criteria in Excel (15 Useful Examples)
2. Delete Excel Hidden Rows
In this section, we will discuss how to delete excel hidden rows. To clarify this process we will explain three different methods to delete excel hidden rows. We will continue with our previous datasets to illustrate these methods.
2.1 Use ‘Inspect Document’ Option to Delete Hidden Rows in Excel
The “Inspect Document” option allows us to delete hidden rows from an excel worksheet. By using this method we can delete hidden rows from an entire workbook at once. To demonstrate this method will hide the highlighted rows from the following dataset at first by using any of the above methods.
From the below image we can see that the highlighted rows are now hidden. Now it’s time to delete the hidden rows by using the “Inspect Document” option.
So, let’s see the steps of deleting hidden rows by using the “Inspect Document” option.
STEPS:
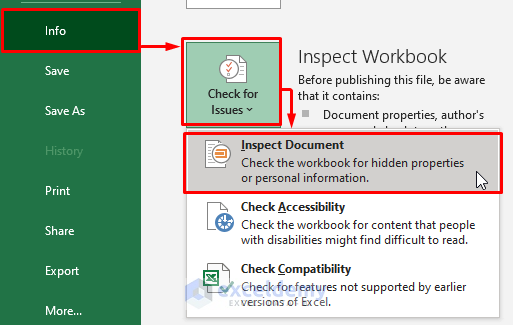
- At first, go to the File tab.
- Select the option Info.
- Select the option Inspect Workbook from the option, Info.
- Click on the “Inspect Document” option from the drop-down menu.
- Next, a new dialogue box will appear. Click on the Yes option to that box.
- Then, one more dialogue box will appear. Click on the option Inspect from that box.
- Again, one more dialogue box will appear. Scroll down and find the “Hidden Rows and Columns”.
- Now, click on “Remove All”.
- So, the above command will delete all the hidden rows.
NOTE:
- The above method deletes hidden rows from an entire workbook. So hidden rows in another worksheet will also be deleted.
- You can not undo the deleted rows. So keep backup if your file is important before deleting any row or column.
2.2 Insert Temporary Column to Delete Hidden Rows
While we are dealing with a huge amount of datasets we can use a temporary column to trace the rows which we have to delete. In this example, we will delete all the rows except the highlighted values of cities in the following dataset.
So, let’s see the following steps to perform this action.
STEPS:
- Firstly, select the data range (B4:E15).
- Secondly, go to the Data > Sort & Filter >Filter.
- Now, the above action will enable filtering icons in the heading cells.
- Thirdly, click on the filtering icon of the column City.
- Check only the cities that we want to keep.
- Then press OK.
- The above command gives us the filtered value of the dataset.
- Fourthly, insert a new column next to the “Total Amount”. Name the column “Temporary”.
- Then input the value 0 in the first cell of the column.
- Drag the Fill Handle tool to the end of the dataset.
- The above action inputs value 0 for all the cells in the column named “Temporary”.
- Fourthly, disable the filtering option including the newly added “Temporary”.
In short: Select Data Range(B4:E15) > Data > Sort & Filter > Filter.
- The above command will remove filtering. But we can see value 0 only in the column that we want to keep.
- Then, enable the filtering option again including the newly added column.
- Click on the filtering icon on “Temporary Column”.
- Uncheck option 0.
- Press OK.
- The above action only keeps the rows containing blank cells in the “Temporary”.
- Now, select all the rows filtered rows and delete them.
- So, there will be no row visible in the worksheet.
- After that, click on the filtering icon on the “Temporary”.
- Check option 0.
- Press OK.
- This action will make the hidden rows visible.
- Lastly, remove the filtering option.
2.3 Use VBA to Delete Hidden Rows from Entire Worksheet
In this example, we will use the VBA (Visual Basic for Applications) code to delete all excel hidden rows from an entire worksheet. In the following dataset, we will hide the highlighted rows and will delete them.
After hiding the highlighted rows the dataset will look like the below image.
Now, let’s look at the steps to delete the hidden rows in this method.
STEPS:
- First, go to the “Visual Basics” option from the Developer tab.
- Next, select the “View Code” option from the active sheet.
- Then a blank VBA module will appear. Insert the following code in the module:
Sub Hidden_Rows_Delete()
Dim st As Worksheet
Dim Last_Row
Set st = ActiveSheet
Last_Row = st.UsedRange.Rows(st.UsedRange.Rows.Count).Row
For i = Last_Row To 1 Step -1
If Rows(i).Hidden = True Then Rows(i).EntireRow.Delete
Next
End Sub
- Now, Click on the Run.
- Finally, the above action will delete all the hidden rows from the active worksheet.
2.4 Delete Hidden Rows from Specific Range Using VBA in Excel
In this method, we will use VBA to delete excel hidden rows from a specific range of data range whereas in the previous method we used VBA to delete rows from an entire worksheet. In the following dataset, we will hide the highlighted row but will only delete the hidden rows before row number 9.
After hiding the highlighted rows our dataset looks like the following image.
So, let’s see the steps of performing this method.
STEPS:
- In the beginning, go to the “Visual Basics” option from the Developer tab.
- Next, select the “View Code” option from the active sheet.
- Then we can see a blank VBA module. Insert the following code in the module:
Sub VBA_to_Delete()
Dim st As Worksheet
Dim Rg As Range
Dim Last_Row As Integer
Dim CountRow As Integer
Set st = ActiveSheet
Set Rg = Range("B4:G9")
CountRow = Rg.Rows.Count
Last_Row = Rg.Rows(Rg.Rows.Count).Row
For i = Last_Row To Last_Row - CountRow Step -1
If Rows(i).Hidden = True Then Rows(i).EntireRow.Delete
Next
End Sub
- Now, Click on the Run.
- Lastly, the above action only deletes rows from the range (B4:G9). Hidden rows out of this range will not be deleted.
3. Unhide Hidden Rows in Excel
We hide rows for the sake of convenience. However, we may need to unhide the excel hidden rows after the work is completed. In this lesson, we’ll go over how to unhide excel hidden rows using several ways.
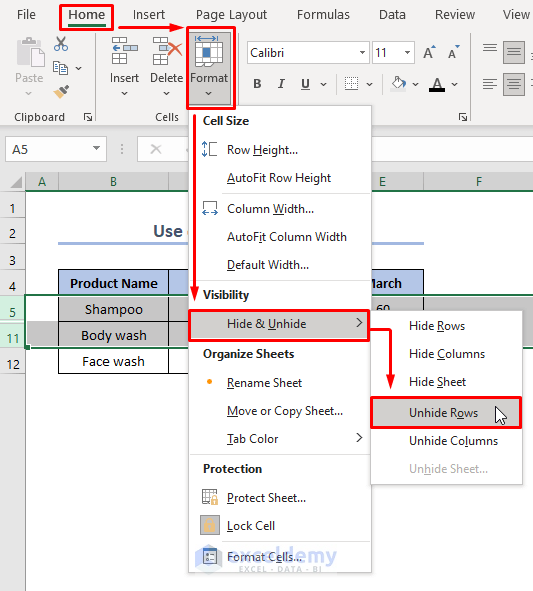
3.1 Use Excel Ribbon to Unhide Hidden Rows
In this example, we will use an excel ribbon to unhide excel hidden rows. We have the following dataset in which row numbers 6, 7 & 8 are hidden. We will unhide these rows by using an excel ribbon.
Let’s take a look at the steps of doing this method.
STEPS:
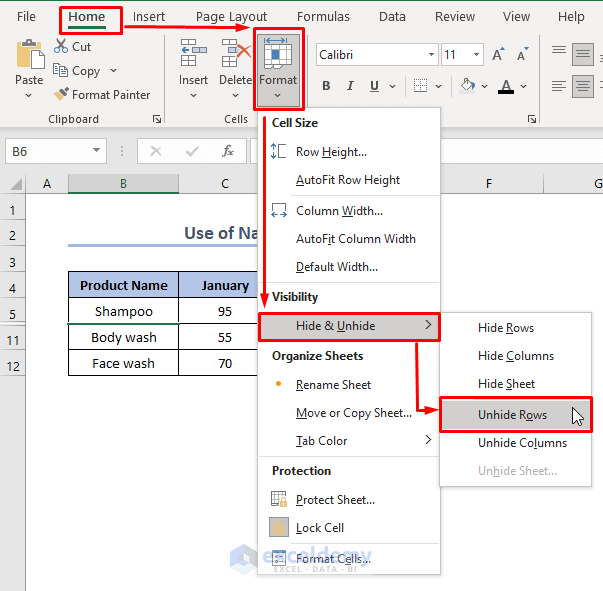
- Firstly go to the Home tab.
- Secondly, click on the Format from the Cells.
- Thirdly, select the option “Hide & Unhide” and then select “Unhide Rows”.
- In short: go to Home > Cells > Format > Hide & Unhide > Unhide Rows.
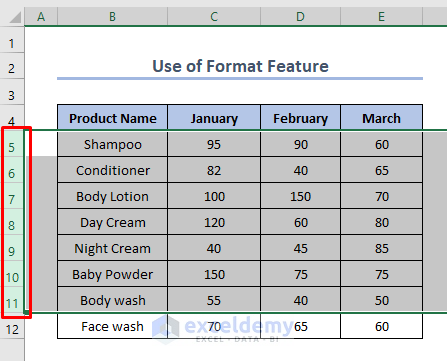
- Lastly, the above action will unhide all the hidden rows from the active worksheet.
3.2 Unhide Hidden Rows Using the Context Menu
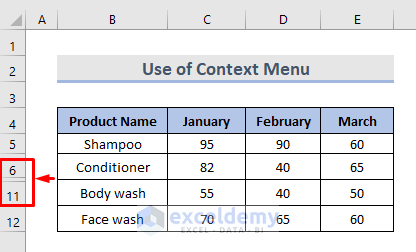
Now we will use the same dataset and will unhide excel hidden rows by using the context menu. The following dataset contains rows 6, 7, and 8 that are hidden.
In the following image, we can see that row numbers 6, 7, and 8 are hidden.
Now, we will follow the below steps to unhide the above-hidden rows.
STEPS:
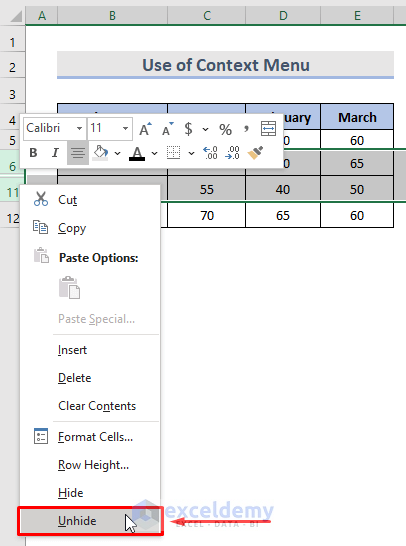
- In the beginning, select the entire data range (B4:E15).
- Next, do a right-click on the index of row numbers.
- After that, select the option Unhide.
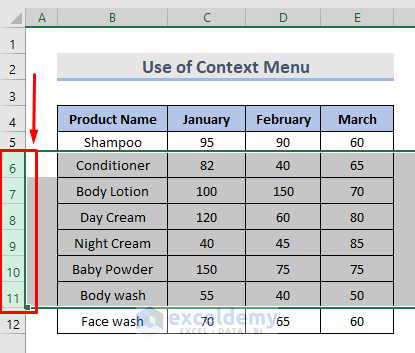
- Finally, the above action unhides all the hidden rows from the selected data range.
3.3 Keyboard Shortcut to Unhide Rows in Excel
We use keyboard shortcuts to complete tasks more quickly and save time. Using a keyboard shortcut, we can quickly unhide excel hidden rows. Look at the image below; first, we’re going to hide the same rows from our previous dataset, and then we will unhide them. But this time we’ll do it with a keyboard shortcut.
- The shortcut for windows: Ctrl + Shift + 9
- The shortcut for Mac: ^ + ⇧ + 9
If we unhide the highlighted rows the dataset will look like the following image.
Let’s see the steps to unhide rows in excel.
STEPS:
- First, select the entire data range (B4:E15).
- Next, press Ctrl + Shift + 9 if you are using windows, or press ^ + ⇧ + 9 if you are on Mac.
- Finally, we can see that row numbers 6,7 & 8 are now visible.
Read More: Shortcut to Unhide Rows in Excel (3 Different Methods)
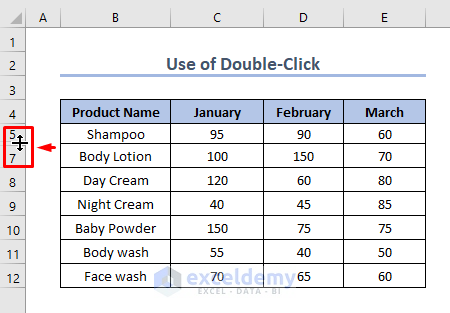
3.4 Use Double Click to Unhide Rows in Excel
In this action, we will hide the highlighted rows from the following image. Then we will unhide them using the double click method.
If we hide highlighted rows that are row numbers 6, 7 & 8 the dataset will look like the following image.
Let’s take a look at the steps to unhide the hidden rows.
STEPS:
- First, place the mouse cursor in the hidden row headings.
- Next, the mouse pointer will turn into a split two-headed arrow.
- After that, just double-click it.
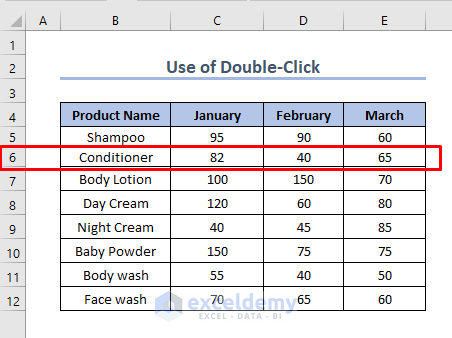
- Finally, we can see the above command unhides the hidden rows.
3.5 Unhide All Hidden Rows from a Single Worksheet
While working with a large dataset with a lot of hidden rows we can delete all the hidden rows at once instead of deleting them one by one. To illustrate this method we will use the following dataset. The highlighted rows from the following image will remain hidden.
After hiding the highlighted rows the dataset looks like the following image.
Now, let’s see the steps to unhide all excel hidden rows from a single worksheet.
STEPS:
- Firstly, click on the Select All You will find this on the top left corner of the sheet where row and column headings intersect with each other.
- Now, we can see all the rows of the active worksheet are selected now.
- Secondly, press Ctrl + Shift + 9.
- Lastly, the above command will unhide all the hidden rows from that active worksheet.
Read More: How to Unhide Multiple Rows in Excel (9 Methods)
3.6 Apply VBA Code to Unhide Rows in Excel
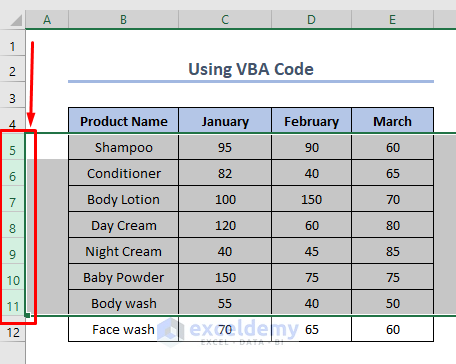
Another fast and convenient approach to unhide excel hidden rows is to apply VBA code. To illustrate this method we will use the following dataset. First, we will hide the highlighted rows from the following dataset and we will unhide them using a VBA code.
If we hide the highlighted rows we will get the following shape for our dataset.
So, let’s see the step-by-step guide to unhide rows by using the VBA code.
STEPS:
- First, go to the Developer tab and select the “Visual Basics”.
- Next, do a right-click on the active sheet and select the “View Code”.
- Now, a new blank VBA module will appear,
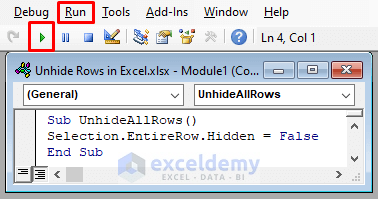
- Insert the following code in the blank module:
Sub VBA_Unhide_Rows()
Selection.EntireRow.Hidden = False
End Sub
- After that, click on the Run.
- Finally, the above command will unhide all the hidden rows from the active worksheet.
3.7 Find the Total Number of Hidden Rows in Excel
Suppose, we want to find the total number of hidden rows in our excel workbook. To do this we have to just follow the simple steps given below.
STEPS:
- Firstly, go to the File tab.
- Secondly, select the option Info.
- Select the option “Inspect Document” from the “Inspect Workbook” drop-down.
- Now, a new dialogue box will appear. Click on Yes in that box.
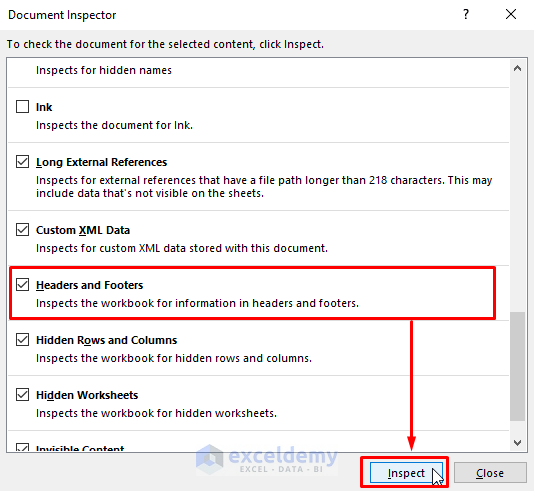
- Next, another dialogue box will appear. From that box look if the option “Headers and Footers” is checked.
- Then, click on the “Inspect”.
- Finally, one more dialogue box will appear. Scroll down and find the section named “Hidden Rows and Columns”. In that section, you can see the total number of hidden rows in our workbook is We get a number of hidden columns for a workbook also by using this method.
Read More: Excel VBA: Unhide All Rows in Excel (5 Practical Examples)
3.8 Can Not Unhide Excel Hidden Rows
If you face any trouble in the time of unhiding excel hidden rows in your worksheet you can check the following reason:
First, if Hide and Unhide options in Excel are disabled, we have to check the worksheet protection. Next, Check the Review tab > Changes group for the Unprotect Sheet button. So, if the Unprotect Sheet button appears, select it. After that, click the Protect Sheet button on the Review tab, choose the Format rows box, then click OK to keep the worksheet protected but allow hiding and unhiding rows.
Read More: Read More: Unhide All Rows Not Working in Excel (5 Issues & Solutions)
Conclusion
Ultimately, this article will provide you with a thorough understanding of excel hidden rows. Download and practice with our practice workbook, which is attached to this article, for the best outcomes. Please leave a comment below if you have any queries or if you know of another way to eliminate sort in Excel. We will try our best to reply as soon as possible.